Sending Violet Hugs

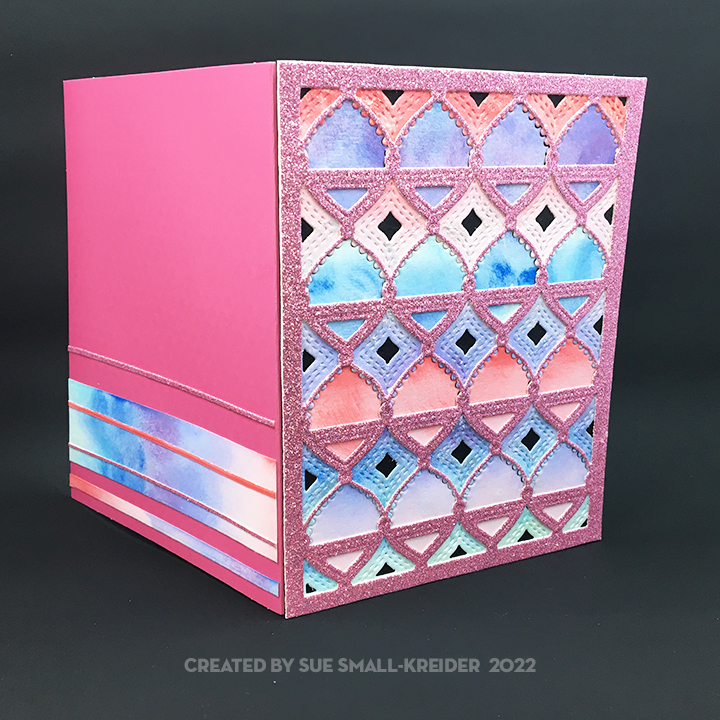
In the language of flowers, violets mean remembrance. Sometimes there aren’t words to express the comfort a hug can bring when someone is suffering a loss.  This card is meant to be up-lifting and offering comfort and hope.

Using recent PoppyStamps Flower Field Tall Curve Border, Penelope Pinpoint Frame and Sending Hugs Poe Script dies to create this card front, I used the solid green back of a striped A2 card base to be the background to the lattice work. Thin foam squares were used to raise the lattice frame off the green card base. (Dies-R-Us often stocks PoppyStamps dies as well as other name brand dies and stamps at discounted prices. The links under the Materials Used section links to Dies-R-Us.)

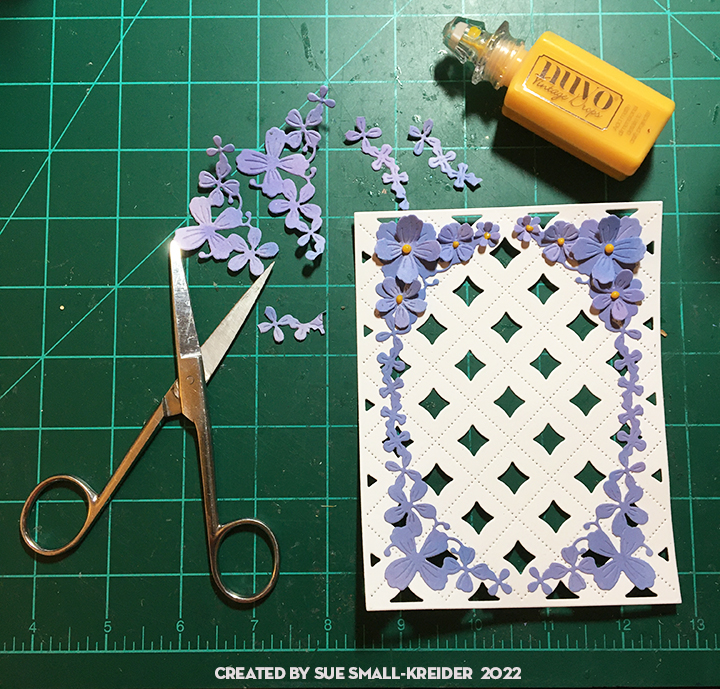
Scrap white cardstock was ink blended on both sides to create the die-cut violets. Four times the flower border was cut with the two glued to the front of the white lattice work frame.  The remaining borders were cut apart and the petals were bent to curl upward. These flowers were glued at the center to the base border flowers using a hand-held stylus with a tiny round tip to move and push the flower centers down into the glue. A dot of yellow Nuvo Drops completed the center of each flower.

The “Sending Hugs” was die cut from matte gold cardstock which was found on cookie packaging.

The inside sentiment “Happiness blooms from within” is from a new stamp set by PoppyStamps – Colorful Life. Another sentiment, “Bloom and Grow,” is from the same sent and is stamped in a gold ink on the envelope flap.

Thank you for reading this blog post. Please like and leave comments 😊

Materials Used:

Dies

Stamps

  • PoppyStamps – Clear Stamp Set – Colorful Life – CL509

Inks

  • Ranger – Jim Holtz’s Distress Oxide Ink – Chipped Sapphire, Shaded Lilac, Dusty Concord, Stormy Sky, Prize Ribbon
  • Stampin’ Up – Classic Stampin’ Pad – Crumb Cake

Papers

  • Lightweight white cardstock
  • Matte gold cardstock
  • A2 green striped card base and white envelope

Miscellaneous

A Persian Sunrise Birthday Card

Trying a new die set sometimes means looking at the manufacturer’s blog for ideas on ways to use it. I looked at the LDRS blog for inspiration. The idea of ink blending a piece of cardstock in sunrise colors seemed appropriate.

Using a piece of white cardstock larger than the 5 1/2 x 4 1/4 inches coverplate dies, I ink blended six lighter/darker shades of pink, purple and blue Distress Oxides inks with sponge daubers. Next I cut the  blended cardstock using Coverplate III, saving the large cutouts to be inserted later. Using Opal Blaze Polishes, I rubbed three shades of the polished sheen onto the die-cut frame, leaving the inserts plain. (The polishes tend to make the ink colors be a shade whiter and thus adding drama to the differences between the plain insert bold colors and the lustrous polished frames of the coverplate.)

For the Coverplate I, I used a non-shed glitter cardstock that had been in my stash (Sorry, I don’t know the brand.) I played with the positioning of the two layers of coverplates, until I settled on the most pleasing one for these materials.  Next, I re-inserted the leftover inserts from Coverplate III reversing the order to get the most contrasts between insert and frame ink colors. To back the layers, I used a very thick and fibrous, black cardstock (again from my stash, so I don’t know the brand.) The piece was then mounted on a pink card base and the back of the card decorated with scraps left from die-cutting the two coverplates.

For the front sentiment, I went through my stash of foiled greetings that I do from batch foiling on scrap pieces. The rose gold foiled piece on dark blue is attached to the card from with foam tape to make it float above the background.

The inside sentiment is from a new stamp set by PoppyStamps. It is stamped on adhesive backed blue vellum with black StazOn ink. (I used StazOn ink because vellum sometimes is hard to get ink to dry on. StazOn as its name implies will stay on most surfaces that are hard to ink.)

The final touches to the card front were adding some bling with flat back gems from my stash of Buttons Galore & More shaker element mixes. (Many of their mixes are limited editions, so order early when you browse their website and see a mix you love.)

The envelope flap was stamped with another sentiment from the PoppyStamps set with a pink to purple ombre ink.

Thank you for reading this blog post. Please like and leave comments 😊

Materials Used:

Dies

Stamps

  • PoppyStamps – Clear Stamp Set – Colorful Life – CL509

Inks

  • Ranger – Jim Holtz’s Distress Oxide Ink – Spun Sugar, Festive Berries, Shaded Lilac, Dusty Concord, Tumbled, Prize Ribbon
  • StazOn – Solvent Ink – Jet Black
  • Recollections – Ombre Ink Pad Pink to Purple

Foiling

Papers

  • Blue scrap cardstock
  • Lightweight white cardstock
  • Thick black cardstock
  • Pinkish lavender glitter cardstock
  • Xcut – Xtras Adhesive Vellum Sheets – Blue
  • A2 pink card base and white envelope

Miscellaneous

Who Is Door Dancing?

Knock, knock. Who’s there? Hoppy Day the dancing bunny of spring.

Interactive cards are fun and creating one with layers adds to the excitement. Hints of Easter baskets filled with eggs flank a blue door that when opened, reveals a cute white bunny that will dance when the pull tab is moved back and forth.

Both the doorway and bunny are craft die sets by Spellbinders. The doorway is the Open House Door Base using the door mat from the Open House Spring die set. (I have found that you can save on bundles from Scrapbook.com for the Spellbinder’s Open House collection.) For the dancing bunny, the March 2021 Large Die of the Month set Spring Together with Lever Pull die set was used. (I watched the assembly video for this die set before making this card.)

Die-cut the door from blue cardstock and then die cut the windows from the door. Using the door, mark its placement with pencil and then cut the three sides using a metal straight edge and craft knife. Trace the window placement from blue door to pink door and die cut the windows.

Die cut four door windows and a transom window from white cardstock. Use the large transom window die to cut window opening in the pink card front.  Adhere the vellum to back of pink card and then glue white window frame into window opening and onto vellum.  The door windows are created by sandwiching the vellum between the blue and pink doors. Glue the white door window frames to the front of blue and back of pink doors.

Cut two of the mail slots and four of the doorknobs from silver foil cardstock. Adhere the mail slots to each side of the door and three doorknobs to the front blue side and one knob to the pink side of door. Mark the door opening with pencil onto the background paper. This will let you figure out the placement of the bunny.

Once the lever pieces are double cut and glued together for strength, they can be linked used tiny brads. Using the assembled level to position the line die, cut the slit for the mechanism to slip into the backing paper.  Thread the level through the slot and add additional brads to affix the mechanism to front of card.

Adhere the bunny body first with foam strips and then the head. Cut the semi-circle notch on the top and background layers of the card as well as the card base before assembling the card front.

Using foam strips adhere the pink card with door to background piece avoiding the lever mechanism.

The door mat is colored brown cardstock with Aged Mahogany Distressed Ink with a black backing for the letters. Die-cut the half-circle for the pull lever on the card base before adhering front layered piece to card base.

The Easter baskets used the large eggshell from the Spring Together set with green foliage from the Open House Spring die set and freehand eggs and handles. The flowers are finished with dots of Nuvo Drops and a pink flower sequin.

Decorate the back of the card with scrap pieces.

Thank you for reading this blog post. Please like and leave comments 😊

Click here to see more dancing animals using these dies.

Click here to see see another door card using these dies.

Click here to see other door cards.

Materials Used:

Dies

  • Spellbinders – Open House Door Base Cutting Dies – S4-1131
  • Spellbinders – Open House Spring Cutting Dies – S4-1181
  • Spellbinders – March 2021 Large Die of the Month set Spring Together with Lever Pull Cutting Dies – DOML-MAR21

Stamping

  • Simon Says Stamp – So Talkative Clear Stamp Set – sss202385
  • Craft Consortium -English Garden Clear Stamps by Hackney & Co.
  • Stampin’ Up – Classic Stampin’ Pad – Pear Pizzazz
  • Simon Says Stamp – Pawsitively Saturated Ink – Sunbeam
  • Ranger – Tim Holtz Distress Ink – Aged Mahogany

Papers

  • Craftwork Cards- Flying High 8×8” Paper Pad
  • Colored cardstock scraps
  • Clear vellum scraps
  • A7 white card base and envelope

Miscellaneous

Layered Crosses – Part 2

There is nothing like the burst of a sunrise from a dark morning sky.

Using five different shades of browns from tan to espresso cut one of each of the cross dies in each color. Lay out the various layers so that when assembled no cross has two of the same color.

Glue the layers together to form five crosses.

Cut a 4 1/4 x 11 inch piece of white cardstock. Score and fold at 7 3/4 inches (valley fold) and at 2 1/4 inches (valley fold).

With a sun rise stencil, orange ink and a sponge dauber, ink in the sun on the back panel. Next ink the sun rays with yellow ink.

Let ink dry before stamping the “He is risen” sentiment in black onto back panel, spacing so it is hiden when the card is closed.  On a white 2 x 4 1/4 inch piece of white paper stamp in black ink “Happy Easter.”  Glue white paper on the inside panel of the card.  (I used the paper to hide an inky mistake.)

In my stash I found some experiements I had done trying out the bokeh stenciling method to create an interesting background for the Apple Blossom butterly stamps.( I know I used Distress Oxide inks for the stenciling and some blue ink cubes from a Papercrafting Society box to stamp the butterflies.) These panels were cut down to 2 x 4 inch pieces and adhered to the front gatefold panels.

Position and then glue the cross to the left half of the closed card. 

To hint at the envelope’s contents, I stamped tulips onto the blue envelope with a yellow ink.

Thank you for reading this blog post. Please like and leave comments 😊

Materials Used:

Dies

Stamps

Stencils

Inks

Papers

  • Browns, tans and white card stock
  • White paper
  • A2 blue envelope

Miscellaneous

Layered Crosses – Part 1

Sunrise means a new day and new beginnings. Using Divinity Designs layered cross die set and a stenciled sunrise, I hope to convey this elated feeling of gladness in this z-fold Easter card.

Using five different shades of browns from tan to espresso cut one of each of the cross dies in each color. Lay out the various layers so that when assembled no cross has two of the same color.

Glue the layers together to form five crosses.

Cut a 4 1/4 x 11 inch piece of sky blue cardstock. Score and fold at 5 1/2 inches (valley fold) and at 2 1/4 inches (mountain fold).

With a sun rise stencil, orange ink and a sponge dauber, ink in the sun on the folded shut card. Ink the sun rays on the left side of folded card with yellow ink. Open up card and ink in all the sun rays on back panel using the inked sun half to lineup stencil.

Let ink dry before stamping the “He is risen” sentiment in black onto back panel, spacing so it is hiden when the card is closed.  On a white 2 x 4 inch piece of white paper stamp in black ink “Happy Easter.”  Glue white paper on the inside panel of the card.  Die-cut strips of green grass to adhere to the bottom of the stenciled sunrise panels of the card.

Position and then glue the cross to the left half of the closed card. 

To hint at the envelope’s contents, I stamped tulips onto the blue envelope with a yellow ink.

Thank you for reading this blog post. Please like and leave comments 😊

Materials Used:

Dies

Stamps

Stencils

  • Spellbinders – Fun Stampers Journey – Sunny Day Stencil 6”x6” – JM-0135

Inks

Papers

  • Blue, browns tans and green card stock
  • White paper
  • A2 blue envelope

Miscellaneous