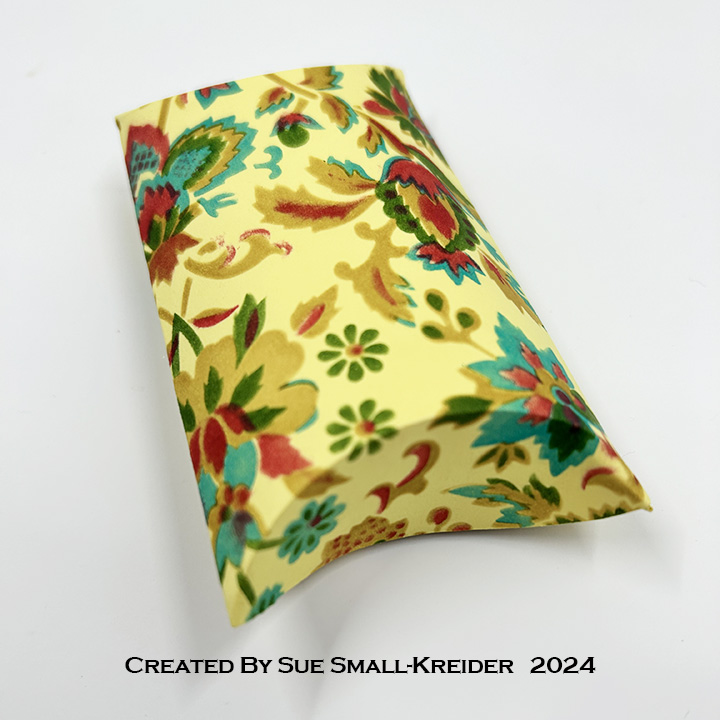
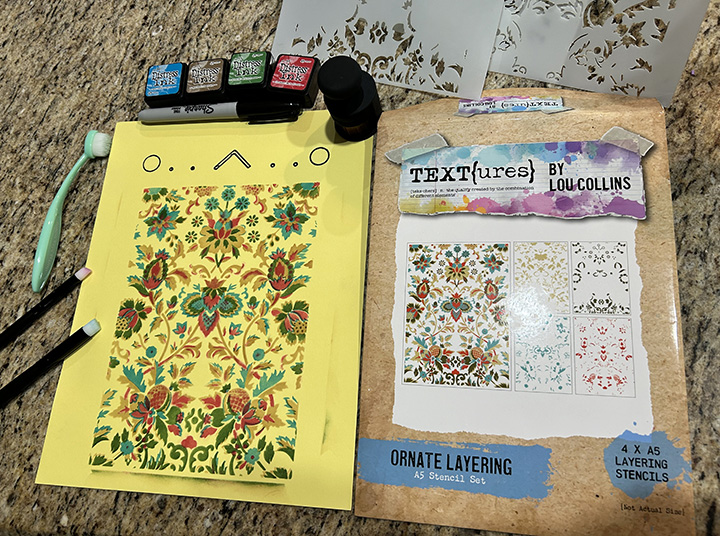
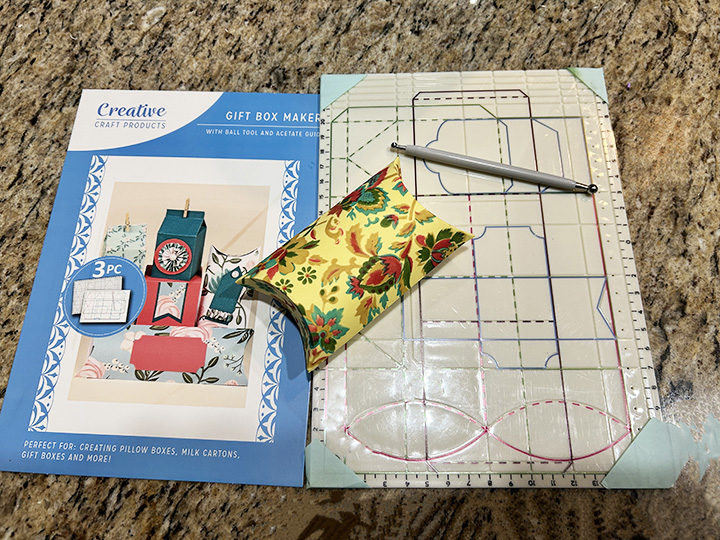
I just got a lovely shipment from Craftstash of papercrafting tools. Included in the package were a layered tapestry stencil set by Lou Collins in her TEXT{ures} brand and a Creative Craft Products gift box maker scoring board with ball tool. Below is a stenciled pillow gift box that I made with these tools.
Stenciling: The four layering stencils in Lou Collins’ Ornate Layering A5 Stenciling Set creates a multi-color tapestry design in the William Morris style. Because I don’t have a stenciling platform or jig that works with the stencils, I taped the first stencil onto the center of my 8 1/2 x 11-inch piece of cardstock and used a marker to trace the jig holes at the top of the stencil onto the cardstock, so I could line-up the various stencils each time. I used a variety of small ink blending brushes to ink in each stencil. I found the small detail brushes worked well as did the larger surface brush on all areas of the stencils. (Sorry I don’t know the brands of the various brushes I used.)
Pillow Box: I used the stenciled piece of cardstock to create a pillow box for a gift card using the Creative Craft Products gift box maker scoring board with ball tool. First I trimmed the cardstock to the 15cmx15cm recommended size and then sandwiched the cardstock between the acetate and scoring board and taped the edges of the acetate at the corners. Next, I used the small end of ball tool to trace over the red pillow box template lines and then turn the cardstock 180 degrees to mark the opposite end’s eye shaped fold/cut lines. After trimming off the excess cardstock, I adhered the side tab to the other edge with double-sided tape.
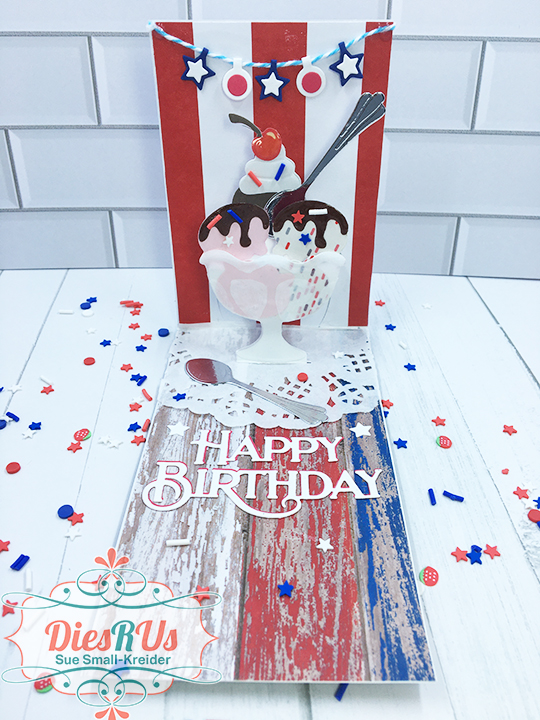
If we could be eating more ‘hole’ foods, what a sweet world it would be. Doughnuts and bagels are tasty carbohydrate treats and a theme for this interactive birthday card which uses Karen Burniston dies and Trinity stamps.
Cardbase: Cut a 4 1/4 x 11-inch rectangle of a single-sided striped cardstock. Score and fold into a top fold A2 (4 1/4 x 5 1/2-inch.) Cut from kraft cardstock, 13 doughnut charms from the Sweet Treats Charms set and trim off the charm loop. On ten of the doughnuts add black poppy seeds to make into bagels. Glue seven bagels onto the front of cardbase. Cut another bagel in half and save with the last two bagels to complete the decorating of the card front once the Frame Pop-Up is added. (Save the remaining three doughnuts for the doughnut section.)
Frame Pop-Up: (Watch the assembly video at the bottom of the linked page for the Frame Pop-Up.) From the striped cardstock cut the two square base pieces and pull strip of the Frame Pop-Up set. Assemble as directed, coloring the arrow purple to match the stripes. Attach to the card base with staples. Cover staples with two whole bagels. Add half bagels at the top edge of the frame pop-up.
Doughnuts: Cut the largest plain circle in the Crosshatch Circles set from kraft cardstock and then using the golf ball circle die in the Sports Charms set, cut the doughnut hole from the larger circle. Trace the large doughnut onto pink cardstock and cut a smear of icing from the pink to cover the doughnut. Glue pink icing onto doughnut. Us a chocolate glitter brush pen to add a drizzle of chocolate. Add dots of glue randomly and add clay colored sprinkles. Cut from pink three icing pieces from the Sweet Treats Charms set. Glue icing to the three remaining doughnut charms cut in the cardbase section.
Attach the large doughnut to the front of the frame pop-up. Add one doughnut inside the frame pop-up with foam squares. Add another doughnut to the inside of card and the remaining one to the envelope flap.
Sentiments: Stamp “You’re a sprinkle donut in a bagel world” on white cardstock and trim to fit inside the frame pop-up. Stamp inside the card “You’re a year older…but you donut look it” and glue a doughnut between the two lines. Die cut “Happy Birthday” and its shadow from pink cardstock. Cover the words with a chocolate glitter brush pen. Glue words and shadow together. Attach over the staples inside the card.
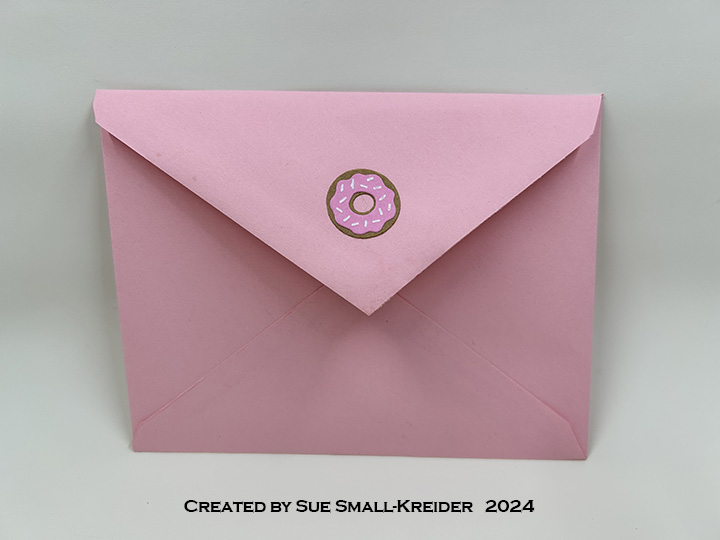
Envelope: The card fits into an A2 envelope with the remaining doughnut on the flap.
Thank you for reading this blog post. I hope this inspires you and makes you smile. Please like and leave comments 😊
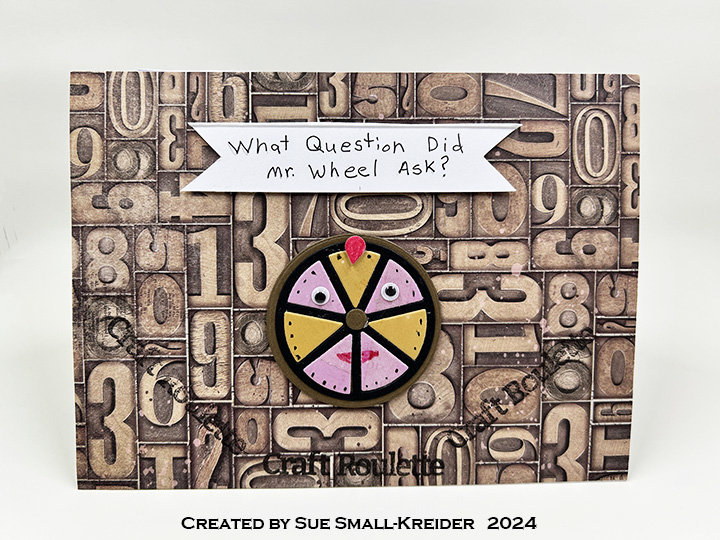
This card was made for Craft Roulette #211 whose parameters included good tidings, summer colors, mechanical element and tie closure.
This is a retirement card for someone who loves working with mechanical action.
(Please note that the Tonic Craft Kit 59 used in this card is no longer available. The Karen Burniston dies however are still available and links are provided to them.)
Cardbase: I used a purchased A7 (5×7-inch) cardbase and matching envelope. Each of the four panels were covered with coordinating papers in either watermelon pink or rind green. The circle was cut thru the front panel using the clock dial circle die.
Clock: Using three different green cardstock, they were cut with the main clock base die from the Tonic Craft Kit 59. The darkest green was trimmed to just the bottom and side trims, while the green patterned paper had the clock dial circle cut out and two bottom art-deco corner die-cut as well. Matching up the patterned green piece with the light green piece, the clock dial circle was cut in the light green piece. The dark green trim was attached to the patterned green piece before having a piece of clear plastic packaging adhered with thin double-sided tape to its backside. Sandwiching the plastic between the patterned green piece and light green piece by using double-sided tape again. The clock was glued onto the card front matching up the circle apertures.
Moving Gears: I watched Karen Burniston’s Double Spinner video at the bottom of her Mailbox Pop-Up page before adding the spinning gears pop-up to my card. I switched out gear dies from the Tonic Craft Kit 59 set for her fancy labels and gardening charms, but I followed her technique exactly to create the spinning gears. Gears were cut from steel blue and cooper oxidized foil cardstock.
Sentiments: All the sentiments on the front of the card “Time flies when you’re having fun,” and “Happy Retirement” are from the Tonic Craft Kit 59. All stamped in black ink. The sentiments were stamped before the inside mechanical pop-ups were added. The personal message circle uses a large gear cut in blue oxidized metal foil cardstock (Tonic Craft Kit die) and a circle of pale gray cardstock using Karen Burniston’s Crosshatch Circles die set.
Envelope: The back flap was stamped in black ink “TIME to celebrate.”
Thank you for reading this blog post. I hope this inspires you and makes you smile. Please like and leave comments 😊
Just wanted to share the card fronts and light-up lighthouse card I made at workshops at the Orlando Stamp & Scrapbook Expo last week.
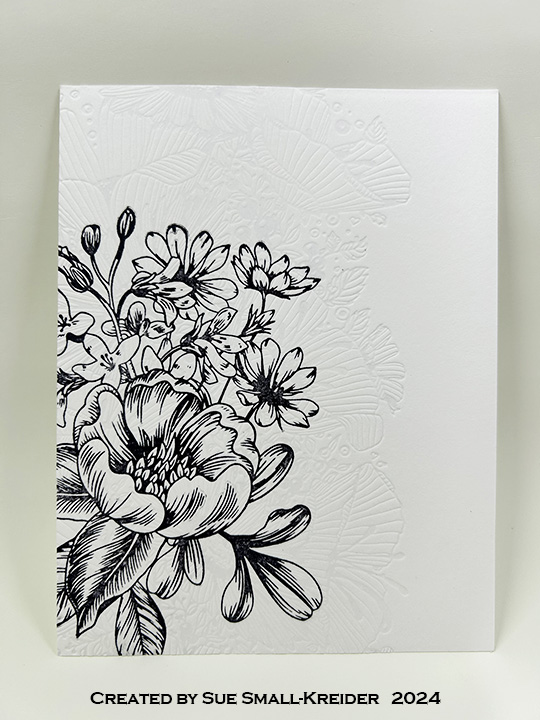
I took a class with Jennifer from Stamplistic on using the Spellbinder’s Better Press. We made a number of card fronts trying different techniques and papers. To get the letterpress look of an embossed plate, you need to use the thick cotton paper such as the Better Press papers. We learned to add sprays to the paper before stamping onto the paper for the crisp imprint and ink coverage of image. You can add a variety of ink colors to one plate, or use one of the new registration plate sets and print different colors in several printing passes. I found the Better Press to be a quick way to get professional and elegant looking images. The cost is more than rubber or clear stamps, but as long as you get enough ink on the plates, you get a professional looking image that you can then watercolor or color with alcohol markers.
Sabrina Leavell ofScrappy Tails taught a quick workshop on making a dimensional lighthouse with a Pear Blossom one light to make it light-up.
Lots of great and friendly vendors at the Expo too.
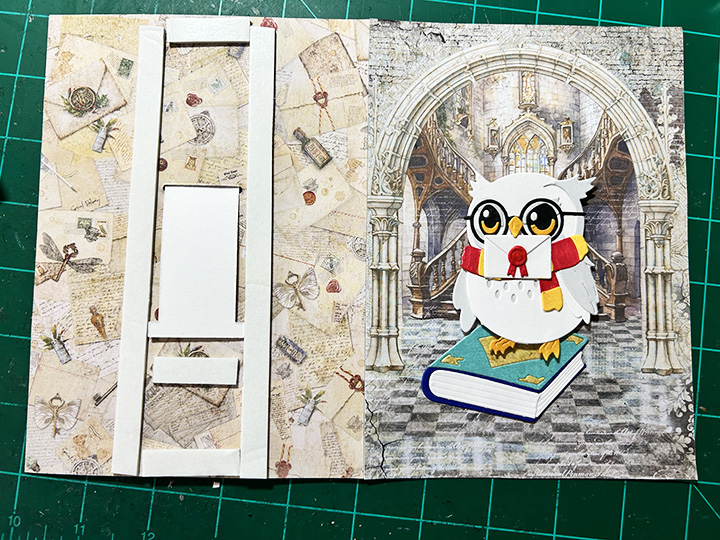
Who doesn’t enjoy receiving mail, but mail by Owl Post is special. This Harry Potter themed birthday card was a commissioned card for a Potter fan.
I used a new die set from Spellbinders for the owl on top of the book and an older die and stamp set from Concord & 9th for the envelope with pull out birthday wishes.
Cardbase: A purchased A7 (5×7-inch) cardbase and envelope was covered on the outside panels with patterned paper from Ciao Bella’ Wizard Academy paper pad. A leftover strip from the back of the card was saved for the small envelope step.
Owl and Book: (Watch assembly video first.) I found it easier to place the glasses on after adding the eyebrows and then adding the eyes. (I cut the black piece of the eyes out of white and colored the bottom “U” shapes yellow and then glued them inside the black pieces.) The beak is popped up on a tiny piece of foam tape so the envelope can fit under it. I cut the scarf from white cardstock and colored the various pieces yellow and red to create the striped scarf. To get the beak, envelope seal and book cover to sparkle, I used glitter brush pens. The book is glued flat to the card front and the owl is popped up on foam tape squares.
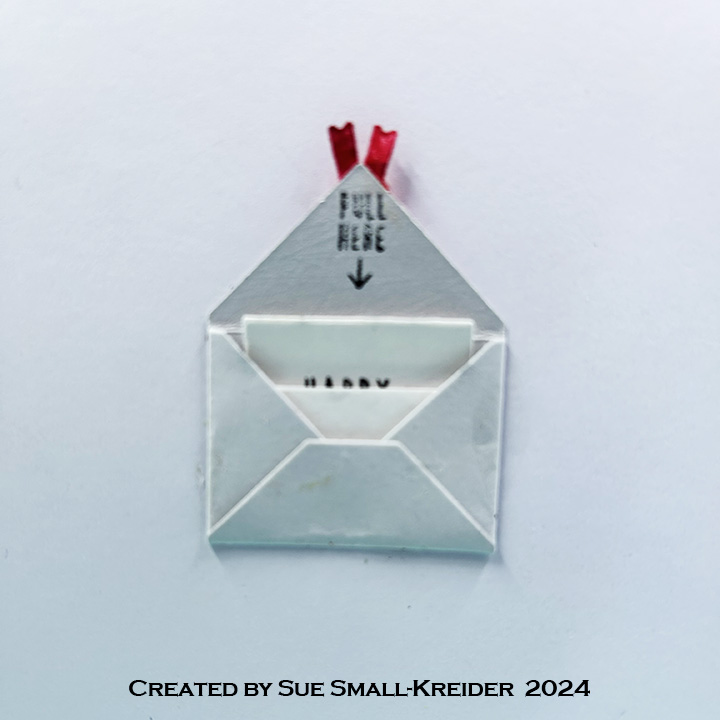
Small Envelope and Message:(Watch assembly video first.) Using the small envelope die in the Concord and 9th cut one from light grey cardstock. Fold envelope on score marks and open back up. Using the small slot die in the set cut a slot in the bottom center of envelope for the message piece to slide through. (I made the mistake of putting the slot at the top of the envelope center and had to cover the grey inside of the envelope below the slot with white.) Figure out the placement of the envelope inside the card and mark with a pencil where the slot goes and die cut it. Using the wide “T” shaped die in the set, cut one from white cardstock. Use the birthday sentiment stamp from the coordinating stamp set to get the message onto the strip.
Glue envelope center back onto inside of card panel matching up the slots. Thread message strip through the slot so that the bottom of the strip is on the back side of the card. Stamp the “Pull Here” on the top of the inside of the envelope just above the white strip. Glue the envelop bottom to its sides making sure that the white strip can move freely though the envelope. Push the white strip so that the envelope can close and on the back side of the card, place a strip of foam tape just below the “T” of the white stripe to act as a stopper for the strip. Add foam tape along the sides of the white stripe to be the channel it will follow. Peel the backing paper from foam. tape Place extra strip of pattern paper over the foam tape. Test message stripe coming out of envelope. Add red ribbon seal from the Spellbinder’s owl set to top flap of envelope.
Card Envelope: The black glasses frame is cut using the owl die set and glued onto the back envelope flap.
This card was made for Craft Roulette #210 whose parameters included Project must include action, Northern Lights colors, blackboard element(s) and oval(s).
Below is a recorded live video (37 minutes) that demonstrates how the inside-out card is made.
For a shorter experience watch the Craft Roulette process video below.
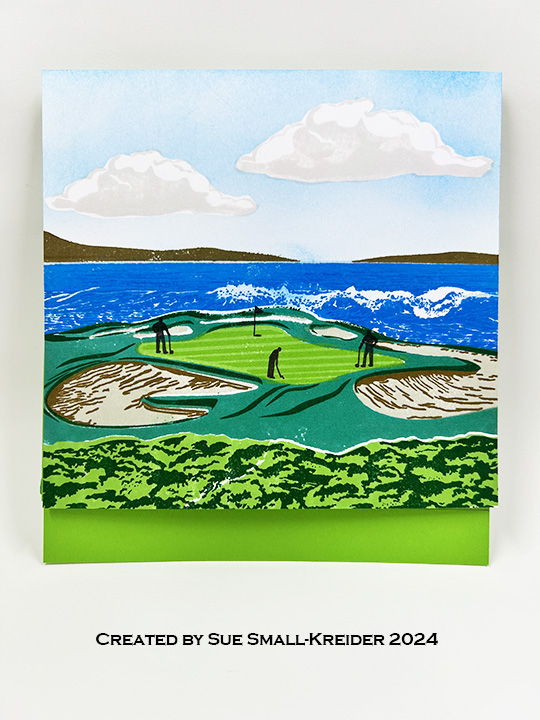
A golfer’s dream is playing Hole 7 at the Pebble Beach Links course in California which is a hole that is next to the crashing ocean surf. Skill is needed to play this windy par 3 hole, but hole-in-ones have happened.
For this special birthday card, I used a layered stamp set by The Ton with dies by Karen Burniston.
Cardbase: Starting with a 11x 5 1/2-inch rectangle green cardstock, score and fold at 5-inches, 3-inches and 2-inches.
Stamped Scene: Watch the assembly video (Google YouTube video March 2018 Flash Release – Golf Course Layered Stamps) for stamping The Ton’s Golf Course Layering Stamps. Cut a 6×6-inch panel of thick white cardstock to stamp onto. (I masked off the clouds before ink blending the blue sky from the top down, keeping the horizon line almost white.) Trim off stamped panel to 5×5-inches and adhere to the smaller fold edge of cardbase.
Bam Box Golf Tee: (Watch assembly video at the bottom of each of these linked die sets before starting.) Using the smaller of Karen Burniston’s bam boxes, make one from the same green cardstock as the cardbase. From the Sports Charms die set, cut the golf ball charm from white cardstock and emboss using an embossing sandwich on your die-cutting machine. Cut three of the blue tees and glue together with golf ball sandwiched between layers. Cut two of the grassy strips from the Easter Borders set in darker green and glue them slightly askew so that there are two layers of grass blades visible.
Attach bam box to cardbase positioning it so that the stamped panel will cover it when folded shut. Adhere the grass strip to bam box side with glue. Trim off any excess grass at card edges. Glue golf ball on tee to grass covered bam box.
Sentiment: Using the two shades of green cardstock, cut two of the Happy Birthday Shadow from the cardbase green and one of the Happy Birthday words from the darker green. Glue together. Position the thick sentiment so that it will act as the easel stop to hold the stamped panel upright.
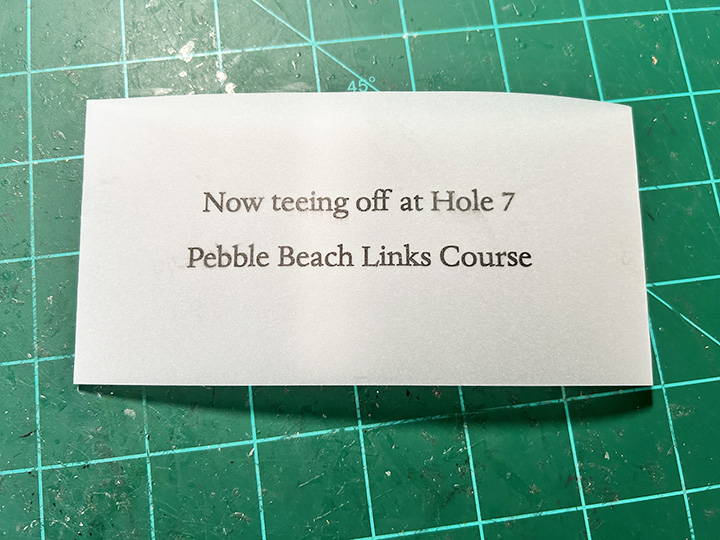
Belly Band: The “Now teeing off at Hole 7 of the Pebble Beach Links course” was digitally printed onto a 3x 8 1/2-inch stripe of clear vellum. Next the strip was wrapped around the closed card and glued in back.
__________________________________________
Thank you for reading this blog post. I hope this inspires you and makes you smile.
This card was made for Craft Roulette #209 whose parameters included a tri-fold card, sleigh ride colors, joke(s)or funny element and out of proportion. It has a number of insider jokes in it for that Craft Roulette fan to get.
The card uses a purchase A6 cardbase (4.625 in x 6.25 in) as a top fold and two pieces of decorative 6 in x 8 in paper.