Hello Summer

Can’t wait for summer? Here is a fun pop-up card reminiscent of summers long ago with the sweet treats of a day at the beach.

This card is made with Karen Burniston dies using the Tiny House Pop-Up to form a carton of ice-cold colas. (I used a 7 inches by 5 inches kraft paper card base and its matching envelope.) My inspiration for this card comes from Sandy Diller of the KB Design Team who made a toolbox from the tiny house, and cola commercials from the 1970s.

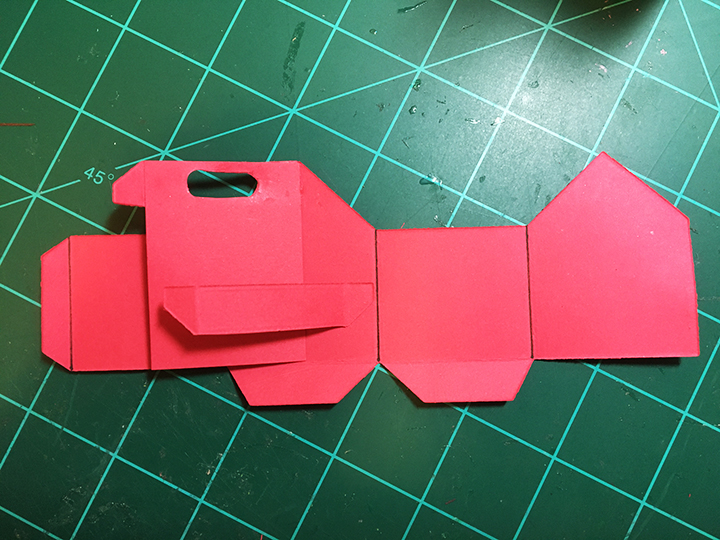
Cut one house and three of the cross bars from red card stock. Trim off top tabs from all the cross panels. Follow the package instructions for basic house assembly.

It is easy to alter the tiny house into a cola carton by not attaching the roof and adding a 2 1/8 inch x 1 ½ inch rectangle to the crossbar. Using a 1/4 inch hole punch to create the handle on the crossbar by punching two holes and cutting the space between them away.  Glue the remaining cross bars inside the carton on either side of the main divider. And glue cola bottles to the crossbars.

The KB charms are great for using up your tiny scraps. You generally need to cut the whole shape for your base pieces, but for the top layers you can cut just the parts you need from other colors, trimming off what you don’t need.

I used some distress inks and black and white pens to decorate the various food, beach, bottles and letters. The cola bottles are modified wine bottles with caps cut form the other bottle die in the set and the crimped bottom of the caps were cut with the saw die from the tool set. The sunglasses are from the Tiny Accessories 2 set using mirror cardstock for the lenses.

Striped paper has been cut to represent beach towels.

In going through my scrap papers, I came across a piece of wax paper that had an orange glitter ink painted on to it with white card stock glued behind it. I cut the sentiments of “Hello Summer” and “Hello Sunshine” from this special paper.

The envelope flap is stamped with the Lawn Fawn Happy Summer sentiment and ants finding a watermelon slice.

Other cards that use the Tiny House Pop-up die Set

Hope this fun card has provided some inspiration for your crafting. 😊

SUPPLIES Used from Dies R Us:

Other Supplies:

  • Colored and mirror cardstock scraps
  • Ranger Distress Ink – Vintage Photo and Cracked Pistachio
  • Stampin’ Up – Early Espresso ink pad
  • 5 x 7 inches kraft card base and matching envelope

#missionpoppable

Long Distance Tea

Love to have a cup of tea with your friend, but COVID-19 measures making you have to do it long distance? Here is a card to let your friend know you are thinking of them.

This card uses Paper Discovery products from the Teacup Fairies collection and the Papercraft Society box 17 which also has a tea theme.

The front is made using the cut and embossing folder with white card stock that I spritzed with water for a good impression. I used a blue watercolor marker to color the embossed areas.

The card base is a 7 x 5 inches folded which had the front edges and center colored with the blue marker as well.

I cut the small circle area a second time from pink card stock to get the pink used inside the card onto the front. Embossed piece was raised up with foam tape. The pink circle was glued to base and teapot raised on foam tape. Using the medium doily die and a circle die the same diameter as the pink circle, cut a scalloped frame from lightweight paper. Glue frame to embossed layer.

The teacup inside is made in two pieces – the cup and the saucer. I stamped the pieces before I assembled.  The saucer is cut into two parts to make for a smoother fold of the card. (The multiple layers of paper on this card means that the fold cannot be covered up.) To assemble, glue cup side tab to form cup and slide in handle. Glue handle tabs inside. Slide cup bottom tabs into saucer slots and glue to underside. Glue cup inside piece tab to underside of saucer. Glue patterned papers and doily to inside of card keeping center fold uncovered. Fold cup and saucer flat ad glue one side of saucer along card fold. Then glue other side.

Add rectangle “calling cards” and die cut spoon to decorate inside. Glue another piece of pattered paper to back of card to have even weight to front and back of card.

The back flap of envelope is stamped with teas set from the Papercraft Society box in China blue ink.

Thank you for reading this blog post. Please like and leave a comment. 😊

Materials Used:

Dies

Stamps

Ink

Papers

Miscellaneous

Swing Gate Fold

Hi it’s Sue here from the Dies R Us Design Team with another interactive swing gatefold card.

I based this card off of a swing card I made in last week’s blog post. You can get the specific instructions on how to make the bench swing by clicking here.

After cutting a 3 inch square opening on a 5 inches x 6 inches piece of heavy white cardstock, ink blend a soft blue sky all over.

Using two pieces of heavy white cardstock 3 inches x 3 1/2 inches, cover with tiny flowered washi tape (you could use patterned paper instead). Next die cut the gate and fence pieces to fit a 3 inch on each side. Before gluing the fence pieces down, use some of the leafy vine from a birdhoue die set to grow up around the fence.

Once the fence and gate pieces are glued to the 3 x 31/2 pieces score and glue the ¼ inch tabs to the back of the 5 x 6 inch base. Cover the back of the base card with washi tape/patterned paper.

Next glue the swing posts and roof over the cut-out 3 inch square blue inked side. To decorate the posts, glue on more of the leafy vines. Make the bench swing as described in last weeks blog. Attach with tape the threaded chains to the back side of the roof, making sure the bench is hanging even. With the swing in place, glue the second post and roof piece over the 3 inch cut square, matching up the post and roof edges. Glue on dark blue roof pieces to front and back of card.

Back of card

Decorate the scene with trees, birds, squirrels and grass. The swing pillows are cut using the pillow dies from a sofa die set.

You can write a message inside the gates or on the back of the card.

Hope this fun card has put a smile on your face and provided some inspiration for your crafting.

SUPPLIES Used from Dies R Us:

Dies

Inks

Miscellaneous

Other Supplies:

  • Flowered washi tape
  • White embroidery floss
  • Striped and colored paper scraps
  • Black fine tip pen

Don’t forget to come join in the fun at the Dies R Us Challenge Blog. There’s a new challenge theme offered on the 1st and 15th of each month and one lucky randomly drawn winner will receive a gift voucher prize to the Dies R Us Store.  

 For your convenience, all the important Dies R Us links are provided below.

click below for:

STORE

CHALLENGE BLOG

FACEBOOK

INSPIRATION BLOG

FRIENDS OF DIES R US PINTEREST PAGE

A Fishing Father’s Day

Hi, it’s Sue here from the Dies R Us Design Team with an interactive Father’s Day card.

This card is made with Karen Burniston dies focusing on the Tiny Trees Pop-Up in a 3 3/4 inch x 8 3/4 inch card base. (I used a thin white card base cut 8 3/4 inch by 7 1 /2 inch folded in half and covered with four panels of 3 3/4 inch x 8 3/4 inch decorative papers.)

Cut the number of trees you plan to use and assemble using the packaging directions. Decide on placement of trees based on where they will be in the folder position. (For slimline cards the trees must be place on the center fold rather than using the offset piece which allows for trees to be added off the center card fold.) Glue down tree frames and wait until glue has set to attach trees.

Die-cut four bears (Winter Animals) stenciling through the die with a black fine tip pen the eyes, nose and mouth. Run the stenciled bears back through the machine with the embossing mat and plate for your die-cutting machine to emboss the face and bottom feet. To make a baby bear, cut the bear just below its paws and then slide the bottom piece up under the arms and trim off excess edges. Glue together. The baseball caps are made by die-cutting the engineer’s cap from the Tiny Accessories 3 die set and rounding off the puffy crown and bill of the cap. (I tried to make the logo of the recipient’s favorite baseball team on the caps.) The fishing poles are described below. Drops of Glossy Accents were added to the bears’ eyes and nose to made them standout on the dark brown cardstock.

The stream is made with a long scrap of shiny spray painted paper in blue, gold and silver that was die-cut several times using the hill die from the Long Nature Edges die set. These wavey pieces were then glued to a strip of blue cardstock and fish cut from the Camping Charms die set, were added to the stream flow. The same fish were embossed, and their eyes stenciled in black ink and then glued to a piece of string or cording which was glued to the stick charm from the same die set. The rings were all cut off of the charms.

To make the bears stand under the trees inside, a small strip of green cardstock was cut and scored to form a cube. The cube is glued to both the card base and the tree frame and then the bear is glued to the font of the cube.

Decorations to the card include one tree front with leaves and three birds cut using the dies from the Tiny Trees set, two apples from the Tree Fruit set, and a white blanket from the Picnic Elements set. The blanket could be used to write a personal message on.

The “Happy Father’s Day” was cut three times from thin cardstock using Karen Burniston’s Alphabet dies. The layers were glued together and then glued to the front of the card using a T-ruler to keep the letters in a straight alignment.

Hope this fun card has provided some inspiration for your crafting. 😊

A

Other Father’s Day cards on my blog

A Tool Box Father’s Day

A Fishing Father’s Day

A Father’s Day Waterfall Pop-Up

A Work Bench Father’s Day Card

In-Vested Father’s Day Card

SUPPLIES Used from Dies R Us:

Other Supplies Used:

  • Textured green and blue cardstock
  • Trees and sky printed paper from Die-Cutting Essentials issue 32
  • Colored and shimmer cardstock scraps
  • Ranger Glossy Accents
  • Natural colored cording
  • Black fine tipped pen
  • Stampin’ Up – Early Espresso ink pad
  • Stampin’ Up Best Catch stamp set
  • Neenah Social –No. 10 envelope – Natural kraft

Don’t forget to come join in the fun at the Dies R Us Challenge Blog. There’s a new challenge theme offered on the 1st and 15th of each month and one lucky randomly drawn winner will receive a gift voucher prize to the Dies R Us Store.  

 For your convenience, all the important Dies R Us links are provided below.

click below for:

STORE

CHALLENGE BLOG

FACEBOOK

INSPIRATION BLOG

FRIENDS OF DIES R US PINTEREST PAGE

A Swinging Anniversary

Today we are making a 3-dimensional swing card using Karen Burniston dies from Dies R Us.

1. Cut two of each color using the swing die. Save the off-cut pieces for bench supports (I find the best piece is right below the bench , about 3/8 inches tall x 2 inches)

2. Trim off two roofs from darkest colour and the four posts from the lightest color. Cut the chains off the middle color. Cut bench support into two strips. (I save all the parts that I’m not using on this card to use on other cards.)

3. Cut words from each of the three colors.

4. Cut four stems from green and ten small flowers and center circles from flower dies.

5. Cut a 5 inch square and four small strips ¼ inches X 1 ¼ inches from sturdy green cardstock for the card base and post tabs.

6. Trim heart and scallop off one of the roof pieces. Glue roofs to yellow bases.

7. Glue heart and scallop trim together, being careful not to glue roofs.

8. Glue white posts ton fronts of yellow base posts.

9. Take one of yellow benches, snip the back at sides and fold down back to become bench seat. Trim of top of the bench as shown.

10. Cut the bench support strip into two side strips Fold ¼ on either end to form two tabs.

11. Trim tabs to fit the bench cut-outs. Glue tabs to lower side of back of seat piece as shown. Then glue other tabs to back bench piece.

12. Take 5 inches green square and fold in half, fold down one side to make a mountain fold, repeat on other side. Base should have two mountain folds in the shape of a “M.”

13. Glue small green support strips to inside of posts. Let dry and then glue posts to inside valley of base as shown in red circles.

14. Trim off top two loops on bench chains.

15. Cut two lengths of thread or embroidery floss. Thread one piece through the two chains on one side of bench. Repeat with other thread on opposite side of bench.

16. Tape threads to underside of roof making sure bench hangs evenly. (Red circles) Trim off tails of thread. Test swinging your bench. Smile.

17.Glue your words together offsetting at least one or both of the back colors. (Off-setting all three gives a blurred effect as shown, but off-setting just one makes the letters look 3D.)

18. Glue your flowers together and then onto the stems/bushes. Glue to base.

Hope this fun card has put a smile on your face and provided some inspiration for your crafting.

Want to see other swing cards I’ve made? Click here.

Thank you for reading this blog post. Please like and leave a comment. 😊

SUPPLIES Used from Dies R Us:

Additional Supplies Used:

  • Stampin’ Up Classic Stampin’ Pads – Early Espresso and Emerald Envy
  • Summer meadow stamp set from Cardmaking & Papercraft Issue 198, August 2019
  • Square envelope from my stash

Don’t forget to come join in the fun at the Dies R Us Challenge Blog. There’s a new challenge theme offered on the 1st and 15th of each month and one lucky randomly drawn winner will receive a gift voucher prize to the Dies R Us Store.  

 For your convenience, all the important Dies R Us links are provided below.

click below for:

STORE

CHALLENGE BLOG

FACEBOOK

INSPIRATION BLOG

FRIENDS OF DIES R US PINTEREST PAGE