Where the Skeletons Live

Hello, it’s Sue from the Dies R Us design team and today we are making a slimline pop-up Halloween card.

You will need:

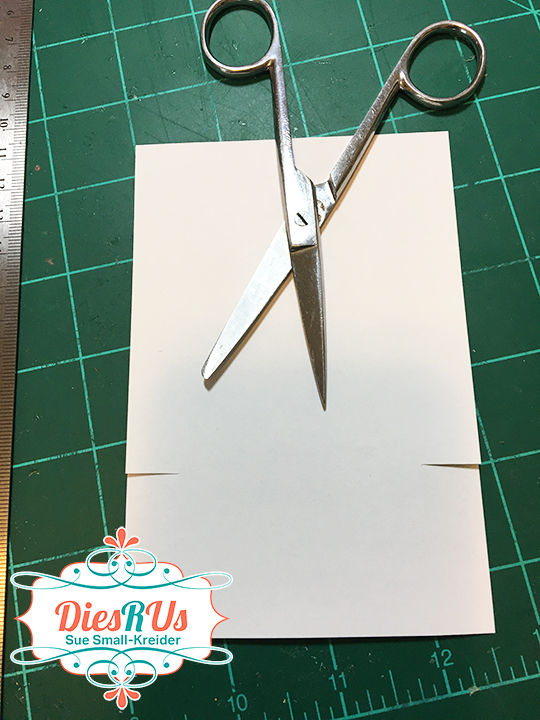
  • One lightweight white cardstock 8 3/4 inches x 3 7/8 inches
  • One lightweight white cardstock 9 inches x 3 7/8 inches scored and folded 1/4 inch from top
  • Two black spider web paper 8 3/4 inches x 3 7/8 inches
  • Two orange leaf paper 8 1/4 inches x 3 7/16 inches
  • One orange leaf paper8 3/4 inches x 3 7/8 inches
  • Two 1 1/2-inch circles
  • Cut from House & Fence Pop-Up set
    • One green patterned cardstock platform
    • Two black fences coated with clear gloss
    • Two path stones from gray or black inked with white
  • Cut from Holiday House Set
    • Two houses complete houses including roof, trim, windows and door (I cut the door from a skeleton paper. The orange and red papers had a shiny coating on them.)
  • Cut from Tree Pop-Up Set
    • Two trees from gray paper
    • One set of oak leaves from orange sparkle paper
  • Cut from Halloween Charms set
    • One Happy Halloween from black paper
    • Three blacks from Happy Halloween oval in black
    • Two spiders from black and use die stencils and white gel pen to ink in face
  • Cut from Winter Charms set
    • One large fir tree
    • One small fir tree
  • Save trimmed strips for additional decorations

Do a practice layout before adhering pieces to front panel (I decided I didn’t want the windows boarded up if the skeletons lived there.)

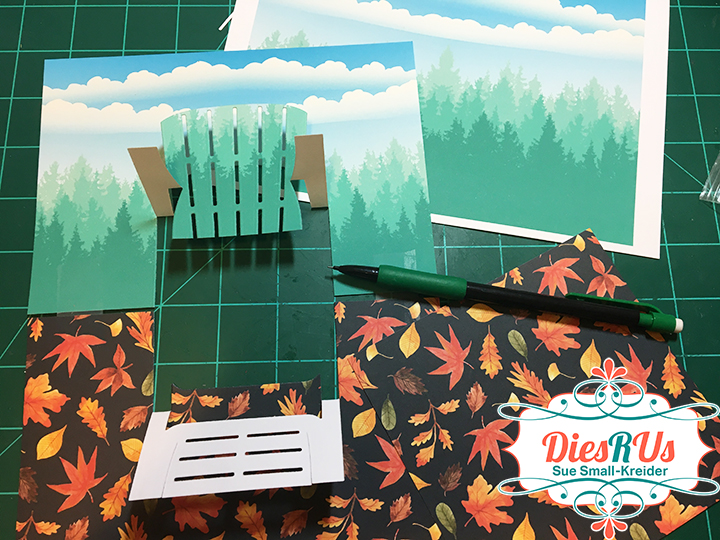
Use strong red double-sided tape on the platform tabs and on the top tab of longest white card base piece. See photo for exact location of tape. Adhere the longest card base to shorter base. The tab will be on the card back.

Use Scor-tape on the decorative paper panels, placing in one the backside of panel on all edges. To make the panels easier to position, peel back tape at all corners and fold backing paper so the tails stick out from edges as shown in the photos. Once positioned where you want press down corners and then peel off backing paper on each side and press don to adhere.

Once all layers of decorative papers have been adhered to cover all four sides of card base, place the platform on the bottom inside of card with taped edges just below the case base fold as shown in photo. Hold center tab down and peel off tape from it and the two platform tabs. Fold down card base top and adhere base to it. Fold down front tab of platform to desired position. Peel backing off tape and adhere to base. Platform should pop up when card is opened. Fold the two strips cut with platform die and glue into slots as shown in photo.

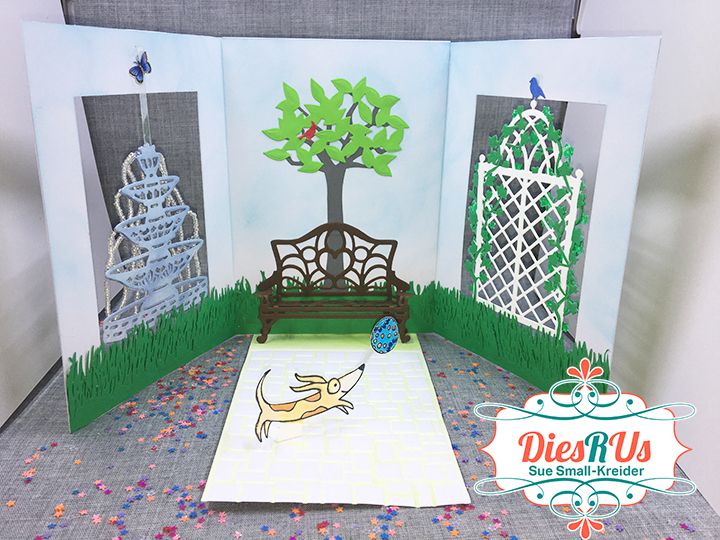
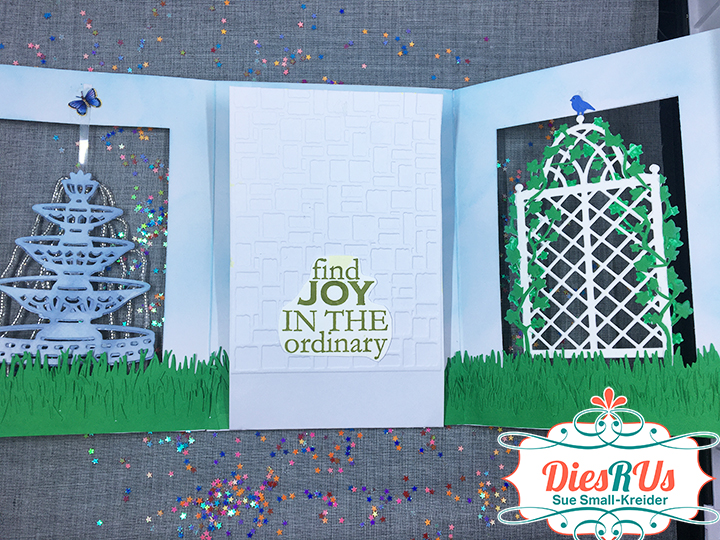
You can now decorate the card. Assemble houses as shown on packaging. Glue trees to inside top panel before gluing house to pop-up piece on platform. Glue fir trees to strips on platform. One of the orange circles is glued behind the Happy Halloween sentiment on the front. Trim fence to fit the edge of platform and bend back one section to be a gate. Trim off the gate’s “foot” as it will be a catching point when the card is opened and closed. It is easier to glue down the stone path before gluing on the fence.

The finished card will fit into a #10 business envelope. (I stamped the back of my envelope with a dancing skeleton.)

Hope this fun card has put a smile on your face and provided some inspiration for your crafting. 😊

Dies from Dies R Us:

Additional Supplies Used from Dies R Us:

Don’t forget to come join in the fun at the Dies R Us Challenge Blog. There’s a new challenge theme offered on the 1st and 15th of each month and one lucky randomly drawn winner will receive a gift voucher prize to the Dies R Us Store.  

 For your convenience, all the important Dies R Us links are provided below.

click below for:

STORE

CHALLENGE BLOG

FACEBOOK

INSPIRATION BLOG

FRIENDS OF DIES R US PINTEREST PAGE

Summer Is In The Air

Hello, it’s Sue of the Dies R Us Design Team and today we are making a summer pop-up card for a vegetable gardener using Karen Burniston dies.

The chair die just fits in a 3 ½ inch x 6-inch mini slimline card. I started by cutting a 3 ½ inch by 11-inch piece of lightweight white card stock and folded it in half.

Next, I cut piece of patterned background paper slightly larger than 3 ½ inch by 5 ½ inch and marked with a pencil where the chair arms connect with the card back on the patterned paper and cut slits so that the printed paper could be slid into place behind the chair. Using the same technique, I cut a piece of green grassy card stock 3 ½ inch by 6-inch for the ground, cutting slots for the chair feet. Glue both decorative papers to card base.

Cut chair, arms and seat from woodgrain paper. (I made my own woodgrain paper using a woodgrain stamp that I heat embossed with watermark ink and clear embossing powder.)

Fold woodgrain chair folds as shown on packaging. Glue wood grain chair to patterned paper chair matching up the seat, back, arms and leg pieces. Train the chair to pop-up by opening and closing card a few times.

Decorate card with the Garden Charm set cutting off the charm loops. To make the basket of corn and tomatoes, use the basket from the Picnic Elements set and the fruit from the Tree Fruit set. (I had corn and red apples already cut from a Rubberneck Stamps dies set which I use turning the apples sideways to look like tomatoes.)

On the card back I cut a patterned piece of green card stock 3 ½ inch by 6-inch and glued to the card base. For the card front I cut a 3 ½ inch by 7 ½ inch piece of green printed paper and glued it onto the card base folding over onto the back of the bard. I added a small decorative topper to finish the back of the card. For the front of the card I used some of the garden charms to hint at what is inside.

The Karen Burniston “Hello sunshine, hello summer” sentiments were cut twice and glued together using a fine-tipped glue bottle for the tiny lines. This adds some depth to the words.

Hope this fun card has put a smile on your face and provided some inspiration for your crafting. 😊

See more chair cards below:

Dies from Dies R Us:

Additional Supplies Used:

Don’t forget to come join in the fun at the Dies R Us Challenge Blog. There’s a new challenge theme offered on the 1st and 15th of each month and one lucky randomly drawn winner will receive a gift voucher prize to the Dies R Us Store.  

 For your convenience, all the important Dies R Us links are provided below.

click below for:

STORE

CHALLENGE BLOG

FACEBOOK

INSPIRATION BLOG

FRIENDS OF DIES R US PINTEREST PAGE

Spring Is In The Air

Hello, it’s Sue of the Dies R Us Design Team and today we are making a spring time pop-up card for a gardener using Karen Burniston dies.

Cut the two printed papers to 4 15/16 inches x 7 inches. Position them inside the card base so that there is a gap between the papers where the fold can be seen. Using removable tape, tape them together and place the chair die with the nibs over the fold.

Run taped papers with die through die-cutting machine. Cut chair, arms and seat from woodgrain paper. (I aged the chair with white ink pad rubbed over the grain.)

Glue printed papers inside card base, adding matching scraps of papers to cover the brown spaces let where chair is cut away. Fold woodgrain chair folds as shown on packaging. Glue wood grain chair to patterned paper chair matching up the seat, back, arms and leg pieces. Train the chair to pop-up by opening and closing card a few times.

Decorate card with the garden charm set cutting off the charm loops. (I dirtied-up the tools and gloves with brown ink.) The pink flowers are made with the flowers from the Tiny Trees Pop-Up set.

Fold up all the petals on the flowers and then glue a smaller flower on top of a larger flower. Add a yellow Nuvo Drop center to flower. Let dry overnight before gluing on to card.

The front of the card is made with scrap rectangles of green patterned paper with another watering can cut on the back side of the mirror cardstock and rounded with my fingers so that it pours from the left. The sentiment is a also a Karen Burniston die.

Hope this fun card has put a smile on your face and provided some inspiration for your crafting. 😊

See more chair cards below:

Dies from Dies R Us:

Additional Supplies Used:

Don’t forget to come join in the fun at the Dies R Us Challenge Blog. There’s a new challenge theme offered on the 1st and 15th of each month and one lucky randomly drawn winner will receive a gift voucher prize to the Dies R Us Store.  

 For your convenience, all the important Dies R Us links are provided below.

click below for:

STORE

CHALLENGE BLOG

FACEBOOK

INSPIRATION BLOG

FRIENDS OF DIES R US PINTEREST PAGE

Winter Is In The Air

Hello, it’s Sue of the Dies R Us Design Team and today we are making a Christmas pop-up card with a Charlie Brown Christmas tree using Karen Burniston dies.


The chair die just fits in a 3 ½ inch x 6-inch mini slimline card. I started by cutting a 3 ½ inch by 11-inch piece of lightweight white card stock and folded it in half. Next, I cut piece of patterned background paper slightly larger than 3 ½ inch by 5 ½ inch and marked with a pencil where the chair arms connect with the card back on the patterned paper and cut slits so that the printed paper could be slid into place behind the chair. Using the same technique, I cut a piece of white glitter card stock 3 ½ inch by 6-inch for the ground, cutting slots for the chair feet. Glue both decorative papers to card base.

Cut chair, arms and seat from woodgrain paper. (I made my own woodgrain paper using a woodgrain stamp that I heat embossed with watermark ink and snow embossing powder.)

Fold woodgrain chair folds as shown on packaging. Glue wood grain chair to patterned paper chair matching up the seat, back, arms and leg pieces. Train the chair to pop-up by opening and closing card a few times.

Decorate card with the Holiday Charm set cutting off the charm loops. To make the tiny potted fir tree, use the pine branch from the charm set and the sand pail from the chair set.

I used Cosmic Shimer Fluffy Stuff to create the little piles of snow around the base of the chair. Read the directions on the bottle before using! (You need to be careful when you heat the fluffy stuff up so as not to burn your card with your heat tool.)

Last, I sprayed the inside of the card with a white spray paint for a soft snow fall effect.

For the card front I cut a 3 ½ inch by 5 ½ inch piece of white glitter card stock and glued it onto the card base. On the card back I cut a textured piece of white card stock 3 ½ inch by 6-inch and glued to the card base. Next taped the top seam of the front and back with a red plaid washi tape and continued down the back of the card for added decoration. On the front the Merry Christmas sentiment is an old die I’ve had in my stash for many years. The snowflakes are from the charm set. (I used a fine-tipped glue bottle for adding glue to the sentiment and snowflakes that made it so easy to glue without a big mess.)

The back of the mini slimline envelope is stamped with fir trees in a dark green ink.

Hope this fun card has put a smile on your face and provided some inspiration for your crafting. 😊

See more chair cards below:

Cat In The Window

Fall Is In the Air

Spring Is In The Air

Summer Is In The Air

*·  Winter Is In The Air

* Happy Hour at the Beach

Dies from Dies R Us:

Additional Supplies Used from Dies R Us:

Don’t forget to come join in the fun at the Dies R Us Challenge Blog. There’s a new challenge theme offered on the 1st and 15th of each month and one lucky randomly drawn winner will receive a gift voucher prize to the Dies R Us Store.  

 For your convenience, all the important Dies R Us links are provided below.

click below for:

STORE

CHALLENGE BLOG

FACEBOOK

INSPIRATION BLOG

FRIENDS OF DIES R US PINTEREST PAGE

Fall Is In The Air

Hello, it’s Sue of Ully Cat’s World and today we are making an autumn birthday pop-up card for a gardener using Karen Burniston dies.

Cut the two printed papers to 4 15/16 inches x 7 inches. Position them inside the card base so that there is a gap between the papers where the fold can be seen. Using removable tape, tape them together and place the chair die with the nibs over the fold.

Run taped papers with die through die-cutting machine.

Glue printed papers inside card base, adding matching scraps of papers to cover the brown spaces let where chair is cut away.

Cut chair, arms and seat from woodgrain paper. (I made my own woodgrain paper using a woodgrain stamp that I heat embossed with watermark ink and clear embossing powder.)

Fold woodgrain chair folds as shown on packaging. Glue wood grain chair to patterned paper chair matching up the seat, back, arms and leg pieces. Train the chair to pop-up by opening and closing card a few times.

Decorate card with the garden charm set cutting off the charm loops. (I dirtied-up the tools and gloves with brown ink.)

The chrysanthemum-like flowers are made with the smallest flower from the Flower Pot Pop-up or Flowers and Bee set cut like fringe around the center circle. Cut two, fringe, push up fringed petals and glue one on top of the other. Glue three flowers onto foliage from charm set. Trim foliage as needed.

Round flowerpots and watering can over a marker or glue bottle. Add oak leaves from Tiny Tree Pop-Up to potted flowers and around card.

Make flowerpots and watering can pop-up taking printed paper cut into strips, fold and glue into squares. Glue pot to square and onto card.

The front of the card is made with a label die and a sentiment from Karen Burniston Word Set 7 – Autumn.

(I used a fine tipped glue bottle to added glue to the die-cut words that worked extremely well. Then I used a fine-tipped brown pen to mark stitches using the die as a stencil.)

Inside, the “Happy Birthday” is another Karen Burniston die that has been colored with Distress Ink. A label die-cut is used for a personal message.

Hope this fun card has put a smile on your face and provided some inspiration for your crafting. 😊

See more chair cards below:

Cat In The Window

Fall Is In the Air

Spring Is In The Air

Summer Is In The Air

Winter Is In The Air

* Happy Hour at the Beach

Dies from Dies R Us:

Additional Supplies Used:

Don’t forget to come join in the fun at the Dies R Us Challenge Blog. There’s a new challenge theme offered on the 1st and 15th of each month and one lucky randomly drawn winner will receive a gift voucher prize to the Dies R Us Store.  

 For your convenience, all the important Dies R Us links are provided below.

click below for:

STORE

CHALLENGE BLOG

FACEBOOK

INSPIRATION BLOG

FRIENDS OF DIES R US PINTEREST PAGE

Have A Seat Mini Series

For the next four days I have a mini chair series focusing on a pop-up chair die by Karen Burniston.

Today’s chair uses the Adirondack Chair Pop-Up with a slip cover to make it into a big overstuffed chair, perfect for cats to nap in!  You can access this post and the ones in this week’s seasonal chair posts below as they become live posts.

See more chair cards below:

The Secret Garden

Greetings it’s Sue here from the Dies R Us design team with a quad-fold, garden pop-up card.

This card was inspired by some of the Tutti Designs garden dies. The card specifically uses Garden Trellis, Garden Fountain and Garden Bench Set.

I created a quad fold card base by taking two 10 x 7 inch heavy card bases and cut one into a 5 ½ x 7 inch piece and a 4 1/5 x 7 inch piece. The larger piece is scored and folded at ½ inch along long side to form a tab to glue behind the other card base that in scored and folded in the middle. This creates a tri-fold card. Cut rectangular apertures from each side large enough to fit the fountain and trellis dies. Apertures should match up when folded closed.

Now is a good time to use Distress Oxide inks and a blending brush to color the inside of the trifold card a sky blue.

Spritz lightly the 4 ½ x 7 inch piece of card base with water to make it more pliable and use a cobblestone embossing folder to create the textured “floor” of this card. Score and fold ½ inch along short side of piece. Paint or decorated the textured area before gluing tab to center back of tri-fold card.

Cut two fountains from white card stock and ink both sides of each piece using Distress Oxide inks and a blending brush. (Adding the beads is optional.) Using a needle and thread, string seed beads and then adhere with glue to fountain. Glue beaded fountain to front of card aperture, glue second fountain to inside of front aperture matching up with front fountain and hiding the threads of the beading. (My aperture was bigger than the fountain and trellis, so I used thin stirps of clear plastic that I cut form packaging to act as extensions for the bases and tops of the fountain and trellis so that I could glue them to the card base.)

Cut two trellises from white card stock and two from green paper. Cut out the ivy from the green pieces and glue to the white trellis pieces. (An alterative is to color the ivy with green markers on the white trellis.) Adhere one trellis to the second aperture on the card base and then glue the second trellis to the back of aperture matching up lattice work.

Cut a tree and leaves from the Karen Burniston Tree Pop-Up die set. Cut a number of strips of grass from green paper and glue in layers to the inside of card. Position the tree behind the bench on the center panel. (I had to cut a second trunk to make the tree taller.)  Glue down the tree then layers of grass. Decorate with birds cut from Karen Burniston’s Tiny Trees Pop-Up die set.

Cut two of the benches out of heavy brown card stock. Save the four strips that are waste from the die cutting of bench. Cut the top of bench back off one piece as shown. Snip the arm rest from the back of the same piece and trim off extra angled piece. Fold the cut back down to form seat of bench.

Fold down the cut arms. Take the wider of the saved four strips and fold in a rectangle that is 1/ 2 x 3/8 inches and glue ends together. Glue the bench seat to the whole bench piece which becomes the bench’s back. Glue the rectangles between the front curved bench legs and the back curved bench legs. Take one of the thin strips and cut in half. Fold each half into an “L” shape. Glue the “L”s under the fold arm rests and adhere “L” strip to the bench back.

Train the bench to fold up, before gluing on to card base. To glue the bench into the card. Add glue first to rectangle bottom strips and position the onto the card “floor” near the fold. Glue bench back on to center panel of card. Move the bench while glue is still wet for best positioning.

To add some activity to the card, I stamped and colored a Funky Fossil dog stamp I had with Distress Oxide – Rusty Hinge with a water brush. The ball was colored with markers and attached to the dog with a strip of clear plastic cut from some packaging. The dog was then attached to the cobblestone flap by cutting a strip of cardstock and folding into an “L” shape and gluing to back of dog and onto cobblestones.

I covered the fronts of the aperture panels and the back center panel with green patterned paper before adding sentiments.

Sentiments are foiled Spellbinders sentiments I had in my stash and a Riley & Co. sentiment that is stamped on white card stock scrap in green ink, fussy cut and adhered to the back of cobblestone panel.

Hope this fun card has provided some inspiration for your crafting. 😊

SUPPLIES Used from Dies R Us:

Other Supplies:

  • White and brown cardstock
  • Green paper
  • Patterned papers from Park Lane Paperie – Strawberry Patch
  • Clear plastic strips cut from packaging
  • Darice cobblestone embossing folder
  • Crayola Signature Brush & Detail Dual-ended Markers
  • Ranger – Distress Oxide – Mowed Lawn, Stormy Sky, Tumbled Glass, Rusty Hinge
  • Scissors
  • Needle and thread
  • Clear glass seed beads
  • Funky Fossil Designs – Clear stamps – More Furry Friends
  • Foiled sentiment strips from Spellbinders Glimmer System foils and plates
  • Riley & Company -inspirations – Find joy in the ordinary – INS-111
  • Stampin’Up Classic ink pad – Pear Pizzazz

Don’t forget to come join in the fun at the Dies R Us Challenge Blog. There’s a new challenge theme offered on the 1st and 15th of each month and one lucky randomly drawn winner will receive a gift voucher prize to the Dies R Us Store.  

 For your convenience, all the important Dies R Us links are provided below.

click below for:

STORE

CHALLENGE BLOG

FACEBOOK

INSPIRATION BLOG

FRIENDS OF DIES R US PINTEREST PAGE

Thankful Wreath

I like making Thanksgiving Day cards for my family to let them know how thankful and blessed I feel to have them in my life.

This card was inspired by one that Nicky Gilburt made in Die-cutting Essentials, issue 81 using a hexagon base. I used a 3 ¼ inch circle die-cut base since I don’t own any hexagon dies and followed Nicky’s general instructions cutting apart the foliage corner die-cuts.

I colored the die-cuts with Distress oxide inks using sponge ink blender tools and a cotton swab for the tin acorn caps.

The thankful sentiment was die-cut three times (two orange and one yellow that was inked brown) and glued together with the top layer slightly off to have an orange shadow. (I find that using a fine tipped glue bottle really makes gluing tiny die-cuts easy.)

The top layer of large leaves, pumpkins and acorns were adhered with a variety of thickness foam squares and glue dots. The entire wreath is attached to the 5 x4 ¼ inch cardbase with thick foam squares. For the final elements, I used Nuvo drops for the red berries.

Inside an old LDRS autumn sentiment stamp was inked onto autumn leaves insert paper from the Sweater Weather foiled collection, Papercraft Essentials, issue 202.

To hint at what is inside the burnt orange envelope, I stamped the flap with a sentiment from this August’s Simply Cards & Papercraft, issue 220 and the pumpkin and leaves are from last year’s Simply Cards & Papercraft, issue 208 all in a brown ink from Memento.

Thank you for reading. If you enjoyed this blog post, please like it and follow the blog. 😊

Dies:

  • Autumn Wishes die set from Die-cutting Essentials, issue 81, September 2021

Stamps & Inks

  • Autumn Blessings from Simply Cards & Papercraft, issue 220, August 2021
  • Autumn Days from Simply Cards & Papercraft, issue 208, August 2020
  • LDRS Creative – Clear Stamps – Happy Fall Sentiments
  • Memento – Fade-Resistant Dye Ink Pad – Rich Cocoa
  • Ranger – Distress Oxides – Barn Door, Ground Espresso, Mowed lawn, Ripe persimmon, Rusty Hinge

Papers

  • Yellow and Orange cardstock from my stash
  • Insert paper from Sweater Weather foiled collection, Papercraft Essentials, issue 202, August 2021
  • A2 burnt orange envelope from Taylored Expressions

Additional Supplies:

  • Nuvo Vintage Drops – Postbox Red

Keys, Stars and Sprays

Playing with new dies and spray mica paints resulted in this card.

I used Marianne Design Craftables Punch Die: Keys to die-cut the keys that are glued to a sheet of card stock and sprayed with brown, silver and gold metallic sprays. The green sheet that was cut up was die-cut with and Joy! Crafts Die – Bille’s Background Stars and sprayed with green and gold sprays. The back blue sheet was sprayed with blue and silver sprays. The birthday sentiment is die-cut from shiny black paper using the Happy Birthday Stamp and Die Set from Stamps by Chloe.

Hope you enjoyed this quick card. If so, please comment and like and follow this blog. 😊

Other Supplies Used: