Popping Egg Hunt Card

Easter egg hunts are a sign of Spring and new life.

For a fun Easter card that pops, I used some cute double-sided papers with sentiment toppers along with Karen Burniston’s Spring Animals, Bam Box Pop-Up, Crosshatch Rectangles and Labels, Crosshatch Circles and Label Charm Pop-Up die sets.

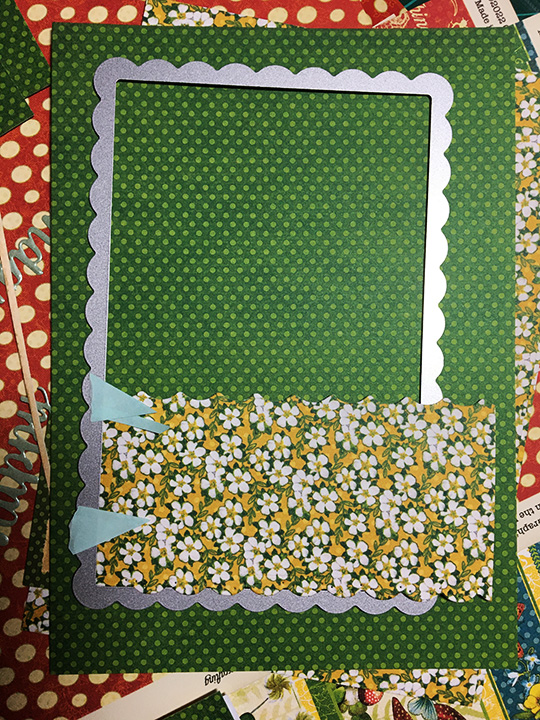
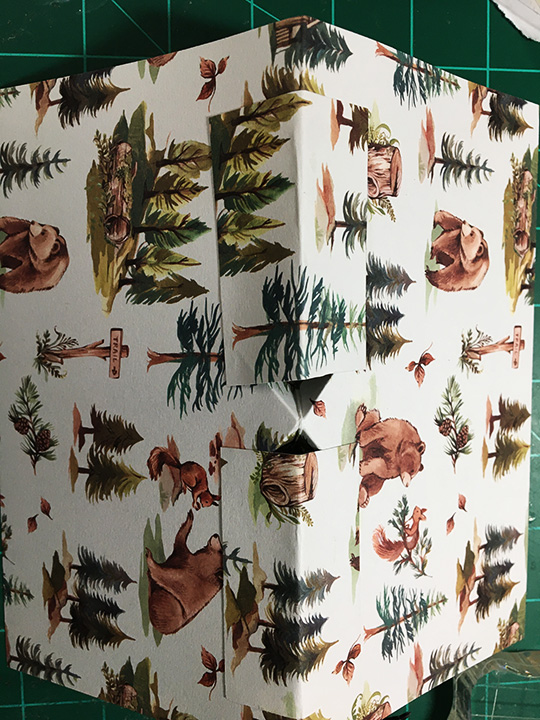
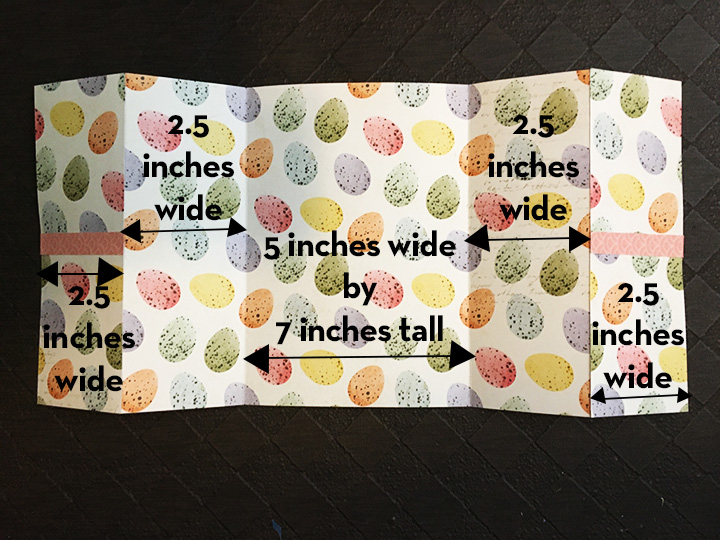
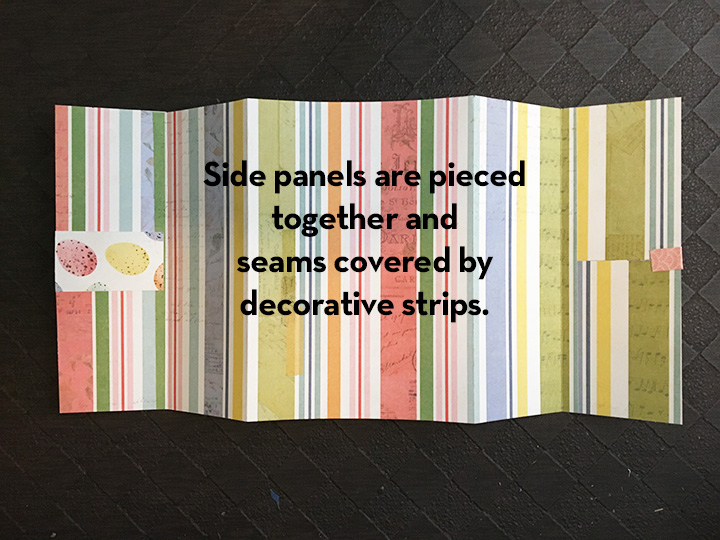
The card base is an extended gatefold with aperture windows cut through the front and side panels that allow two spring animals to peek out the card front. From a 12×12 sheet cut a 10.5×7-inch rectangle. Score and fold at 1/4-inch, 2 3/4-inches, 7 3/4-inches, 10 1/4-inches. Glue front panels (2.5×7 inches) to the side tabs. (I had to piece together my front panels using decorative strips of paper to hide the seams.)

Close card and layout your card front decorations using the smallest decorative label dies from Bam Box set to cut the windows. Tape dies in place using removable tape and open out cardbase and then fold back the front panels so that the dies will cut through both front and side panels.

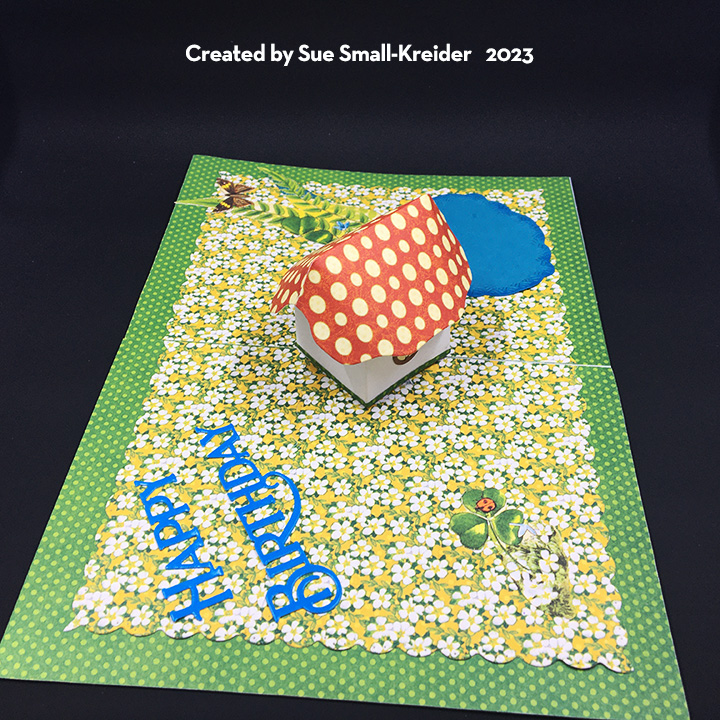
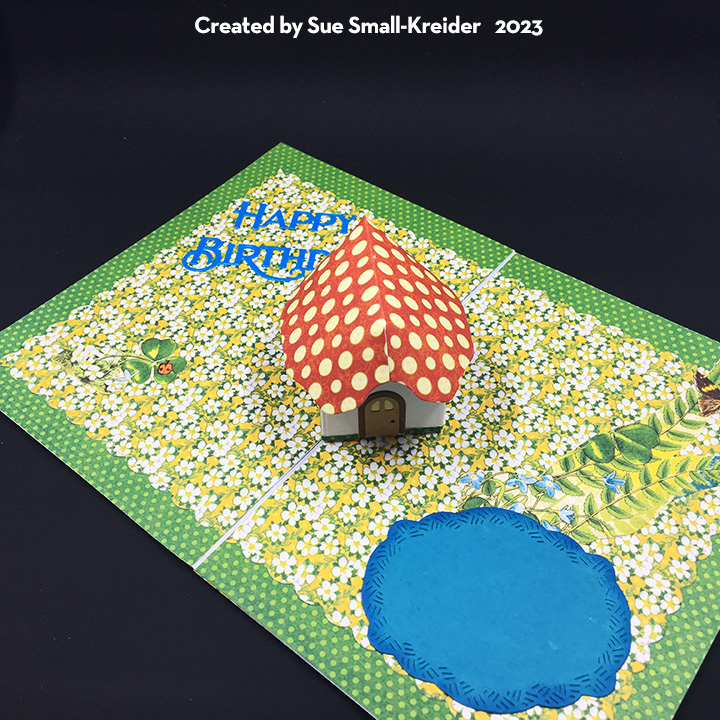
Create two bam boxes per directions on assembly video. Assemble a bunny and a chick in an egg following their assembly video. (I used half of a cotton make-up removal pad to die the bunny’s tail.)

(I used a paper cutter to trim my sentiment toppers and a circle die to cut the wreath sentiment.)

Layout your inside decorations of the card using placement of the animals glued to the bam boxes in a flatten position making sure the animals will be seen through the windows. (I used fancy labels from two sets to create the personal message label – Label Charm Pop-Up and Rectangles and Labels Crosshatch.)

For the back of the card, I chose to glue a 30-inch piece of ribbon under a decorative panel to tie the card shut. Cut a scalloped rectangle using the new Rectangle and Labels die set and glued a sentiment topper from the Echo Park paper pad. Tie the card shut to get correct placement of ribbon before gluing decorative panel on to card back. (For my signature block on the card back, I fussy cut three eggs from the scraps of printed paper.)

The card fits into an A7 envelope decorated with one of the window off-cuts as a seal on the envelope flap. I like to enclose instructions on how to close the Bam Box. You can download the instructions below.

Thank you for reading this blog post. I hope this inspires you and makes you smile. Please like and leave comments 😊

For more Bam Box projects click here.

Materials Used:

Dies

Papers

  • Photoplay – 12×12 Double-Sided Cardstock – Bunnies and Blooms – Easter Egg – #BUN3746
  • Echo Park – 6×6 Double-Sided Paper Pad – It’s Easter Time – #IET300023
  • Bazzill – 8.5×11 Textured Cardstock – Tiara – 18-1002
  • Colored Cardstock and Paper Scraps
  • A7 Envelope – White

Pens

  • Pigma – Mircon 01 – Black
  • Pink Fine-Tipped Makers

Miscellaneous

Enjoying The Little Things

Spring greenery and the mention of fairies, sprits, leprechauns and other wee creatures of mischief and fortune is what this card is about. It uses papers from the Graphic 45’s Little Things collection and dies by Karen Burniston including the new Rectangles and Labels Crosshatch set for creating backgrounds.

The card uses a pre-made 5×7-inch cardbase that decorative papers have been adhered. For the card front a card topper and two layers of decorative papers were used.

On the inside of the card, I covered the cardbase with a green dotted paper (5×7-inch) and then cut the floral papers (6×4.5-inches). I wanted a scalloped edge on the floral paper, but the scalloped rectangle in the die set is slightly smaller than 6×4-inches, so I had to cut the edges in a modified way. I placed one edge under the die and the other over the top of the die to cut. Unfortunately, I messed-up and cut two edges, which meant I had to piece the paper when I adhered it. The edge of the floral paper that abuts the center fold is not scalloped.

Before cutting or assembling the mushroom house, I watched the assembly video for both the Tiny House and Mushroom Roof. I decorated the white house piece first before assembling the house using windows and door from the mushroom set. I had a thin strip of the green dotted paper that I placed as grass edging the bottom of the house. The paper collection has a red dotted mushroom paper that was perfect for the roof.

I wanted the “Happy Birthday” to match as close as possible to the lettering font used on the card front, so I used a PoppyStamp word die, cut twice from blue cardstock scraps and glued together before adhering to the card.

For the pond label, I cut the crosshatch label from the new Rectangle and Labels die set and inked the edges with a dark blue ink. The clover leaf and ferns were fussy cut from the decorative papers.

One of the coordinating papers was used on the card back while a large sentiment was cut from the paper set for the back of the envelope flap.

Thank you for reading this blog post. I hope it gave you inspiration and a smile. Please like and leave comments 😊

Materials Used:

Dies

Papers

  • Graphic 45 – 12×12 Double-Sided Papers – Little Things Collection
  • Blue, Brown and Yellow Cardstock Scraps
  • Park Lane – A7 White Card and Envelope

Ink

  • Ranger – Tim Holtz Distress Ink – Prize Ribbon

Miscellaneous

Spring Picket Fence Card

This card was designed for Craft Roulette episode #153 whose perimeters were:

  • Project: Rounded Edge
  • Colors: 2 Blues + 2 Additional Colors
  • Element: Flowers
  • Random: Fussy cut

If you haven’t watch this fun Friday night YouTube crafting show https://www.youtube.com/c/CraftRoulette) which has a game show theme and hosted by Mary Gunn. Each week Mary and a guest crafter spin the roulette wheel to randomly pick four perimeters that crafters should use to make a card for that week. Mary and the guest crafter also  make cards using the perimeters during the remainder of the hour. Randomly chosen winners from each week’s submissions receive prizes. On March 17, 2023 the guest crafter will be Karen Burniston. (website: https://craftroulette.live/show)

For my Craft Roulette submission card I took an accordion fold design, I had made a template for, but hadn’t constructed yet.

Having experimented with Karen Burniston’s Landscape Rectangle Accordion and cutting the pivot panel into other shapes. For this card I took inspiration from a pivoting die that Karen Burniston had designed for Elizabeth Craft Designs that had a house and a picket fence.

I made a template from heavy cardstock (110 lb) by first cutting an accordion panel and then tracing around a die-cut of the fence portion of the House Pivot Card die to create the fence pattern. (Make sure you don’t cut away the pivot mechanism at the top and bottom of the panel. The center point of the rectangle is the scored fold-line.) I fussy cut the pattern and then used it to trace onto my die-cut panels of patterned, pale blue cardstock.

After tracing the fence onto the panels I cut the fence out using a metal ruler and craft knife to cut all the straight edges and scissors for the curved parts. I used a small corner punch to round the accordion frame corners, folding the tab to be rounded as well.

Because my fence was cut from blue cardstock, I had to color or whitewash the pickets with an white opaque marker. The flowers are small flowers from the following Karen Burniston die sets: Fireplace Extras 2, Tiny House Pop-Up, Flowers and Bee, and Flower Pot Pop-Up. (The flowers in Flowers and Bee and the Flower Pot Pop-Up are the same.) I used yellow posy flatback gems as the purple flower centers. The grass was cut from a spotted green paper using the grass from Long Nature Edges.

Happy Birthday” is a die cut sentiment using a navy-blue star patterned paper. A personal message can be written on the backside of the frames and fence posts.

The card fits an A2 size envelope.

Thank you for reading this blog post. I hope this inspires you and makes you smile. Please like and leave comments 😊

For more Accordion Fold cards click here.

Materials Used:

Dies

Papers

  • Dress My Craft – 12 x12 Scrapbooking Papers 240 GSM – Chickoo & Friends
  • Colored Cardstock and Paper Scraps

Pens/Gels

  • Faber-Castell – Pitt Artist Pen 2,5 – White -101
  • Gel Pen – Neon Orange

Adhesives

Tools

  • Die Cutting Machine
  • Quickstik Tool
  • Pokey Tool
  • Scissors
  • Tweezers
  • Metal Ruler
  • Craft Knife
  • Pencil
  • Small Corner Punch
  • Small Ball-Tipped Stylus

Miscellaneous

  • Queen & Co. – Posies Topping – Golden

Cafe Coffee

Do you have that favorite café with checkered tablecloths and oversized cups where you get that creamy cup of dark roasted coffee and while away the afternoon talking with friends? This card is for you.

Designed around two coffee themed Funny Bones rubber stamps, all the dies used to make this card are by Karen Burniston. (Please note the cup pop-stand, saucer, spoon and swirl of steam are from a die-set she designed for Elizabeth Craft Designs in 2015 and can be found on on-line craft resale shops.)

I recommend watching the assembly video for the cup pop stand before starting this card. To begin, I used a purchased A7 (5-inches tall by 7-inches wide) brown craft paper card base and envelope. I covered the two inside panels with thin red and white checked paper cut as 4 3/4-inches by 6 7/8-inches rectangles butted up almost to the fold, but not covering it. Next, I cut a black and white paper napkin into a 5-inch square and then cut it diagonally into two triangles. I cut and embossed the saucer as shown in the assembly video. Each napkin triangle is adhered to the card base with two pieces of double-sided tape forming a “T”. The saucer is attached using glue that will be absorbed into the napkin and adhering it to the card base.

To get a glossy red coffee cup, I used red cardboard packaging that I had saved from a child’s fast food meal box and cut three cups from it. The alphabet border on the cups is washi tape. The steam die cuts are made with clear vellum.

The humorous coffee spoon sentiment was stamped in brown ink onto a 1 1/2-inches by 3-inches piece of cream cardstock. The red rimmed circles (from the Coffee Cup Pop-Up die set) on the card are for personal messages. Washi tape borders and silver mirror card complete the inside decorations.

For the card front, I stamped the Coffeeology sentiment on a 3 1/4-inches x 2 3/4-inches rectangle and glued diagonally over a 5-inches x 5 1/4-inch piece of decorative paper after stenciling sides of the card using the coffee bean die from the Coffee Cup Pop-Up set with a mini cube of Distress Ink in walnut stain and adding washi tape. The third die-cut steaming coffee cup and another spoon cut from mirror cardstock complete the front.

As is my style, the envelope back flap has stenciled coffee beans in brown ink.

The tiny coffee cup on the card back comes from the coffee charms die set. (See charm assembly video.) White steam was added using a medium tipped opaque white marker with detailed swirls of a white gel pen. More washi tape and a strip of checked paper complete the back’s decorations.

See more coffee themed card by clicking here.

Thank you for reading this blog post. I hope it provides inspiration and joy. Please like and leave comments. 😊

Materials Used:

Dies

Stamps

Papers

  •  
  • American Crafts -DCWV – 12×12 Inch Paper -Bright Red Checks – CP-002-00171
  • Paper Napkin
  • Clear Vellum
  • Red and Silver Scrap Cardboard Packaging
  • White and Cream Cardstock
  • Park Lane Paperie – A7 Card Base and Envelope – Kraft

Ink

  • Stampin’ Up – Classic Stampin’ Pad – Early Espresso
  • Ranger – Tim Holtz – Distress Ink- Walnut Stain
  • Recollections Opaque Marker – Snow
  • Sakura – Gelly Roll Pen – Medium – White
  • Pigma Micron 05 Pen – Black
  • Pigma Micron 05 Pen – Brown

Adhesives

Tools

  • Die Cutting Machine
  • Stamping Platform
  • LDRS – Stampendable Stamping Tool
  • Stamping Cloth
  • Sponge Dauber
  • Scissors

Coffeeology

Some of us love the smell of a dark roast coffee. Others love a pumpkin spice latte. All of us need sometimes to just stop and smell the coffee and appreciate life. This is one of two coffee cards this week. Look for another tomorrow.

Designed around the Funny Bones Coffeeology rubber stamp on the card front, the inside pops up with a take-out cup of coffee that doubles as a gift card holder. All the dies used to make this card are by Karen Burniston.

I recommend watching the assembly video for the coffee cup pop-up before starting this card. The inside of the card mimics the card Karen Burniston demonstrates in the video for an A2 top fold card.

For the card front, I stamped the sentiment on a 3×3-inch square and glued diagonally over a 4×4-inch piece of decorative paper. The three tiny vessels of coffee come from the coffee charms die set. (See charm assembly video.) White steam was added using a medium tipped opaque white marker with detailed swirls of a white gel pen. Throughout the card there are inked coffee beans that were cut out of brown cardstock and covered using a mini cube of Distress Ink in walnut stain.The beans are in the coffee cup pop-up die set.

The card back has another 4×4-inch piece of decorative paper and is a place to write a lengthy personal message.

As is my style, the envelope back has a die-cut coffee mug with a heart that hints at what is inside.

See more coffee themed card by clicking here.

Thank you for reading this blog post. I hope it provides inspiration and joy. Please like and leave comments. 😊

Materials Used:

Dies

Stamps

Papers

  • Crafter’s Companion – 12×12 Double-Sided Paper Pad – Decadent Decor
  • Brown, White and Cream Cardstock
  • A2 ivory Envelope

Ink

Adhesives

Tools

  • Die Cutting Machine
  • Stamping Platform
  • LDRS – Stampendable Stamping Tool
  • Stamping Cloth
  • Sponge Dauber
  • Craft Mat
  • Scissors

Train Ride Through The Canadian Rockies

It’s the Karen Burniston Design Team March 2023 Challenge and the theme is Vacation!

I’ve always wanted to take the train from Vancouver through the Canadian Rocky Mountains and this card pays tribute to that train trip using Karen Burniston’s Twist Panel Pop-Up and Train Pivot Panels.

First, I watched the assembly videos for Train Pivot Panel and the Twist Panel Pop-Up. (If I had been paying attention, I would have realized that when the train pivot panels installed on the twist panel mechanism would need a card base that has 6-inches from the fold to its outer edge. Hence my train engine juts out from the card bottom by 3/4-inch, and I had to hide it with ribbon.)

When adding the twist panel mechanism to card larger than 5-inches, I use a metal ruler and a craft knife to cut the ends of the arms free and I glue additional patterned paper behind the mechanism to hide the openings that the arms make.  My patterned papers have 3-inch-tall scenes that I cut to go inside the card at the top and bottom of the twist mechanism to added depth for mountains the train is going through. The actual train panels are cut from coordinating paper of fir trees.

While the Canadian Rail trains are diesel trains rather than steam, I tried to make the train have the Canadian flag colors and I found a tiny red maple leaf sequin in my shaker elements stash. The train track comes from the Train Elements die set.

For the outside of my card, I created some maple leaf paper on my computer and printed it. The “Enjoy the ride” sentiment was released by Karen Burniston as part of the train themed dies. I used her Mini Alphabet to finish the sentiment. (I find using removable paper tape to line up the lettering works well with a t-ruler.)

For the card back, I used a vintage Canadian railway sticker and a heart sticker to hide the ribbon end.

A piercing tool (an ice pick) was used to poke the holes for the ribbon.

Thank you for reading this blog post. Please like and leave comments 😊

Materials Used:

Dies

Papers

  • Craft Consortium – Premium Quality Papers – 12” x 12” – In The Forest by Clare Therese
  • Colored cardstock scraps
  • Copy Paper
  • Paper Lane – 5 x7 white card

Inks

  • Sharpie Permanent Marker –Fine Point – Black

Miscellaneous

  • Neutral PH Adhesive by LINECO
  • Fine-Tip Glue Bottle
  • Quickstik Too
  • Scrapbook.com – Double-Sided Adhesive 1/4 Inch Tape
  • Die Cutting Machine
  • Computer and Printer
  • Craft Knife
  • Piercing Tool
  • Pencil
  • Dollar Tree – Craft Clips
  • Removable Paper Tape
  • Red Organza 5/8 Inch Wide Ribbon
  • Kat Scrappiness – Shaker Elements – Shimmering Fallen Leaves