You’re the G.O.A.T.

While being told that you’re the G.O.A.T. may sound bad, it really means You’re the Greatest Of All Time. In my family of sports players, being told you’re the G.O.A.T. after a game is common, so letting Dad know he’s the G.O.A.T. is a fun thing. This card could be used for birthdays or Father’s Day.

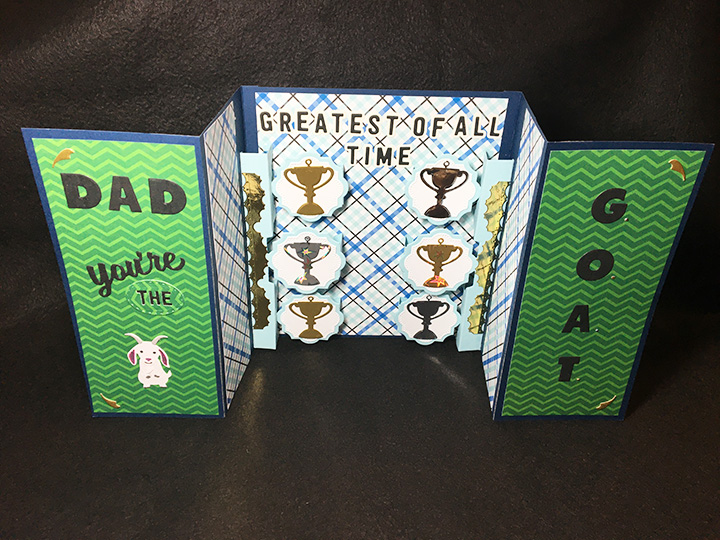
In challenging myself to use Karen Burniston’s Little Labels Pop-up in a vertical position, I saw the labels as shelves for trophies. Some of my inspiration comes from Sam Calcott of Mixed Up Crafts when she makes her tower cards.

I started with a 7 x 8 inches rectangle of dark blue heavy cardstock.  The side panels are made up of two panels per side. Because of my limited amount of the dark blue cardstock, I cut two panels of 3.5 x 8 inches and two more panels 4 x 8 inches. (I recommend cutting four panels of 4 x8 inches rather than having to use washi tape to attach the front panels.) Score the 4 x 8 panels at 3.5 inches to make a long tab.

Cut decorative panels ¼ inches smaller thane the base panels. Glue side panels to large base. Adhere decorative panels to card base inside panels.

If you haven’t already die-cut your inside decorative labels and trophies do so now. (I find some of the best, thick foiled silvers and golds are on personal care and food packaging such as cookie/biscuit packets.)

Also, cut and assemble all letters need for the inside sentiment. (I sort mine in a tiny bag, so I don’t lose any letters.) Die cut two of the Little Labels Pop-ups. Space out the placement of the pop-up labels and sentiment. (While I adhered my sentiment after I installed the pop-up labels, it might be easier to add the letters first and then the pop-ups.)

To adhere the letters, line them up on a grid background and place removable tape over them. (I used Post-it Note yellow tape.) I trimmed the tape down to make it easy to line up the bottom edge with the pencil line I drew on the card. I added glue to the back of one word’s letters and then placed them onto the card, pressed down to adhere and then peeling off the tape.

I watched Karen Burniston’s assembly video before I glued in my pop-up labels. (I find reviewing the videos help me before I make a mistake using my special papers.) You need at least 3.5 inches of width to close one pop-up labels panel, unless you stager the panels, you will need at least 7 inches width to close the card.  Add decorations to pop-up labels.

If you cut all the side panels at 4 x 8 inches, then fold the ½ inch tab and glue panel to other side panels. If you end up needing to tape your front panels, use the widest washi tape you have. Mine was 2 inches wide.

I used Karen Burniston’s Mini Alphabet for the inside sentiment and her original alphabet for the larger outside letters as well as parts taken from two other sentiment dies – “You’re Sweet” and “Enjoy the Ride.” I saved the tiny circles and scraps from the arms and lid of the trophies to decorate the front of the card. The goat is also a Karen Burniston die.

The belly band or belt that holds the card closed is made from scrapes and leftover pieces from other projects. This is intended as a presentation card to be hand delivered as it is too big for most standard size envelopes.

Label on back is a place to add a personal message.

Thank you for reading this blog post. Please like and leave comments 😊

Materials Used:

Dies

Papers

  • Heavy weight dark blue and pale blue cardstock
  • Patterned papers from my stash
  • Silver and gold packaging
  • Holographic silver and gold scraps
  • Black and white cardstock scraps
  • White gold shimmer cardstock

Miscellaneous

On the Injured List

For a baseball fan, having your favorite player on the injured list, is bad, having yourself on the list is even worse.  This card is for a sports fan recovering from surgery.

Echo Park Paper Co. makes a Baseball mega bundle of double-sided papers and ephemera that works well with Carta Bella’s Baseball element stickers. I used items from both these sets along with the circle twisting mechanism designed by Karen Burniston to make this card.

After watching Karen’s assembly video for the Snowman Twist Circle die set, I selected the largest two circle dies, cutting the largest from sand colored paper and the smaller stitched circle from white cardstock. I used a pencil to sketch where the red stitching would be on the white circle and used a fine tipped marker to mark the baseball’s stitching.  The striped paper for the inside of the card was folded and die-cut as directed in the video. The arm piece was also cut from the striped paper.

A lightweight 5 x 6.5 inch card base was what I glued the striped inside paper to. For the outside I cut two 5 x 6.5 inch pieces of the sand colored paper. Decorating the card with the stickers and pre-cut ephemera was the fun part of the card.  Using a computer, I created the two sentiments playing off the twisting action of the batter on the circle. “It won’t be long before your back in the swing of things!”

The envelope is also decorated with a baseball sticker.

Thank you for reading this blog post. Please like and leave comments 😊

Materials Used:

Dies

Inks

  • Red fine-tipped pen
  • Black fine-tipped pen

Papers

  • Echo Park Paper Co. – Baseball by Steven Duncan Mega Bundle – CBBA95000TM
  • Carta Bella Paper Company – Baseball Element Sticker – CBBA95014
  • White card base from my stash

Miscellaneous

  • Sizzix – Big Shot PLUS die cutting Machine
  • Cosmic Shimmer – Specialist Acrylic Glue – 125ml
  • Fineline 20 Gauge Applicator & Bottle

Hello Summer Two!

Gumballs and relaxing on the beach are somehow tied together in my memories of summer family vacations. This card incorporates some new crafting supplies that came into my crafting room.

The gumball machine is one I’ve been eyeing from Stampin’ Up for a while. The tropical background paper is from Scrapbook.com. “Hello Summer” die-cut is from Tutti Designs and has its various elements cut from colored scraps and glued to a whole brown die-cut.

To make the inside message more legible I used some colored adhesive backed vellum which Messed up on the stamping and covered with the stamped sentiment on blue cardstock.

The card fits into an A7 size envelope which has been stamped on the back with a gumball machine.

Thank you for reading this blog post. Please like and leave comments 😊

Materials Used:

Dies

  • Stampin’ Up – Dies – Gumball Machine – 157647

Stamps

  • Stampin’ Up – Photopolymer Stamp Set – Gumball Greetings -157646

Inks

  • StazOn Solvent Ink – Jet Black

Papers

  • Scrapbook Customs – 12×12 double-sided – Retro Tropical Islands -DS#30505b
  • Silver foiled cardstock from toothpaste box
  • Multicolors of paper scraps
  • Xcut – Xtras Adhesive Vellum Sheets- yellow
  • A7 brown craft paper card base and envelope

Shaker Elements

  • Stampin’ Up – Gumball Machine Shaker Domes – 158131
  • Stampin’ Up – Frosted Beads Assortment – 158132

Miscellaneous

Squeeze The Day!

Sometimes life keeps throwing lemons at people. I am always amazed at how individuals keep smiling through it all and even find time to do kind things for others as well. This is a card for those smiling individuals that know how to make lemonade out of what life throws at them.

Using the Vintage Lemon Twist papers by Simple Stories and the You Shine stamp set both in the Simon Says Stamp! July 2022 Card Kit of the Month, I crafted this card with dies from Karen Burniston, Divinity Designs, Crafter’s Companion, Made to Surprise and Oriental Trading.

The front of the card is made from the paper collection with Nuvo Drops, buttons and a tiny ribbon bow from my stash. A symmetry is a theme for this card. The back of the card is a collage of leftover pieces from making the rest of the card. (I decorated both the inside and outside of the card base because the card base was thin cardstock. I adhered the papers with double side tape and an occasional drop of glue.

I had the idea of a pitcher of lemonade pouring into a glass with a lemon slice as the inside interactive mechanism of the card. After looking at a number of Karen Burniston pop-up/interactive dies, I settled on the Mailbox Pop-Up after watching a video by Karen using the mechanism for a double spinner card which I adapted into a tilting pitcher. I cut from scrap cardstock, a template of the mailbox to know where to cut the square opening in my decorative scalloped circle (Made to Surprise). After trimming the lower lever mechanism off, I folded the piece as directed in the video and trimmed the small section off one edge that would not be covered by the scalloped circle.

Using clear vellum to resemble glass, I die cut two tumblers (Divinity Designs) and fitted a scrap of vellum behind the die-cut pale blue pitcher (Crafter’s Companion). Using a bright yellow marker, I colored the back side of the vellum as the lemonade. I always color the edges of exposed vellum with a black marker to make them more defined. From the backing paper from some adhesive sheets that I had saved because the paper had a shiny yellow surface, I cut some lemon slices (Divinity Designs) for the tumblers and pitcher.

The lemonade sentiment is from the You Shine stamp set and is heat embossed with black ink and clear embossing powder. Once heat embossed, I die cut the sentiment out with a wave oval die from oriental Trading. I cut a second oval of plain white cardstock as the sentiment for a personal message to be added.

Black backgrounds inside the card make the white scalloped circle and ovals pop. Small scraps of the yellow printed paper were used to balance out the inside decorations.

The card fits into an A2 size envelope which has been stamped on the front with a lemon slice and back flap with a whole lemon. the back flap image is colored with markers. All the stamps are from the Simon Says Stamp You Shine stamp set.

Thank you for reading this blog post. Please like and leave comments 😊

Materials Used:

Dies

Stamps

Inks

Papers

  • Pattern papers by Simple Stories – Vintage Lemon Twist
  • Clear vellum scraps
  • White cardstock scraps
  • Shiny yellow paper scraps
  • A2 white card base and envelope

Miscellaneous