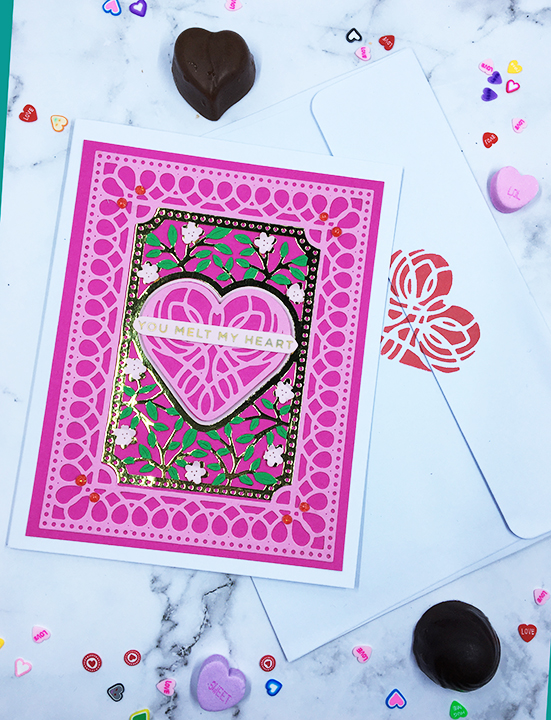
Valentine’s Day is coming and a handmade card that reminds one of chocolates or the colorful candy hearts associated with the holiday maybe just the thing for your loved one.
These two cards were made with elements from the three shades pink cardstock cut once using the Small Die of the Month for January 2021 from Spellbinders.
The cherry blossoms and leaves were fussy cut from the center die. The leftover very light pink border from the cherry blossoms was layered onto the sending love card while the center heart cut out was used behind the cherry blossom heart.
Foiled sentiments from the coordinating Glimmer Kit of the Month complete the hearts which were adhered with foam squares.
Nuvo drops of contrasting shades at the corners complete the cards.
These card fronts were mounted using double sided tape to 6 inches x 4 ¾ inches white card bases.
The back flaps of the envelopes were stenciled with Distress Oxide ink and one had a glitter sticker added.
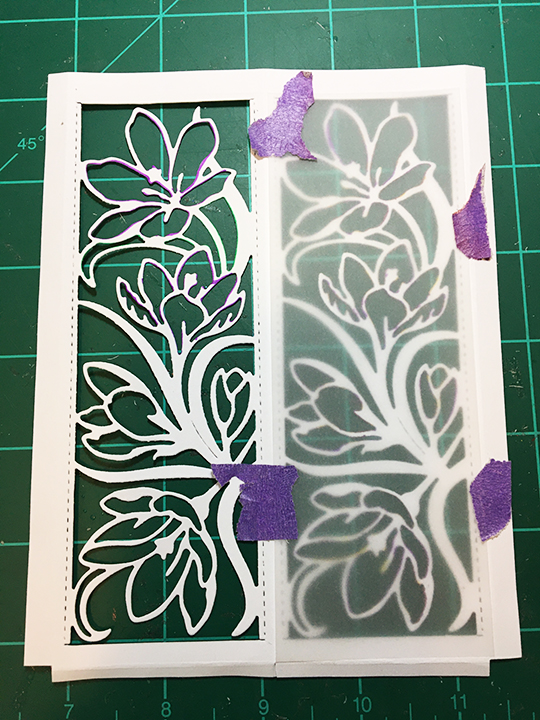
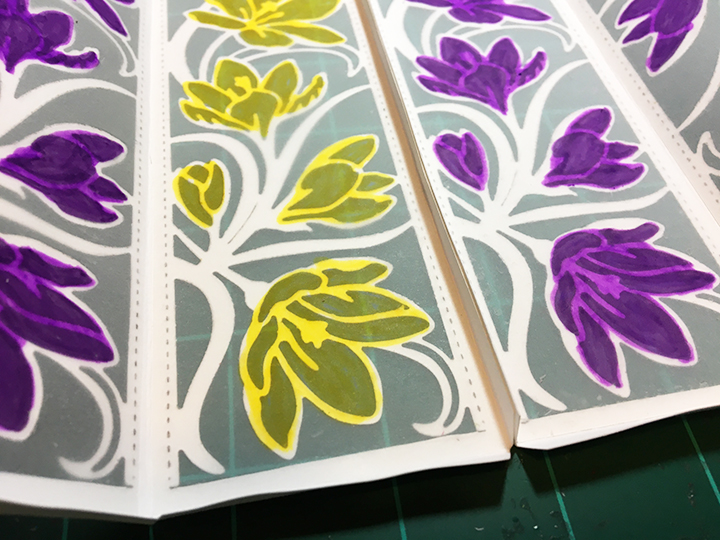
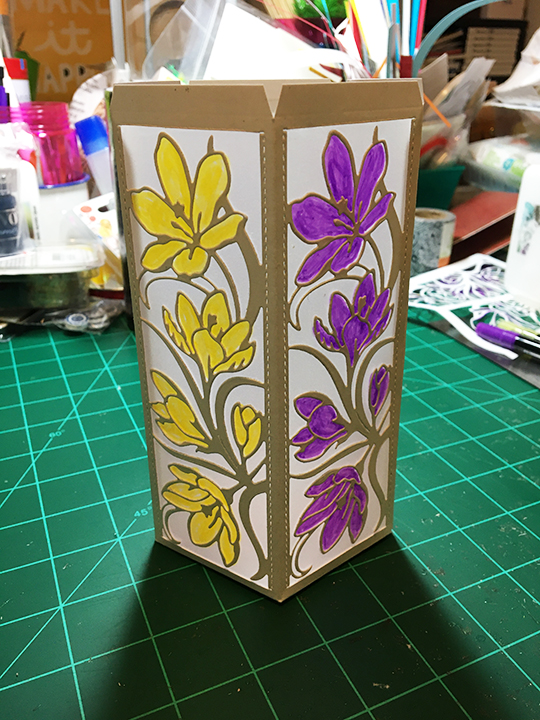
When the crocus start blooming in their purples and yellows, spring can not be far behind. This tall tealight holder is reminder that spring is coming.
Th intricate die cut is a design by Christina Griffiths of Card Making Magic that was the free gift in Die-cutting Essentials issue 73. The pentagon base is from a Tonic Craft Kit 25. Colored vellum panels behind the die-cut cardstock sides defuse light.
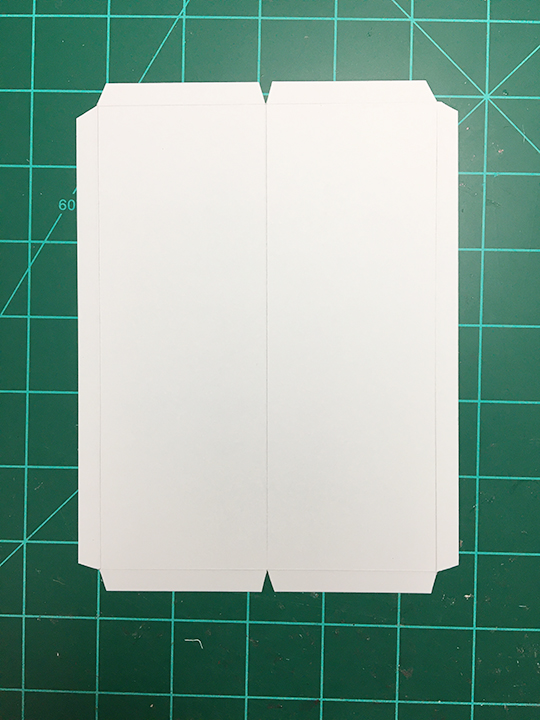
Materials: Cut two 5 inches x 6 ¾ inches (12.5 cm x 17 cm) rectangles, one 2 ¾ inches x 6 ¾ inches (7 cm x 17 cm) rectangle from heavy white cardstock, and five vellum rectangles 2 ¼ inches x 6 ¼ inches (5.5 cm x 15.75 cm). Die-cut a sixth panel from scrap cardstock to use as a stencil. Die-cut one pentagon from heavy white cardstock.
Die-cut Sides: Score all three white rectangles along all four sides at ¼ inch (3 cm). On the two larger rectangles score down the center at 2 ½ inches (6.25 cm). Place die centered inside score lines on all five sections and cut. (Hint: Because this an intricate die, you may need to add cardstock shims to get a good sharp cut throughout the die. I rolled the die through three times to cut the thick cardstock.) Using fine tipped scissors or a craft knife and metal ruler, trim off the attached top and bottom pieces of the die-cut.
Vellum Panels: Tape a vellum panel to the front of the stencil and turn the vellum and stencil over to color the crocus flowers through the stencil onto the backside of the vellum. Once all panels are colored, glue to the back of the die-cut panels. Once glued, touch-up the coloring on the backside of the panel. (Hint: Depending on what type of markers are used to color the vellum, ink can transfer to the white cardstock, so coloring the backside away from the cardstock is best.)
Assembly: Trim away the squares created by the score lines on the white cardstock pieces and cut the tab corners off as shown in photograph. Fold the two double panel pieces down the center score line and burnish with a folding tool. Fold the five bottom tabs and burnish. Fold and burnish the six long side tabs.
With two of the panels lying flat on your work surface, align the panels and glue the two tabs together. Pinch until the glue sets. Repeat until all but the last set of tabs are glued. Allow glue to dry. Gently fold the glued sides and burnish by pinching the sides together to have crisp folds. Glue the final tabs laying panels flat and reaching in, to pinch tabs until glue sets. Allow glue to dry. Fold and burnish the last corner. Drop pentagon base into center of holder and work under the three seams. Glue tabs to bottom of pentagon.
Add your battery powered tealight. (Note: because this light holder is made from flammable paper, do not use candles with real flames.)
Thank you for reading this blog post. Please like and leave a comment. 😊
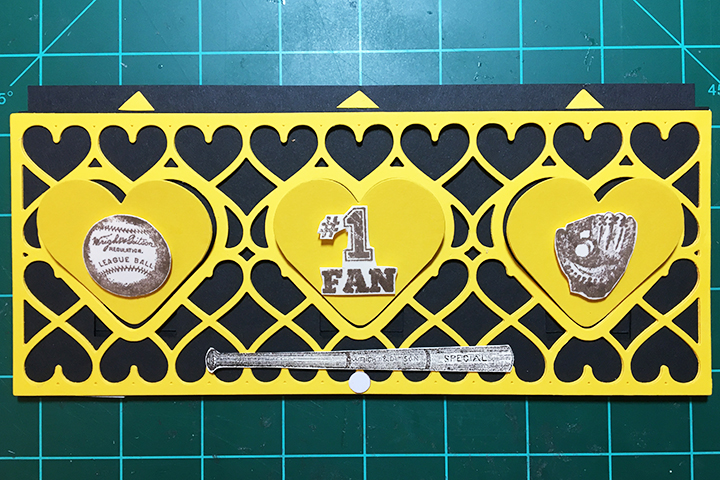
Card base is cut from heavy black cardstock. It is a rectangle 8 5/8 inches x 7 inches and folded in half to form a 3 ½ inch x 8 5/8 inches card base. The slider arm and easel panel template was printed also on heavy black card stock.
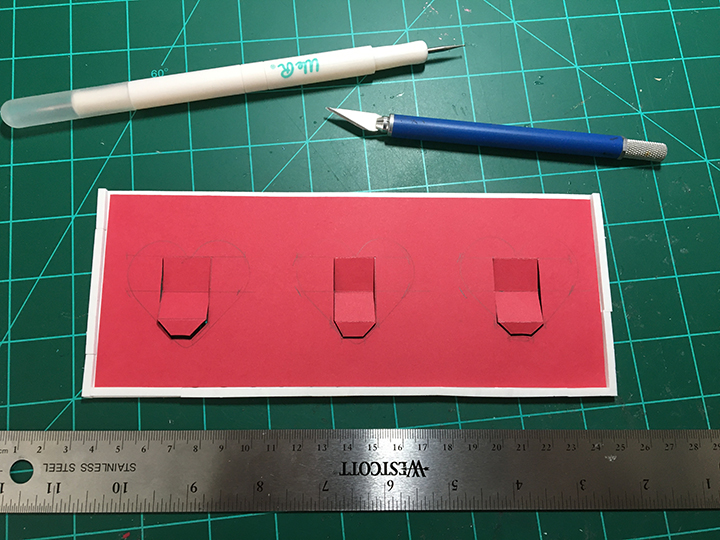
Split-Slider: This split slider is based off Spellbinders Large Die of the Month for January 2021. The three mini easels were drawn and cut based off the three heart openings in the slimline die. (You can download a template for the horizontal split slider in the Materials Usedsection below.) The slider arm is horizontal rather than vertical as previous cards were. (Hint: Rectangular easels that will slide under the heart frames eliminate a catchpoint for the easel.)
You can glue the easel panel to the back of the lacy panel as long as you don’t glue the easel tab area at the bottom of the heart frames. Just put glue around the outer edge of the lacy panel.
Because the top lacy panel is adhered on three sides to the card base and needs to be raised, I used foam tape strips to raise the panel. (I like Stampin’ Up’s foam adhesive strips because they are precut and narrow enough to fit along the edge of the lacy panel.) Adhere the easel tabs to the slider arm before removing the backing paper of the foam tape.
You may have to help fold the easels into the fully opened position the first time to train them. Once satisfied with the slider/easels’ movement, remove panel backing tape paper and adhere to card base lining up the lacy panel with the top fold edge of the card base. (Note: The top edge of the slider arm (the pull bar) should jut out over the card base so that fingers can easily pinch the bar and pull up.)
Pull-Bar: The long pull bar or top edge of the slider arm is reinforced with a thick cardstock strip. Three yellow arrows are glued to the pull bar and a white dot for the place to hold the card when pulling up the slider arm. (For good CRX – I add a slip of paper to the card when mailing to show how to open the card.PDF of slipdownloadis inMaterials Used.)
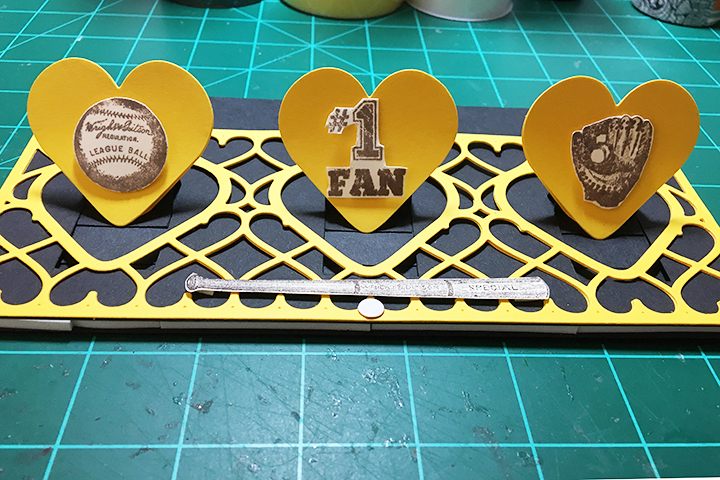
Decorating the Easels: Because I had cut the lacy panel three times, I had plenty of the heart cut outs. I used three yellow hearts to form the easel bases that are folded at the tip of the heart when adhered to the slider easel. Three more yellow hearts are glued only at the rounded tops to the easel base hearts.
Using foam squares I adhered stamped baseball equipment to the yellow hearts and placed a bat under them.
Make sure you don’t glue anything that will impede the easels from moving.
The foiled “Happy Valentine’s Day” sentiment and stamped “Take me out to the ball game” are adhered to the inside of the card with double sided tape.
Thank you for reading this blog post. Please like and leave comments 😊
If you enjoy reading about the card I make, please follow ullysworld489442913.com.
Valentine’s Day is coming and a handmade card, reminiscent of folk art hearts and flowers, fancy chocolate boxes and old-fashioned lacy Valentines, maybe just the thing for your loved one.
Split-Slider: This split slider is based off Spellbinders Large Die of the Month for January 2021. The three mini easels were drawn and cut based off the three heart openings in the slimline die. (See previous split slider posts for more detailed directions.) The slider arm is horizontal rather than vertical as previous cards were. (Hint: Cut rectangular easels that will slide under the heart frames to eliminate a catchpoint for the easel.)
You can glue the easel panel to the back of the lacy panel as long as you don’t glue the easel tab area at the bottom of the heart frames.
Because the top lacy panel is adhered on three sides to the card base and needs to be raised, I used foam tape strips to raise the panel. (I like Stampin’ Up’s foam adhesive strips because they are precut and narrow enough to fit along the edge of the lacy panel.) Adhere the easel tabs to the slider arm before removing the backing paper of the foam tape.
You may have to help fold the easels into the fully opened position the first time to train them. Once satisfied with the slider/easels’ movement, remove panel backing tape paper and adhere to card base.
Decorating the Easels: Because I had cut the lacy panel three times (once from lightweight cardstock and twice from heavy weight cardstock), I had plenty of the heart cut outs. I used the lightweight hearts so form the easel base that was folded at the tip of the heart when adhered to the slider easel. The decorated heavy weight hearts are glued only at the rounded tops to the easel base hearts.
I used flowers and greenery left from other projects on the outer hearts and then I foiled the center heart with a coordinating foiling plate from the Spellbinders Glimmer Plate of the Month for January 2021.
Make sure you don’t glue anything that will impede the easels from moving.
Pull-Bar: The long pull bar or top edge of the slider arm is reinforced with a thick cardstock strip. Three holes were punched, and ribbon looped through for pulls. (If I were to make this card again, I would make the card base narrower so no ribbon pulls would be needed. See free template download under Materials Listed)
The foiled “Happy Valentine’s Day” sentiment is attached with foam squares. Nuvo Glitter Drops were added to the lacy panel.
When sending this card, I would enclose a slip of paper with directions on how to open. (See split-slider CRX Sheet download.)
Thank you for reading this blog post. Please like and leave comments 😊
During these COVID 19 times when we all are having to be more isolated, it is relaxing to dream of traveling once again. Here is a card that depicts that dream.
Split-Slider: Print split-slider template (download under Materials Used) onto light blue lightweight cardstock and then cut out the top panel and slider arm around the outer red cutting lines. (Note: The printed side of the cardstock will be the back of the panel and when assembled will not be seen.) Using a craft knife and a metal ruler, cut the top panel’s eight mini-easels on the red lines. Next, using a scoring tool, score the green and blue fold lines – green being valley folds and blue mountain folds.
Because the top panel is adhered on three sides to the card base and needs to be raised the thickness of the lightweight cardstock slider arm, place two layers of double-sided tape on the long sides and bottom of the panel making sure not to cover the red lines of the easels. A single layer of double-sided tape should be placed on each of the narrow tabs of the eight mini-easels. (If you are using tape that is wider than the tabs, trim off excess.)
To adhere the slider arm to the mini -easel tabs, first, using low-tack tape, tape the front side of the easels shut. (This will ensure that the easels are adhered to the slider arm in the shut/flat position.) Position the slider arm over the back of the panel, making sure there is at least an 1/8 inch/3 mm gap between the tape along the panel edges and the slider arm. Hold the slider arm in place and remove the backing tape on the lowest easel and adhere to the slider panel. Repeat removing tape backing and adhering each easel. Once slider arm is attached to easels, turn over and remove low-tack tape. Test the slider. You may have to help fold the easels into the fully opened position the first time to train them. Once satisfied with the slider/easels’ movement, remove panel backing tape paper and adhere to card base. (Hint: If parts of the mechanism is catching, place some clear tape over the edge that is catching such as I did with the circle on the pull-tab pictured below.)
Decorating the Easels: I have had these hot air balloon charms from Blue Fern Studios for awhile. To make the dirigible dangle, I’ve used some sturdy plastic strips cut from packaging as the posts to string the charm on monofilament fishing line. The smaller charms are on foam tape glued to the plastic strips. Clouds were embossed in dies using the embossing sandwich for my die cutting machine, then die-cut, inked with Distress Ink and then painted with Nuvo Glitter Gloss pen. Make sure you don’t glue anything that will impede the easels from moving.
Two white 1-inch circles were cut using a paper punch and glued to the circle pull-tab – on front and back side of the slider arm. A hole was punched to thread a piece of shimmery ribbon through as a pull.
More of the ribbon was used to decorate the front of the card. I was careful not to get glue inside any of the slider easels or their slider tracks.
The “enjoy the journey” sentiment charm is attached with foam squares.
Envelope: The back flap of the envelope was stamped with a Sara Davies Nautical Collection sentiment “Adventure awaits” to hint at the enclosed card is about.
I enclose a slip of paper with instructions on how to open the card. (See split slider CRX sheet download below.)
Thank you for reading this blog post. Please like and leave comments 😊
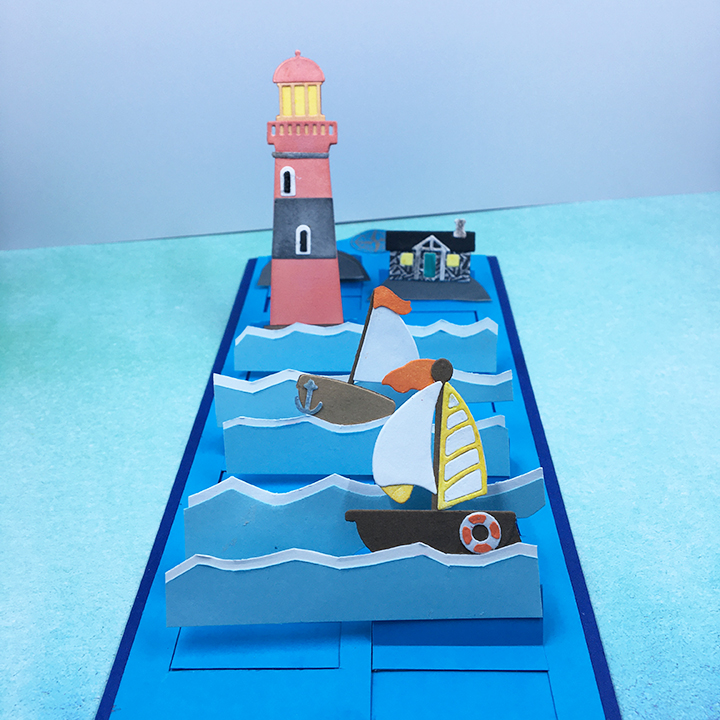
Life gets rough and choppy sometimes and life isn’t always smooth sailing. Sometimes our friends need to be encouraged to take a chance and try something new. This interactive card is for those times.
This card is the first of a series to use my Ully Cat Designs’Split-Slider Slimline template.
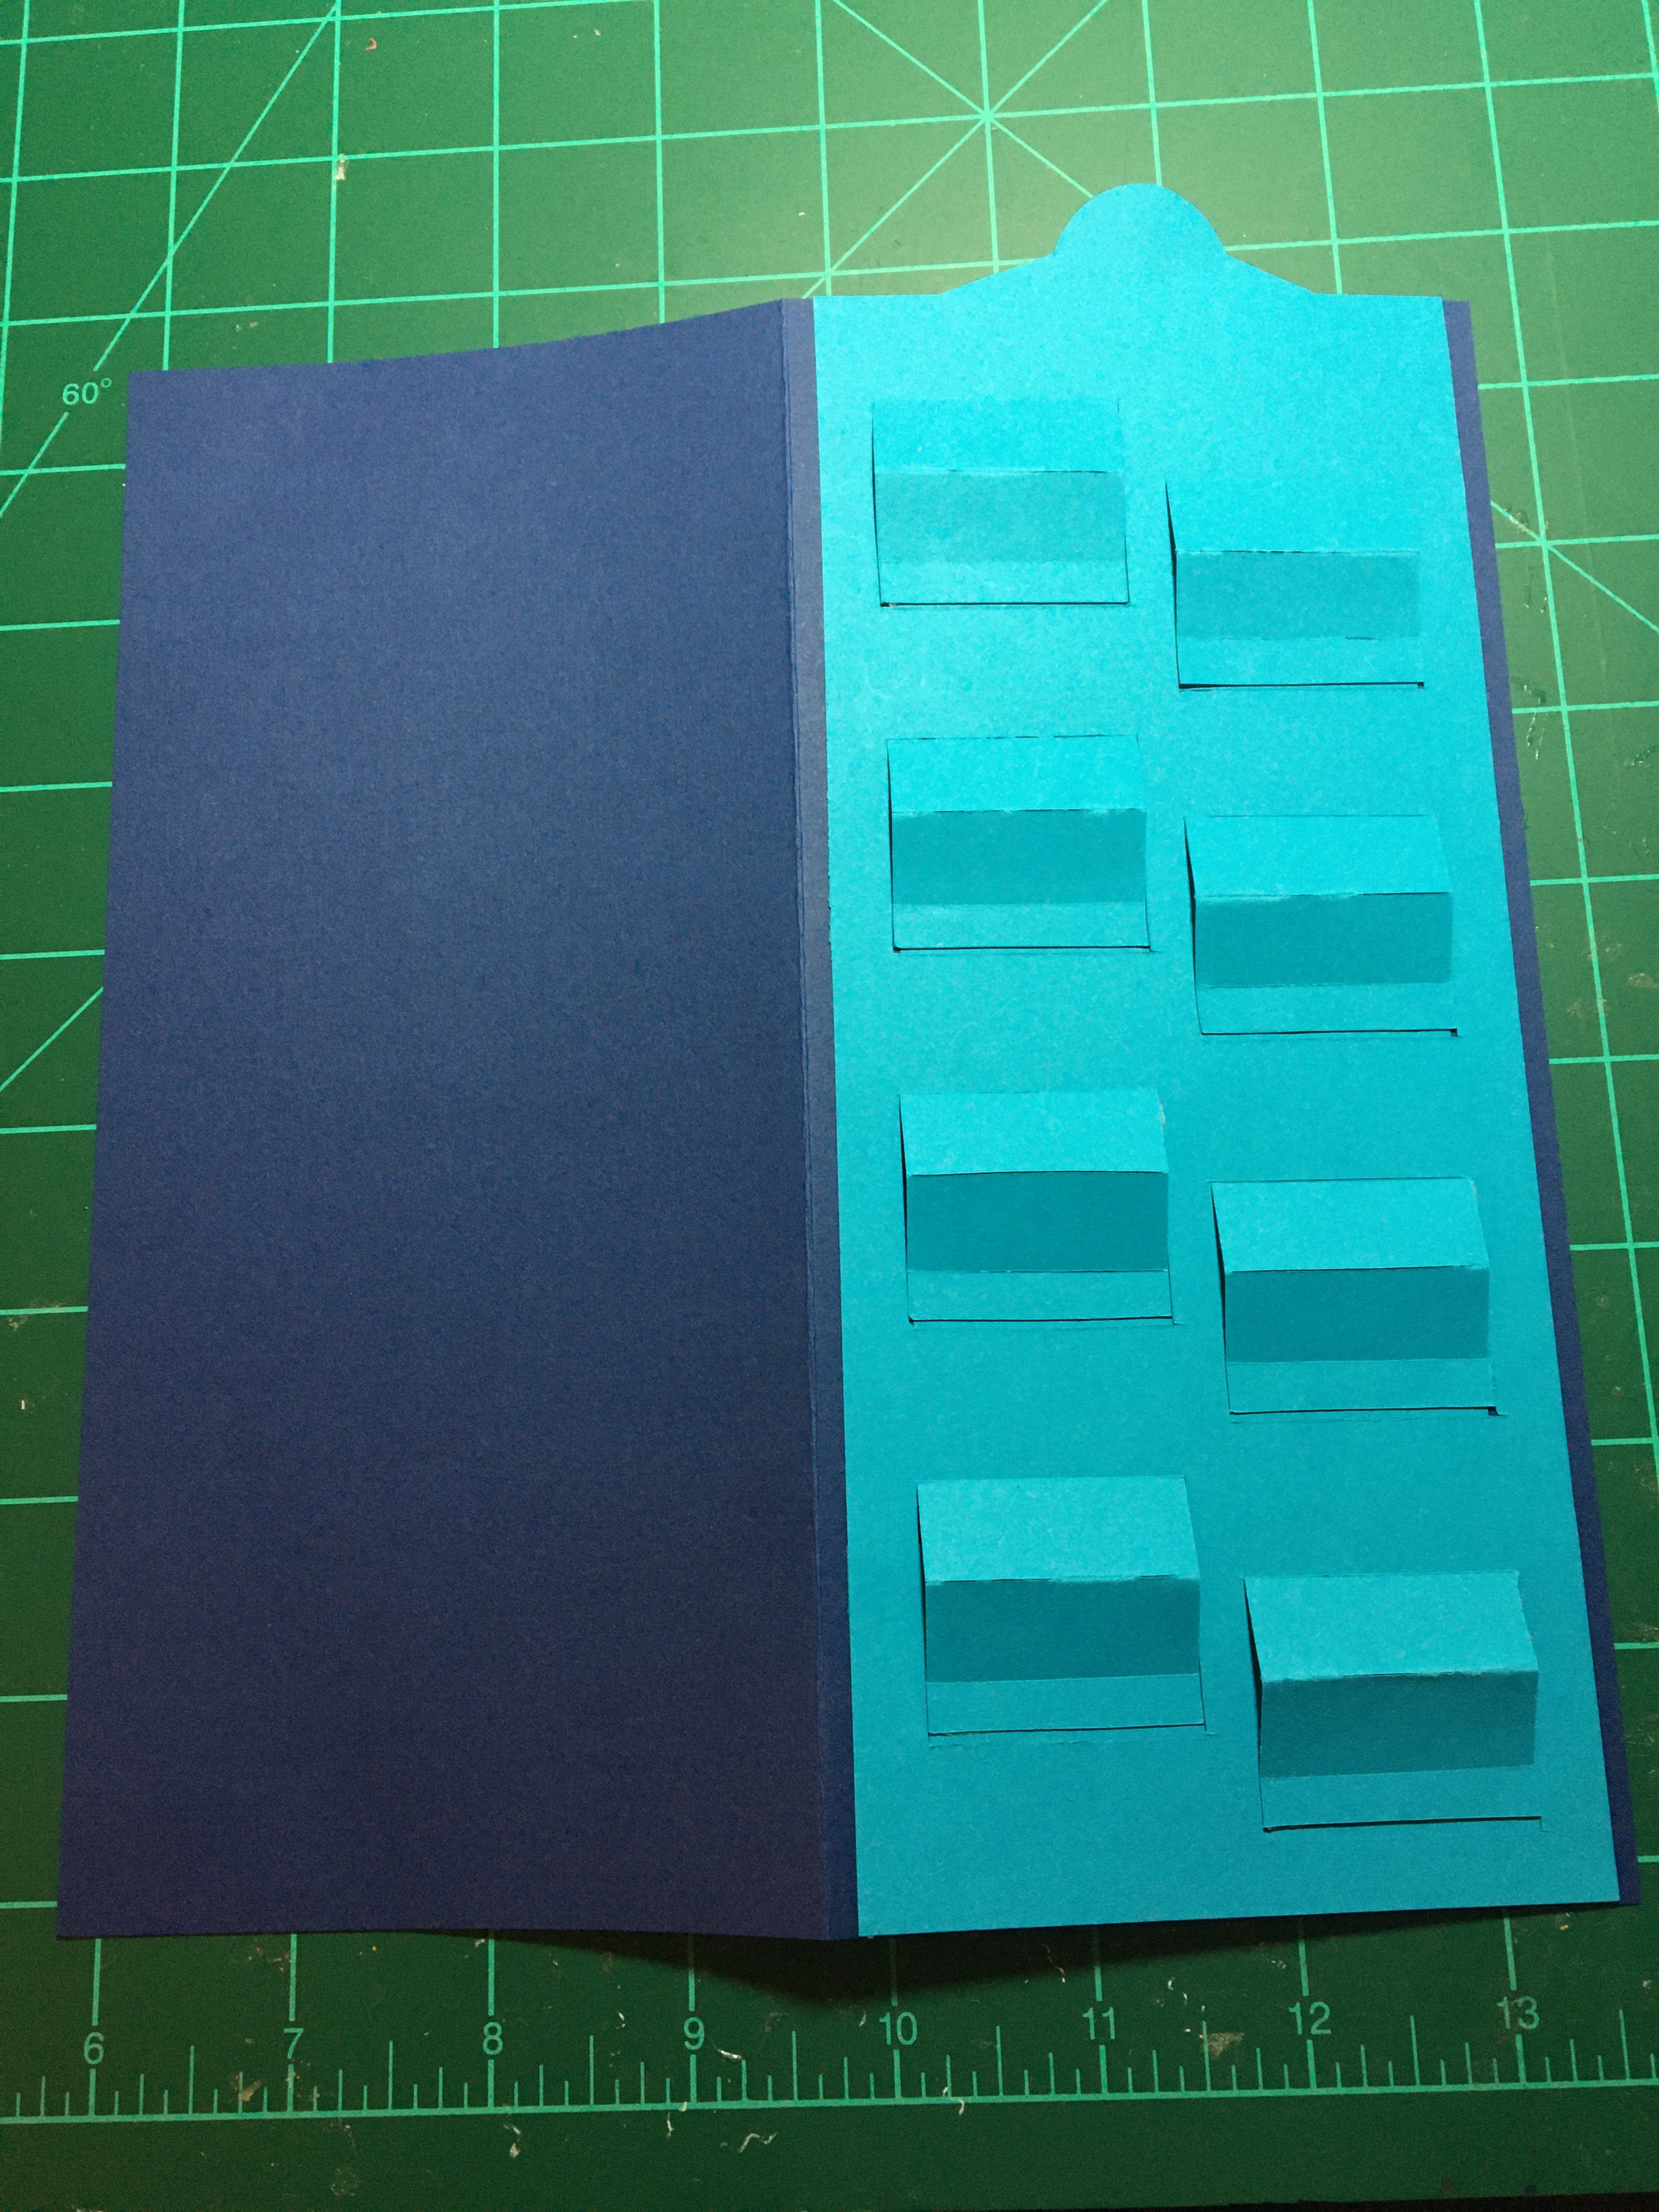
Split-Slider: Print split-slider template (download under Materials Used) onto bright blue lightweight cardstock and then cut out the top panel and slider arm around the outer red cutting lines. (Note: The printed side of the cardstock will be the back of the panel and when assembled will not be seen.) Using a craft knife and a metal ruler, cut the top panel’s eight mini-easels on the red lines. Next, using a scoring tool, score the green and blue fold lines – green being valley folds and blue mountain folds.
Because the top panel is adhered on three sides to the card base and needs to be raised the thickness of the lightweight cardstock slider arm, place two layers of double-sided tape on the long sides and bottom of the panel making sure not to cover the red lines of the easels. A single layer of double-sided tape should be placed on each of the narrow tabs of the eight mini-easels. (If you are using tape that is wider than the tabs, trim off excess.)
To adhere the slider arm to the mini -easel tabs, first, using low-tack tape, tape the front side of the easels shut. (This will ensure that the easels are adhered to the slider arm in the shut/flat position.) Position the slider arm over the back of the panel, making sure there is at least an 1/8 inch/3 mm gap between the tape along the panel edges and the slider arm. Hold the slider arm in place and remove the backing tape on the lowest easel and adhere to the slider panel. Repeat removing tape backing and adhering each easel. Once slider arm is attached to easels, turn over and remove low-tack tape. Test the slider. You may have to help fold the easels into the fully opened position the first time to train them. Once satisfied with the slider/easels’ movement, remove panel backing tape paper and adhere to card base.
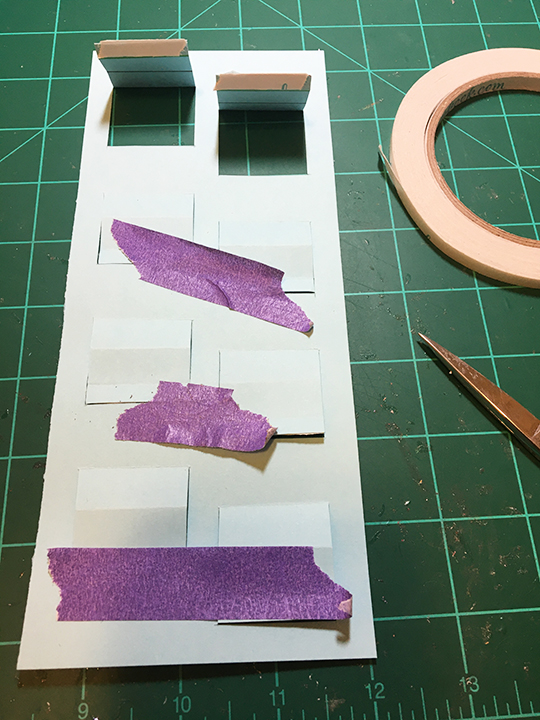
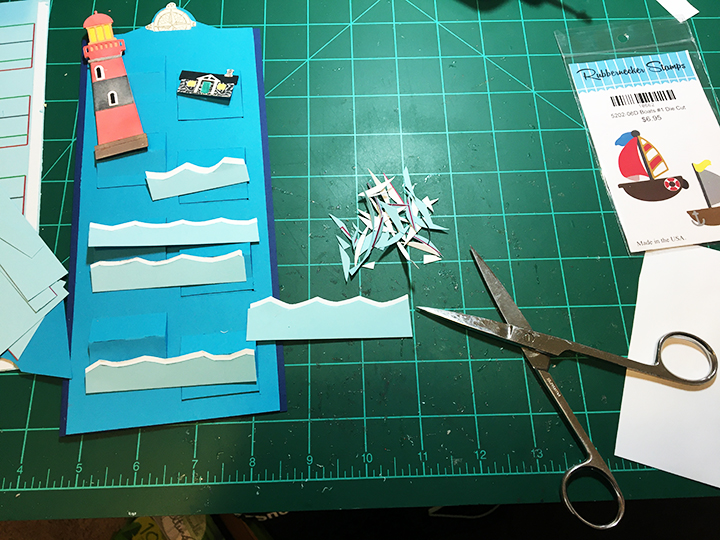
Decorating the Easels: For my die-cut lighthouse and boats, I used Distress Oxides and Inks to color the lighthouse and boat flags, a black gel pen for windows and a silver gel pen to color the anchor. The lightkeeper’s house is cut from a pattern paper and colored with pencil for the grey stone. The blue and white layered sea waves are cut freehand as is the rocky land masses for the three easels around the lighthouse. Make sure you don’t glue anything that will impede the easels from moving. (Note the 2nd & 4th waves on my card have been trimmed to allow the easel in front to operate.)
The gold heat embossed compass on the pull-tab of the slider arm, was stamped on a separate peace of cardstock, embossed and them fussy cut. The compass adds sturdiness to the pull-tab. (Depending on the thickness of your cardstock, you may want to add another circle on the bottom of the pull-tab as well.)
The “SEAS the Day” sentiment is attached with foam squares between two easels and is not adhered to any moving parts.
Inside Decorations: You can decorate as you would normally inside the card. Because of the dark card base, I used paper that looks like an old ship’s log, to stamp the inside sentiments “Enjoy life’s journal” and “We cannot control the wind, but we can direct the sails.”
The back flap of the envelope was stamped with a Sara Davies Nautical Collection sentiment “Adventure awaits” to hint at the enclosed card is about.
I enclose a slip of paper with instructions on how to open the card. (See split slider CRX sheet download below.)
Thank you for reading this blog post. Please like and leave comments 😊
According to the Language of Flowers, a small book that Amazon Drygoods reprinted from its Victorian original, lilies of the valley mean a “return of happiness.” And so to, does this card promise happiness from it envelope through to its inside message.
Based on a panel die from Tutti Designs, that was die-cut twice (one white cardstock and one green paper), this card comes together with its sentiments. The front “With love” is a foiled strip on scrap cardstock. (Sometimes when my mojo is lacking, I make a batch of foiled sentiments to have on hand.)
Inside the sentiment is heat embossed onto vellum. The longer sentiment is:
“Let us be grateful
to people who make us happy;
they are the charming gardeners
who make our souls blossom.”
Only liquid glue was used in the assembly of the card.
The back flap of the envelope was stamped with a Card Making Magic sentiment “OPEN immediately to release happiness!” to hint at what the enclosed card is about
White elephants can be seen as special creatures in some cultures. This white elephant card was made to cheer up a friend going through some difficult times.
I was trying for a rich and silky effect by doing a blend of sunrise colors over a cut and embossed background that was then gone over with a Cosmic Shimmer Opal Blaze Polish to make it shimmer. The card base is made from shimmer paper as well.
The elephant’s headpiece and covering also have some of the opal blaze polish. The leafy heart die cut was adhered with foam squares to the embossed layer, and the elephant glued to the leaves.
The foiled sentiment was one that I had made previously in a foiling session. It is adhered with foam squares.
Sequins finish the decorations.
Althrough not pictured, I stamped the back envelope flap with “sending you love and Kindness” from a Hero Arts using an ombre ink pad.
Thank you for reading this blog post. Please like and leave a comment. 😊
Having just discovered i-crafter dies, I had to try out their Heart Hands, Wiper Insert die set.
For this quick card I used a printed card base designed by April Comell from my stash. Because it is a heavy cardstock, I decorated with thin papers, but used a lightweight dark blue scrap of cardstock for the main wiper mechanism and a medium weight cardstock scrap for the hands.
I watched Lynda Kanase’s assembly video a few times before making the card. The mechanism is a simple one that could be used with other things that wave or move. The hand dies have slight embossing for fingernails that you could paint red for nail polish.
After deciding to make this a Valentine’s card, I used my favorite Karen Burniston die for “Happy Valentine’s Day” cut once in white and again in red and off set for the inside. I used the “Love” sentiment die that is part of the Heart Hands set for the front of the card.
The lacy white trim is an older Joanna Sheen die used whole on the front and cut in half for inside the card.
As is my style, I stamped the back of the envelope with a BoBunny hearts stamp in a red ink to hint as to what is inside.