Santa’s Sleigh Pop-Up

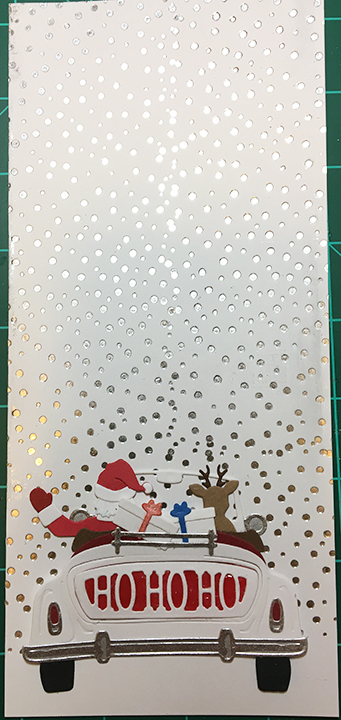
A wet snowy night for Christmas Eve and Santa and his reindeer are feeling a bit blue with the weather, but whoever receives this card will be cheerfully surprised when Santa pops-up.

This is a slimline card version of a non-traditional color scheme Santa scene that I used on another project that will be unveiled during the sneak peak week of Karen Burniston’s December 2022 release.

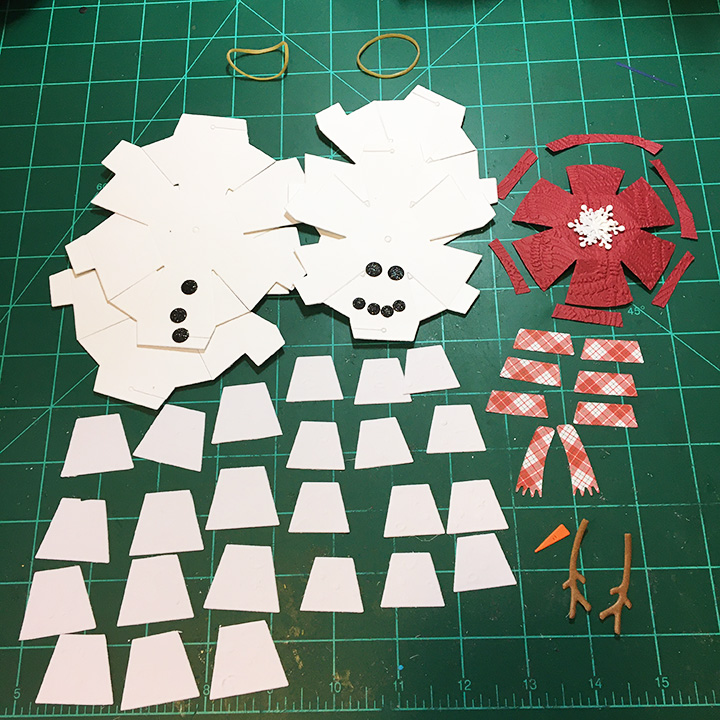
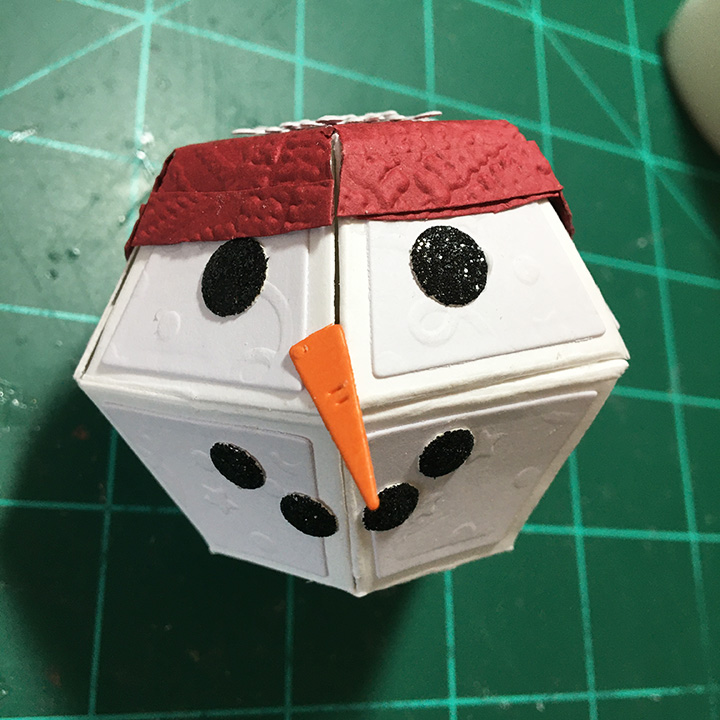
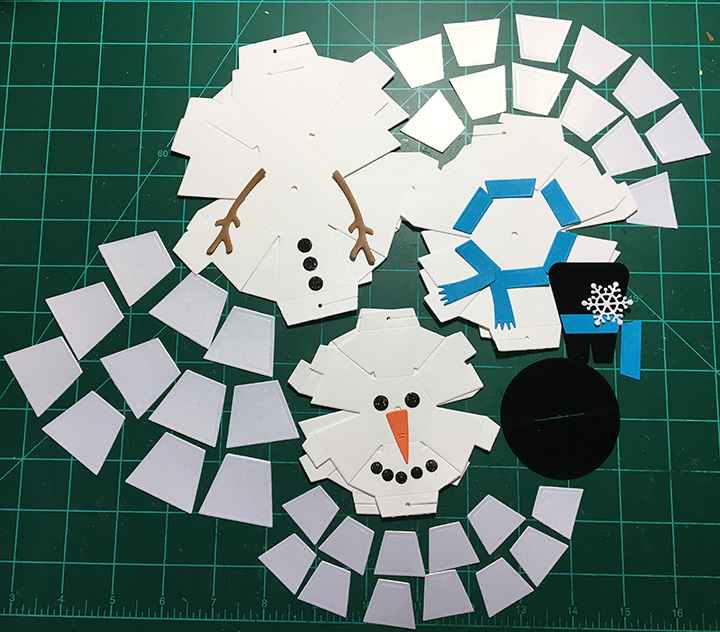
To create the the inside pop-up scene, I used four of Karen Burniston’s previously released die sets – Sleigh Pop-Up, Christmas Animals and Gnome and Santa. I had to reverse the direction of the sleigh to make it work with the reindeer dies. The reindeer are each made up of two die cuts that are glued together at their antlers and have the face colored on the front side only, but with narrow strips of cardstock forming “U” shaped bases for the feet to be glued onto. Blue and white baker’s twine is glued on to the reindeer for the harness and reins.

The front sentiment and pine branches are all by Karen Burniston. The tiny bows are from the sleigh die set while the pine branch is from the Holiday Charms set.

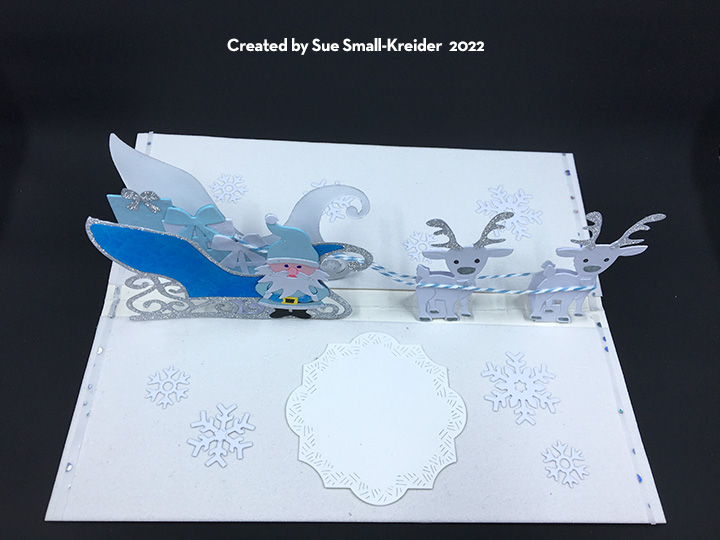
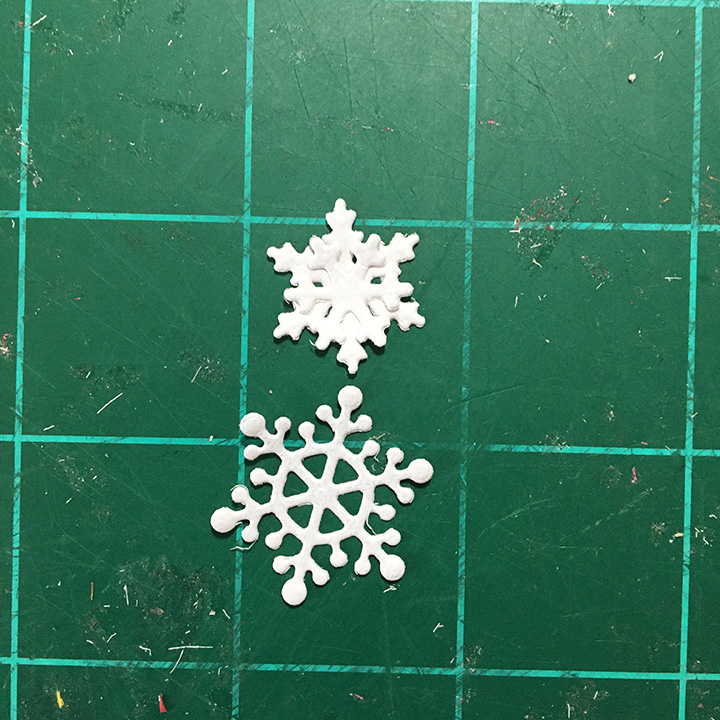
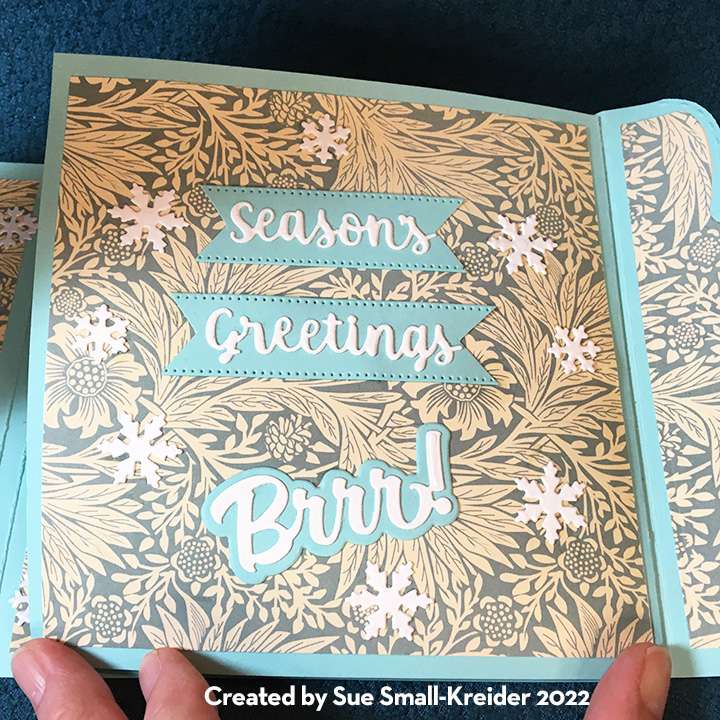
Velvety flocked paper lines the inside of the card with crisp white snowflakes (from holiday charms and sleigh die sets) and a fancy edged label for a personal message finish the inside scene.

As per my usual, I like the back of the envelope to hint at what is to come. The stamps are by Paper Discovery.

Materials Used:

Dies

Papers

  • Recollections – Signature Especial 12×12 Foil Paper – Silver Glitter -220520
  • Spellbinders -8.5×11″ sheets of 100lb. Cardstock – Waterfall – CS-017
  • Stampin ‘Up – 12×12″ Specialty Vellum – Snowflakes
  • Stampin’ Up – 12×12″ Snowy White Velvet Sheets
  • Brazzill – 12×12″ Cardstock -Coconut Swirl
  • Pink, Black and Yellow Cardstock Scraps

Inks

  • Blue and Pink Fine-Tipped Markers
  • Sakura – Gelly Roll Pen – Silver -XPG#744
  • Ranger – Tim Holtz – Distress Ink – Salty Ocean
  • Stampin’ Up – Classic Stampin’ Pad – Blueberry Bushel

Stamps

  • Paper Discovery by Olga Direktorenko – A5 Clear Stamps – Rustic Christmas – Christmas Sentiments

Miscellaneous

Brr, It’s Cold Outside!

Sometimes it’s nice just to watch it snow with a warm cup of coffee or hot coco.

This fun mini-slim sized card is a blend of stenciled coffee cups and a die-cut snowflake collage pop-up. All the dies used are by Karen Burniston while the layered stencil is by Pretty Posh Pink. The coffee cups by both designers are similar in size and work well together.

I went through all my Karen Burniston die sets to find as many different single snowflakes as possible to use for the swirling collage mechanism inside the card. (I recommend watching the assembly video before starting your card. The video has useful tips and card base minimum sizes that will help you design your card.)

The sentiments all come from Karen Burniston’s Word Set 13 – Snow and include the shadow dies for the large words of “Brr!” and “Snow.” The mug and travel coffee cup inside are all die-cuts inked similar to the stenciled ones on the card front.

As with all my cards that are sent in an envelope, I have decorated the back flap with a hint of what’s inside. This time I stenciled a coffee mug on the flap.

See more coffee themed cards by clicking here.

Thank you for reading this blog post. Please like and leave comments 😊

Materials Used:

Dies

Stencils

  • Pretty Pink Posh – 6×6 Stencil – Layered Coffee Cups

Ink

  • Ranger – Tim Holtz – Distress Oxides – Festive Berries, Saltwater Taffy, Ground Espresso, Pumice Stone, Hickory Smoke, Mowed Lawn, Crushed Olive, Prize Ribbon and Tumbled Glass

Papers

  • Stampin’ Up – 6’ x6” Specialty Designer Series paper – Lights Aglow
  • Blue and White Medium Weight Cardstock
  • Simon Says Stamp – Mini Slimline envelope – Grocery Gag

Miscellaneous

Thanksgiving Leaves

November winds are working the last of the leaves off the trees as we go to celebrate Thanksgiving.

A fun little pop-up card using Karen Burniston dies and some thread to dangle fallen leaves from in the two open ovals. The pop-up mechanism, small trees, small ovals, and grass are from the Oval Frames Pop-up set.

The leaves and large tree are from the Tiny Trees Pop-up set. And the large oval and frame are made using the Oval Crosshatch dies. While acorns are from the Autumn Elements die set, the grass pieces are scraps from another project.

I glued two leaves together with a bit of cotton thread between them and then sandwiched the threads between two of the oval pop-up frames.

The sentiment is cut from two different shades of brown using the Autumn word set.

For a place to write a personal message, I used medium crosshatched ovals with two leaves as decoration.

As with all my cards that are sent in an envelope, I have decorated the back flap with a large oak leaf from the Autumn Elements die set.

Thank you for reading this blog post. Please like and leave comments 😊

Materials Used:

Dies

Papers

  • Rubbernecker – 6 x6 Paper Pad Double-Sided Papers 80# Cardstock – Autumn Leaves
  • A2 Brown Kraft Paper Card and Envelope

Miscellaneous

  • White Cotton Thread

Snow in review

Over the past few years, I’ve made a few cards featuring snow and thought it might be fun to review them again.

Early Christmas Cards

12 Days of Christmas Trees – Day 4

Let It Snow Shadow Box

Snowy Forest Day

A Snowy Drive with Santa

Warmish Winter Wishes

Santa Vintage Trifold

Winter is in the Air

Snow Days

Snowy Good Morning

Hillside Holiday Wishes

Silent Night in the Village

Winter Mail

Scandinavian Snowman

Meet The Snow Family

Happy Autumn Colors

Autumn can be such a happy, colorful time with much to be thankful for in life.

This card uses Karen Burniston’s Label Charm Pop-Up and her Autumn word set. Colorful double-sided paper makes this card pop.

I decided to make a cardbase mistake into a proper card. I had cut the main pivot Label Charm Pop-Up die through both front and back of an A6 cardbase (6 1/4 x 4 1/2 inches) and used the smallest fancy label die from the set with two small strips to connect the two pivot labels.

My favorite way to make the Label Charm Pop-Up is to figure out the mechanics with a thin cardbase and then cover it with decorative papers. The frames around the pivots are the waste from cutting the out. Because of catch-points the frames create, the sharp points of the frame are trimmed to allow the fancy label to pivot freely.

Double cut the sentiments from different colors and stagger the layers to create shadows as well as some dimension.

Final elements on the card are decorative strips from the paper collection.

Continuing with the autumn leaf theme, I stenciled colorful leaves onto the back of the envelope.

Thank you for reading this blog post. Please like and leave comments 😊

Materials Used:

Dies

Papers

  • Sunny Studio – Double-Sided 6×6 Cardstock – Critter Country
  • Park Lane Paperie – A6 Cardbase and Envelope – Ivory

Inks & Stencil

  • AlteNew – Grape Leaves Mask Stencil
  • Ranger – Tim Holtz’s Distress Oxide – Barn Door, Mustard Seed and Ripe Persimmon

Miscellaneous

Meet the Snow Family – Baby Snow

This card is part of the Karen Burniston Design Team snowmen challenge for November.

Today, I’m show you how to Baby Snow.

Baby Snow is comprised of the Mini Ball Pop-Up and the Bitty Ball Pop-Up with his coal features and scarf from the Snowman Add-Ons. His smaller carrot nose and stick arms are from the Snowman Twist Circle set while his cap is custom made.

Cut two of the Bitty Ball halves and two of the Mini Ball halves. (I was able to get all the pieces from a single sheet of 8.5×11 inch cardstock.) I find watching the assembly videos for the balls very useful. (Bitty Balls, Mini-Balls) Numbering the order of gluing the tabs is useful for the assemble of the balls. I cut all the trapezoid panels from an embossed white cardstock. And the ball halves are cut from a 100 lb. smooth white cardstock.

Assemble the balls as shown on videos, including a brad in the bottom of the Bitty Ball. (I didn’t have a brad when I made Baby Snow, so I improvised with a pipe-cleaner. I works, thin wire would be a better choice as the pipecleander adds bulk to the bottom of the card.)

Add facial features to the mini ball. The hat is one half mini ball cut in red, embossed with a knitted pattern embossing fold, and then trimmed down to fit the head. Once glued on, a three snowflake pom-pom was added to the top.

The scarf pieces are glued to the top of the Bitty ball edges and a full-size hexagon is traced using the die to cover the top of the body.

The ear flap and bill of the hat were free handed pieces cut first from scrap paper and once correct size traced onto the red cardstock and fussy cut. Some red and white twine was added when gluing on the ear flaps.

Once the decorations are complete attach Baby Snow to the card base.

Learn more about how each member of the Snow Family was created in these blogs:

Thank you for reading this blog post. Please like and leave comments 😊

Materials Used:

Dies

Papers

  • Spellbinders – 100 lb cardstock – Waterfall
  • Hot Off the Press – Black Suede
  • Hot off the Press – Black Glitter Cardstock
  • Blue, orange, brown, red and white cardstock scraps
  • Recollections – 8.5×11 White gold shimmer cardstock
  • Staples – 8.5×11 Printable glitter paper

Miscellaneous

Meet the Snow Family – Mama Snow

This card is part of the Karen Burniston Design Team snowmen challenge for November.

Today, I’m show you how to make Mama Snow.

Mama Snow is comprised of all three balls – the Mini Ball Pop-Up, the Bitty Ball Pop-Up and the Surprise Ball Pop-Up with all her facial features, hat and stick arms from the Snowman Add-Ons. Her cape is made from the Mini Ball and Bitty Ball dies and her hat is cut down from the Snowman Add-ons set.

I find watching the assembly videos for the balls very useful. (Bitty Balls, Mini-Balls and Surprise Balls) Numbering the order of gluing the tabs is useful for the assemble of the balls. I cut all the trapezoid panels from an embossed white cardstock. And the ball halves are cut from a 100 lb. smooth white cardstock.

Assemble the base Surprise Ball in all white with a brad threaded through the bottom hole. The middle and head balls are of graduating size and are decorated with the blue cape and collar pieces before assembling.

The blue cape is made by cutting one half of a Mini Ball in blue and trimming as shown in the photos. I glued it to the bottom of the ball first before assembling the ball. (Note that one panel of blue was cut off and the corners facing the missing panel were curved and not glued down. The missing panel area is where the mouth will be for the face.)

The cape is cut using the same blue cardstock using one half of a Bitty Ball. Cut a thin stripe out of the front of the cape and curve the bottom corners. Glue down stick arms to sides of Bitty Ball. Glue all of the cape to the top of the bitty ball, except for the curved corners.

Glue on facial features of coal eyes and mouth cut from glitter cardstock and an orange carrot nose. Docorate the cape and collar with snowflakes.

To assemble the hat, trim the tall top piece down to about 1/2 inch above the tab. Decorate brim with snowflakes from Snowman Add-Ons, Snowman Twist Circle or Snowman set.  Glue top of hat flap through the slot in brim. Glue hat onto top of head. Cut a piece of ribbon long enough to go over hat brim and under the head plus 2 inches. Glue middle of ribbon to top of hat and them flatten head and glue ends of ribbon to the bottom of head ball. (You will need this slack in the ribbon to allow the ball to fold flat.)

Now you can glue the three balls together to make Mama Snow. I glued the ribbon bow on after I had assembled her to get the correct placement.

You can now added her to the card base using the brad.

Learn more about how each member of the Snow Family was created in these blogs:

Thank you for reading this blog post. Please like and leave comments 😊

Materials Used:

Dies

Papers

  • Spellbinders – 100 lb. cardstock – Waterfall
  • Hot Off the Press – Black Suede
  • Hot off the Press – Black Glitter Cardstock
  • Blue, orange, brown, and white cardstock scraps
  • Staples – 8.5×11 Printable glitter paper

Miscellaneous

Meet The Snow Family – Papa Snow

This card is part of the Karen Burniston Design Team snowmen challenge for November.

Today, I’m show you how to make Papa Snow.

Papa Snow is comprised of all three balls – the Mini Ball Pop-Up, the Bitty Ball Pop-Up and the Surprise Ball Pop-Up with all his facial features, hat and stick arms from the Snowman Add-Ons.

I find watching the assembly videos for the balls very useful. (Bitty Balls, Mini-Balls and Surprise Balls) Numbering the order of gluing the tabs is useful for the assemble of the balls. I cut all the trapezoid panels from white gold shimmer cardstock. And the ball halves are cut from a 100 lb. smooth white cardstock.  Assemble the base Surprise Ball with a brad threaded through the bottom hole.

(I used the rubber bands recommended by Karen Burniston and had noted the number of knots for each size ball I used in the photo.)

Because the different size balls don’t cover the “shoulders” or top of neck of the snowman, I like to cut a full-size hexagon to cover this area by tracing the die and then cutting with scissors.

Once all the balls are assembled and decorated, glue the balls together. Next, you’ll attach the snowman to the card base with the brad.

Learn more about How each member of the Snow Family was created in these blogs:

Thank you for reading this blog post. Please like and leave comments 😊

Materials Used:

Dies

Papers

  • Spellbinders – 100 lb cardstock – Waterfall
  • Hot Off the Press – Black Suede
  • Hot off the Press – Black Glitter Cardstock
  • Blue, orange, brown, and white cardstock scraps
  • Recollections – 8.5×11 White gold shimmer cardstock
  • Staples – 8.5×11 Printable glitter paper

Miscellaneous

Meet The Snow Family

This card is part of the Karen Burniston Design Team snowmen challenge for November.

Today, I’ll introduce you to the Snow Family and then each of the next three days, I’ll explain how I made each member of the family.

In her August release, Karen Burniston has come out with some additional die sets that make putting together snowpeople so easy. An add-on character set includes the top hat and band, carrot nose, large and small circles for eyes, mouth and buttons, as well as stick arms and a large snowflake. The Double-Ups for the all the pop-up balls have the side trapezoids linked together to cut 6 pieces all at once, so with the original individual trapezoid dies, you can cut all 12 side panels in one pass.

I started with a pale blue card base of made up of two 6x 6 1/2 inch pieces. I scored the extra 1/2 inch at 1/2  and 1/4 inch to make tabs with a gusset to glue each piece to a central 6 x 6 inch square.

The decorative papers are 5 ¾ x 5 ¾ inches. (Flap assembly video) I cut the the flap from pale blue cardstock and two decorative panels from scraps of the decorative papers.  Off the back of the center section is where the flap is glued.

The flap dies set cuts six washers of which three are glued together for each of the circle brad cover. Glue the front decorative panel onto the flap. Using a sharp piercing tool, punch a hole in the center of the flap.

Glue the washers over the hole. I used a needle and thread to pull the twine through the hole leaving knot on underside of flap. Pull brad legs through hole and bend the legs onto the back of the flap and glue the twine in place on back of flap.

Glue the back decorative panel over the twine knot.  Cover back of card and flap tab with decorative paper.

Glue the front decorative papers to the card front. Mark the center of the front of the card base and pierce, glue the next two washers. Thread another brad through the hole Then thread the brad legs into the hole in the bottom of the bottom all of a snow person. (It is easier to add just the bottom ball and then build the snowperson onto this ball once it is attached to the card base.)

Once all the snowpeople base balls are attached to the card base and decorative papers cover the brad legs or wires, decorations can be added to the outside of the card panels.

The card is too thick to be mailed in any standard envelope to mail.

Learn more about How each member of the Snow Family was created in these blogs:

Thank you for reading this blog post. Please like and leave comments 😊

Materials Used:

Dies

Papers

  • Spellbinders – 100 lb cardstock – Waterfall
  • Hot Off the Press – Black Suede
  • Hot off the Press – Black Glitter Cardstock
  • Blue, orange, brown, and white cardstock scraps
  • Recollections – 8.5×11 White gold shimmer cardstock
  • Staples – 8.5×11 Printable glitter paper

Miscellaneous