It’s a snowy day as you walk through the woods of white birch trees and here the red cardinals singing their sweet song, and then he appears. The majestic stag, who quietly walks to the ridge and surveys his kingdom. Finally, you come to a small fir tree that has been decorated for Christmas. You know this is your destination and the faint tune of “We wish you a Merry Christmas” hums through your head.
This is the story I hope the recipients of this card have when they open the card.

I fell in love with the Creative Expressions Paper Panda Forest Stag die the first time I saw it and designed my card around this large die creating a 5 ½ x 8 ½ inches card using two pieces of heavy white cardstock. I went through my dies to find a large enough opening to go behind the stag that still left a sufficient border to keep the card sturdy. I used one from the Crafters Essentials I by Kat Scrappiness.
Having scored and folded both pieces of 8 ½ x 11 inch white cardstock in half, knew I had to cut the rectangular aperture in three of the four panels. Laying out how I wanted the front of the card to look with my dies, I cut two of the panels at the same time by putting the sheet folded in-half through the die cutting machine. Once the front and middle were cut, I laid-out how the second folded sheet of cardstock would overlap on the middle panel and traced the aperture opening onto the overlap panel. I cut this aperture with the cardstock fully open so a wide format die cutting machine was needed.
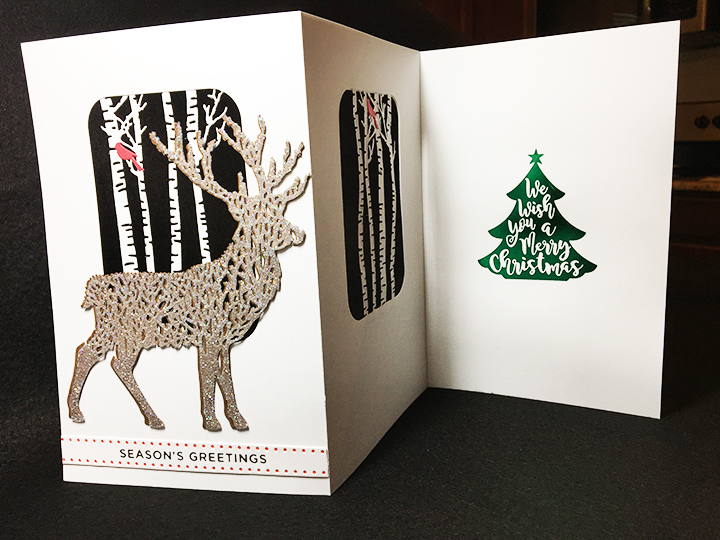
I didn’t have any birch trees long enough to fill the apertures so I scoured my favorite on-line crafting stores and found on my favorite discount die store Dies R Us the Impression Obsession birch trees with the tiny cardinal dies. I cut two sets of trees out from the same white cardstock as the card base. I cut two sets of cardinals (front and back) from red scrap cardstock.
To make the stag, I cut the shape three times from brown cardstock. The last of the three stags was cut from brown cardstock covered on one side with double-sided adhesive and then when the backing paper on the adhesive was pulled off I laid the piece on scrap paper and shook ultra-fine glitter over the adhesive to ‘frost” the stag much the same way you would cover an inked image to be heat embossed. The excess glitter should stay on the scrap paper so it can be put back into its storage container. Once glittered, I glued the three stag shapes together off setting, the glittered one on top to create a slight shadow.

Being new to heat foiling, I practiced some on scrapes before using the Christmas tree foiling plate on my good paper. The Glimmer Foiling System by Spellbinders is easy to use if you watch a lot of videos on how to use the system and follow the instructions faithful. I do not recommend doing heat foiling when you are tired or in a hurry, that’s when mistakes happen. Because the card is a large size, I had to foil the tree through the cut aperture to fit it through my die cutting machine. The season’s greetings sentiment is foiled in silver and die cut out using a dotted sentiment banner die that comes in the same Spellbinders Holiday Sentiments set. I placed scrap red cardstock behind the dots before gluing the banner in place.

Once all the elements had been cut and foiled, the assembly began with laying out how the layers would look when the card was closed. Four birch trees were glued behind the stag then the four birch trees were glued to backside of the middle panel. Then the two middle panels were glued together sandwiching the trees between them. Then the stag was glued to the front with the antlers glued to the trees. A cardinal was laid-out on each of the tree panels and each glued down with its matching back piece glued on the back side of the trees. The “Season’s Greeting” banner was glued on the front to anchor the stag.

Supplies
Dies & Glimmer Foil Plates
- Round cornered rectangle – Kat Scrappiness – Crafters Essentials I
- Birch trees & birds – Impression Obsession – DIE079-U
- Forest Stag – Creative Expressions – Paper Panda -CEDPP003
- Season’s Greetings – Spellbinders – Glimmer Plates & Dies – Holiday Sentiments Series 2- GLP-191
- Christmas Tree – Spellbinders – Glimmer Plate – We Wish You – GLP-046
Paper
- Heavy White Cardstock 110# weight 8 ½ x 11 inches
- Brown Cardstock from my stash
- red scraps from my stash
Foil
Miscellaneous
- PVA Glue – Cosmic Shimmer Acrylic Glue
- Double-side adhesive – Elizabeth Craft Designs – Clear Double Sided Adhesive – 6×6 inches
- Glitter – Stampendous! – Crystal Glitter-Multi-Ultra Fine -GX220U
- Spellbinders – Platinum Die Cutting and Embossing Machine – 8.5″ Platform
- Spellbinders – Glimmer Hot Foil System
- Scoreboard
- Paper Cutter
- Scissors – fine tip
- Tweezers
- Removable tape
Sue Small-Kreider ©2020
See the video at https://spark.adobe.com/video/oYtdMGCXyVNe9

Wow…lovely card. That birchtree die is really intricate!!! This makes me want to get started on my Christmas cards. Thanks for sharing!
LikeLiked by 1 person
Beautiful creation, the deer is amazing in its detail. Emmax
LikeLiked by 1 person