Art Deco Foiling and Stenciling

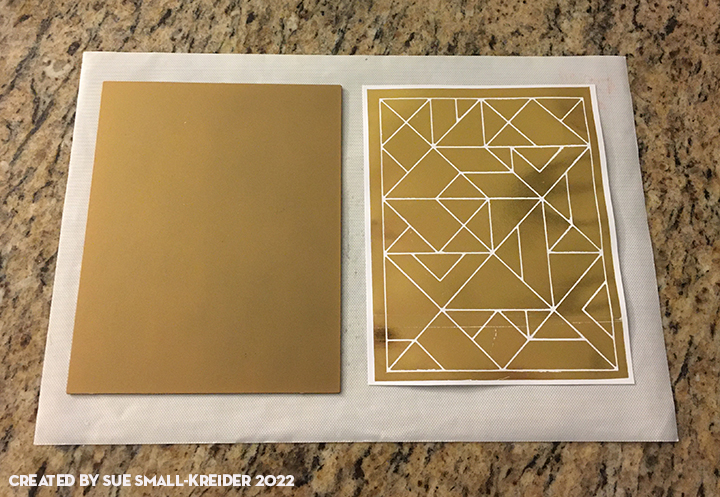
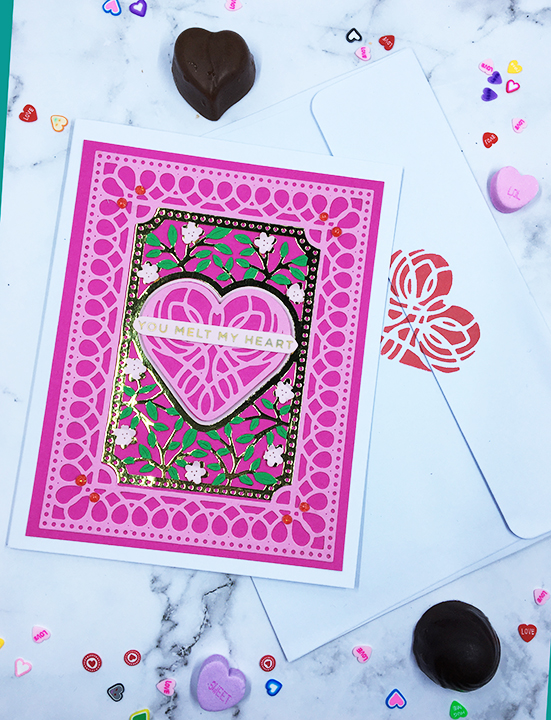
Coordinating sets make crafting easy. PinkFresh’s Art Deco hot foiling plate and coordinating three stencils set make it easy to create a variety of backgrounds for card fronts. I was influenced by Jennifer McGuire’s video on using a similar PinkFresh foiling plate and stencils.

I hot foiled three backgrounds making two foiled lines and one solid foil using the foil leftover. (I accidentally foiled my solid hot foiling plate with the second solid foil piece. Make sure the foil has the backing side next to the paper, not the foiling plate!)

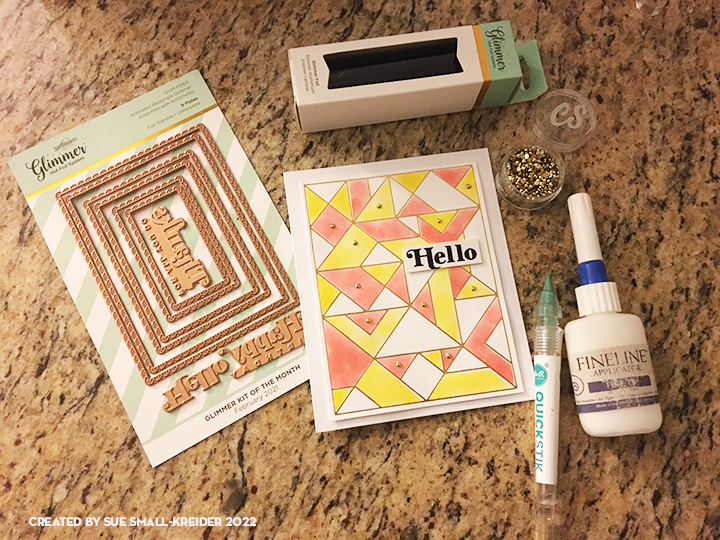
Using the three stencils I did two versions of coloring in the shapes on the foil lines backgrounds. On one background I took the stencil with mostly triangles and used the Citrine ink for the smaller triangles and the Sunbeam ink for the larger shapes. The nenext stencil I used the Poppy Red ink for all the shapes and left the remaining shapes white.  For the second colored background, I used a different colored ink for each of the three stencils. Because the Citrine and Sunbeam inks are only one shade different, I feel like the background with the white shapes is more interesting.

For the two “Thanks” cards, I glued the backgrounds directly to the card bases. Next, I cut four of the circle Thanks from white scrap cardstock and glued three of the die-cuts together. The single layer thanks, I glued to the colored background, while the foiled background received the layered die-cut.

The “Hello” card uses a black foiled sentiment from a Spellbinder’s frames and sentiment set. The sentiment and the inked background are adhered with foam squares. To add more interest, I glued tiny gold flatback gemstones from my stash. (I think they may have been in an advent calendar from Craftstash or Crafter’s Companion.) (A sticky tip tool is great for adding small elements like these gemstones to your projects.)

Because I used A7 sized card bases (5 x 7 inches), I needed to trim the bases down for the 5 ¼ x 4 inches foiled backgrounds.

Thank you for reading this blog post. Please like and leave comments 😊

Materials Used:

Foiling

Stencils

Inks

  • Simon Says Stamp – Pawsitively Saturated Ink – Citrine and Sunbeam
  • Nuvo – Hybrid Ink Pad – Poppy Red

Dies

Papers

  • White cardstock
  • A7 white card base and envelope

Miscellaneous

Stitched Valentine

Valentine’s Day is coming and a handmade card in masculine colors with a bit of stitching and soft bling, maybe just the thing for your loved one.

In playing around with the Spellbinder’s Layered Stitched Background dies, I realized that if put side-by-side, two of the backgrounds would fit on a slimline card for a #10 business envelope which would go well for the masculine card I needed to make for Valentine’s Day. The card is to be attached atop a chocolate bar.

I had enough large scraps of pearlescent coordinating green cardstock and a pale celery green textured paper to cut two each of the layers. (I saved all the out-cut pieces and tiny dots to use in other cards.) The card base is a brown flowery patterned cardstock with a white back cut into a 6 ½ inch x 9-inches rectangle, scored and folded in half.

The stitching was done with three strands of brown embroidery floss. Using clear tape on the backside to adhere the thread tails to the card.

A fine tipped glue bottle is the easiest way to apply glue to the fine lines of the top two layers of the die-cuts. (I cut the thicker, middle layer from the lightest color to add contrast to the two other shades of green and to make the medium green fine line detail pop.) Once the lattice layers were glued together it was easy to adhere them to the stitched layer.

Hot foiling the inside of the card needed to be done before the stitched panels could be adhered to the card base. Spellbinders calls their hot foiling system glimmering. (Here are two videos explaining the hot foiling process – Jennifer McGuire  and Yana Smakula) I have found their Quick Trimmer to be much easier to cut the foil with than scissors. I usually do a batch of hot foiling when I get out the Glimmer Hot Foil System heating plate and my die-cutting machine as it takes time to heat-up and cool-down. (I use a die-cutting machine that can take an 8 1/2 x 11 inches sheet of paper but the system can use a smaller 6-inch wide machine too.)

I did some small sentiments first on scraps of the green cardstock and a piece of cream cardstock using scraps of different foils. Some worked well, but some had issues. (I do these as practice runs as I only had one shot at the card inside.) I positioned my foiling plates and rose blush foil on the inside of my card and taped them down using low tack tape. (The plates moved slightly when I ran them through the die-cutting machine and made the sentiments a bit wonky. I should have taped both sides of the plates down.) A sand eraser is good for removing errant foil bits but be careful when using white corded cardstock as the eraser will wear away the color to white.

Once the foiling was completed, the stitched card layers were glued to the front of the card base.

The front sentiments “FROM ME TO YOU” (in Speckled Aura foil on cream cardstock) and “XOXO” (in Aura foil on dark green cardstock) are glued to other scraps to give them some firmer stability before being adhered to the card front with foam squares. Ten gold sequins were added to the tops of the stitching and where the lattice frames meet for a bit of sparkle.

A gold heart rub-on transfer was added to the back of the brown envelope. A chocolate bar will be bundled under the card-stuffed envelope and tied with a white ribbon for presentation.

You can view more Valentines by clicking here.

Thank you for reading this blog post. Please like and leave comments 😊

Materials Used:

Dies

Foiling

Papers

  • Scrap colored and textured green papers and cardstock
  • Hunkydory – Adorable Scorable Patterned Paper Pack – Secret Garden
  • Brown #10 Business Envelope

Miscellaneous

Candy Hearts

Valentine’s Day is coming and a handmade card that reminds one of chocolates or the colorful candy hearts associated with the holiday maybe just the thing for your loved one.

These two cards were made with elements from the three shades pink cardstock cut once using the Small Die of the Month for January 2021 from Spellbinders.

The cherry blossoms and leaves were fussy cut from the center die. The leftover very light pink border from the cherry blossoms was layered onto the sending love card while the center heart cut out was used behind the cherry blossom heart.

Foiled sentiments from the coordinating Glimmer Kit of the Month complete the hearts which were adhered with foam squares.

Nuvo drops of contrasting shades at the corners complete the cards.

These card fronts were mounted using double sided tape to 6 inches x 4 ¾ inches white card bases.

The back flaps of the envelopes were stenciled with Distress Oxide ink and one had a glitter sticker added.

You can see more Valentines by clicking here.

Thank you for reading this blog post. Please like and leave comments 😊

Materials Used:

Dies

Foiling

Papers

Miscellaneous

© 2021 Sue Small-Kreider/Ully Cat Designs

A Valentine for a Baseball Fan

What kind of Valentine’s Day card do you give to a baseball fan during a time of COVID-19? A triple heart slider in their team’s colors.

This card is the fourth of a series of Split-Slider Slimlines.

Card base is cut from heavy black cardstock. It is a rectangle 8 5/8 inches x 7 inches and folded in half to form a 3 ½ inch x 8 5/8 inches card base. The slider arm and easel panel template was printed also on heavy black card stock.

Split-Slider: This split slider is based off Spellbinders Large Die of the Month for January 2021.  The three mini easels were drawn and cut based off the three heart openings in the slimline die. (You can download a template for the horizontal split slider in the Materials Used section below.) The slider arm is horizontal rather than vertical as previous cards were. (Hint: Rectangular easels that will slide under the heart frames eliminate a catchpoint for the easel.)

You can glue the easel panel to the back of the lacy panel as long as you don’t glue the easel tab area at the bottom of the heart frames. Just put glue around the outer edge of the lacy panel.

Because the top lacy panel is adhered on three sides to the card base and needs to be raised, I used foam tape strips to raise the panel. (I like Stampin’ Up’s foam adhesive strips because they are precut and narrow enough to fit along the edge of the lacy panel.) Adhere the easel tabs to the slider arm before removing the backing paper of the foam tape.

You may have to help fold the easels into the fully opened position the first time to train them. Once satisfied with the slider/easels’ movement, remove panel backing tape paper and adhere to card base lining up the lacy panel with the top fold edge of the card base. (Note: The top edge of the slider arm (the pull bar) should jut out over the card base so that fingers can easily pinch the bar and pull up.)

Pull-Bar: The long pull bar or top edge of the slider arm is reinforced with a thick cardstock strip. Three yellow arrows are glued to the pull bar and a white dot for the place to hold the card when pulling up the slider arm. (For good CRX – I add a slip of paper to the card when mailing to show how to open the card. PDF of slip download is in Materials Used.)

Decorating the Easels: Because I had cut the lacy panel three times, I had plenty of the heart cut outs. I used three yellow hearts to form the easel bases that are folded at the tip of the heart when adhered to the slider easel. Three more yellow hearts are glued only at the rounded tops to the easel base hearts.

Using foam squares I adhered stamped baseball equipment to the yellow hearts and placed a bat under them.

Make sure you don’t glue anything that will impede the easels from moving.

The foiled “Happy Valentine’s Day” sentiment and stamped “Take me out to the ball game” are adhered to the inside of the card with double sided tape.

Thank you for reading this blog post. Please like and leave comments 😊

If you enjoy reading about the card I make, please follow ullysworld489442913.com.

Split-Slider Slimline Series:

Day 1 – Split Sea Slider

Day 2 – Cloud Dreams

Day 3 – Triple Hearts

Day 4 – A Valentine for a Baseball Fan

Materials Used:

Template

Dies

Foiling

Stamping

  • Hampton Art – Graphic 45 – Cling Stamps No. 11
  • Fun Stampers Journey – Rubber Stamps – Winners – SS-0362
  • Hero Arts – mini ink pad from My Monthly Here Kit September 2020 – Cup 0’ Joe

Papers

Miscellaneous

© 2021 Sue Small-Kreider/Ully Cat Designs

Triple Hearts

Valentine’s Day is coming and a handmade card, reminiscent of folk art hearts and flowers, fancy chocolate boxes and old-fashioned lacy Valentines, maybe just the thing for your loved one.

This card is the third of a series of Split-Slider Slimlines.

Split-Slider: This split slider is based off Spellbinders Large Die of the Month for January 2021.  The three mini easels were drawn and cut based off the three heart openings in the slimline die. (See previous split slider posts for more detailed directions.) The slider arm is horizontal rather than vertical as previous cards were. (Hint: Cut rectangular easels that will slide under the heart frames to eliminate a catchpoint for the easel.)

You can glue the easel panel to the back of the lacy panel as long as you don’t glue the easel tab area at the bottom of the heart frames.

Because the top lacy panel is adhered on three sides to the card base and needs to be raised, I used foam tape strips to raise the panel. (I like Stampin’ Up’s foam adhesive strips because they are precut and narrow enough to fit along the edge of the lacy panel.) Adhere the easel tabs to the slider arm before removing the backing paper of the foam tape.

You may have to help fold the easels into the fully opened position the first time to train them. Once satisfied with the slider/easels’ movement, remove panel backing tape paper and adhere to card base.

Decorating the Easels: Because I had cut the lacy panel three times (once from lightweight cardstock and twice from heavy weight cardstock), I had plenty of the heart cut outs. I used the lightweight hearts so form the easel base that was folded at the tip of the heart when adhered to the slider easel. The decorated heavy weight hearts are glued only at the rounded tops to the easel base hearts.

I used flowers and greenery left from other projects on the outer hearts and then I foiled the center heart with a coordinating foiling plate from the Spellbinders Glimmer Plate of the Month for January 2021.

Make sure you don’t glue anything that will impede the easels from moving.

Pull-Bar: The long pull bar or top edge of the slider arm is reinforced with a thick cardstock strip. Three holes were punched, and ribbon looped through for pulls. (If I were to make this card again, I would make the card base narrower so no ribbon pulls would be needed. See free template download under Materials Listed)

The foiled “Happy Valentine’s Day” sentiment is attached with foam squares. Nuvo Glitter Drops were added to the lacy panel.

When sending this card, I would enclose a slip of paper with directions on how to open. (See split-slider CRX Sheet download.)

Thank you for reading this blog post. Please like and leave comments 😊

Split-Slider Slimline Series:

Day 1 – Split Sea Slider

Day 2 – Cloud Dreams

Day 3 – Triple Hearts

Day 4 – A Valentine for A Baseball Fan

Materials Used:

Dies

Foiling

Papers

Miscellaneous

© 2021 Sue Small-Kreider/Ully Cat Designs

Elephants Remember

White elephants can be seen as special creatures in some cultures. This white elephant card was made to cheer up a friend going through some difficult times.

I was trying for a rich and silky effect by doing a blend of sunrise colors over a cut and embossed background that was then gone over with a Cosmic Shimmer Opal Blaze Polish to make it shimmer. The card base is made from shimmer paper as well.

The elephant’s headpiece and covering also have some of the opal blaze polish. The leafy heart die cut was adhered with foam squares to the embossed layer, and the elephant glued to the leaves.

The foiled sentiment was one that I had made previously in a foiling session. It is adhered with foam squares.

Sequins finish the decorations.

Althrough not pictured, I stamped the back envelope flap with “sending you love and Kindness” from a Hero Arts using an ombre ink pad.

Thank you for reading this blog post. Please like and leave a comment. 😊

Materials Used:

Embossing Folder

Dies

Stamps

Ink/Polishes

Papers

Dies/Foiling Plates

Miscellaneous

A Ship In -A Bottle Birthday

Inspired by an image of a ship in a bottle, I set out to create a schooner in a bottle birthday card for a retired Navy officer.

Bottle:  Because I didn’t have a bottle die large enough or in the shape I desired, I made a template from a 9 inches x 4 inches scrap piece of paper folded long-ways and drew a bottle and cut it out. (See Materials Used list to download a bottle template.) Next, I traced the bottle onto my navy-blue card base (9 inches x 8 inches folded to 4 inches by 9 inches.) In order for the inside paper to match the outside bottle cut-out, I positioned the inside paper (8 ¾ inches by 3 ¾ inches) and taped it to the front with low tack tape. Using a craft knife, I cut out the bottle through both layers of paper. I cut two sheets of acetate 8 ½ inches x 3 ¾ inches for the “glass” of the bottle and set aside until the assembly of the card.

Ship:  I made the schooner stamp into a digital stamp that I could flip into a mirror image and slightly enlarge the size to fill the bottle better. You could still stamp the ship and using a mirror stamping technique to make a smaller ship. (Here is a video demonstrating the mirror stamping.) Once I had my two images stamped onto vellum, I fussy cut them out and glued them together where the sails and flags matched up since I knew the glue would show through the vellum. I also stamped the ship and its mirror image onto white copier paper and watercolored the flags. The sails and flags were fussy cut and using my fingers I curled them. Using tiny pieces of foam squares behind the sails and glue on the flags, they were adhered to the front and back sides of the vellum ship. I cut a small stand from green scrap for the stand on which the ship rests in the bottle.

Assembly of Card:  The baker’s twine was taped to the back side at the neck of the battle. Using double sided-tape I adhered one sheet of acetate to the back or inside of the bottle cut panel. Next, I glued the ship to its stand and then glued the stand to the inside/backside of the bottle cut-out. Again using double-sided tape, I glued the last sheet of acetate over the other piece of acetate sandwiching the ship in between. Finally, I adhered the inside paper over the acetate using double-sided tape. The lower inside piece was adhered in the same manner. I drew the lip and bottom of the bottle on the acetate with a black gel pen.

Sentiments:  The foiled sentiment strip was one I had made during a batch foiling session using up scraps. It was die-cut into a doted ribbon. The inside stamp sentiment and two sea gulls were placed so that the ship hid all but the one gull when the card is closed. It was easy to get the position correct using a stamping platform. The final embellishment to the front of the card is a tiny handwritten tag that says “FOR YOU” with a twine bow tied to it. The tag is adhered with a foam square.

As is my style, I stamped the back of the envelope with a sentiment and two gulls flying to hint as to what is inside.

Thank you for reading this blog post. Please like and leave a comment. 😊

Materials Used:

Stamps

Ink/Watercolors

Papers

Dies/Foiling Plates

Miscellaneous

Sending Love

What to send to cheer a friend up when they are an ocean away and going through some tough times is the theme of this card – part thinking of you, part Valentine.

A whimsical mouse carrying a heart is a stamp set designed by Bonnie Krebs for Art Impressions. It comes with coordinating dies to cut out the image and with a companion die the twist frame it makes an interactive element that can twist to see the front and back of the image.

I colored the image with watercolor pencils and brushed them with water. Once the images were dry, I added a layer or two of Glossy Accents, a clear gel that adds dimension. (Hint: if you get air-bubbles in the gel, quickly pop them with a straight pin before they harden into the piece.) I let these pieces dry over-night before I glued them together.

Using a pre-cut and scored 10 inches x 6 ½ inches card base with coordinating envelope, I cut three pieces of 5 inches x 6 ½ inches double-sided patterned paper from the Hot Off the Press Spice Market set. I glued two of the pieces to the front and back of the card base and the third was glued inside the front panel. Because the pattern paper is thinner than cardstock, I used the reinforcement of the double paper for the card front so that it would be sturdy when I cut the twister window from it. (Hint: if you glue the papers on first, you only have to die-cut the window once.)

Once the window was cut, I decorated the card front with a foiled sentiment strip and yellow ribbon. The slotted mouse image pops in the notched center of the window perfectly. (Hint: use up your cardstock scraps by hot foiling a bunch of sentiment strips at one time and save for future projects.)

For the inside of the card, I wanted a pink gingham background to match the pink of the heart and also something lighter and not so intense in color as the front of the card. I found it in in a journaling card pad from Prima. (Hint: if you love a paper collection and can’t afford the larger paper pads, try the journaling cards or 6 x6 pads as they are affordable and often can be found in the clearance sections.) At 4 inches by 6 inches the journaling card left some white space on which I doodled some circles, hearts and arrows.

The back flap of the envelope has a heart with a friendship message stamped in Blushing Bride pink to give a hint as to what was inside.

See more Valentine’s by Clicking Here.

Thank you for reading this blog post. Please like and leave comments 😊

Materials Used:

Stamps/Dies

Inks/Watercolors

Papers

Foiling

Miscellaneous

There’s Always Room for Cake

There is always room for indulgence on one’s birthday. This card is inspired by the Daisy Mae Designs bakery and sweet shops collection of stamps and stencils.

I created the gingham stenciled background with the striped stencil inked one way for the vertical stripes and then turned once to ink the horizontal stripes in coral ink. The doily is inked with the green pistachio through a stencil. The cake was stamped with a permanent black ink and then colored with watercolor pencils and mixed using a waterbrush.

Sentiments stamped on the front of the card come from the Daisy Mae stamp set while the inside sentiment is a Spellbinders’ foiling plate.

The envelope’s back flap was stamped using a mask to stamp just the fruit atop the cake and the spayed with gold mica mist.

Hope this card brings a smile to your face. 😊 Please like and leave a comment.

Supplies:

Stamps/Stencils

Inks/Watercolors

Papers

Foiling

Miscellaneous