Summer Sympathy Basket

Sympathy cards are never easy cards to do. I think of making them as part of my own grieving process, putting in loving thoughts to those left behind.

Karen Burniston’s Wide Woven Basket has become my go to for sympathy cards tailoring the flowers and decorations to the individual who has passed.

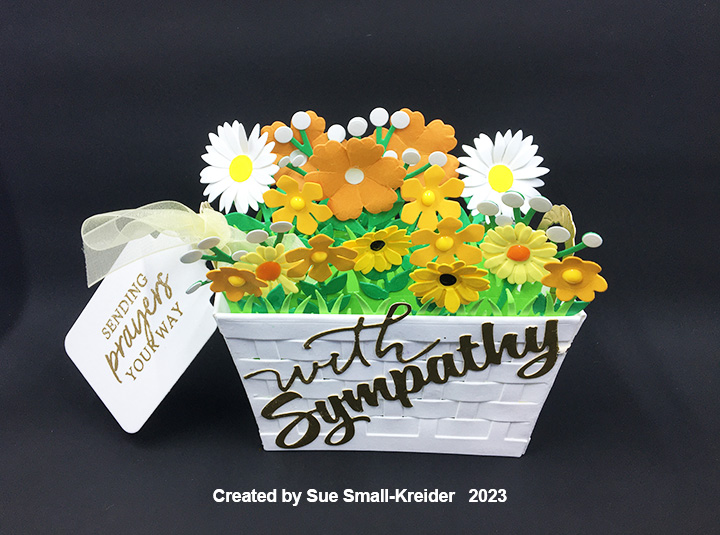
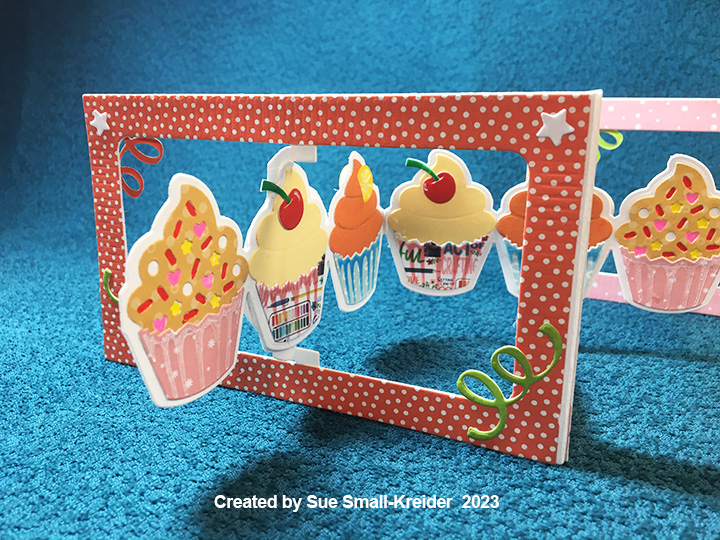
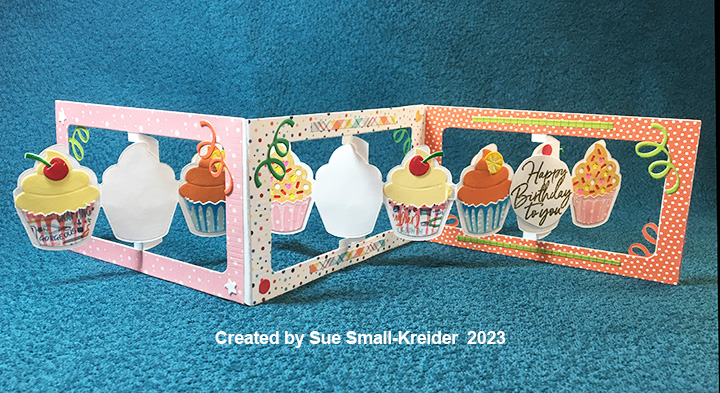
I use the following Karen Burniston dies Woven Basket Box Card, Wide Woven Box Card, tag from Tag Book Pop-Up, flowers from the Flowers and Bee and Flower Pot Pop-Up, and With Sympathy sentiment. I also tried the new Small Scenes Bam Box to pop-out the basket when pulled from the envelope. Nuvo Drops were used to make the small flowers’ centers.

(Please watch the assembly videos for the various dies that are located toward the bottom of each die set’s link page before starting a card.) For a detailed tutorial of a sympathy basket click here.

The folded card fits into a catalog 6×9 inch envelope. To mail the card, I fold a sheet of 8 1/2 x 11-inch white cardstock in half to fit inside the envelope and cushion the card in the mail.

Thank you for reading this blog post. I hope this inspires you and makes you smile. Please like and leave comments 😊

Materials Used:

Dies

Stamps

  • Waffle Flower – Clear Stamps – Sweet Sentiments -271296

Papers

  • Colored Cardstock
  • Matte Gold Cardstock
  • White Heavyweight Cardstock
  • White Catalog 6×9 Inch Envelope

Ink

  • VersaMark – Watermark Stamp Pad

Embossing Poweder

  • Papercraft Society – Embossing Powder – Matte Gold

Adhesives

Tools

  • Die Cutting Machine
  • We R Memories – QuickStick
  • Stamping Platform
  • LDRS – Stampendable Stamping Tool
  • Stamping Cloth
  • Kat Scrappiness – Anti-Static Tool
  • Scissors
  • Tweezers
  • Heat Tool
  • Ball Tipped Flower Shaping Tool
  • Foam Mat

Miscellaneous

  • Ivory Organza Ribbon – 1/4-inch wide
  • Nuvo – Crystal Drops – Dandelion Yellow, Ripened Pumpkin, and Ebony Black

Celebrate with Cupcakes!

This card was made for Craft Roulette #172 whose parameters included: Z-fold card, OLD, any colors and something from my mesk (messy desk.)

For this mini-slimline card, I used Karen Burniston’s dies to created a three panel accordion card with cupcakes. The main dies used are Cupcake Add-ons and Landscape Rectangle Accordion with decorations from Paper Frames Pop-Up and Happy Hour Charms.

Accordion Frame: (Watch assembly video at the bottom of link page.) Cut three frames from heavy white cardstock using the Landscape Rectangle Accordion set. Trim the rectangle panel to just a pivot post. Cut a total of six frames from patterned papers and cut out the pivot panels and tabs from all to have decorative frames. Glue the white frames together as shown in video. Adhere the decorative frames. Trim off unused tab.

Cupcake Panels: (Watch assembly video at the bottom of link page.) Cut four of the cupcake panel die from the Cupcake Add-ons set from white cardstock. Cut a total of 15 of the cupcake icing piece from different papers. (I cut six from three different papers coating the yellow and orange papers with a glitter gloss. the sprinkles were die cut into the icing piece and colored with fine-tipped markers and gel pens.) Cut a total of 15 of the cupcake paper piece from different papers. Using die, stencil shadows onto cupcake papers. The sprinkles die and cherry decoration dies are included in the Cupcake Add-ons. The orange slice is from the Happy Hour Charms set. Adhere cupcakes to fronts of three of the white panels. Cut fourth panel apart into thee separate cupcake outlines. Glue decorated panels to pivot posts on frames. Decorate backs of panels using the white cupcake outlines to cover the pivot posts and the remaining six cupcakes to cover ends of panels. Glue the panels together using tabs. trim off unused tab.

Decorations: The ribbon streamers are in the Cupcake Add-ons set along with the hearts. The stars and circles come from the Paper Frames Pop-Up. Strips of decorative papers were also used from my scrap bag.

Sentiment: The white cupcake panels on the back are for either personal messages or the heat embossed happy birthday sentiment. When the card is closed the main sentiment is visible.

Thank you for reading this blog post. I hope this inspires you and makes you smile. Please like and leave comments 😊

Materials Used:

Dies

Stamps

  • Waffle Flower – Clear Stamps – Sweet Sentiments – 271296

Papers

  • Carta Bella – 6×6 Double-Sided Paper Pad – Happy Crafting by Steven Duncan
  • Solid and Patterned Paper Scraps
  • White Heavy Cardstock 110 lb

Ink

  • Ranger – Tim Holtz – Distress Ink- Saltwater Taffy and Salty Ocean
  • Simon Says Stamp – Pawsitively Saturated Ink – Citrine and Sunbeam
  • Sharpie – Permanent Marker – Red and Yellow
  • Gel Pen – Pink
  • Sakura – Gelly Roll Pen – Medium – White
  • Nuvo – Aqua Simmer – Glitter Gloss
  • Papercrafting Society – Matte Metallic Embossing Powder – Gold

Adhesives

Tools

  • Die Cutting Machine
  • We R Memories – QuickStick
  • Stamping Platform
  • LDRS – Stampendable Stamping Tool
  • Stamping Cloth
  • Sponge Dauber
  • Craft Mat
  • Scissors
  • Craft Knife
  • Heat Tool

A Classy Card

This card was made for Craft Roulette #169 whose parameters included: see-thru card, rustic garden colors, fashion element and a hexagon.

I made this card using all Concord & 9th dies and stamps. (See other shop cards.)

Cardbase: For this A2 (4.25×5.5-inches) card start with a piece of white cardstock 8.5×5.5-inches and scored and folded in half at 4.25-inches.  Cover the back of the card base with white brick paper.

Shop Front: Watch an assembly video to get the basics on the assembly. Cut the shop front from white brick paper. (My paper was double-sided with red and white bricks on the back side.) Fold on score lines as directed in video. Decorate and add window acetate before attaching to cardbase. I used white and blue cardstock to cut the side posts and just blue for the panel below the windows. I cut the planters from white cardstock and brushed gray ink over them to add shape to them. The greenery is peppered with tiny red flowers made with a red gel pen. The planters are adhered and popped up on the shop front with thin foam squares.

Shop Front Door: I decided to make the door window see-thru too, so I played with positioning the door and its windowpane die on the shop front. I only cut the panes into the front. Cut the door with pane die taped together with the door die and the decorative panel from blue cardstock. Ink edges of the decorative panel before gluing to bottom of door. (I used a white gel pen to freehand the lines on the panel.) I stamped the open sign (Fashion Shoppe Stamp set) and die-cut the sign base from white cardstock coloring string with a yellow marker. Die cut the door handle and plate from silver foil card and adhere to door side.

Shop Front Window: Cut a piece of acetate 4×5.25-inches. Use double-sided tape around all the window and door openings on the back side of the shop front.

Shop Assembly: Using double side tape, adhere bottom tab on shop front to bottom edge of front panel on cardbase. Cut a piece of decorative paper (I used a hexagon paper) 4.125×5.5-inches and adhere over the shop front tab and line-up with card fold. (I cut an additional hexagon strip to cover the top tab.) Decorate the inside of the shop before adhere top tab of the shop front . (I didn’t remember to decorate first and had to use tweezers to place all my shop pieces inside the shop.)

Watch fashion shop dies assembly video before constructing your outfits and merchandise table. (I used the mirror die to cut backdrops for my dress frames.)

Using double-sided tape on the front side of the shop front upper tab, adhere to card base as shown in the assembly video.

Awning: Die cut the shop awning from striped paper and fold along score lines. Glue the die-cut “Boutique” to middle of awning. I adhered the backside of the awning top tab with thin foam tape to the top of the card base.

Sentiments: The sentiment inside of “You’re classy from head to toe,” is from the Fashion Shoppe Stamp Set and stamped in a turquoise blue ink on a 4×5.25-inch piece of white cardstock. The sentiment piece was matted with a 4.25×5.5-inch piece of blue printed cardstock (backside of hexagon print.)

Envelope: The card fits into an A2 envelope. To give a hint as to what’s inside, a pair of shoes and a hat were glued to the back envelope flap.

Thank you for reading this blog post. I hope this inspires you and makes you smile. Please like and leave comments 😊

Materials Used:

Dies

Stamps

Papers

  • Craft Consortium – 6×6 Double-Sided Paper Pad – Brick Textures
  • My Favorite things – 6×6 Double-Sided Paper Pad – Finishes and textiles EP-96
  • Honey Bee Stamps – 6×6 Double-Sided Paper Pad – Bee Bliss
  • Recollections – 5×7 Embossed Solids – Neutrals
  • Colored Cardstock Scraps
  • Matte gold Cardstock
  • Silver Foiled Cardstock
  • Heavy White Cardstock for cardbase
  • A2 Blue Envelope

Ink

  • Red Gel Pen
  • Sharpie – Permanent Marker – Fine Point – Yellow
  • Ranger – Distress Crayon – White
  • Pigma – Mircon 01 Fine Tip Pen – Black
  • Sakura – Gelly Roll Pen – Medium – White
  • Ranger – Distress Ink – Lost Shadow
  • Catherine Pooler – Premium Dye Ink – Party Collection – All That Jazz

Adhesives

Tools

  • Die Cutting Machine
  • We R Memories – QuickStik
  • Scissors
  • Stamping Blocks/ Weights
  • Bone Folder
  • Blending Brush
  • Craft Mat
  • Stamping Platform
  • LDRS – Stampendable Stamping Tool
  • Stamping Cloth

Miscellaneous

  • Dura-Lar – .005 Clear Film – Acetate

Summertime Fun

It’s time for the Karen Burniston design team challenge for July 2023 with the theme of “COLLECTION PACK CREATIONS” – using papers from collection packs of papers plus at least one die from the June 2023 release.

The collection pack that I chose to work with was Echo Park’s Best Summer Ever designed by Jen Allyson. The stickers reminded me of summers spent in the backyard with a blow-up pool, Dad grilling burgers, lots of watermelon and friends and family all around.

From the June release, I picked the Fence Landscape Accordion Add-On and Small Scenes Bam Box die sets. I also used two previously released die sets – Fireplace Pop-Up and Paper Frames Pop-Up.

Cardbase: I used a purchased A6 (4 1/2 x 6 1/4-inch) card base and cut papers to cover the four panels of the card.

Fence: The new fence add-on is a versatile die set. I cut one fence from a woodgrain embossed cardstock and did a partial die-cut to get one large post with the same die and cardstock. (I like the look the embossed cardstock gives to a white fence better than printed woodgrain paper which often has dark lines in it that makes the fence look pieced together.) Leave the tabs on the extra post and use them to glue to the fence so that it has three posts.

To make the fence pop-up I used the small strip pop-up mechanism in the Fireplace Pop-Up die set behind each of the three fence posts. Once the mechanisms are glued in place add grass from the fence set to the front of the fence.

Grill: I adhered the sticker to a piece of yellow cardstock and fussy cut it out. Next, I made bam box from the Small Scenes Bam Box die set. (See assembly video.) This smaller bam box is the perfect size for the grill sticker. I figured out which way I wanted the box to fold flat in the card and glued it in place. Grass (from fence set) was glued to the front of the bam box and then the grill over the grass.

Pool: I used two stickers to make the unicorn float in the pool. They were stuck together and then glued as one piece to yellow cardstock and fussy cut. I had a small bam box already made which was used behind the pool. (The key to installing bam boxes is to play with the positioning of the box and its attached element in both the open and folded positions.)

Decorations: There are lots of small stickers in the collection pack which makes decorating easy. I make some bluebell flowers to go behind the fence. Tweezers were needed to place the flowers after they were assembled. I ended up adding the pink flamingos because they were taller than the fence.

The string of lights was created using the circle banner dies in the Paper Frames Pop-Up set glued over a piece of baker’s twine glued to the corners of the card.

Sentiments: All the sentiments are either stickers or a journaling card which was used on the front of the card with sticker sunglasses added. A pink label was cut from the Paper Frames Pop-Up set for a personal message.

Envelope: The card fits into an A6 envelope with a slice of watermelon sticker on its back flap.

Thank you for reading this blog post. I hope this inspires you and makes you smile. Please like and leave comments 😊

Materials Used:

Dies

Papers

  • Echo Park – 12×12 Double-Sided Paper and Stickers – Best Summer Ever designed by Jen Allyson
  • MemoryBoxCo.com – 8.5×11 Embossed Cardstock – Woodgrain
  • Blue, Green, White and Yellow Cardstock
  • Park Lane Paperie – A6 Cardbase and Envelope – Ivory

Adhesives

Tools

Miscellaneous

  • Baker’s Twine – Pink and White
  • #8 Rubber Bands