Under The Sea

Hi it’s Sue of Dies R Us design team with an underwater tunnel card.

The card uses three of the Memory Box Collage dies to create the gradually smaller frames that make up the tunnel of an underwater world of bubbles, seaweed and coral.  (You could use just one of the dies to cut the three frames and decorate each layer differently.)

I started with two different shades of cut 7 x 5 1/2 inches and scored at 1 inch, 2/3 inch and 1/3 inch from each edge. I cut a third shade of blue 7 x 4 1/2 inches and scored at 1/3 inch form both edges. Folded darkest at 1 inch scoring on both side. Folded the next two pieces at all of the scored lines.

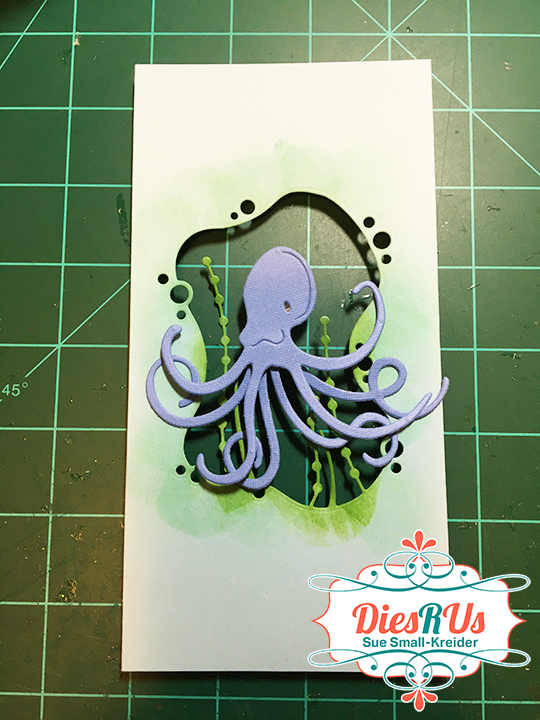
Next I inked up the seaweed and tinted around the edges of the openings with two shades of green Distress inks.

While I cut and inked a number of decorative pieces from the Collage and School of Fish dies, I ended up only using a few them in this card. (I often cut and prepare extra decorative pieces in a batch fashion and keep with the dies to save time later.)

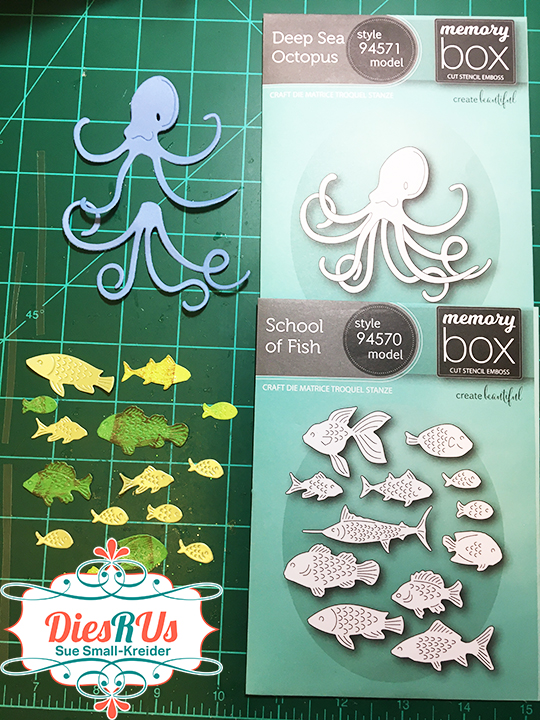
The octopus is a two piece die that lends itself to being on an Action Wobble Spring. By adhering the two parts together with a foam dot, the eight tentacles are at different levels. The spring comes with self-adhesive and is stuck to the back of the octopus’ head. A black pen colors his eye. (I found that adding an extra foam dot to the back of the spring made it so the octopus could be in front of the last frame of seaweed.)

To assemble the tunnel box, I took the card base with the shell front shown in a previous blog and adhered a printed paper to left inside of card base. Then with the sticky red double-sided tape to the left flap of the outside die-cut panel with the largest opening, I adhered it to the inside of the card. (I glued in placed a glitter net over the front of this panel before I adhered it inside the card.) Place red tape on both side flaps between the 1 inch and 2/3 inch score lines on both flaps. Attach the left flap to inside of first panel’s left flap lining up with 2/3 inch score line on first panel. Attach third panel to inside of second panel’s left flap lining up with 2/3 inch score line on second panel.

Adhere a background to the card base back inside before attaching the octopus. Peel tape on right flap of middle panel and adhere to inside of first panel at 2/3 inch score line. With octopus over the last panel, peel and adhere the right flap to inside of middle panel flap at 2/3 inch score line.

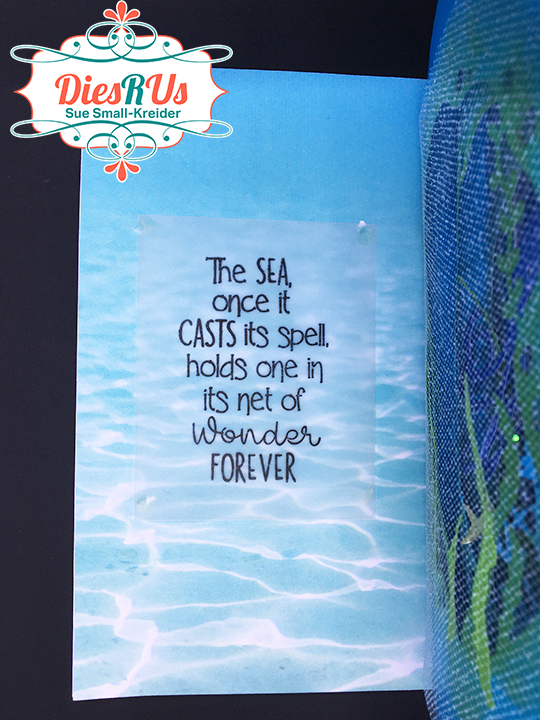
The inside sentiment was stamped on vellum and attached to the inside of the card with glue dots.

See the front of this card by going to One Shell of A Party

Hope this fun card has provided some inspiration for your crafting. 😊

SUPPLIES Used from Dies R Us:

Other Supplies:

  • Colored cardstock and clear vellum scraps
  • Three shades of blue sheets of card stock
  • Underwater patterned paper
  • 5 x 7 inches white card base
  • Foam squares
  • Red-backed, super sticky double-sided tape
  • Glue dots
  • Green and brown ink cubes
  • Tuxedo Black Memento dye ink
  • White glitter netting
  • 9 x6 inch catalog envelope
  • Sara Davies Nautical Collection stamp set from Simply Cards & Papercraft, issue 207
  • Stampin’ Up Dapper Denim ink pad

Don’t forget to come join in the fun at the Dies R Us Challenge Blog. There’s a new challenge theme offered on the 1st and 15th of each month and one lucky randomly drawn winner will receive a gift voucher prize to the Dies R Us Store.  

 For your convenience, all the important Dies R Us links are provided below.

click below for:

STORE

CHALLENGE BLOG

FACEBOOK

INSPIRATION BLOG

FRIENDS OF DIES R US PINTEREST PAGE

Rainbow Threads

“Beautiful things come together one stitch at a time,” is the sentiment of this friendship card made with a new Lou Collins Text{ures} die and stamps along with some vintage stamps and heart die.

The Fabric Edging Die Set has a die that cuts a course woven strip of hessian or burlap which I used as the base for weaving embroidery floss in bright rainbow colors for the flaps of this asymmetrical-gatefold slimline card. Once the weaving was completed, I covered the back of the weaving with white cardstock cut ½ inch longer than the woven panel to use as a tab to glue to the 8 ½ inches x 4 inches rectangular card base.

For the lacy heart, two hearts were cut using the lace heart die by Moda Scrap of Elizabeth Craft Designs. Each heart is folded in half and the lacy side covered in Persian Red Nuvo Embellishment Mousse.

The solid part of the folded heart is glued to the inside of the flaps lining up the tips of the heart halves to make a whole heart when card is closed.

Before gluing the flaps to the card base, I stamped, and heat embossed the two sentiments in black detail embossing powder.

On the front of the card are three stamped and watercolored buttons from the Fun Stampers Journey Button Bliss set.

The envelope back is stamped with another sentiment from the same stamp set in a dark blue ink.

Hope you enjoyed this quick card. If so, please comment and like and follow this blog. 😊

Supplies used:

Marigold Blessings

Weddings can be times of great joy. This wedding card inspired by traditions from India is a brightly colored card using a flower mandala as its centerpiece in marigold colors. 

The marigold petals are three die-cut layers using the free die set from Die-cutting Essentials Issue 78. 

To create the card base, I used a 7-inch tall by 12 inches wide piece of double-sided cardstock. The piece is scored and folded at 1 inch, 3 ½ inches, 8 ½ inches and 11 inches.

The inside sentiment was printed digitally onto printable 8 1/2 x 11 inch vellum and adhered with glue dots.

For the final decoration Nuvo drops were added onto the card front and the flower center.

Thank you for reading this blog post. Please like and leave a comment. 😊

Materials Used:

Dies

Stamps

  • Unknown brand cabbage rose clear stamp possibly from an advent calendar box from Craft Stash

Nuvo Drops

  • Vintage Drops – Post Box Red and Yellow Brick Road
  • Crystal Drops – Bright Gold and Red Berry

Papers

  • First Edition 12×12 Storyteller paper pad
  • Printable vellum

Miscellaneous

A Pumpkin Patch Kind of Halloween

Here is a quick layered card for Halloween or Fall greetings using one of the Birch Press layered designs.  It went together in less than an hour.

First decide on your colors. I knew orange for the pumpkins and then decided on autumn leaf colors for the four layers needed.  The dies cut an A2 size panel (4 ¼ x 5 ½ inches), I decided to go for a 5 x 7 inches card, so I also cut a 5 x 7 inches rectangle of an orange card stock and a mat layer of Terra Cotta card stock at 4 ½ x 6 ½ inches.

I cut layer A from Lemon, layer B from Terra Cotta and layer C from Orange. All the layers will give you lovely small leaves as off-cuts, but layer B also gives you large, veined leaves that can be used to decorate your card or save for other projects. You will want to cut a fourth layer for the backing. I cut my 4 ¼ x 5 ½ inches backing from Pumpkin Bread cardstock.

Using a green fine-tip marker, I colored in the pumpkin vine leaves and vine once the layers were all glued up.  (Another alternative would be to cut same green squares of paper to cover behind the lemon layer the pumpkin leaves.)

The sentiment was an extra one left from another project using Karen Burniston’s Halloween Charms.

Because the card has so many layers, I have opted to leave it as a single layer -postcard style card that will fit in an A7 envelope as it is too thick to send as a postcard.

Hope you enjoyed this quick card. If so, please comment and like and follow this blog. 😊

Supplies used:

64th Anniversary Wishes

It is wonderful when people get to celebrate 64 years of marriage, so a special card is needed.

This card is primarily made with Karen Burniston dies focusing on the Cake Pop-Up in a 3 3/4 inch x 8 3/4 inch card base. (I used a green leafy coated card stock for the base.)

Cut out two of each of the cake tier pieces, two of the three scalloped edging pieces and two of the bride and groom piece. (I used shimmer cardstock for all but the groom pieces.) Fold tier pieces on scored lines as shown in the photos. Glue each tier together following the video photos.

It is easier to decorate the cake before attaching it to the card. (I added some embellishment drops to the scalloped edges that needed to dry overnight.) Glue one set of bride and groom together on to tab at cake top. Glue the second set on to back side of cake top. Adhere the scalloped edging on to each tier of cake, starting and stopping each scalloped piece at the center fold of each tier.

Use two rectangular foiled gold leaf die-cuts for the cake platter, cutting them in half where they go over the fold. Glued each layer down.

Align the cake center fold with the card base fold on top of the platter+. Place glue on the lowest tier’s folded tabs and glue in place. Fold card closed and firmly press cake to card base. Wait until glue has set to open.

The sentiments for the card front are Karen Burniston’s Word Set 12 -Anniversary and Happily ever after. The heart on the front with “Happily Ever After” is covered with Nuvo Glitter Drops in red. The “64th”was cut using a numbers die from The Greetery and the “th” was cut from one of the word dies in a Hunkydory-Moonstone die set.

Thank you for reading this blog. Please like and follow Ully Cat’s World blog. 😊

Other Anniversary cards I’ve blogged about:

SUPPLIES Used:

Dies

Miscellaneous:

Other Supplies:

  • Papers by BoBunny and Recollections’ Shimmer Cardstock
  • Colored and mirror cardstock scraps
  • Nuvo Dream Drops – Cloud 9
  • Nuvo Glitter Drops – Red Sunstone
  • Stampin’ Up – Crumb Cake ink pad
  • Neenah Social – A7 envelope – Bare white techweave
  • Heart dies & stamp set from Papercraft Inspirations, issue 176, April 2018

Luscious Wedding Wishes

Hi, it’s Sue here from the Dies R Us Design Team with an interactive wedding card.

This card is primarily made with Karen Burniston dies focusing on the Cake Pop-Up in a 3 3/4 inch x 8 3/4 inch card base. (I used a green leafy coated card stock for the base and coordinating mosaic tile cardstock inside.)

Cut out two of each of the cake tier pieces, two of the three scalloped edging pieces and two of the bride and groom piece. (I used shimmer cardstock for all but the groom pieces.) Fold tier pieces on scored lines as shown in the photos. Glue each tier together following the photos.

It is easier to decorate the cake before attaching it to the card. (I added some embellishment drops to the scalloped edges that needed to dry overnight.) Glue one set of bride and groom together on to tab at cake top. Glue the second set on to back side of cake top. Adhere the scalloped edging on to each tier of cake, starting and stopping each scalloped piece at the center fold of each tier.

Cut a 3 1/2 inch circle from gold mirror and then cut a 2 inch circle from the center of the larger circle. Cut in half and glue on either side of the card base fold. (Because I used inside decorative panels, I cut out the 3 1/3 circle from my panels so the card would have no catch points and lessen the bulk of the card.) Play with the layout of your decorative pieces before gluing the cake to the gold circle. Align the cake center fold with the card base fold. Place glue on the lowest tier’s folded tabs and glue in place. Fold card closed and firmly press cake to card base. Wait until glue has set to open.

The sentiments for the card front are Karen Burniston’s Word Set 12 -Anniversary and Happily ever after that I cut twice so that I could off-set the gold and green letters and to be able paper piece the gold heart into the green words. The gold borders on the card front are from another Karen Burniston dies set of Party Border Blends.

Hope this fun card has provided some inspiration for your crafting. 😊

SUPPLIES Used from Dies R Us:

Dies

Miscellaneous

Other Supplies:

  • Papers by BoBunny and Recollections’ Shimmer Cardstock
  • Colored and mirror cardstock scraps
  • Nuvo Dream Drops – Cloud 9
  • Stampin’ Up – Crumb Cake ink pad
  • Neenah Social – A7 envelope – Bare white techweave

One Shell of A Party

Hi it’s Sue of the Dies R Us Design Team with a beachy kind of birthday card.

For this card front I used three of Memory Box new dies –Wood Grain Planks, End of My Rope Set and Grand Spiral Shell.

The card base is a white 7 x 10 inches rectangle fold to 7 x 5 inches. The three shades of blue mats are 6 5/8 x 4 1/2 inches, 6 3/8 x 4 1/4 inches, and 6 x 4 inches.

The wooden planks were cut on gray paper and aged with white and brown ink cubes. Cut from an oatmeal cardstock, the rope frame was inked with a dark brown ink.

The shell has a base cut from mother of pearl holographic cardstock and its top detail piece from white shimmer cardstock. A green gem was glued to the spiral center.

Assembly of the card is mat layers, wooden planks, a glitter white netting, sentiment and shell adhered with foam squares, and finally confetti sequins glued down with a few green gems.

The sentiment is a recycled one from another card.

See the inside of this card by going to Under The Sea.

Hope this fun card has provided some inspiration for your crafting. 😊

SUPPLIES Used from Dies R Us:

Don’t forget to come join in the fun at the Dies R Us Challenge Blog. There’s a new challenge theme offered on the 1st and 15th of each month and one lucky randomly drawn winner will receive a gift voucher prize to the Dies R Us Store.  

 For your convenience, all the important Dies R Us links are provided below.

click below for:

STORE

CHALLENGE BLOG

FACEBOOK

INSPIRATION BLOG

FRIENDS OF DIES R US PINTEREST PAGE

A Toolbox Father’s Day

Hi, it’s Sue from the Dies R Us Design Team with an interactive Father’s Day card.

This card is made with Karen Burniston dies focusing on the Tool Charms and Tiny House Pop-Up dies in a 5 1/2 inch x 4 1/4 inch card base. (I used a kraft paper card base and its matching envelope.) My inspiration for this card comes from Sandy Diller.

It is simple to alter the tiny house into a toolbox by not attaching the roof and adding a side panel cut from the house die cut and then adding it to the crossbar. I used a hole punch to create the handle on the crossbar.

The tool charms are great for using up your tiny scraps. You don’t have to cut the full piece if you are piecing handles on to the silver mirror cardstock. Just cut enough beyond the piece to glue the other half onto. (I used white and brown ink to “age” my tools.)

Once you adhere the toolbox to the card’s inside fold, following the directions on the packaging, you can decorate the card as you want. (I used some woodgrain cardstock cut into planks as well a scrap that looked like a wooden candle holder and the pieces are on foam squares to add some dimension to the card.)

The “Happy Father’s Day” was cut from the words in Karen Burniston’s Word Set 1 – Greetings and Word Set 2 – Birthdays. Piecing Father and Day together from letters from various words in both sets. You could also use the new “Happy Father’s Day” sentiment by Karen Burniston.

Hope this fun card has provided some inspiration for your crafting. 😊

Other Father’s Day cards on my blog

A Tool Box Father’s Day

A Fishing Father’s Day

A Father’s Day Waterfall Pop-Up

A Work Bench Father’s Day Card

In-Vested Father’s Day Card

SUPPLIES Used from Dies R Us:

Other Supplies:

  • Wood grain and scratched medal cardstock
  • Colored and silver mirror cardstock scraps
  • Black fine tipped pen
  • Hampton Art ink pads
  • Stampin’ Up – Early Espresso ink pad
  • Sizzix World’s Best Dad stamp set
  • A2 sized kraft card base and matching envelope

Don’t forget to come join in the fun at the Dies R Us Challenge Blog. There’s a new challenge theme offered on the 1st and 15th of each month and one lucky randomly drawn winner will receive a gift voucher prize to the Dies R Us Store.  

 For your convenience, all the important Dies R Us links are provided below.

click below for:

STORE

CHALLENGE BLOG

FACEBOOK

INSPIRATION BLOG

FRIENDS OF DIES R US PINTEREST PAGE