The Circus is Coming!

Circus-inside

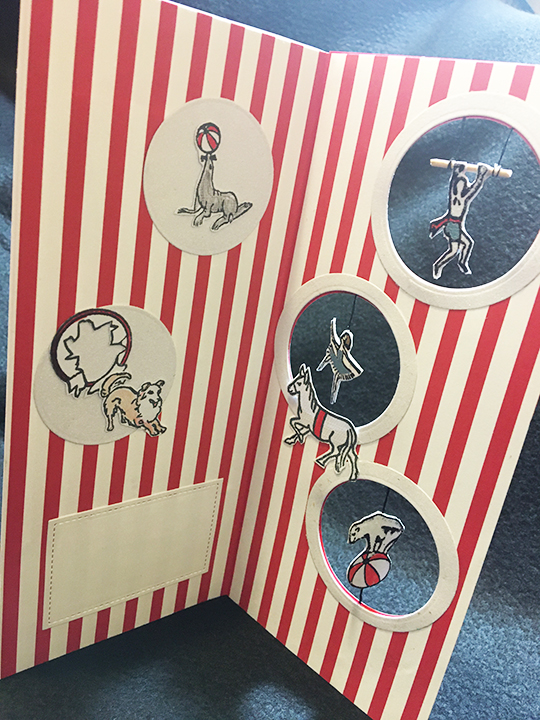
After seeing numerous circus theme cards being made because of Craft Consortium’s Circus collection and Sam Calcott’s Mixed Up Crafts tutorials on circus themed spinner cards. I decided to make my slimline version using some wooden block rubber stamps that I had played with as a child.

The funny thing about these stamps was I thought I had lost them in my last move, but a few days ago the battered box they were in caught my eye as I was looking for something else on my craft shelves. My great aunt who had been a schoolteacher from the 1920s-1960s had given the original of the stamps to my siblings and I. My father having a machine to make rubber stamps, was able to duplicate the stamps so that each of the children in my family could have our own set.

Circus-stamps

As I reacquainted myself with these stamps, I found the lady who I always made ride the prancing horse and the flying trapeze artist. There was my favorite stamp – the cage wagon in which I could stamp whatever animal I wanted to be in the cage. There were seals and bears balancing balls and a dog that would jump through a paper covered hoop. This was definitely a circus from another era with different notions of how to treat animals.

Because I could not find any suitable red and white striped paper in my stash, I used Adobe Illustrator to create the striped paper I needed and to create a number of versions and sizes of the circus sign.

Circus-front

Because the slimline card is 4 inches by 9 inches, it will fit into a #10 business size envelope. With this long and narrow card, I could make my 3-ring circus with two spinners and the flying trapeze artist using nesting circle dies to cut out the three circles and created decorative rings to frame the cut-out circles. I should have taped my two sheets of stripped cardstock together and cut all three holes on both sheets at the same time having them lined up. (I made the mistake of cutting first one and then having to tracing the holes on to the second sheet.)  (NOTE: Don’t glue your backing paper to your front until you attach the spinners.)

I highly recommend watching the spinner videos by Sam Calcott before making one. I used black sewing thread for this card using 2 to 4 strands for the spinners. (NOTE: Don’t glue your backing paper to your front until you attach the spinners.) I also stamped reverse images of the three stamps I wanted for spinners/swingers using a gellie plate. (Sam demonstrates in one of her other videos how to make the reverse image. Sorry I don’t remember which video, but it involves giraffes.) I used the printable glitter paper because it is glitzy, but also it hides bad stamping better.

Circus-inside-flat

Having learned a few tricks since I had last played with these stamps, I masked off parts of the cage wagon before I stamped the bull lion (We always called this stylized creature the bull lion because we didn’t really know which it was.)

I cut a white stitched rectangle from a Lawn Fawn die set to use as a place for a personal message.

To active the spinners, you must twist them before closing the card and placing in the envelope. They will spin when the card is open.

Supplies

Dies

Stamps

  • Rubber stamps designed circa 1920-1960 from my stash

Inks/Watercolors

Paper

Miscellaneous

Stable Happy Mail

7 Stable-front-opened

Everyone likes Happy Mail and this one is made for a family of horse lovers. After making a z-fold card using a gate and fencing, I envisioned this horse paddock card.

5 Stable-folded envelope

The card is designed to fit folded into a #10 slimline envelope.

I laid-out the fence first on a 2 ½ inch x 12-inch strip of textured cardstock folding it long-ways in half and then scored at 3 inches and 9 inches. Draw pencil lines for the fence posts at: 1/4 inch, 1 7/16 inches, 1 9/16 inches, 2 7/8 inches, 3 inches, 3 1/8 inches, 4 7/16 inches, 4 9/16 inches, 5 7/16 inches, 6 1/16 inches, 7 7/16 inches,, 7 9/16 inches, 8 7/8 inches, 9 inches,, 9 1/8 inches, 10 7/16 inches, 10 9/16 inches, and 11 ¾ inches. Next, I evenly spaced three boards long-ways and colored in the spaces to be cut out. Using an Xacto craft knife and metal ruler I cut out the colored spaces on the folded over strip measuring 1 ¼ x 12 inches. (I recommend coloring in the cutout spaces as it gets very confusing, and like me, you have to start over again.)  (If you have the Karen Burniston Farm Edges die set or another fence die set, you could piece together the fence rather than cutting it as I did.)

3 Stable-Fence cut

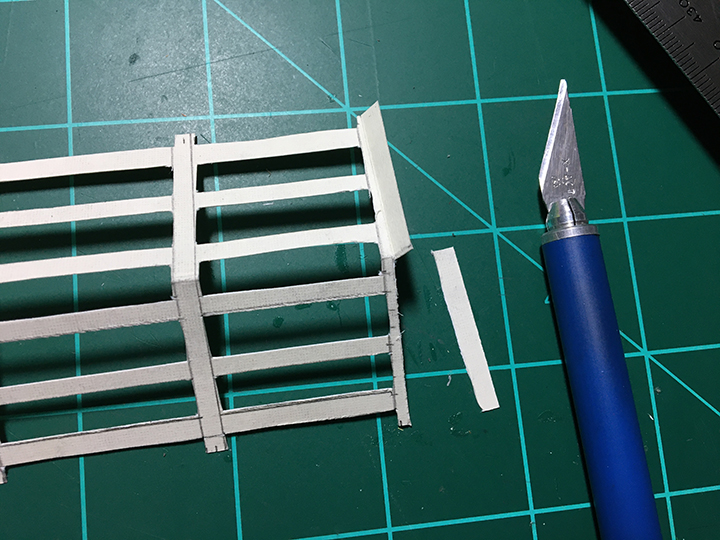
The last cutting is to trim one half of the endposts off (See photo). Once the fence is done being cut, glue the wrong sides together to form a sturdy fence. I used distress inks to color the fence.

4 Stable-Fence endpost

The stable doors are sized to fit the Karen Burniston horse die. I cut three horses and decorated them differently using a black fine tipped pen and watercolor pencils. (Watch the assembly video for decoration ideas and tips). The doors are loosely based of the retired Stampin’ Up barn door set. I cut pieces of woodgrain paper to form the trim pieces and glued. The sliding door hardware is from the Stampin’Up set. Because the door is smaller than the die set door, I had to do a modified cutting of the slots that the door slides on.  I followed the door assembly method described in this video by The Creativity Cave.

6 Stable-front-unopened

The sentiments are from the barn door set. You will need to cut two pieces of wood grained paper for the stable at 4 x6 inches. Once you have cut the door slots out of the front piece, and assembled the door, you can adhere the backing piece with the grain sided facing the back side of the front. (The grain will camouflage the slot cuts. Make sure you don’t glue your acetate door mechanism to the backing piece. Test your door before the glue dries if you need to make adjustments. Stamp and cut out your sentiments and adhere behind the doors. Glue one horse head to be peaking out from the stall door and the glue door onto stable.

7 Stable-front-opened

Glue the fence endposts to the front of the stable once the doors and decorations have been added to the front of the stable. Add the horses to your paddock by gluing one to the back of the front fence and the other by using a strip of clear plastic from packaging (It needs to be sturdier than acetate.) to glue the acetate in place, first glue one side the inside of the side fencing. Fold the paddock flat to one side and see where the plastic strip folded tab ends up on the fence and, then glue to that spot.

You can write your personal message on the back of the stable.

Supplies

Stamps/Dies

Inks/Watercolors

Paper

  • Textured 12 x12 off white card stock from my stash
  • All other papers were from my scrap bin

Miscellaneous

Garden Gate and A Curious Kitty

Garden Gate -Front Cat -bird

An idyllic summer morning with birds singing, a kitten roaming about the garden and the prospect of a cup of tea and good long chat with a friend are what this card reminds me of when I see it.

My friend challenged me to make something special with my new Stampin’ Up stamp and die sets. (So this card is for you, Donna.)

I had seen on Pinterest cards using the Garden Gateway die to create a z-fold card with a fenced in garden. This was my inspiration and starting point.

Garden Gate -side open CU

Fence and Gate: I cut two of the arched gateway and four of just the garden gate without the arch.  Using a craft knife, I trimmed off the cross-piece sections on the small gates and the middle hinge to get the gate to look like a fence. Next, I tried laying out the fence knowing it had to be 11 inches (278mm) long because my card base was 4 inches by 11 inches (102mm x278mm).  I had scored and folded my card base in the middle and then the left side I folded in half to make the z-fold. I needed the gate to be right of the front quarter-fold section on the card base. I wanted the folded corner of the fence at the right of the gate to be at the mid-section of the timed gate. I cut and pieced the fence gluing large end posts over large end posts. I trimmed off the far-right end post as it was too long. The arch seemed to bend too easily, so, I took the second arched gate and glued it to the back of the fence and gate for added strength.

Garden Gate -side open

Card Base Background: I stamped the tree and bistro table and chairs from the Joanna Sheen stamp set and tried a grass stamp with green distress ink but ended up using the grass stencil in the Joanna Sheen set to do the grass. Using a fingertip dauber sponge, I smoothed out the grass. The clouds on the blue cardstock were made with a white Distress Crayon that was slightly blurred with a water brush.

Garden Gate -Front open CU

Garden: I stamped the flowers, kitten and bird on the leftover white cardstock I had leftover from die-cutting the gate and fence pieces. Using watercolor pencils and a waterbrush, I colored the stamped images.  After getting the fence glued together and the folds made to create the garden, I glued the fence sections to the front and back of card base, making sure the free standing fence sections don’t accidentally get glued to anything. I decorated the outside of the fence with flowers making sure the gate could open. For the flowers inside the garden, I attached them with folded pieces of clear acetate. The placement of the inside flowers needs to be done so the card will fold flat so using glue to adjust their placement is useful.

Garden Gate -Front folded

Sentiments: I stamped the sentiments last, using a blue ink. I tried to center the two sentiments on the back so that they were framed by the arch of the gate when closed or opened.

Garden Gate -Envelope Folded

Envelope: The back flap of the envelope was stamped first with the bird stamp in blue on a sticky note, cut out and stuck as a mask over the stamped bird on the envelope flap. Next, I stamped small flowers over the masked bird in green. Once the mask was removed, it looks like the bird is standing amid the flowers.

Garden Gate -Envelope CU

Supplies

Stamps

Inks/Watercolors

Paper

Miscellaneous

Happy Hello

Happy Diamond -inside

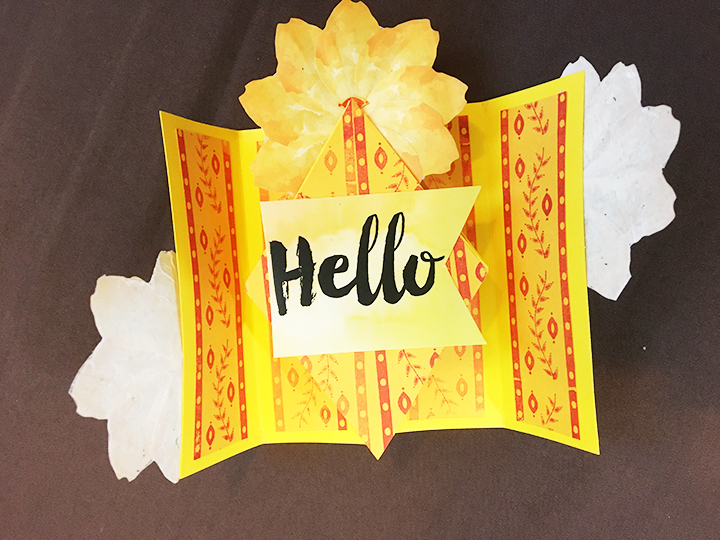
Experimenting with new folds and materials, discovering items hidden in your stash and having the internet go down all played a role in the making of this triple diamond gate fold card.

Backgrounds

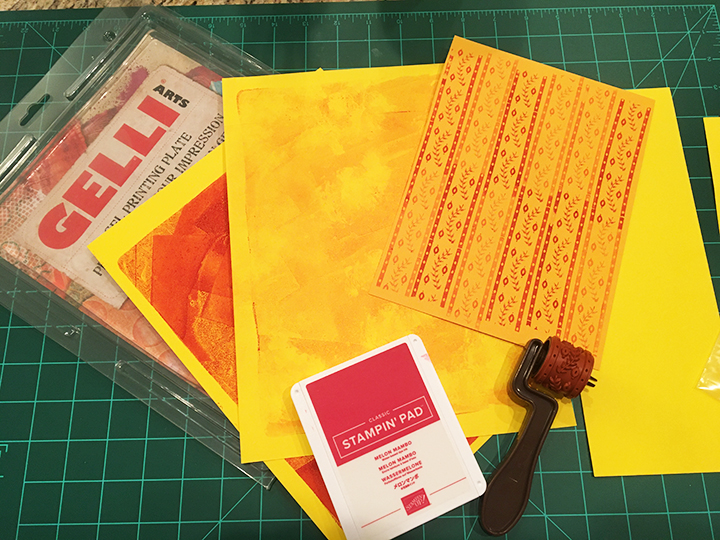
When our internet went down one morning, I decided to experiment with my gelli plate to make some back grounds. I rounded up all my red inks and thought to play that way, but in the process of looking for the gelli plate, I found some forgotten rubber stamps on a roller. I had to try them out and before I knew it I had stamped all my cardstock. I did try to make some background prints using the backs of the stamped sheets. I only opened up one ink in a watermelon color.

Also in the morning I had made a bunch of washi tape flowers from cut petals from Park Lane and the V&A Collection, layering them onto wax paper to use at some future time.

Happy Diamond -Front

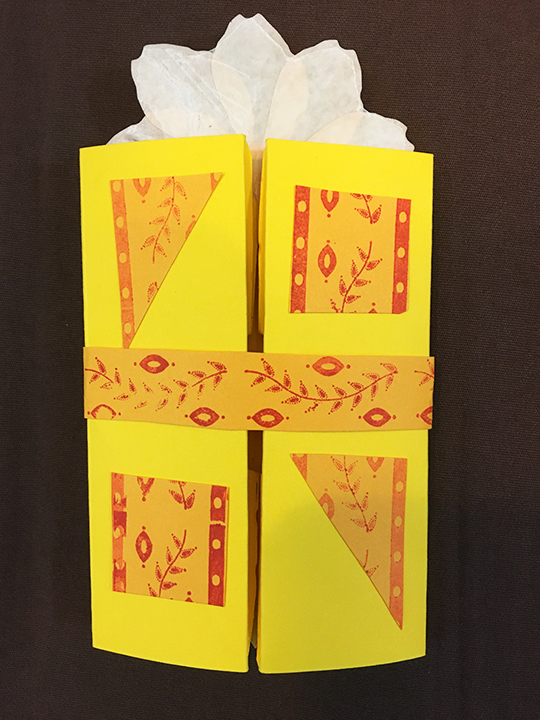
In the afternoon, I decided to try and remember how Sam Calcott on her Mixed-Up Crafts You-Tube video had made her version of a triple diamond gate fold card. Without the internet, I had to improvise, but with only one mistake, I figured it out. The key is to divide the long ways portion of card into 10 even rectangles, but I advise to watch the video for exact details and how to fold. (I used 8.5 inches x 11 inches paper. Sam used 12 inches x12 inches paper)

Happy Diamond -Back

Once folded, I began to decide on decorations. The one rolled stamp design was just the right width of the card folds, so I cut the diamond shape first by tracing it on the paper.  Using the scrapes of the stamped paper I decorated the washi tape flower centers and the belly band. For the “Hello” sentiment, I cut down a printed tag to fit.

There is space on the back side of the diamond to write a personal message.

Hoping this card brightens your day. 😊

Materials Used:

Stamps

Inks

Papers

Miscellaneous

Work Bench

WOrk Bench-inside

Not every dad has a work bench, but many do and the recipient of this Father’s Day card was a carpenter when his family was young.

Much of my inspiration for this card has come from a variety of Pinterest posts of 3D workbenches and some tool bench and tool box posts on Craftworld.com.

To make the bench, I stamped the Stampin’ Up hardwood stamp twice on light kraft paper. I cut the stamped pieces out to their edges of 5 inches x 5 ½ inches. Next, I scored down the long side at 1/2 inches, 2 ½ inches and 4 ½ inches. Using a pencil on the back side of the scored paper, I drew a line at 3 1/8 inches (5/8 inches below the 2 ½ inch score line). I also drew lines ½ inch parallel to the short edge from the 5-inch edge to the 3 1/-inch pencil line on each side. These pencil marks should form a smaller rectangle that needs to be cut out to from the lower center portion to form the table legs. Save the rectangle to cut two drawer fronts. I punched holes for black button shaped tiny brads to go thru to form the drawer pulls. (And then used foam tape to adhere the drawers to table front after it was all folded and glued to card.) Age the edges of drawers and table top with some Distress ink and a sponge or brush before gluing table into card.

Mean back to the table. All the score lines should be mountain folds with the woodgrain facing up and pencil marks hidden underneath. From the second stamped piece cut the lower shelf 2 ¾ inches by 5 ½ inches. And then score at ½ inches and 2 ½ inches down long side and make into mountain folds. Make pencil marks on back of each leg 3/8 from bottom foot flap. You will glue the edge of shelf at these marks. Once the shelf is glued on to legs the bench is ready to install on card. Mark the inside back of card at 3/8 inches and 2 inches from center fold. These marks are what you will use to glue the tale top and shelf flaps to on inside card back. Once the table is glued to card securely, glue the table leg flaps down.

Because I used dies by three different brands, none matched the others in scale, so I adapted the Divinity Designs pegboard and hooks to work with the tiny Tayored Expressions tools set. The picture frames are scraps from the table that I darkened with Distress inks. The tiny photos are of photos of the recipient’s family reduced in Photoshop to ¾ inches wide and printed on computer printer. The “Happy Father’s Day” was die cut from two die sets. Foam tape was used to adhere all items to the table top. All the tools were cut once from silver card and then again from colored or stamped card scrap to cut handles which were then glued onto silver base tools.

The front of the card was made using a mat of graph paper, a computer printed sentiment given to me by the card giver and the die cuts of hammer, nails and saw were from the larger set of tool dies by Sunny Studio.

WOrk Bench-Front-Envelope

I used the matching stamps from Sunny Studio to stamp the hammer and saw “x” on the envelope flap. The hammer was stamped first and then, using a post-it tape mask over the saw, I stamped the hammer.

Other Father’s Day cards on my blog

A Tool Box Father’s Day

A Fishing Father’s Day

A Father’s Day Waterfall Pop-Up

A Work Bench Father’s Day Card

In-Vested Father’s Day Card

Supplies used:

Dies

Stamps

Papers

  • AC Cardstock – 5 x 7 in set of 8 kraft cardstock cards & envelopes
  • Computer paper
  • Colored and silver matte metallic cardstock from my stash
  • Graph paper

Inks

Miscellaneous

The Rainy Season

Frogs and Splashes

Where I live it gets so hot and humid that in the summer, that it just has to rain for a few minutes to get it out of its system. Sometimes it even rains with the sun shining.

This card was made as a test of my new die called “Splashing Puddles” by Memory Box. It reminded me of the light rain and the tree frogs chanting.

I began with a stripe printed card as the base. I die cut the puddles and placed washi tape on the back of the raindrops and then sprinkled blue glitter on the front sticky side to make them sparkle. The frogs I had left over from another card, so added them hopping about in the rain. The “Hi” sentiment I picked because it was tiny and seemed to fit into the design best. I spotted it with the tips of markers just as I had colored the frogs but tried to match the raindrops in color. The final touch was some gold foiled washi tape I found in my stash.

Hope the card brings a smile to you.


Materials

Dies:

Papers:

  • DCWV – Strips Box of Cards – 40 A2 Printed Textured Cards & Envelops
  • Pale blue cardstock from my stash

Inks:

Miscellaneous:

  • PVA Glue – Cosmic Shimmer Acrylic Glue
  • Washi Tape from my stash
  • Non-toxic Sparkling Glitter by Advantus Corp – Blue Mix – SUL54634

Hats off to the Grad

Hats Off - Front-envelope

For many graduates of 2020, there were few opportunities to collectively toss their caps in the air and celebrate their accomplishments together.  This card is for the class of 2020!

The wait for this stamp and die set was worth it. The quintuple slider dies make a quick and interactive card that has the graduates’ caps moving up and down.

Hats Off - Front-down

To start, I used a stencil to ink in a cloudy background that ends with tiny confetti being stamped in blue up to the bottom of the slider slits (as if the confetti was falling out of the caps.) Next, I stamped the arms and caps using a black ink that dries fast and doesn’t bleed if watercolored over. Using the colors of the graduate’s college, a pale blue, I colored the caps and gowns using watercolor pencils and a thin tipped waterbrush.

Hats Off - Front-center

Next, I did all my die cutting of elements using the matching dies and the squarish quintuple slider. In my test card, I had placed the die that cuts the slots into the background card, upside down. So, making sure that I had all the slots lined up at the top end of my background and using the slider die as a guide to know where the position the slot cutting die, I cut the slots. (Watch the assembly video to see how the alignment is done.)

Hats Off - Front-up

To assemble the slider mechanism, I suggestion watching another assembly video to understand how the slider flaps wrap around the slots and how best to keep the flaps aligned. Once the tiny foam squares are adhered to the flaps, the decorating of the card can begin. (Don’t forget to add some hint that the slider tab needs to be pulled up by adding a die cut arrow which is included in the slider die set.)

Hats Off - inside

I found some scrap printable glitter paper in my stash and stamped the main sentiment directly on to it.  For an added touch, I stamped “Hats off to you!” near the top front, and inside the card, I stamped “Good luck on your new adventure!” both in black. I decided the inside needed something else, so I stamped in blue above the good luck a tiny rolled diploma.

IMG_8234

The back flap of the envelope had a cap stamped in blue to give a hint as to what was inside.


Materials Used:

Stamps/Dies/Stencils

Inks/Watercolors

Papers

Miscellaneous


Seaside Vacation

Seaside vacation - front

Need a break? Jump-into this vacation card and get away, hear the waves gentling coming ashore, the occasional seabird crying out overhead, smell the sea air and feel the grit of the sand beneath your feet.

This fun, A7 sized card came from my desire to make a nautical themed card from my stash of underwater, fishy, and nautical stamps, dies, papers and embossing folders. The papers and embossed/inked background came from one of early papercrafting magazines I purchased – Love Cardmaking issue 4 and its the “By the Shore” embossing folder, stamps and digi papers. I love these papers and have used them for to make a number of cards in years past. Two small stamp sets from Prima Marketing’s Seashore collection at some point made their way into my stash, but never used. Some new to me Stampin’ Up inkpads gave me the excuse to try stamping the small nautical stamps.

After pulling together all the various elements that I might use and having noticed a trend of shapes being layered askew on card fronts, I decided to try the trend. I played with the layout and began by gluing the blue background over the front and back of card. Next, I glued edges of inked embossing folder piece and trimmed off the overlaps that went off the edges. The top is wrapped over the fold and glued on the back.

Seaside vacation - front-cu

Using two different thicknesses of foam squares/dimenisionals, I adhered the stamped pieces to the front. The rectangular card needed somethings to hide the fact the rope border didn’t fully meet-up at the corners. In digging around in my elements caddy, I found some K & Company die-cut sea life images which were all too big for my purposes, but on the packaging were just the right size of images which I fussy cut and adhered to the rope corners. The addition of a puffy orange starfish and a foiled rising sun sticker and, voila, the front was finished.

I had one tiny multi-colored masked and stamped image with the word “Enjoy” which I glued inside the card.  The blue paper on the back of the card didn’t come completely down to the bottom edge so I pieced together a sandy beach to complete the card.

Seaside vacation -inside-envelope

The sailing ship was stamped in blue ink on the back of the envelope.