Sundae Shop – You’re So Sweet

2 spoons-CUEX

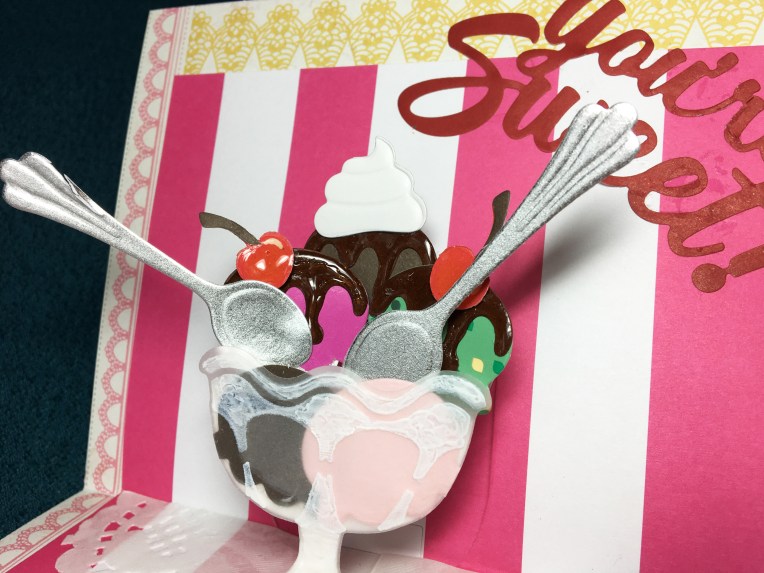
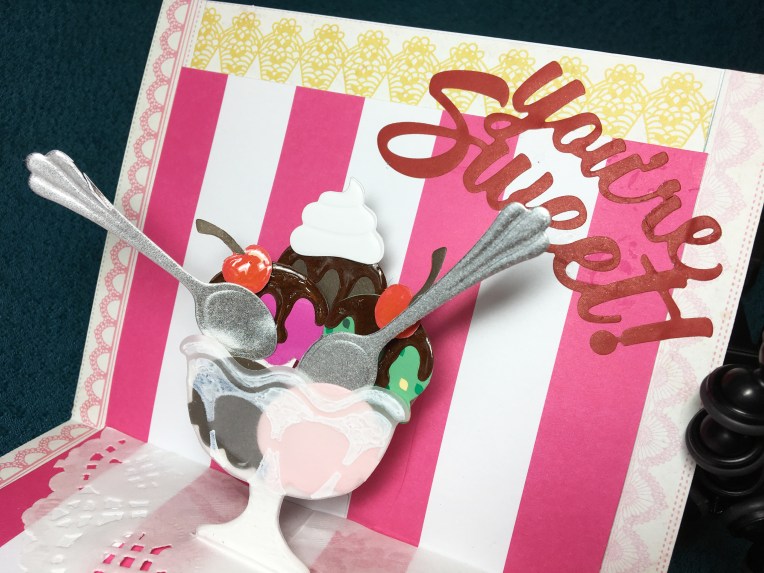
I scream, you scream, we all scream for ice cream! Ice cream sundaes YUMMY! And even better when shared with two spoons. This is a sweet Valentine’s card made for a special couple.

2 spoons-inside

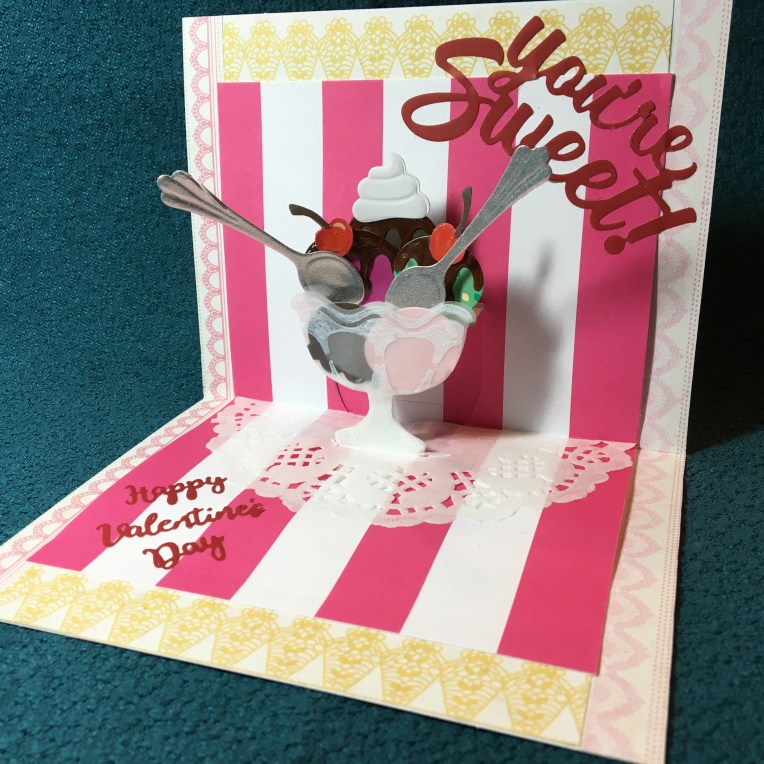
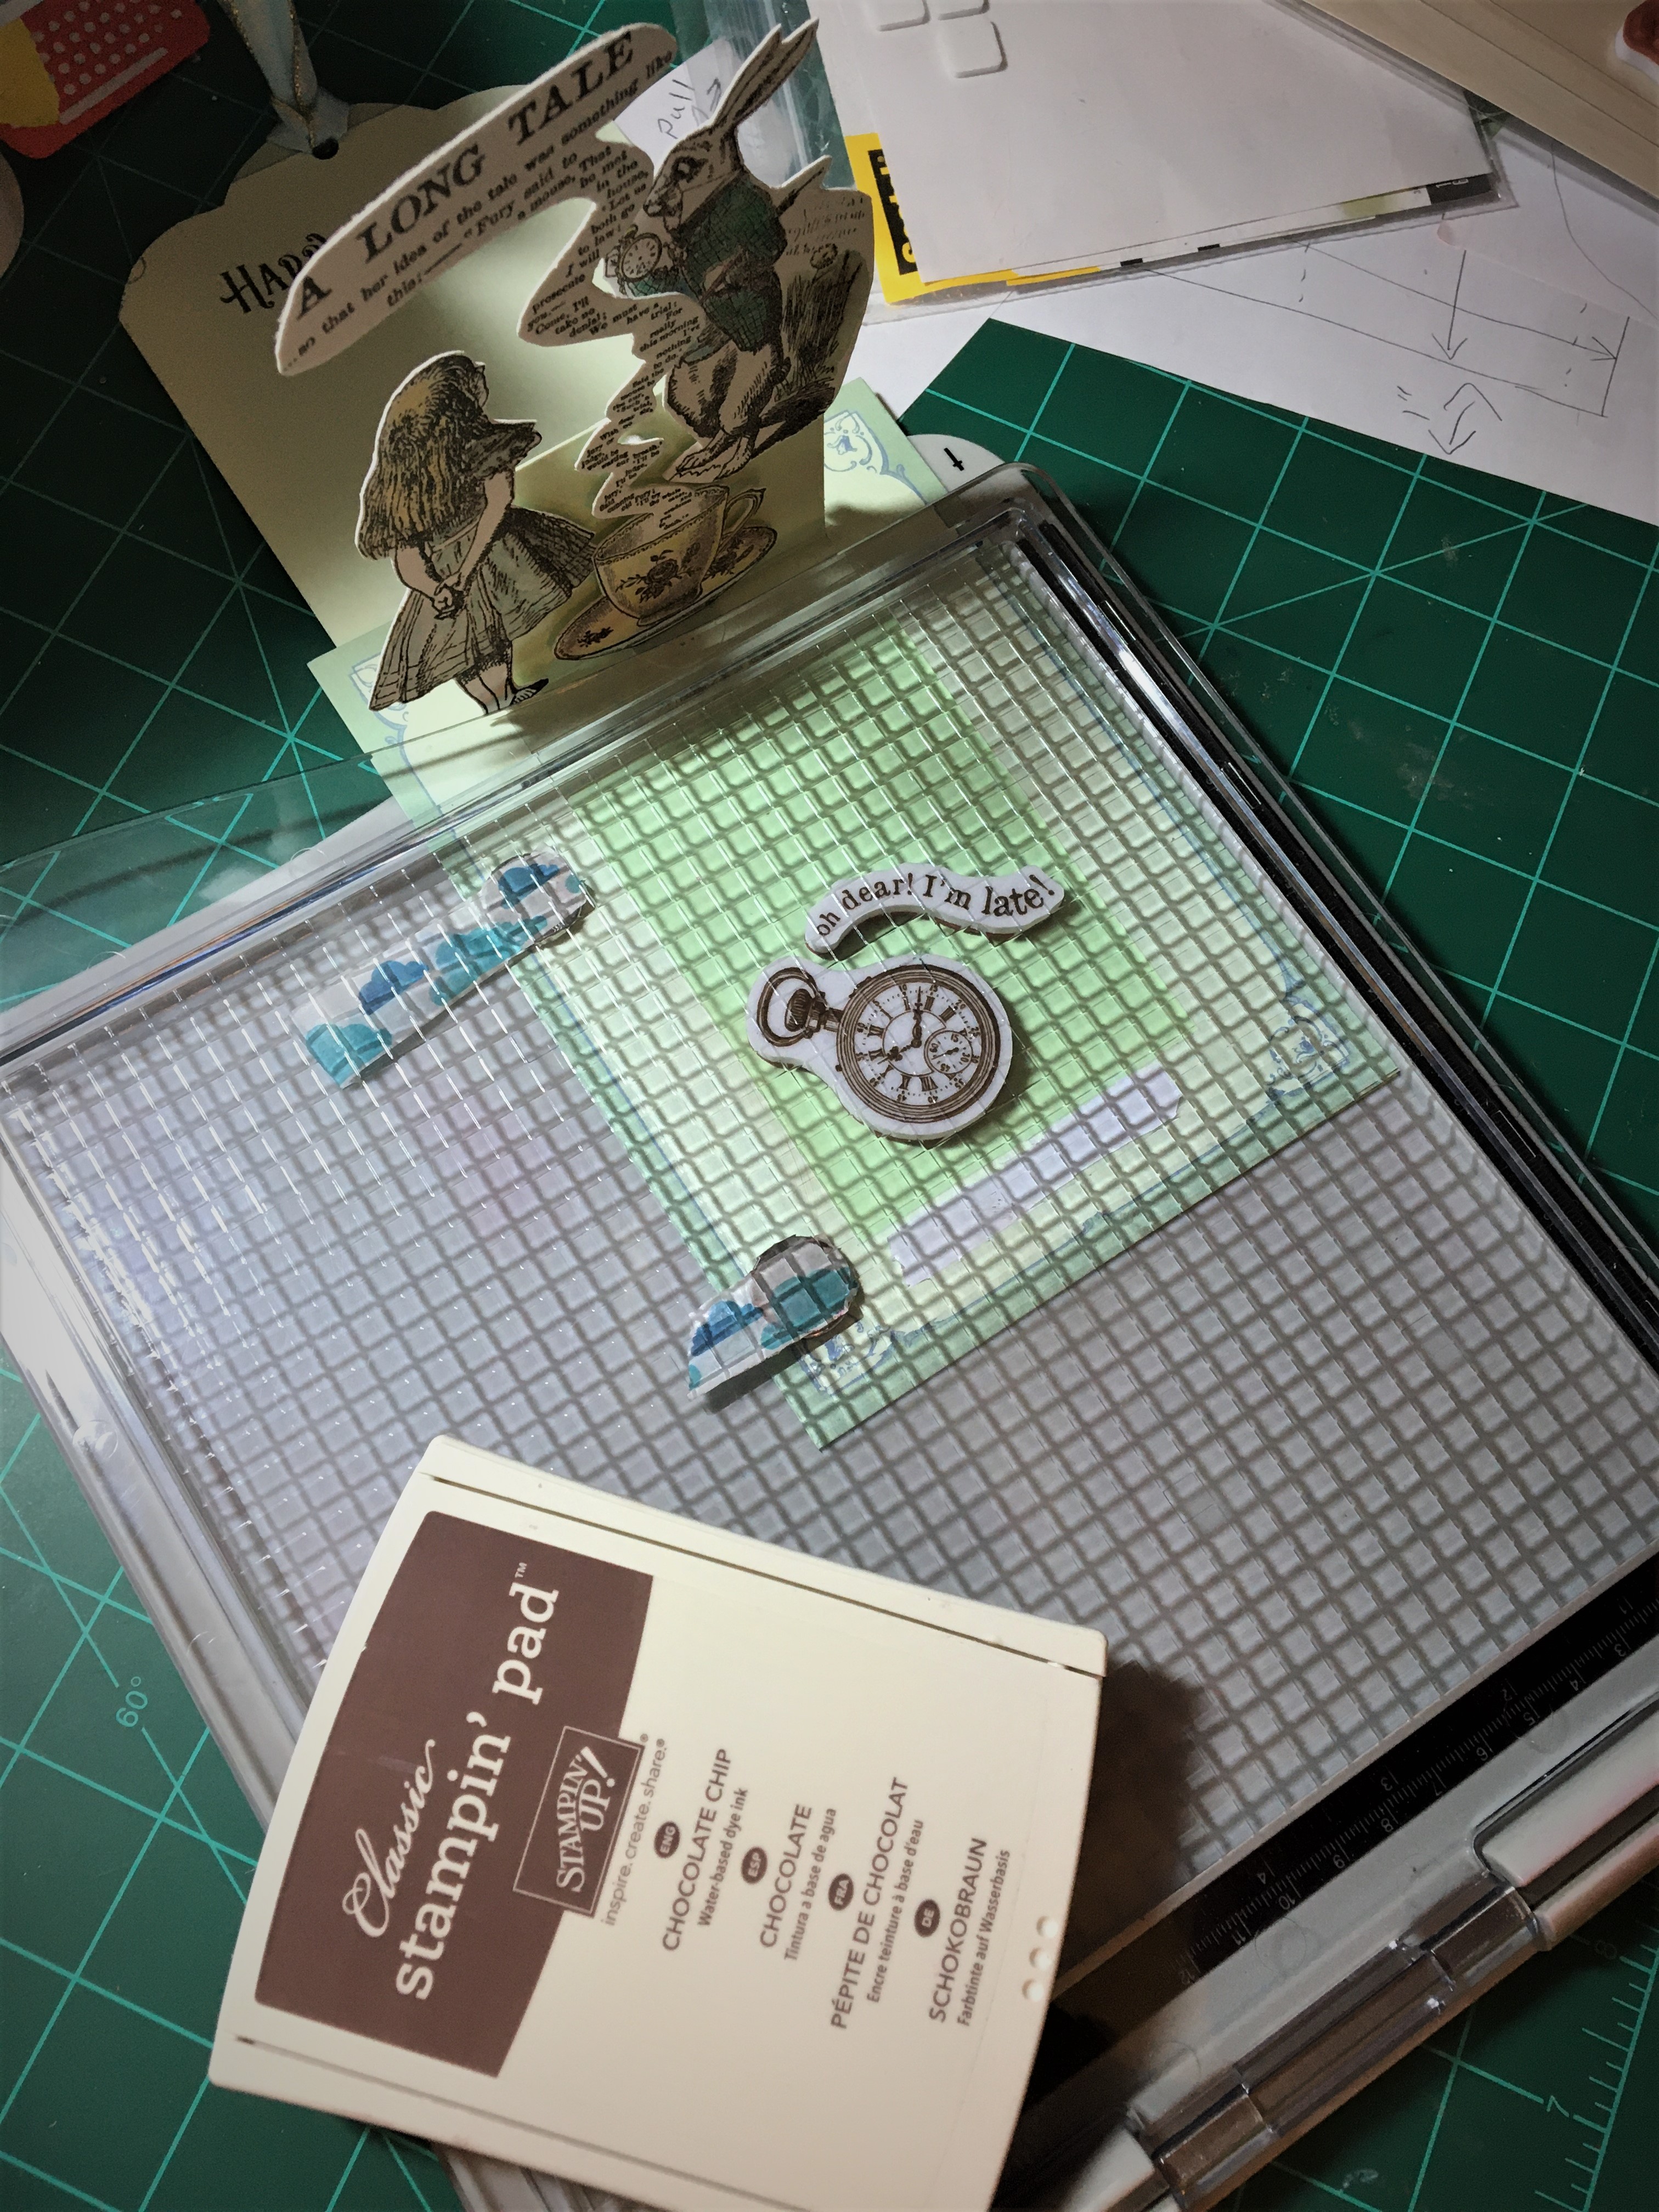
Made this card using die sets from Karen Burniston and lots of recycled colorful packaging from my stash. The shine on the hot fudge topping and cherries is Nuvo Jewel Drops. The “glass” dish is vellum that has been stenciled using the die with a white paint pen.

IMG_7833

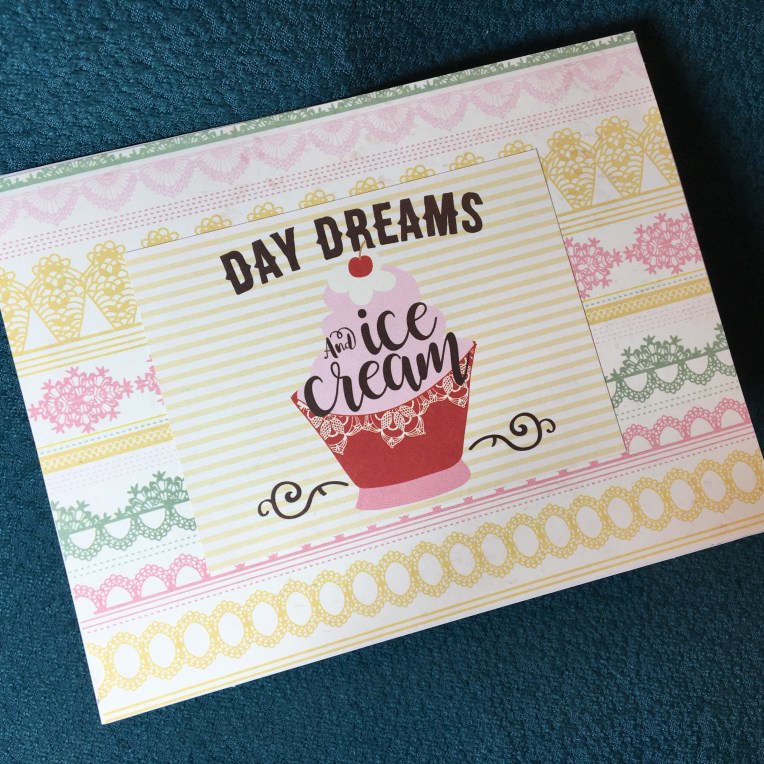
The card front is made with papers from Authentique’s Confection Collection.

IMG_7842-cu 2 spoons

See more Valentines by clicking here.

Supplies

Dies:

Papers:

Miscellaneous:

Under the Weather

13 side view of card
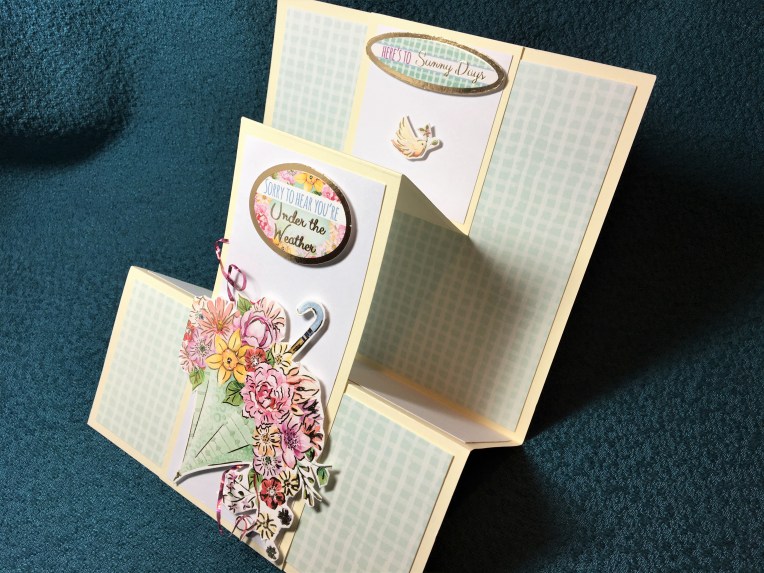
This is a double Z-fold card turned sideways using Hunkydory’s Happy Days – Adorable Scorables set and an 8.5 inches x 11 inches (21 cm x 28 cm) piece of cream card stock.

1 folds
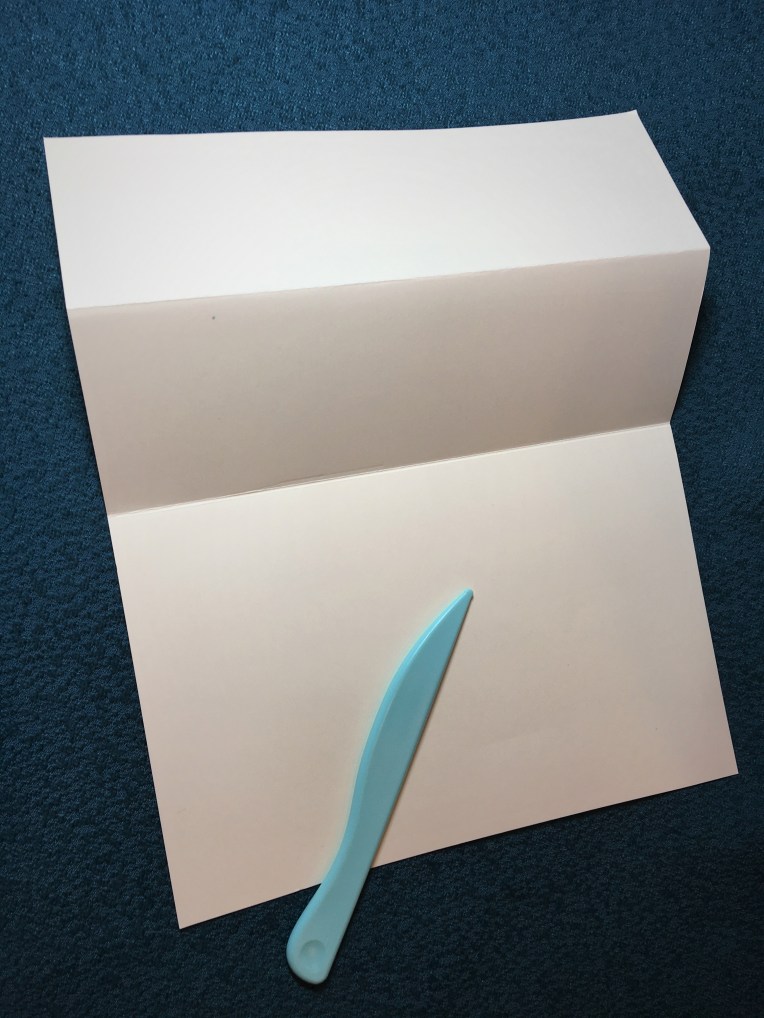
1  Fold in half to make 5.5 x 4.25 inches (140 x 107 mm) card. Burnish fold. Fold front in half to make 2.75 x 5.5 inches (70 x 140 mm) panel. Burnish fold.

2 cutting
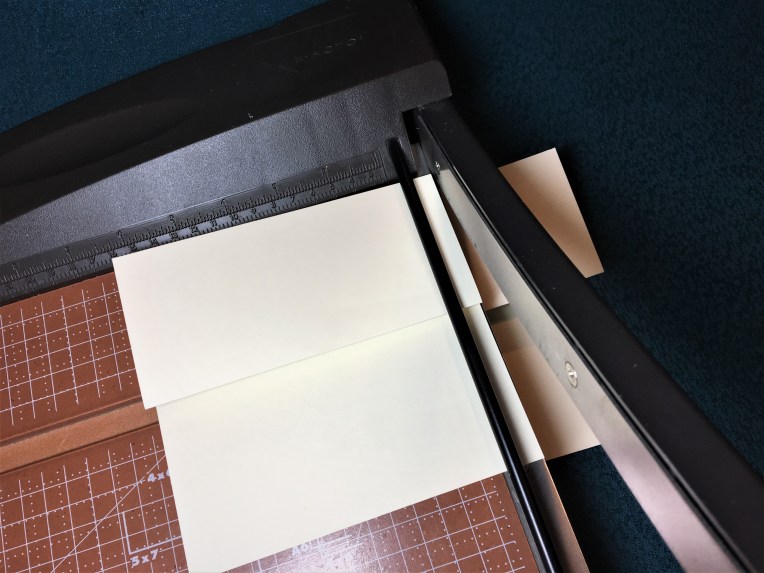
2  Cut folded card at 2.5 inches (63 mm) from the side.
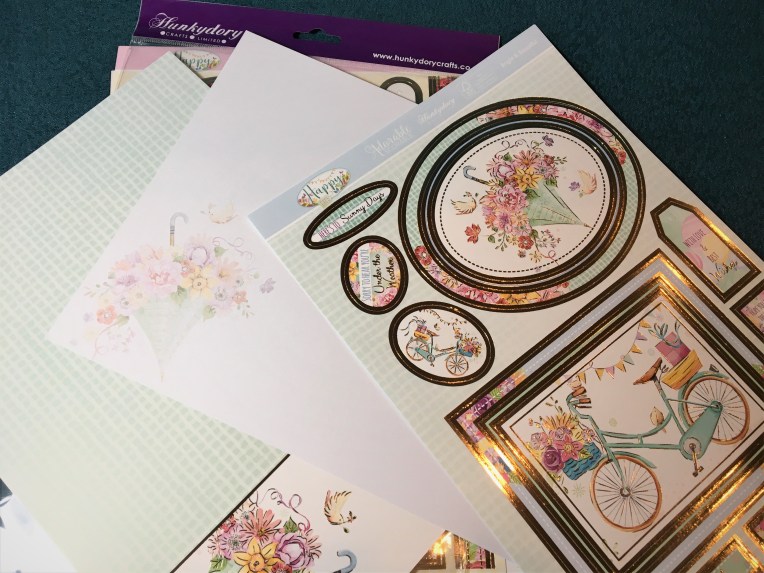
3 papers3  Pick your papers.

4 layers4  Cut from pattern paper two pieces – 5.75 x 5.25 inches (146 x 133 mm) and 2.5 x 5.25 inches (63 x 133 mm). Cut four pieces of white – 2.5 x 5.25 inches (63 x 133 mm), 2.25 x 5.25 inches (58 x 133 mm) and two at 2.25 x 2.5 inches (58 x 63 mm)

5 decorating
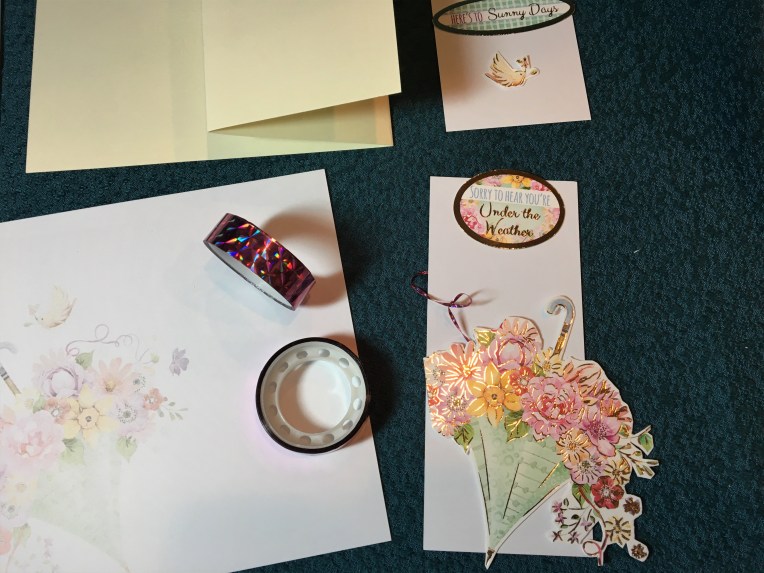
5  Fussy cut out front umbrella. Create thin ribbon by sticking back-to-back holographic tape and cutting into thin strips.

6 ribbon placement
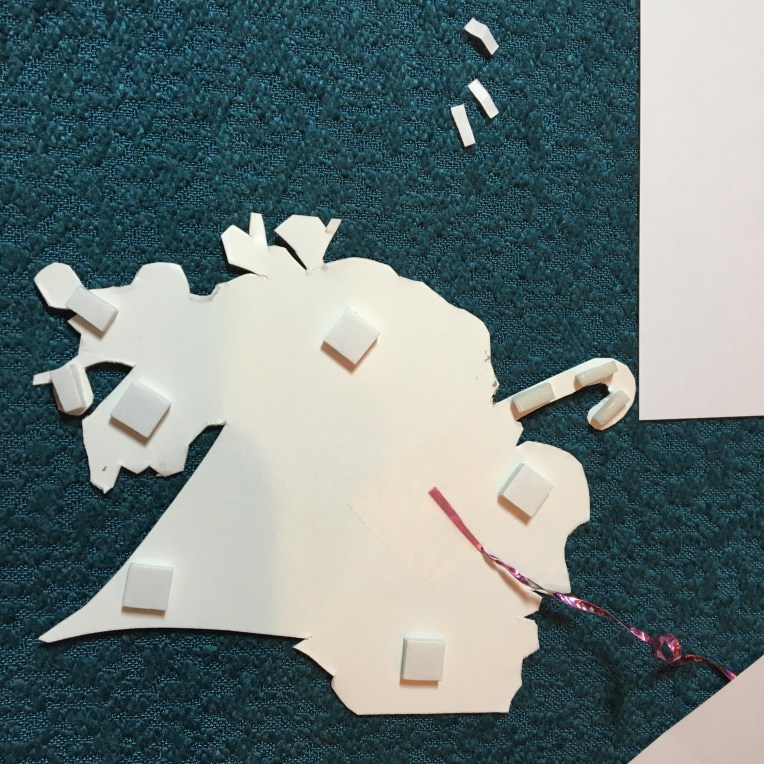
6  Figure-out placement of ribbon and tape on backside. Place foam squares on back.

7 ribbon secured
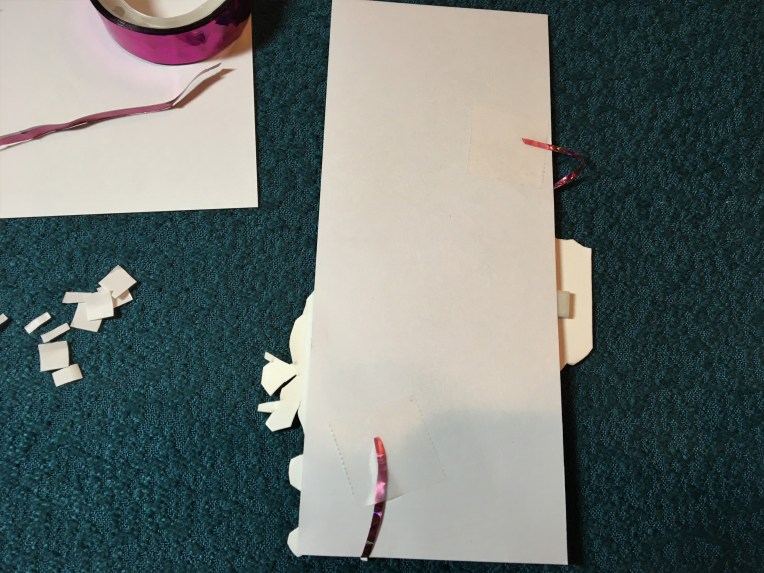
7  Adhere umbrella to white card (2.25 x 5.25 inches). Tape ends of ribbon to back of white card.

8 layers adhered8  Adhere patterned and white papers to appropriate spaces. There should be an 1/8 inch (3 mm) bit of cream card showing all around each of the top layered pieces. Adhere sentiment with foam squares above umbrella.

9 tape on doble z piece
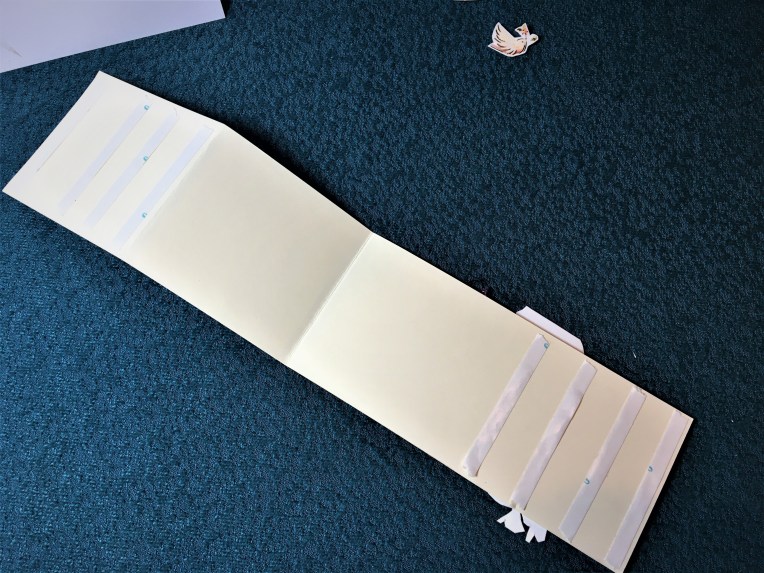
9  Add several rows of double-sided tape to the back edge section making sure the tape does not extend above fold marks.

10 front of card
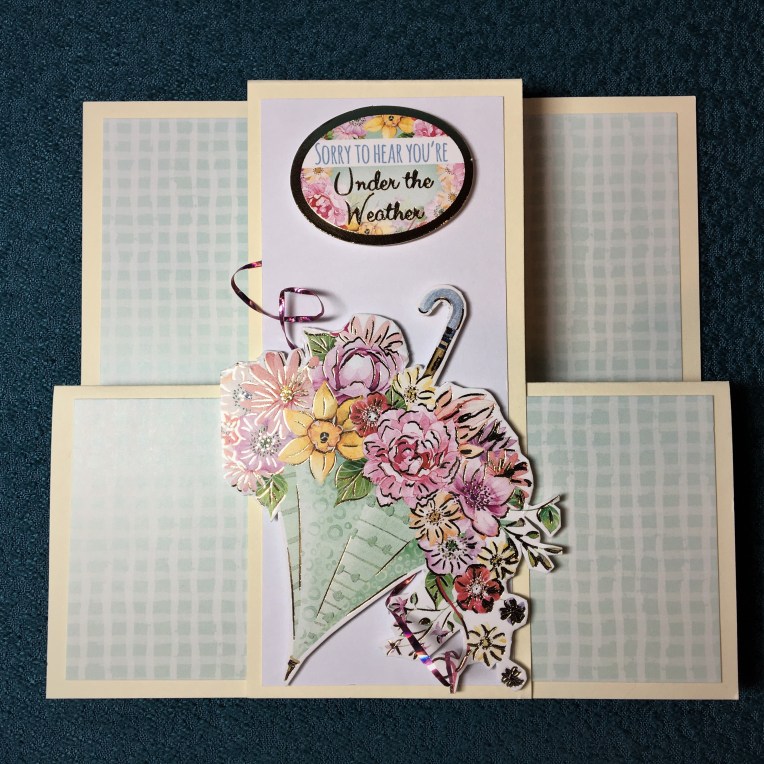
10  Peal off tape from behind umbrella section and adhere to front of car. Next pull off backing tape from back section and press card folded shut to adhere back of center layer to back layer of card.

11 card unfolded
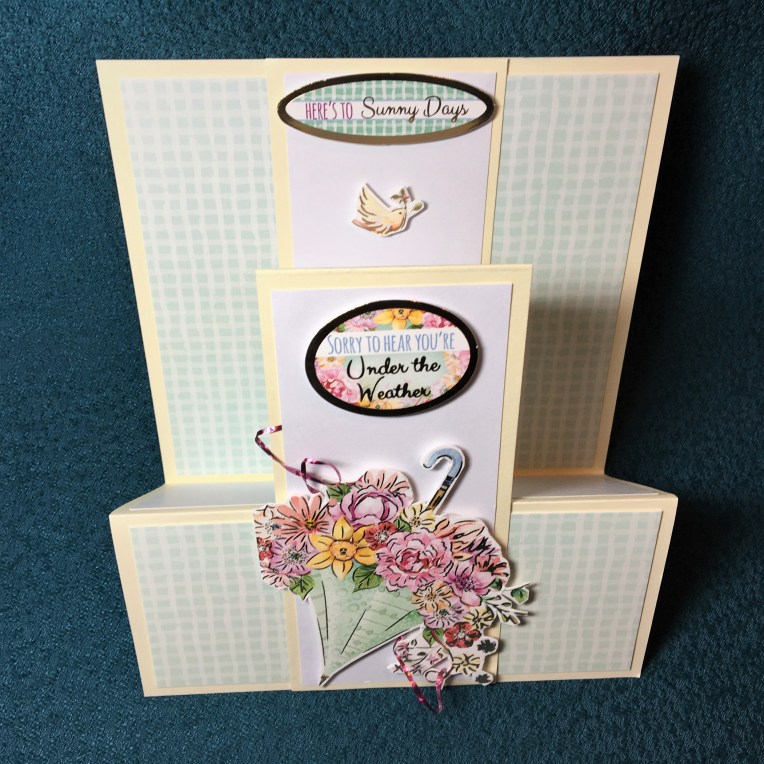
11  Add back sentiment and bird decoration.

12 back of card
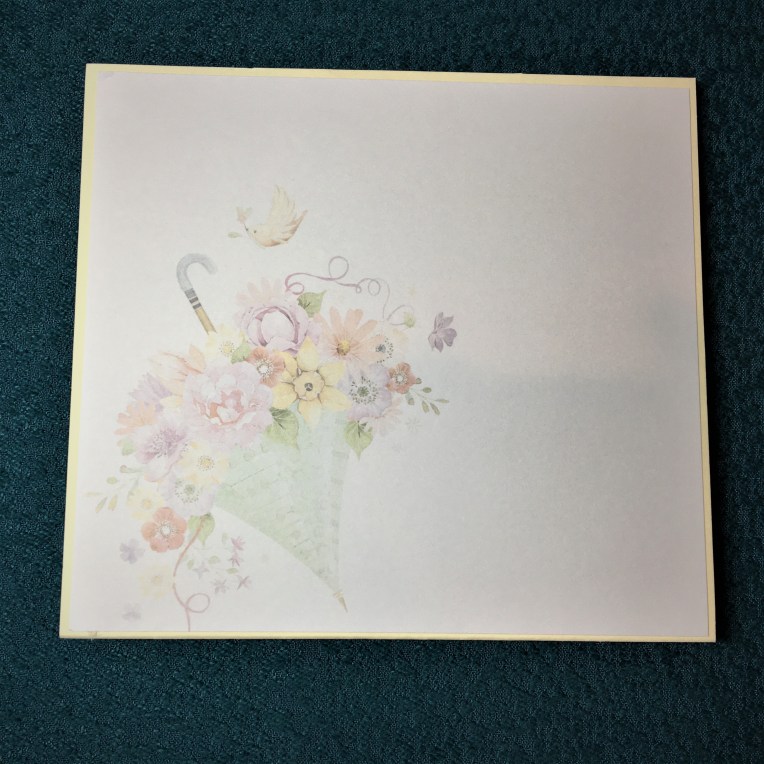
12  Adhere back paper to back of card as a place for a personal message.

Supplies:

  • Hunkydory Happy Days- Adorable Scorables set
  • Cream Cardstock
  • Holographic tape from Target
  • Double-sided tape
  • Foam squares
  • Scissors
  • Folding tool
  • Paper Cutter13 side view of card

An Old-Time Christmas

1 Parlor-Wide

Queen Victoria and Prince Albert are credited with popularizing the idea that families need evergreen trees adorned with babbles and sweet treats at Christmas.  This fold-out parlor card is in that tradition.

1 Tree CU

Christmas Tree:  The tree frame and pop-up mechanism were made using Karen Burniston’s Christmas tree pop-up die set. I embossed thin copier paper with the saucer die from Karen Burniston’s Cup Pop Stand die set and then cut a circle of cardstock to back it. Using the tabs cutting die from the Christmas tree set, I cut tabs on the embossed saucer to make the tree skirt. Next, I assembled the tree (an assembly video is on the link to die set below) and decorated it using fir branches from the Gemini fireplace accessories pack, ornaments from the Gemini Yuletide treasures die set, and candy canes and gingerbread men from Sara Davis’ Frosty Christmas die set. (The ornaments have glitter glue, Nuvo Drops and Aqua Shimmer on them.) The two star pieces are cut twice from recycled foil from an envelope liner. Once the tree was decorated, it was attached to its brown tree stand and then glued to the tree skirt tabs. Placement on card was based off where the furniture and tree would be when the card was closed.  A portion of the tree skirt was trimmed to fit the card size.

1 Furniture wide

Furniture:  Using Karen Burniston’s Family Room Pop-up die set I altered the style of sofa and changed the chair into a table. I cut the base pop-up mechanism from clear acetate and made the chair arms lower by trimming some of the middle arm piece off and adhere the remaining sides together. Next, I embossed some blue cardstock with an embossing folder by Jennifer Ellory to create brocade fabric for the sofa. I used the sofa seat/back piece to cut the basic shape and then trimmed and added an additional sofa back piece cut from Olga Direktorenko’s Elegant Room sofa die. I made my own template for the brown base and legs of the sofa trying to mimic an empire style settee. A separate back sofa piece was also cut with the Elegant Room die. The Family Room die set has the cushions die and pop-out mechanism on the sofa seat. The tea table was created using the table die from the Elegant Room die set and a Spellbinder’s scalloped circle die for the tabletop. The plate was cut using Courtney Chilston’s Birthday Shadow box die set and the candy cane and gingerbread man were made as describe in the tree section above. Placement on card was based off where the furniture and tree would be when the card was closed.

Fireplace:  Using a recycled greeting card back in an off-white, cut the fireplace out using the Gemini Fireplace Concept die set. Because the die is designed to pop-up from a folded card, I had to cut the fireplace out with tabs at the back edge of mantle and the floor of the fireplace. I I also cut the trim pieces from the same card back and glued the pieces in place after scoring the tab folds. I also cut a rectangular piece of black cardstock to become the back of the fireplace. Taping the bottom of the black back to the floor tab. I cut two brick pattern pieces from the Gemini Yuletide Treasures die set and then I glued them to the black back piece and created smoke and soot on the brick by rubbing a Tim Holtz Distress Crayon over the bricks. The fire and logs were cut from the Gemini Fireplace Accessories Pack. The flames were cut from cardstock that I had blended two colors of Spectrum Noir Sparkle Glitter Ink on, let dry and then cut. The logs and flames were glued together and then placed in fireplace with foam squares.

1 fireplace decorated

Wallcovering:  The wallcovering was created using two embossing folders by Olga Direktorenko. The main piece with pillars and molding is the Elegant Room folder and the crown molding is from the Timeless Room folder. I masked the molding and rubbed Distress Ink over the wallpaper. The mirror (cut from recycle mirror card from a box) wreath, bows, holly and coal shuttle were also cut using the Fireplace Accessory Pack. The embossed “wings” on each side are from the Timeless Room embossing folder.

1 Front Door

Door: The Front of the folded-up card is an elegant Italianate styled door. I used Olga Direktorenko’s entire Elegant Door die and embossing folder set. The windows are wax paper over pale yellow card stock and red marker. The door hardware is cut from gold foil cardstock and gold gel pen. The wreaths were cut from recycled boxes using lawn Fawn’s mini wreath die set.

1 Greeting wngs folded

Greeting: The greeting is on the front of the second folded-side of this tri-fold card. Merry Christmas is cut from recycled red foil envelop liner using a Card Deco Essentials die. The gold lacy background was cut from foil card using Spellbinders Charming Christmas Boughs die set. The greeting is offset to left to allow room for a personal message.

1 Parlor close up

Supplies

Dies:

Embossing Folders:

Stamps & Inks:

Papers:

Miscellaneous:

Vintage Alice

Slider Easel CardIMG_7737

When is an easel not an easel? When it is a flattened easel slider card. This card slides open to reveal two hidden messages.

  1. Stamp images onto white cardstock using a dark brown ink and heat emboss with clear embossing powder to set ink.IMG_7706
  2. Using watercolor pencils color images and then use water and brush to blend colors. Let dry.IMG_7715 (2)
  3. Rough cut images and glue to heavy cardstock. Let dry and then fussy cut out images.IMG_7717 (2)
  4. Take one printed card front and on back side make lines 1 inch (25 mm) from all edges.IMG_7718 (2)
  5. Using a blade knife and metal ruler, cut three lines in card front to form a door flap.IMG_7720 (2)
  6. Using a score board, score door flap at ½ inch (12 mm), 2 ¼ inches (55 mm) and 5 inches (127 cm) from door flap bottom edge. Fold door flap with valley folds at ends and mountain fold in middle.IMG_7723
  7. Cut second printed card front down to 6 1/2 inches (170 mm) x 4 3/8 inches (110 mm). make a cutting template for top by folding scrap paper the is 4 3/8 inches wide in half and cutting out design. Trace template on to top of card and cut out. Punch hole in center top for pull ribbon. Thread ribbon through punched hole and tie off ribbon. This is slider card.IMG_7725 (2)
  8. Using a 1 inch (25 mm) wide circle punch, cut a half circle at top center edge. Place double-sided tear tape at edges on three sides of back of printed card with door flap leaving top edge with half circle untaped. Peel off backing tape and place a second layer of tape on top of first layer of tape. Place one layer of red backed double-sided tape on back of bottom tap of door flap.IMG_7724 (2)
  9. Stamp sentiment on top half of slider card using stamp platform.IMG_7726 (2)
  10. Peel off red backing on taped door flap tab. Place slider card face down on back side of door flap card so that it is inside the three taped edges and the ribbon pull is at the half circle end. Adhere taped edge of door flap to slider card. Turn over card front and test slider so easel comes up. Reposition or trim slider card to eliminate catchpoints.IMG_7727
  11. Position 5 x 7 inches colored cardstock over back of printed card front. Peel off backing tape and line up one edge at a time until slider pocket is formed.IMG_7728 (2)
  12. Using a stamp platform, place card with ease up revealing hidden space to be stamped. Stamp sentiment.IMG_7729 (2)
  13. Decorate the slider easel by laying out stamped images on flatten card and playing with slider to see how and where to place double-sided sticky foam squares to one side of easel or other. Decorate card front frame edges with sticky backed gems, but do not block easel slider.
  14. A simple sketch showing how the card functions may need to be included in the mailing envelope for good CRX (Card Receiver Experience).IMG_7730 (2)

Materials:

Printed Card Front – Anna Griffin 5 x 7 inches -Delicate Engravings

Colored Lightweight Cardstock – 5 x 7 inches pale green (127 mm x 177 mm)

Heavy White Cardstock – 8.5 x 11 inches

Rubber Stamps – Stamperia – Alice

Brown Ink-Stampin’ Up Classic Stampin’ Pad – Chocolate Chip

Clear Embossing Powder – Recollections Detail Embossing Powder

Watercolor Pencils – Prima Marketing Inc. Watercolor Pencils – The Basics

Printed Sentiment – Anna Griffin-Delicate Engravings Card Toppers

Ribbon – 8 inches

Sentiment Stamp – Apple Blossom-Parisian Sentiments-Happy Birthday

Foam Squares – Scotch Create Permanent White Foam Squares

Sticky-backed Gems – Recollections Bling on a Roll

Glue – Cosmic Shimmer Specialist Acrylic Glue

Double-Sided Tear Tape – Scrapbook.com Clear Double Sided Adhesive Roll ¼ inch

Super Sticky Red Backed Double-Sided Tape – Home Hobby by 3L Extreme Double-Sided Tape 1/8 inch

Clear Tape – Scotch Magic Tape


Tools:

Blade Knife

Sharp Pointed Scissors

Metal Ruler

Heat Tool

Anti-Static Bag

Stamping Platform

Scoreboard

1 inch (25 mm) circle punch