This card was made for Craft Roulette #187 whose parameters included a card made with cardstock and not-cardstock, Santa’s workshop colors, collar(s) element and zig-zags.
As a simple Christmas card with a pieced paper background and sentiments from the paper pad. This was a quick card to make in less than two hours. I started with the Carta Bella Letters to Santa paper pad and a mail-order catalog page of a red Christmas shower curtain to die cut three different colors of chevron background die. After separating all the pieces into a tray, I took the woodgrain frame and glued it to an A2 (4.25-inches by 5.5-inches) kraft card base. Alternating the colors, I filled in the frame.
The two sentiment cards or toppers were cut from the paper pad. Santa’s helpers with their collars was popped-up on the card front with foam dots. Small dots of translucent red Nuvo Drops were added to the elves’ shoe and hat tips. Santa’s face with “Merry Christmas” greeting were added to the card inside.
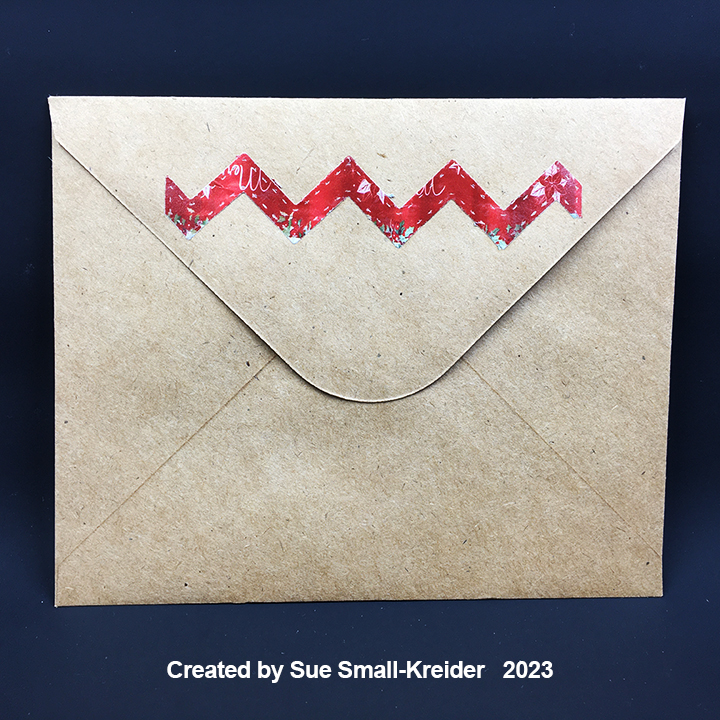
An extra red zig-zag stripe of red decorates the envelope flap.
Thank you for reading this blog post. I hope this inspires you and makes you smile. Please like and leave comments 😊
Materials Used:
Dies
Divinity Designs – Metal Die – Chevron Background – CBD474
Papers
Carta Bella – 6×6 Double-Sided Paper Pad – Letters To Santa
“Stepping out with my baby!” coons Fred Astaire in his top hat and tails. “Putting on the Ritz!” the monster in Young Frankenstein moans with his top hat and stick. These were the sights and sounds that serve as the theme of this wedding anniversary card for a couple married close to Halloween.
The card brief was for some interactivity that was spooky (but not too spooky) and included the word “BOO!” as well as “Happy 15th Anniversary.”
Cardbase: Starting with an orange 8 1/2-inches wide by 7-inches tall rectangle folded in half for a top-fold, slimline cardbase of 3 1/2 -inches tall by 8 1/2-inches wide. The front and back panels of the card base has mats cut using the three crosshatch dies from Karen Burniston’s Long Rectangles – Crosshatch die set and papers from Graphic 45. They are glued together and then glued to the cardbase. (I found placing weights – stamping blocks or cell phone – on the mats to keep them flat as the glue dried very helpful.) The inside has a piece of white computer paper cut to 6 3/4 -inches tall by 8 1/4 -inches wide and folded in half before being adhered to the cardbase with thin double-sided tape.
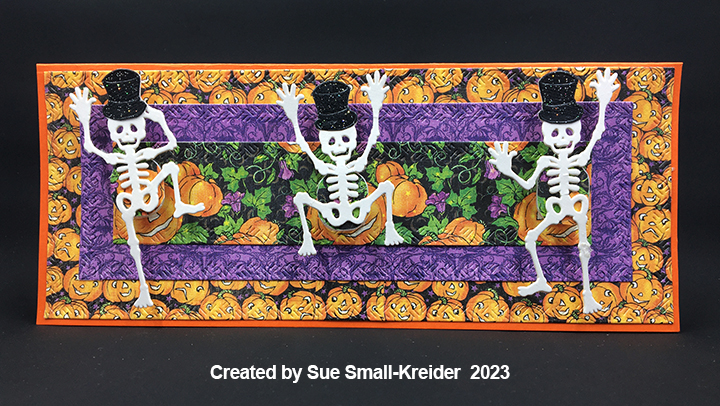
Card Front: Using the Creative Expressions Skeletons by Sue Wilson cut two each of the three skeletons dies from thick white cardstock and glued them together. Die cut just the hats/heads from black glitter cardstock. Fussy cut the hats from the heads and glue them in place. Cover one side of the wobbler springs with patterned paper to match the center mat of the card front. Glue the skeletons onto the patterned paper side of the spring and allow the glue to dry before gluing the springs to the card front.
Sentiments: The sentiments come from two different Karen Burniston die sets – Halloween Elements and Word Set 12 – Anniversary. The numbers are The Greetery’s Cake Pops Number Candles die set and fussy cut of their tabs and flame. The “th” superscript is from Karen Burniston’s Numbers set. (I cut two “Boo!” from black glitter and orange cardstock and offset them to create a shadow. For the anniversary greeting I used one layer of orange foil cardstock.)
Envelope:Karen Burniston’s jack-o-lantern border decorates the back flap of the envelope. It is cut in two pieces – the top orange and the bottom full outline from black glitter cardstock.
Thank you for reading this blog post. I hope this inspires you and makes you smile. Please like and leave comments 😊
Materials Used:
Dies
Creative Expressions – Craft Dies by Sue Wilson – Halloween Collection – Skeletons
Karen Burniston in cahoots with Riley and Company – Halloween Borders – 1247
Karen Burniston in cahoots with Riley and Company – Long rectangles – Crosshatch – 1151
Karen Burniston in cahoots with Riley and Company – Word Set 12 – Anniversary – 1137
Karen Burniston in cahoots with Riley and Company – Numbers – 1031
Karen Burniston in cahoots with Riley and Company – Halloween Elements – 1013
The Greetery – Wafer Thin Steel Dies – Cake Pops Number Candles
Papers
Graphic 45 – 8×8 Double-Sided Paper – Charmed Collection – If the Broomstick Fits
This card was made for Craft Roulette #186 whose parameters included a dude card, library colors, large flower(s) and stitched.
These parameters suggested a book box with a pop-up surprise to me. I followed Nicki Baxley’s idea of using an embossing folder with flowers for the cover of the book and Mary Gunn’s idea of a 3D book.
Before the show, I had been experimenting with a new Stampin’ Up stamp and die bundle of skeletons so I had a number of heat embossed skeletons ready. I also had been playing with a Whimsey Stamps ATC Book die set.
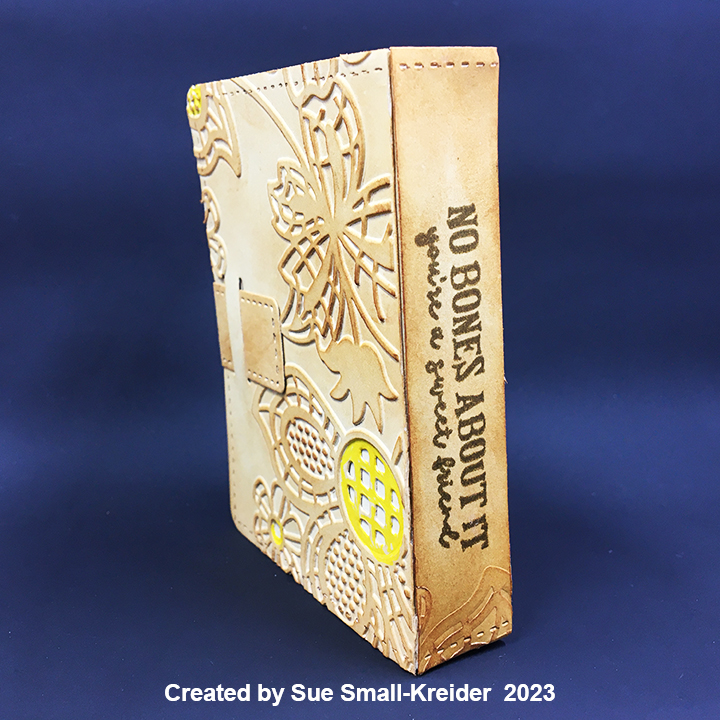
Book Box: Watch this video to see how the book box is assembled. Next, die cut two book cover pieces from kraft cardstock along with one of the box base piece from kraft cardstock and another from textured black cardstock. Run over one book cover with an embossing folder and color the flower centers with a yellow marker. Then trim off the front embossed cover and glue it to the top of the other book cover piece. Stamp the book title sentiment onto the embossed book spine and trim it off to be glued onto the top of the other book cover piece. With Distress Ink, age the book cover along the edges, spine and over the embossed flowers. Use a thin brown marker to color stitch marks embossed into book cover and closure strap.
Assemble the kraft box base. Cut off the tabs of the black box base piece and then trim off the four side pieces. Glue the black base into the kraft box bottom and then glue in black side pieces. Stamp sentiments to inside of book cover. Glue box onto inside bottom panel of plain book cover piece.
Book Pages: Cut three pieces of white cardstock the same width as the end sides and then trim to fit the outside of the box. Glue the white strips to the outside edges of the box. With a fine tipped dark marker, draw thin lines on all the white strips to represent page edges.
Skeletons: Stamp skeleton pieces onto black cardstock with watermark ink. Heat emboss with white detail embossing powder. Use dies to cut out pieces. Glue a jumping skeleton together. Cut an 11-inch by 1/4-inch strip of black cardstock. Fold strip in half and begin folding one strip end over the other to form a spring. Glue spring to the back of skeleton. Attach spring to inside of box. Add cat skeleton below the skeleton’s feet.
Sentiments: Stamp the “No Bones about it, you’re a sweet friend” sentiment on embossed book spine before gluing the piece onto book cover. Stamp the inside sentiments “Happy Halloween” and “BOO to you” before the box is glued inside the cover.
Thank you for reading this blog post. I hope this inspires you and makes you smile. Please like and leave comments 😊
Materials Used:
Dies
Stampin’ Up – Cut & Emboss Dies – Bag of Bones
Whimsey Stamps – Metal Craft Dies – ATC Book – WSD569
I have a crafty friend who loves Halloween. This card was made for her using Poppy Stamps Neighborhood Home Pop Up Easel set along with their Whittle Monsters, Whittle Creatures and Boo Poe Script dies.
It took just a morning to make. The die cutting of the Whittle creatures and monsters took the most time, but they went together easily and used up leftover scraps. For the house I had to make some decisions on open or pained windows. I decided some of the creatures should be outside rather than behind windows.
The easel stop is four layers of green and orange cardstock die-cut using the Boo Poe Script die.
I included a CRX sheet to show how to open the card. (You can download the CRX sheet for free.)
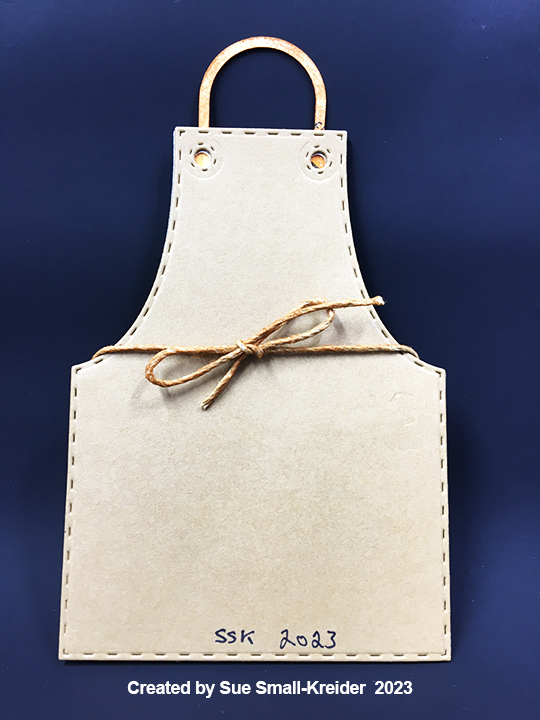
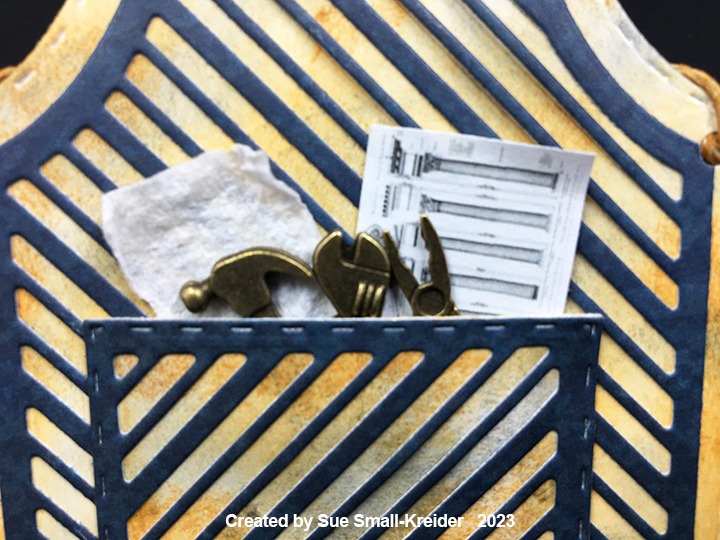
This card was made for Craft Roulette #185 whose parameters included a card a pocket, fresh and clean colors, element(s) that rhyme with “-ool” and columns.
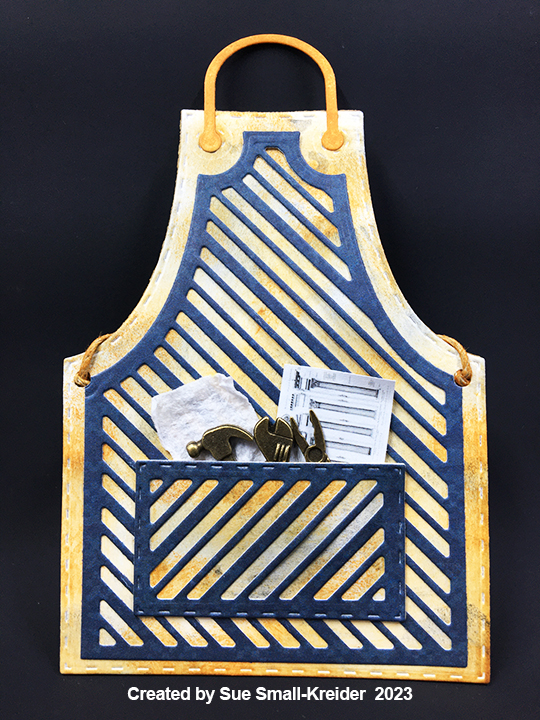
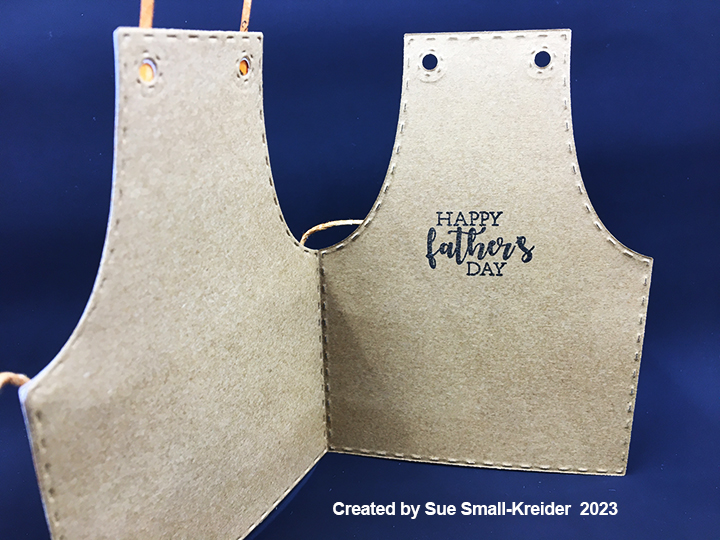
These parameters suggested a Father’s Day card to me with a wood shop apron, tools in a pocket and plans for Greek columns. For the apron, I used the Country Apron Tonic Craft Kit with its stripe inset for both the pocket and apron.
Cardbase: Fold a 4 1/2-inch tall by 7-inch rectangle of brown kraft paper in half for a 4 1/2-inch by 3 1/2-inch cardbase. Using the die for the apron base die cut the folded cardbase with the left die edge just off the fold, but with the stitching part of the die on the fold.
Apron: The apron base was die cut from white cardstock and inked along the edges for wear. The neck loop was inked to resemble a leather strap. Holes were punched for the apron ties and linen string was also inked brown to imitate leather. The string ties around the back of the card and keeps it closed until untied. Once the apron was assembled it was glued to the front of the card base.
Tools and Column Plan: The tools are metal charms by Docrsaft Papermania/ West Design Products of UK. The Greek columns were digitally produced. A piece of kitchen towel is also in the pocket.
Sentiment: “Happy Father’s Day” was stamped in black ink inside the card using a stamp included in the kit.
Envelope: The card will fit in an A2 envelope.
Thank you for reading this blog post. I hope this inspires you and makes you smile. Please like and leave comments 😊
Materials Used:
Dies
Tonic Studios – Tonic Craft Kit – Country Apron
Stamps
Tonic Studios – Tonic Craft Kit – Country Apron
Papers
Photoplay – 12×12 Double-Sided Paper Pad – Stars and Strips Collection – Soda Bottles
White and Kraft Cardstock
Ink
Ranger – Tim Holtz – Distress Ink- Rusty Hinge and Black Soot
Making a gingerbread house always involves candy and white icing. Half the fun of making a gingerbread creation is sampling the construction elements.
This Christmas card is one that I hope the recipients won’t try and taste the ingredients. I used Queen & Co.’s Holiday House Kit to make this shaker card. In the kit you get dies to decorate the foam shaker base with pre-cut acetate window cover as either a gingerbread house or a Victorian house. I chose to use polymer clay shaker elements that are from Queen & Co. but not included in the kit. (There are solid color shaker beads included in the kit as well as stamps.)
Cardbase: I used a purchase brown kraft cardstock and matching envelope in an A7 size. The card I cut it down to a 6×4 3/4-inch side-fold card so that there would be room in the envelope for the foam shaker. The front panel was covered with a 4 1/2×5 3/4-inch piece of patterned red paper from the Queen & Co. Happy Holly Days mat stack. The inside white panel is the same size cut from white copier paper.
House: Brown patterned paper from Queen & Co. Homemade Holiday mat stack was use for the gingerbread house and man. The white icing and candies were cut from white cardstock and made sparkly with a wash of a glitter gloss aqua brush. The stripes on the candy can were drawn on with a red marker while the round peppermint candies have a die to cut the red swirl. Gum drops on the roof ridge were cut using a die in the kit and brushed with glitter gloss. The tiny peppermint candies are polymer clay shaker elements from Buttons Galore More.
Once the house front is made, position the foam frame on the cardbase to allow for the gingerbread man and candy cane to hang off the house, but not the card. Adhere foam to cardbase. Add strips of leftover foam to the inside of the frame to section off areas where the windows are. Add shaker elements to the sections. Place the acetate piece over the foam frame to seal in the elements. Color the exposed sides of white foam with a brown marker. Using double-sided tape, attach the decorated house front to the acetate piece.
Decorations: Glue candy pieces to decorate the house. The gingerbread man is cut in two pieces – bottom white with glitter gloss and the top from the brown patterned paper. Attach the man with thin foam squares to fit over the polymer clay candies.
Sentiment: The inside sentiment is a clear stamp included in the kit stamped in red ink.
Envelope: A gingerbread man from a Joanna Sheen card making kit was stamped in dark brown ink and brushed over with glitter gloss on the back flap.
Thank you for reading this blog post. I hope this inspires you and makes you smile. Please like and leave comments 😊
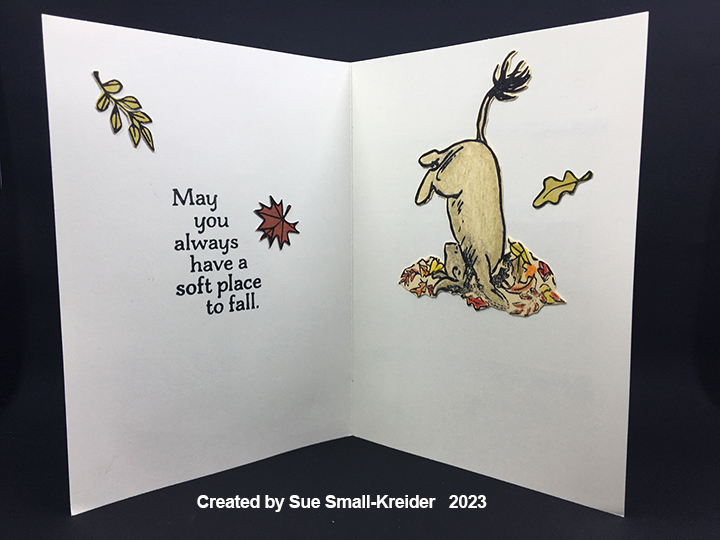
Crisp, colorful leaves gently falling off tree branches sometimes bring bitter-sweet emotions. A.A. Milne’s characters of Winnie-the-Pooh and Eeyore the donkey are playful reminders that fun can be had even in the worst of times.
For this card I used stamps and papers from Impression Obsession featuring E. H. Shepard’s Winnie-the-Pooh and Eeyore along with leaves and sentiments designed by Dina Kowal. The images were stamped in black ink and then colored with watercolor pencils. (I elected not to water brush the coloring.) Next the colored images were fussy cut. Additional leaves were stamped on some of the matted papers used on the card front and fussy cut.
The design principle of three is floated with the leaves throughout the card. Notice that the heart shaped leaf is always pointing to where your eye should flow. Leftover paper scraps were used to decorate the card back.
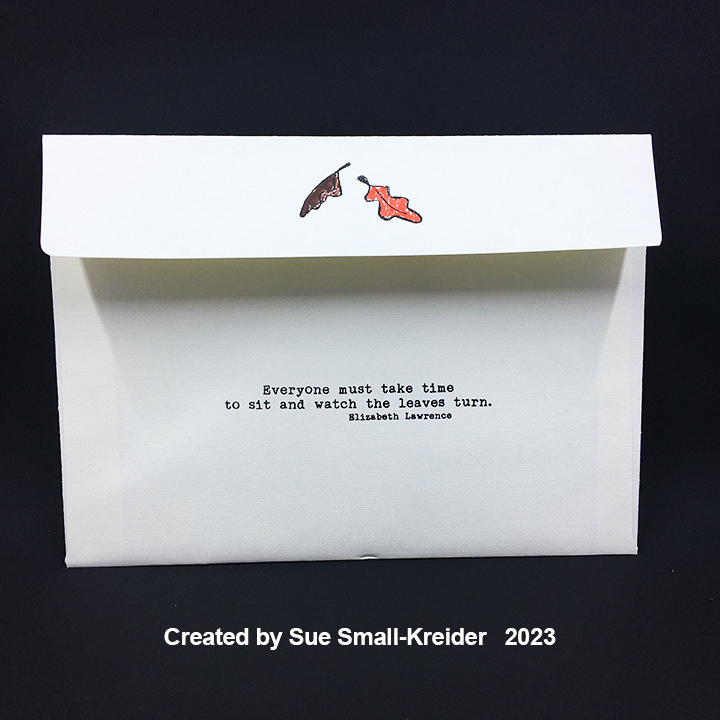
For the envelope back, leaves and a quote from Elizabeth Lawrence about taking time to watch the leaves turn colors, are stamped in black ink and colored with permanent markers.
Thank you for reading this blog post. I hope this inspires you and makes you smile. Please like and leave comments 😊
Materials Used:
Stamps
Impression Obsession – Clear Stamps designed by Dina Kowal – Pooh Window – CL1138
Papers
Impression Obsession – 6×6 Double-Sided Paper Pad – Classic Pooh – PP004
Park Lane Paperie – A6 Cardbase and Envelope – Ivory
Ink
StazOn – Solvent Ink – Jet Black
Ranger – Tim Holtz – Distress Watercolor Pencil- Antique Linen, Barn Door, Fired Brick, Mustard Seed, Peeled Paint, Rusty Hinge, Spice Marmalade and Walnut Stain
Pigma – Mircon 01 Fine Tip Pen – Black
Sharpie – Permanent Marker – Ultra Fine Tip – Orange and Brown
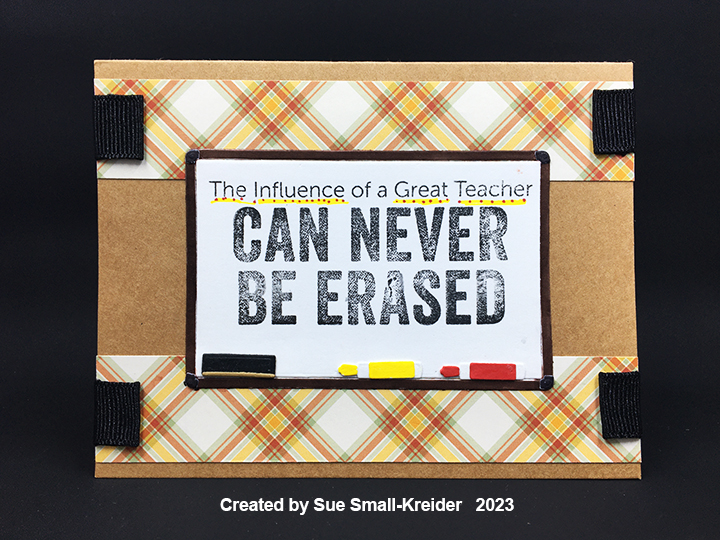
This card was made for Craft Roulette #184 whose parameters included a card for a teacher, tartan colors, Autumn or Spring scene and wrap.
Everyone has influenced someone’s life. Teachers specifically help shape lives with their explanation of the way things work. This is a card to say thank you and offer encouragement to teachers who may feel under appreciated in public schools.
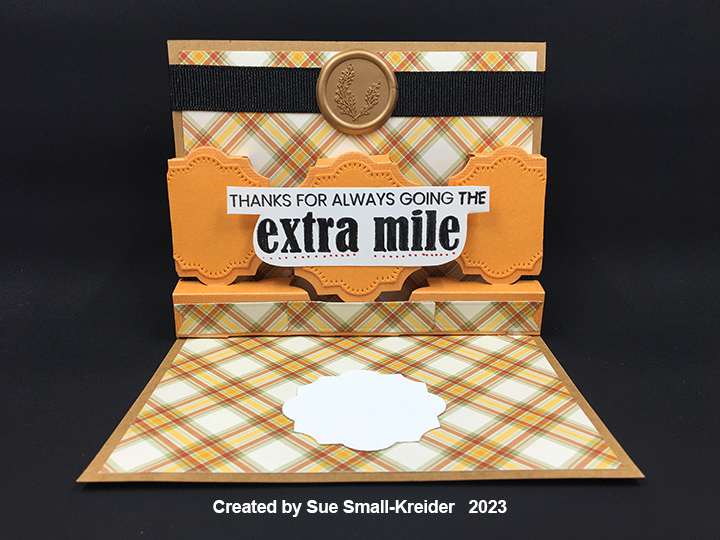
I used My Favorite Things Dry Erase, Whiteboard die set along with their clear stamp set Teach, Sleep, Repeat for this card along with Karen Burniston’s Little Label Pop-Up to make the inside sentiment feel like a special award.
To decorate the envelope, I glued strips of the plaid paper to the back flap.
Thank you for reading this blog post. I hope this inspires you and makes you smile. Please like and leave comments 😊
Materials Used:
Dies
My Favorite Things – Die-Namics – Dry Erase, Whiteboard -MFT-2532
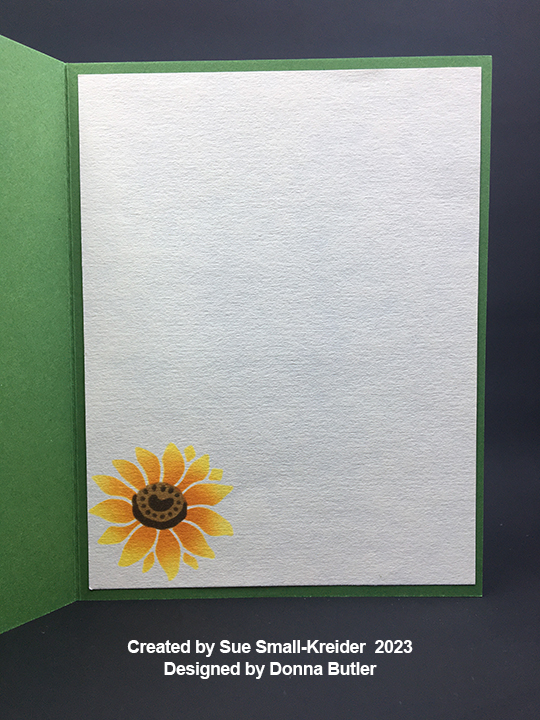
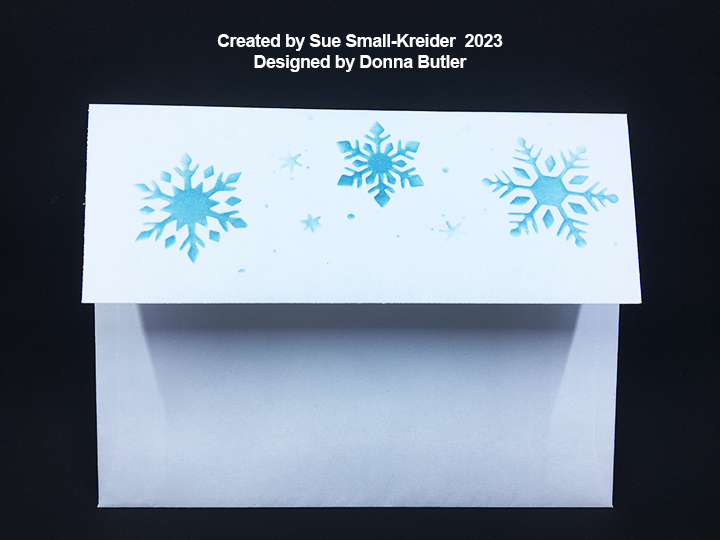
Last week I went to a cardmaking class using stencils taught by Donna Butler and had a chance to catch-up with some crafty friends I hadn’t seen in a while. Here are the cards I made.
EMBOSSED FALL LEAVES CARD
We embossed the stencil first into the top panel and then inked the piece. Inside and on the envelope we masked off a portion of the stencil to single out various elements.
SUNFLOWER CARD
Using several shades of ink easily created these striking flowers with 4-part layered stencils.
SNOWFLAKE CARD
Thank you for reading this blog post. I hope this inspires you and makes you smile. Please like and leave comments 😊