This card was made for Craft Roulette #207 whose parameters included an A2 size card, ice cream store colors, tasty or tastes element and a banner.
I wanted to make a pop-up or 3-dimensional A2 size card for this episode of Craft Roulette, so I modified a 3D postal truck I had made for my mail carrier to say thank you to fit into an A2 size envelope (4.25×5.5 inches.) (See Mail Truck blog post.)
I saw a side-fold of like this card on social media and decided to make my own version using a top fold A6 (4 1/2 x 6 1/4-inches) purchased card base and the egg die from Karen Burniston’s Spring Animals die set.
Cardbase: Using a purchased A6 card base, I used double sided patterned paper from Kat Scrappiness to make a mat frame on the front panel, piecing it together as the patterned paper was 1/2-inch smaller than the card height. Added a yellow 5 3/4 x 4 1/4-inches panel over mat frame. On the back panel, I used the leftover pieces to make an interesting symmetrical design utilizing both patterned sides of the paper.
Egg Panel: A 4×5 1/2-inches rectangle cut from white cardstock, I lightly marked in pencil lines at 1 1/8-inches, 2 3/4-inches and 4 3/8-inches. Along the tops and bottoms of these lines I marked 5/16-inches from the edge. These “T” marks where to center the top or bottom of the egg die. I used the center crack in the egg die to center on the vertical lines. After die-cutting out the six eggs, I erased the pencil marks. (I found it easier to sketch out the egg placement on the back side of the card, tracing around the die to see if it looked right before die-cutting from the front of the panel.) (I added two clay flower shaker elements to the front of the card.)
Shaker Assembly: Position the white panel over the yellow panel and mark the corners of the white panel on the yellow as well as tracing the egg cut-outs onto the yellow. Using double-sided tape, adhere a 4×5 1/2-inches rectangle of clear acetate/film to the back of the white panel. Add strips of narrow foam tape to create boxes around the traced eggs on yellow panel. Using an anti static tool to apply powder to the inside of each box (including the sides of the sides of the foam tape) and back side of acetate/film on white panel. Add confetti and clay sprinkles to each box, avoid putting too much in each box and level out any high points to below the foam tape level. Holding the card base, carefully peel off the backing paper on the foam tape. Remove any confetti from tape. Using the corner marks on the yellow panel line-up the white panel and adhere to foam tape, sandwiching the confetti inside the boxes. (I like to use the confetti sequins from This Calls For Confetti who have a variety of colors, sizes and finishes and have wonderfully quick customer service/delivery time.They also have the best anti-static tool for making shaker cards.)
Sentiment: I cut out the words only using Karen Burniston’s Happy Easter word die from purple cardstock for the inside of the card.
Envelope: I cut out a sticker from the decorative paper to embellish the back of the envelope flap.
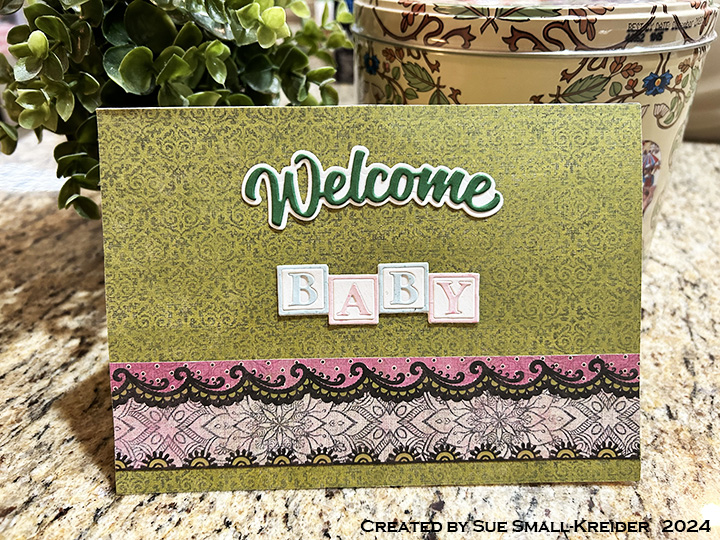
This card was made for Craft Roulette#206 whose parameters included Project type of card with a heart, vintage colors, plant(s) element and lace on the base.
In honor of Craft Roulette’s host Mary Gunn’s new grandchild, I made a new baby card using the parameters listed above.
Cardbase: I used a 5×7-inch purchase cardbase and covered all four panels with vintage green patterned paper. The decorative stripes and lacy decorations were scraps from the opposite side of the paper.
Potted Plants: I decorated the panels with potted animal planters that were made from solid color cardstock using My Favorite Things Potted Pets die set.
Pop-Up Twist Panel:I used Karen Burniston’s Twist Panel Pop-Up die set. Watch video below for instructions.
Sentiments: I used Karen Burniston Welcome and Baby Charms die sets to create the “Welcome Baby.” In the video above I explain how I used Karen Burniston’s Connectors word set dies to perform “word surgery” to create the phrase “oh baby.”
_____________________________________
Thank you for experiencing this blog post. I hope this inspires you and makes you smile.
The sweet pinks and reds of old-fashion rose bushes always remind me of their scent. This Mother’s Day card is a loving way to say how much mothers are appreciated.
I used Honeybee Stamps’ layering Bold Backgrounds Vintage Roses dies for the front of the card. The roses are cut from three different shades of pink cardstock and inked with a bright red ink. The leaves were cut in an apple green and inked with a medium green ink. There layering guide which you have to download from the Honeybee Stamps website shows how the the three sizes of roses are assembled. The sentiment banner is a strip of apple green cardstock 4 1/2-inched wide by 1/2-inches tall with fishtails ends cut free-hand and inked to match the leaves. The gold foiled sentiment strip “Appreciate You” is from Spellbinders that I had batched foiled previously.
The inside “Happy Mother’s Day” sentiment is cut from the apple green cardstock using a die by Papertrey Ink. The back of the card is covered with a striped sheet of printed paper from This Calls for Confetti.
I went stash diving to find a old-fashioned looking rose for the back of the envelope and ended up using a stamp set from Pinkfresh Studios called Pretty Paisley. The roses were stamped in melon red ink while the tiny sentiment “It’s the little things that make life big” was stamped in a green pear ink.
This card was made for Craft Roulette #204 whose parameters included: thinking of you project, fairy tale colors, hear(s) or ear(s) element and stamped background.
To learn how I made the card, watch this process video.