Valentine Swing

Garden swings have played a role in the courtship of the lovely couple for whom this card was made. So, an interactive card to reminded them of their early days getting to know one another is appropriate.

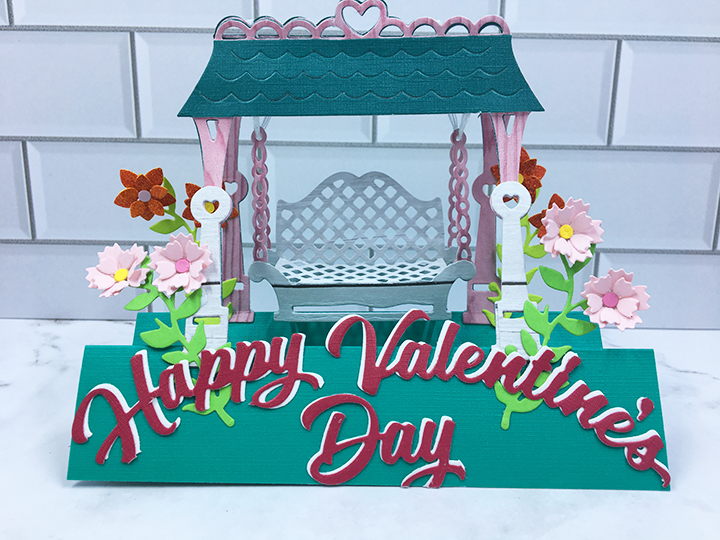
The starting point for this card is a new Tutti Designs swinging bench die and a “M” fold stepper base.

Die-cut:  Cut the whole swing die out six times – 2 green, 2 pink wood, 2 white wood. From these six designate one of each color to be the front section and one of each color to be the back section. The pink wood pieces will be used as the section bases. The chain with the bench attached should be trimmed from the roof of the pink pieces. Cut the rounded bench arms with the chain attached off the pink bench pieces and discard the bench remains.

Front Section:  Trimmed off the green roof from the front section and glue the two green posts to the back of the pink wood piece. From the white wood piece, trim off the roof from the chain with bench attached and posts. Then trim down the post pieces to the circles. These shortened white posts glue to the front of the pink wood posts.

Back Section:  Trim off the chain with bench attached from the green piece. Glue the green piece to the back of the pink piece to strengthen it. From the white wood piece, trim off the roof from the chain with bench attached and posts. Then trim down the post pieces to the circles. These shortened white posts glue to the front of the pink wood posts. Save the white roof for later.

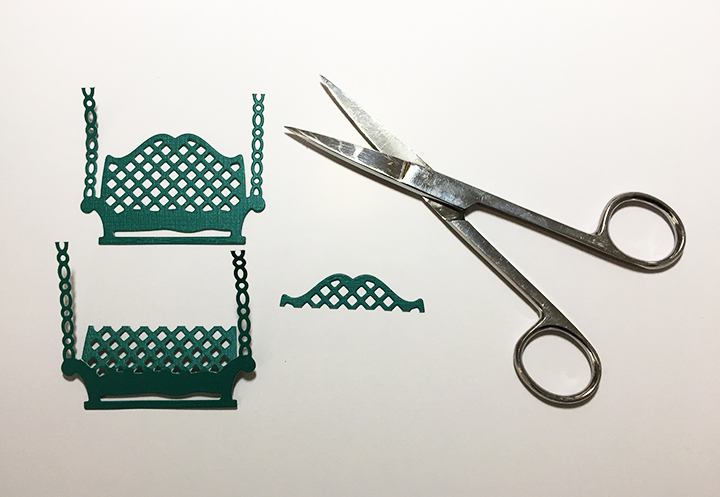
Bench:  Trim off the chains from both white bench pieces and discard the chains. On the front bench piece snip the two connecting lattice bars from the arms. (See first photo) Bend down the lattice seat and trim the curved portion off so that the seat is ½ inch deep. (See second photo) From white scrap, cut two strips 1 inch by ¼ inch. Fold ¼ inch tabs at each side of the strips. (See third photo) Glue strips to the back side of front bench under the bend for the seat. Glue the remaining tabs to the front of the back white bench piece. The bench now should have a rectangular frame once which the lattice seat will rest on. (See fourth photo and photo below)

Glue the pink chains to the back sides of the bench arms, keeping the chains perpendicular to the bench seat. Cut two pieces of white embroidery floss at least 5 inches long. Thread a piece of floss through the top chain link and then through the other top chain link. Repeat with second piece of floss on opposite bench side.

Stepper Base:  Cut a piece of green cardstock 5 inches by 5 ½ inches. With the 5 ½ side of card vertical, score the shorter side at the middle (2 ½ inches) and at the quarter marks (1 ¼ Inches and 3 ¾ inches). Fold the middle as a valley fold and the quarters as mountain folds. Your folded base should resemble a “M.”

Assembly of Card:  Lay the back pink-roof-with-posts piece on your work surface and position the bench and its floss threads as it would hang from the roof. Flatten the bench to see where the chains will move to and adjust bench so threads with reach roof. Tape only the back two threads to front of pink roof. Trim tails off the two taped threads. Glue the white roof piece over the taped threads.

Place the front pink-roof-with-posts piece on top of the back piece aligning the posts. Glue only the top heart and scalloped roof trim of the front and back pieces together.  Position the front chain threads over the front pink rood and tape to roof. Open glued front and back to a tent-like shape. Reposition front taped threads to make bench level and free to swing. Glue green roof over the taped threads.

Glue the back posts to the back ‘mountain’ of card base and front posts to front “mountain” of base. Decorate with as desired with flowers and sentiment. Add a white strip of cardstock to back side of base to write a personal message.

The card will fold flat to fit into an envelope, by flipping up bench seat and flatten bench frame.

I decorated my card with some tiny flowers made from a Spellbinders die set and the sentiment (Karen Burniston die) was cut once from red and once from white and then glued slightly askew to give highlights.

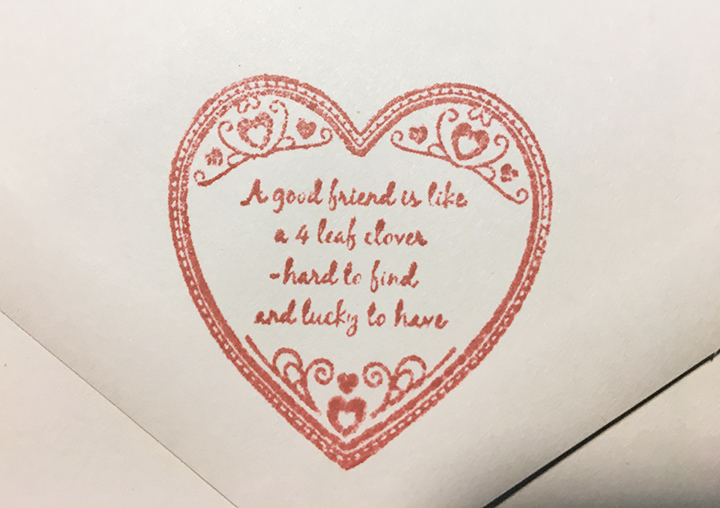
As is my style, I stamped the back of the envelope with a BoBunny hearts stamp three times in a cherry red ink to hint as to what is inside.

You can view more Valentines by clicking here.

Thank you for reading this blog post. Please like and leave comments 😊

Materials Used:

Dies

Stamps/Ink

Papers

Miscellaneous

Happy Retirement

Linda, Thank You For A Job Well Done

A new year is coming and for those who are retire this year, 2021 will be a start of a new kind of life.

I needed to make a retirement card for a co-worker who announced her retirement two weeks before December 31, 2020.

Having a large collection of Hunkydory sentiment dies I was able to find all the words I needed except for the word “Done” which I pieced together from other words and placed on a piece of low tack tape to act as a transfer sheet while I added glue to the back and then adhered to the card.

Wishing You A Happy Retirement

I used paper and a color scheme I had recently used on another slimline card with a doubled-sided First Edition paper that had lines and dots on it that I could line up the words one. The inside sentiment was glued to a piece of vellum laid over the grid pattern on my craft mat to align the words. I personalized the front of the card by adding the individual’s name using some gold mirror card and a tiny Spellbinder’s alphabet die set.

A light blue organza ribbon was tied around the card and a bow tied on. A shiny flat back button was glued to the center of the bow.

The back flap of the envelop was also heat embossed with the gold to say thanks and to hint at the card inside. 

Thank you for reading this blog post. Please like and leave comments 😊

Materials Used:

Dies/Stamps

Inks/Embossing Powders

Papers

Miscellaneous

A Drop of Sunshine’s Inspiration Box

Have to share some inspiration with you from a papercrafter who goes by the name Drop of Sunshine. I have been inspired by her mixed media creations, but she has shared some papers and digital kits to make things like this exploding box.

To access her free digital download that I am linking to, you need to be a member of Craftworld.com which is a free membership based site where papercrafters (and crafters in general) have a community to post and share their projects, get inspiration, and converse with crafters from all over the world.

I downloaded and printed the six sheets that make up this exploding exploding box digital kit on lightweight white cardstock. I followed Drop of Sunshine’s YouTube tutorial and only changed up the center decoration by cutting the four flower wreaths with no background into two cones, one spiral strip and one base mat. The two cones I glued one on top of the other and used the spiral to make the top of the tree. I fussy cut most of the individual rose blooms and leaves and shaped them by scoring, folding and curving the leaves with my fingers. The roses are in several sizes so the layers are largest on the bottom and the smallest on top again with folding and curving the petals with my fingers.

From scrap cardstock left from fussy cutting I made four small loops to act as ‘faux foam tape’ to raise the circle sentiments up. The other sentiment strips were curved and pleated using my fingers. I used a black pen to write the recipient’s name on one of the blank banners.

Below is all the flower and sentiments I had left over from the kit. I made the box in about two hours using only scissors, glue, ruler, scoring board and black pen.

Thank you for reading this blog post. Please like and leave comments 🙂

Please check out Drop of Sunshine’s YouTube Channel too!

Celebrate 2021! – Part 2

A new year is almost here and the celebration of it should be festive even if we can’t celebrate together.

This card is made with the “Let’s Celebrate!” die set from Die-cutting Essentials issue 72 and the “Fabulous Fizz” stamp set from Simply Cards & Papercrafts issue 212, along with a pre-cut and scored 5 inches x 6 ½ inches card base and envelope.

Mirror card is used as the background that peaks through the die cute sentiment on this card. The card front, after it was covered in a patterned paper, was trimmed to 4 ¾ inches x 6 ¼ inches so that the mirror card border would show. When the word “Celebrate” was cut out the waste from the loops was saved and glued on to the mirror card. The year 2021 was cut from mirror card and glued to the front of the card.

Inside the sentiment was stamped with Versamark Watermark ink and heat embossed with a matte gold embossing powder from Ranger. The confetti was heat embossed with gold tinsel embossing powder.

To add interest to the mirror card inside, a champagne glass was cut from vellum and the glue applied to mimic a liquid filled glass. Bubble made from Glossy Accents were added over the glass.

The closed card, after the glossy accents had dried for several hours, was rolled between cutting plates on a die cutting machine to emboss the “Celebrate” and “2021” into the mirror card.

The back flap of the envelop was also heat embossed with clear gold sparkle confetti to hint at the celebration to come.  The card could be filled with sequins when being placed in the envelope to add to the card recipient’s experience. (In my case, knowing the recipient will not appreciate the mess to clean up, I am omitting this step.)

Thank you for reading this blog post. Please like and leave comments 😊

You can see Celebrate 2021! – Part 1 by clicking here.

Materials Used:

Stamps/Dies

Inks/Embossing Powders

Papers

Miscellaneous

Sending Love

What to send to cheer a friend up when they are an ocean away and going through some tough times is the theme of this card – part thinking of you, part Valentine.

A whimsical mouse carrying a heart is a stamp set designed by Bonnie Krebs for Art Impressions. It comes with coordinating dies to cut out the image and with a companion die the twist frame it makes an interactive element that can twist to see the front and back of the image.

I colored the image with watercolor pencils and brushed them with water. Once the images were dry, I added a layer or two of Glossy Accents, a clear gel that adds dimension. (Hint: if you get air-bubbles in the gel, quickly pop them with a straight pin before they harden into the piece.) I let these pieces dry over-night before I glued them together.

Using a pre-cut and scored 10 inches x 6 ½ inches card base with coordinating envelope, I cut three pieces of 5 inches x 6 ½ inches double-sided patterned paper from the Hot Off the Press Spice Market set. I glued two of the pieces to the front and back of the card base and the third was glued inside the front panel. Because the pattern paper is thinner than cardstock, I used the reinforcement of the double paper for the card front so that it would be sturdy when I cut the twister window from it. (Hint: if you glue the papers on first, you only have to die-cut the window once.)

Once the window was cut, I decorated the card front with a foiled sentiment strip and yellow ribbon. The slotted mouse image pops in the notched center of the window perfectly. (Hint: use up your cardstock scraps by hot foiling a bunch of sentiment strips at one time and save for future projects.)

For the inside of the card, I wanted a pink gingham background to match the pink of the heart and also something lighter and not so intense in color as the front of the card. I found it in in a journaling card pad from Prima. (Hint: if you love a paper collection and can’t afford the larger paper pads, try the journaling cards or 6 x6 pads as they are affordable and often can be found in the clearance sections.) At 4 inches by 6 inches the journaling card left some white space on which I doodled some circles, hearts and arrows.

The back flap of the envelope has a heart with a friendship message stamped in Blushing Bride pink to give a hint as to what was inside.

See more Valentine’s by Clicking Here.

Thank you for reading this blog post. Please like and leave comments 😊

Materials Used:

Stamps/Dies

Inks/Watercolors

Papers

Foiling

Miscellaneous

There’s Always Room for Cake

There is always room for indulgence on one’s birthday. This card is inspired by the Daisy Mae Designs bakery and sweet shops collection of stamps and stencils.

I created the gingham stenciled background with the striped stencil inked one way for the vertical stripes and then turned once to ink the horizontal stripes in coral ink. The doily is inked with the green pistachio through a stencil. The cake was stamped with a permanent black ink and then colored with watercolor pencils and mixed using a waterbrush.

Sentiments stamped on the front of the card come from the Daisy Mae stamp set while the inside sentiment is a Spellbinders’ foiling plate.

The envelope’s back flap was stamped using a mask to stamp just the fruit atop the cake and the spayed with gold mica mist.

Hope this card brings a smile to your face. 😊 Please like and leave a comment.

Supplies:

Stamps/Stencils

Inks/Watercolors

Papers

Foiling

Miscellaneous

Celebrate 2021!

A new year is coming and the celebration of it should be festive.

This card is made with the “Let’s Celebrate!” die set from Die-cutting Essentials issue 72 and the “Fabulous Fizz” stamp set from Simply Cards & Papercrafts issue 212.

A piece of double-sided patterned cardstock measuring 8 ¾ inches x 8 inches was folded in half to make a slimline card measuring 4 inches by 8 ¾ inches. Next the “celebrate” die cut the word from the front of the card (with both the word and the waste pies from the letter loops were saved.) It was cut again from mirror cardstock. The single die to cut the splash design was used six times to create a sense of pizzaz to the feeling of celebration. Because of my limited amount of mirror card, the shiny side of a 3 ¼ inches by 8 ¾ inches piece of mirror card was adhered to the underside of the die cut front of the card base. The “celebrate” die cut from mirror card was glued into the opening left from the die cut on the card front. The leftovers from the patterned paper were paper pieced in the openings. The year 2021 was also die cut from mirror card and glued in place.

Because the inside of the card is a patterned paper, a decorative label was cut from white card stock and a larger frame for it from mirror card stock.  Using an anti-static pad to dust the white label before being stamped with Versamark watermark ink and then a matte gold embossing powder was applied and heat set. The white label and its mirror card frame were then glued in place on the card base.

Two different colors of embossing power were used on the decorative fireworks and confetti stamped on the white back side of the large mirror card glued to the backside of the card front. These decorations were stamped, and heat embossed in three phases – left fireworks – gold tinsel confetti – right fireworks.

The back flap of the envelop was also heat embossed with the gold tinsel confetti to hint at the celebration to come.  The card could be filled with sequins when being placed in the envelope to add to the card recipient’s experience. (In my case, knowing the recipient will not appreciate the mess to clean up, I am omitting this step.)

Thank you for reading this blog post. Please like and leave a comment. 😊

You can view Celebration 2021! – art 2 by clicking here.

Materials Used:

Stamps/Dies

Inks/Embossing Powders

Papers

  • Joy Craft Mirror Cardstock
  • First Edition – 12 in x 12in Gem Effect Premium Paper Pad – Storyteller – FEPAD137
  • #10 Business Envelope from my stash

Miscellaneous

Congrats, Grad!

For many graduates of 2020, there were few opportunities to collectively toss their caps in the air and celebrate their accomplishments together.  This card is for the class of 2020!

I used the Simon Says Stamp Hat’s Off Grad stamp and die set along with the Quintuple Slider dies to make an interactive card that has the graduates’ caps moving up and down.

To start, I used a stencil to ink (Salty Ocean) a cloudy background with tiny confetti being stamped in Dapper Denim blue up to just below the bottom of the slider slits (as if the confetti was falling out of the caps.) The bold sentiments were stamped with Versamark ink and heat embossed with gold embossing powder.

Next, I stamped the arms and caps using a black ink (Tuxedo Black) that dries fast and doesn’t bleed if water colored. Using the colors of the graduate’s college, a dark blue, I colored the caps and gowns using watercolor pencils and a thin tipped waterbrush.

Inside the card base I stamped two of the smaller text sentiments included in the set – “The tassel was worth the hassle” and “Good luck on your new adventure” – in Blueberry Bushel blue.

Next, I did all my die cutting of elements using the matching dies, circle arrow and the squarish quintuple slider. On my test card, I had placed the die that cuts the slots into the background card, upside down. So, making sure that I had all the slots lined up at the top end of my background and using the slider die as a guide to know where the position the slot cutting die, I cut the slots. (Watch the assembly video to see how the alignment is done.)

To assemble the slider mechanism, I suggestion watching another assembly video to understand how the slider flaps wrap around the slots and how best to keep the flaps aligned. Once the tiny foam squares (I cut a square in half to fit the slider flaps) are adhered to the flaps, the decorating of the card can begin. (CRX – Don’t forget to add some hint that the slider tab needs to be pulled up by adding a die cut circle arrow which is included in the slider die set.)

I used two shades of blue cardstock to mat the slider mechanism. I found that I needed to cut a circle notch from all layers of the four layers of cardstock. I started by folding back the top of the slider once I had aligned the circle arrow die up on the background top layer and cut the circle out. Next, I took the two blue layers which I had glued together and aligned the top background layer over the blue mats and used a pencil to mark where the circle die should go. Cut these two layers and trim the top of the cut area to make a “U” shaped notch in blue layers. Position the blue mats over the card base and using a pencil to mark and then cut the circle from card base. Adhere the blue layers to card base with double-sided tape. Adhere the top mechanism using foam tape on sides and bottom. Leave top of mechanism layer free so slider can move up and down.

The back flap of the envelope has a diploma stamped in Blueberry Bushel blue to give a hint as to what was inside.

Thank you for reading this blog post. Please like and leave comments 😊

Materials Used:

Stamps/Dies/Stencils

Inks/Watercolors

Papers

Miscellaneous

Festive Foliage and Hearts – Trifold card

I love the sentiment “The holidays are a time to open our hearts” that is at the center of this card.  The card was stamped with the Alte New stamp set Festive Foliage which allows you to stamp a fir tree with two to four colors.

I stamped this card from a piece of heavy white cardstock 5 ½ inches x 11 inches using a stamping platform so that I could position the stamps easily. I used a different green ink for the tree and the heart foliage stamps. The tree is Tranquil Tide, and the heart is Pear Pizzazz. The sentiments were stamped with VersaMark-Watermark ink and heat embossed with a gold embossing powder. The red heart is stamped using Real Red ink.

To create the tri-fold base I scored and fold the longest edge at 4 ¼ inches and 2 ½ inches. Once the tree was stamped on the front, I opened the card out flat and using a craft knife cut the heart out of the card front. Next, I refold the card and placed the cutout heat back in place and stamped the heart foliage. I also opened the card front, slipped a scrap piece of paper in and stamped the inside flap with the heart in green as well.  I then put glue on the inside stamped heart section and with the cut-out heart in the tree front, closed the card and adhered the cut-out heart to inside flap. Once the glue had dried, I also stamped the back side of the flap and heat with green foliage stamp. With the inside flap unfold, but the front fold shut I positioned the solid heart stamp to be stamped directly behind the foliage hearts.

To finish the card, I folded the card and taped the front tightly shut to spray some gold mica mist over the front of the card for added interest and glued a small red ribbon to the top of the tree.

See the gift tags I stamped using the same stamp set by clicking here.

If you enjoyed this tri-fold card, check out some of my other trifolds:

One In A Melon

Shabby Chic Trifold Card

Santa Vintage Trifold

Sleepytime Dreams

Supplies:

Stamps

Papers

Inks/Embossing Powder

Miscellaneous