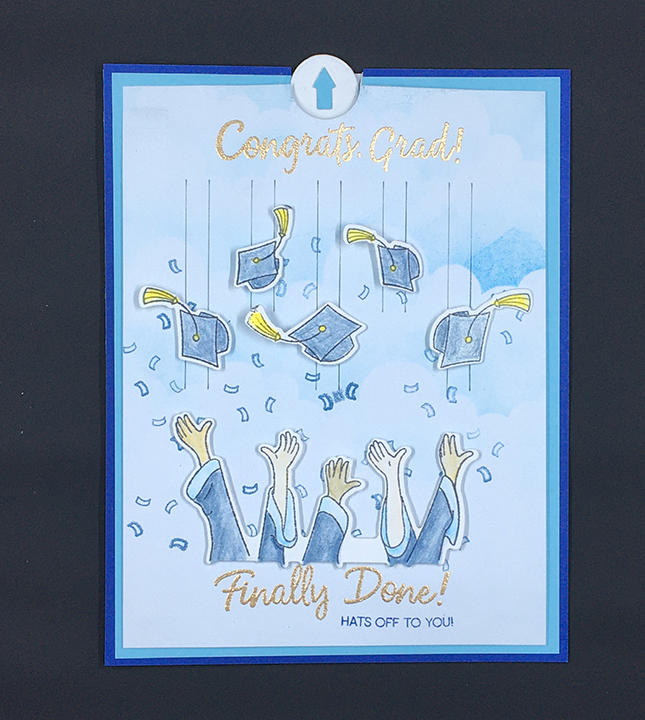
For many graduates of 2020, there were few opportunities to collectively toss their caps in the air and celebrate their accomplishments together. This card is for the class of 2020!
I used the Simon Says Stamp Hat’s Off Grad stamp and die set along with the Quintuple Slider dies to make an interactive card that has the graduates’ caps moving up and down.
To start, I used a stencil to ink (Salty Ocean) a cloudy background with tiny confetti being stamped in Dapper Denim blue up to just below the bottom of the slider slits (as if the confetti was falling out of the caps.) The bold sentiments were stamped with Versamark ink and heat embossed with gold embossing powder.
Next, I stamped the arms and caps using a black ink (Tuxedo Black) that dries fast and doesn’t bleed if water colored. Using the colors of the graduate’s college, a dark blue, I colored the caps and gowns using watercolor pencils and a thin tipped waterbrush.

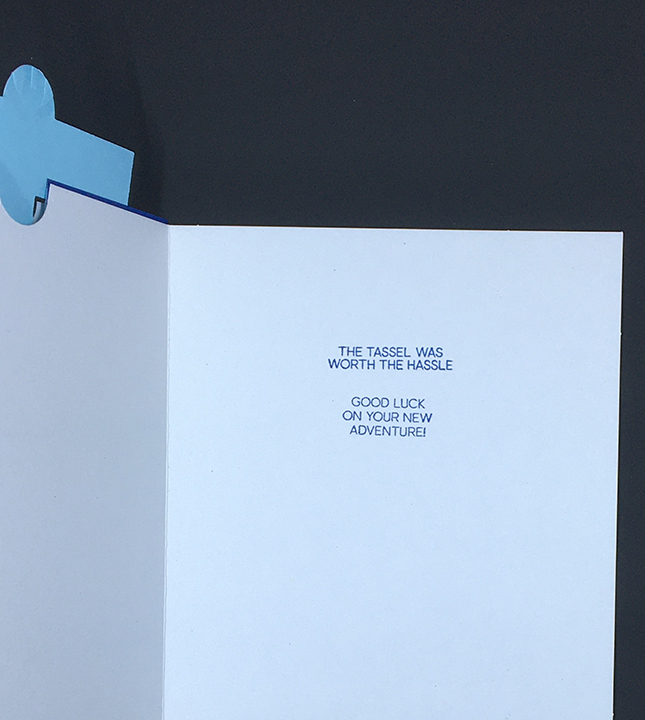
Inside the card base I stamped two of the smaller text sentiments included in the set – “The tassel was worth the hassle” and “Good luck on your new adventure” – in Blueberry Bushel blue.
Next, I did all my die cutting of elements using the matching dies, circle arrow and the squarish quintuple slider. On my test card, I had placed the die that cuts the slots into the background card, upside down. So, making sure that I had all the slots lined up at the top end of my background and using the slider die as a guide to know where the position the slot cutting die, I cut the slots. (Watch the assembly video to see how the alignment is done.)
To assemble the slider mechanism, I suggestion watching another assembly video to understand how the slider flaps wrap around the slots and how best to keep the flaps aligned. Once the tiny foam squares (I cut a square in half to fit the slider flaps) are adhered to the flaps, the decorating of the card can begin. (CRX – Don’t forget to add some hint that the slider tab needs to be pulled up by adding a die cut circle arrow which is included in the slider die set.)


I used two shades of blue cardstock to mat the slider mechanism. I found that I needed to cut a circle notch from all layers of the four layers of cardstock. I started by folding back the top of the slider once I had aligned the circle arrow die up on the background top layer and cut the circle out. Next, I took the two blue layers which I had glued together and aligned the top background layer over the blue mats and used a pencil to mark where the circle die should go. Cut these two layers and trim the top of the cut area to make a “U” shaped notch in blue layers. Position the blue mats over the card base and using a pencil to mark and then cut the circle from card base. Adhere the blue layers to card base with double-sided tape. Adhere the top mechanism using foam tape on sides and bottom. Leave top of mechanism layer free so slider can move up and down.
The back flap of the envelope has a diploma stamped in Blueberry Bushel blue to give a hint as to what was inside.
Thank you for reading this blog post. Please like and leave comments 😊
Materials Used:
Stamps/Dies/Stencils
- Simon Says Stamp! -Clear Stamp and Matching Dies-Hats off Grad -sss102120
- Simon Says Stamp! – Quintuples Slider Wafer Dies – sssd112138
- Craftin Desert Divas – 6×6 Stencil -for clouds, roads, hills
Inks/Watercolors
- Stampin’ Up Classic Stamin’ Pad – Dapper Denim and Blueberry Bushel
- Memento – Tuxedo Black ink pad
- Ranger-Tim Holtz – Distress Ink – Salty Ocean
- VersaMark – Watermark Stamp Pad
- Ranger – Embossing Powder – Gold
- Nuvo – Watercolour Pencils – Elementary Midtones, Pastel Highlights and Dark Shadows
Papers
- Reflections – 8.5×11 inch cardstock – Cape Cod
- Recollections Value Pack of Cards & Envelopes 6 ½ x 5 inches
Miscellaneous
- Foam tape & squares from stash
- PVA Glue – Cosmic Shimmer Acrylic Glue
- Double-Sided Tear Tape – Scrapbook.com Clear Double Sided Adhesive Roll ¼ inch
- Ranger – Tim Holtz® Waterbrush Detailer Tip – TIP33080
- Tonic Studios – Tim Holtz Stamp Platform
- Recollections – Embossing Heat Tool
