Warm gingerbread smells wonderful on a cold Autumn day fresh from the oven. This card tries to capture that yummy feeling of holiday baking using the new dies and stamps from Stampin’ Up.
Watch the video below to see how the card was made.
___________________________________
Thank you for experiencing this blog post.
I hope this inspires you and makes you smile.
Please subscribe, like and leave comments 😊
___________________________________
Disclaimer: Karen Burniston products are provided free of charge by the manufacturer for review and use. All other items were personally purchased. Compensated affiliate links used where or when possible, meaning I will receive a small percentage commission from these manufacturers at no cost to you. This will allow me to add more content to my YouTube channel and help out a lot. Thank you.
Materials Used:
Dies
Stampin’ Up – Stampin’ Cut & Emboss – Gingerbread Man
Stamps
Stampin’ Up – Photopolymer Stamps – Gingerbread Man
Papers
Rainbow Splash – 8.5×11 100lb Cardstock – Carmel
Ink
Versamark – Watermark Stamp Pad
Brutus Monroe – Embossing Powder – Marshmallow Puff
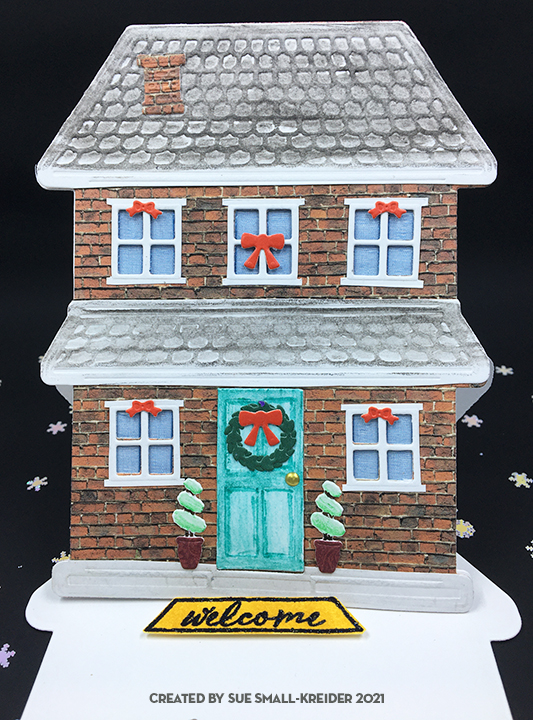
“From our home to yours” is a sentiment that is often seen during the winter holidays. House cards are one of my favorite types of cards to make. The cards shown in today’s blog were made using new Creative Expressions Craft Dies by Sue Wilson.
To die cut a large solid die like the house front, it is best to angle it so that it goes through the die cutting machine at a diagonal rather than straight across. (See picture below.)
For the red brick house, I used leftover stenciled cardstock that was stenciled with Distress Ink in Fired Red Brick, a brick stencil and a small make-up brush (I find these inexpensive contour make-up brushes from Dollar Tree work as well as the expensive ink brushes.)
For the brown brick house, I used a digital image of a brick wall to create a tiled pattern to print on an 8 ½ x 11 sheet of white cardstock using a computer and ink jet printer.
The windows, door and roofs were all cut from lightweight white cardstock and then fussy cut. The roof and door were colored with watercolor pencils and a water brush and allowed to dry under the dies’ plastic packaging so they would be flat. Once the door was dry, I added a drop of a gold Nuvo drop for the door knob and set it aside to dry overnight.
Solid colored scraps of red and green papers were used for the bows and wreath. The topiary trees were cut from white cardstock and colored with watercolor pencils. Their pots are cut from scrap patterned paper.
To glaze the windows, I used shiny organza ribbon glued to the back of the house die-cut. (I had ¼ inch wide ribbon so had to use two stripes for each window. You could use wider ribbon.) After the ribbon has set, the decorated house front was glued to a solid house frame cut with the largest die in the set. The top of the this die has a non-cutting edge which has to be hand-cut.
The tiny decorations can be attached at this stage in the assembly.
While the die set is designed to cut a tent fold card, I decided to make it an easel card using a 5 ¼ inch by 11-inch sheet of heavy white cardstock to score and fold along the long edge at 3 inches and at 3/8 inches. I then die-cut the base, folded at the 3 inches scoring with the non-cutting top of the house die at the fold. (See photo below for how the easel base looks opened up after being cut.)
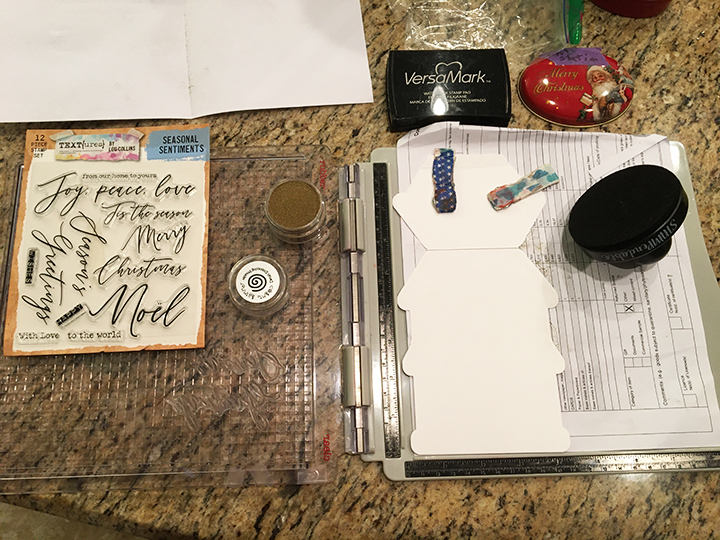
Next, I used a stamping platform, clear VersaMark watermark ink to stamp the inside greeting after rubbing clean the cardbase with an anti-static powder pad. (I like to use the round stamping tool Stampendable with my stamping platform for uniform pressure on my stamps. I also use scrap copier paper under my items being stamped to add more pressure and to keep the platform clean.) The greeting from Lou Collins’ Text{ures} Seasonal Sentiments set was heat embossed with my favorite gold detail embossing powder from Cosmic Shimmer.
To adhere the house to the easel base, fold the short roof piece closed and add glue to the 3/8 inch tab. Position the house front to match-up with folded base and press at the tab area to adhere to glued tab. Open card up to see if positioned correctly, before attaching welcome mat (stamped and heat embossed from a retired Stampin’ Up front door stamp set) with foam tape.
I used two more stamps from the Text{ures} Seasonal Sentiments set on the envelope flap with Stampin’ Up’s Crumb Cake ink, which looks very much like gold embossing on the cream-colored envelope.
Thank you for reading. If you enjoyed this blog post, please like it and follow the blog. 😊
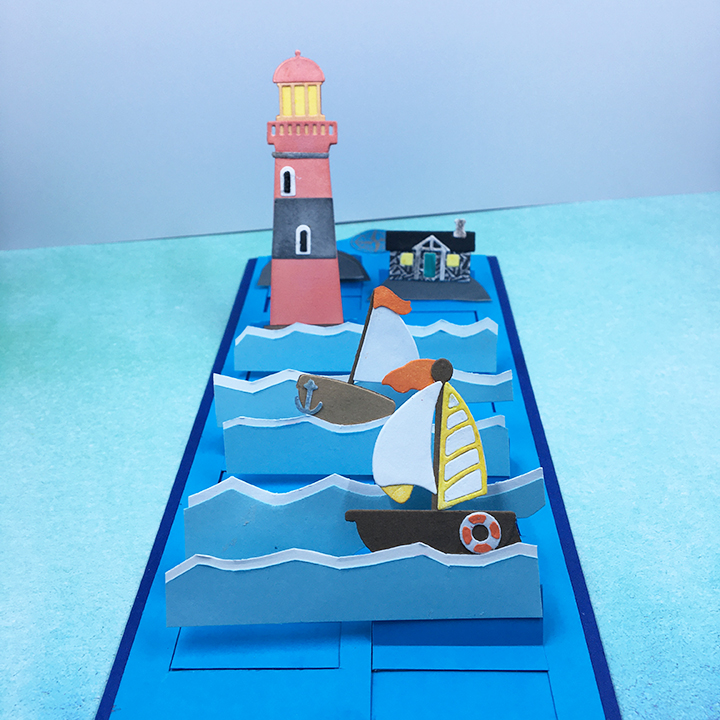
Life gets rough and choppy sometimes and life isn’t always smooth sailing. Sometimes our friends need to be encouraged to take a chance and try something new. This interactive card is for those times.
This card is the first of a series to use my Ully Cat Designs’Split-Slider Slimline template.
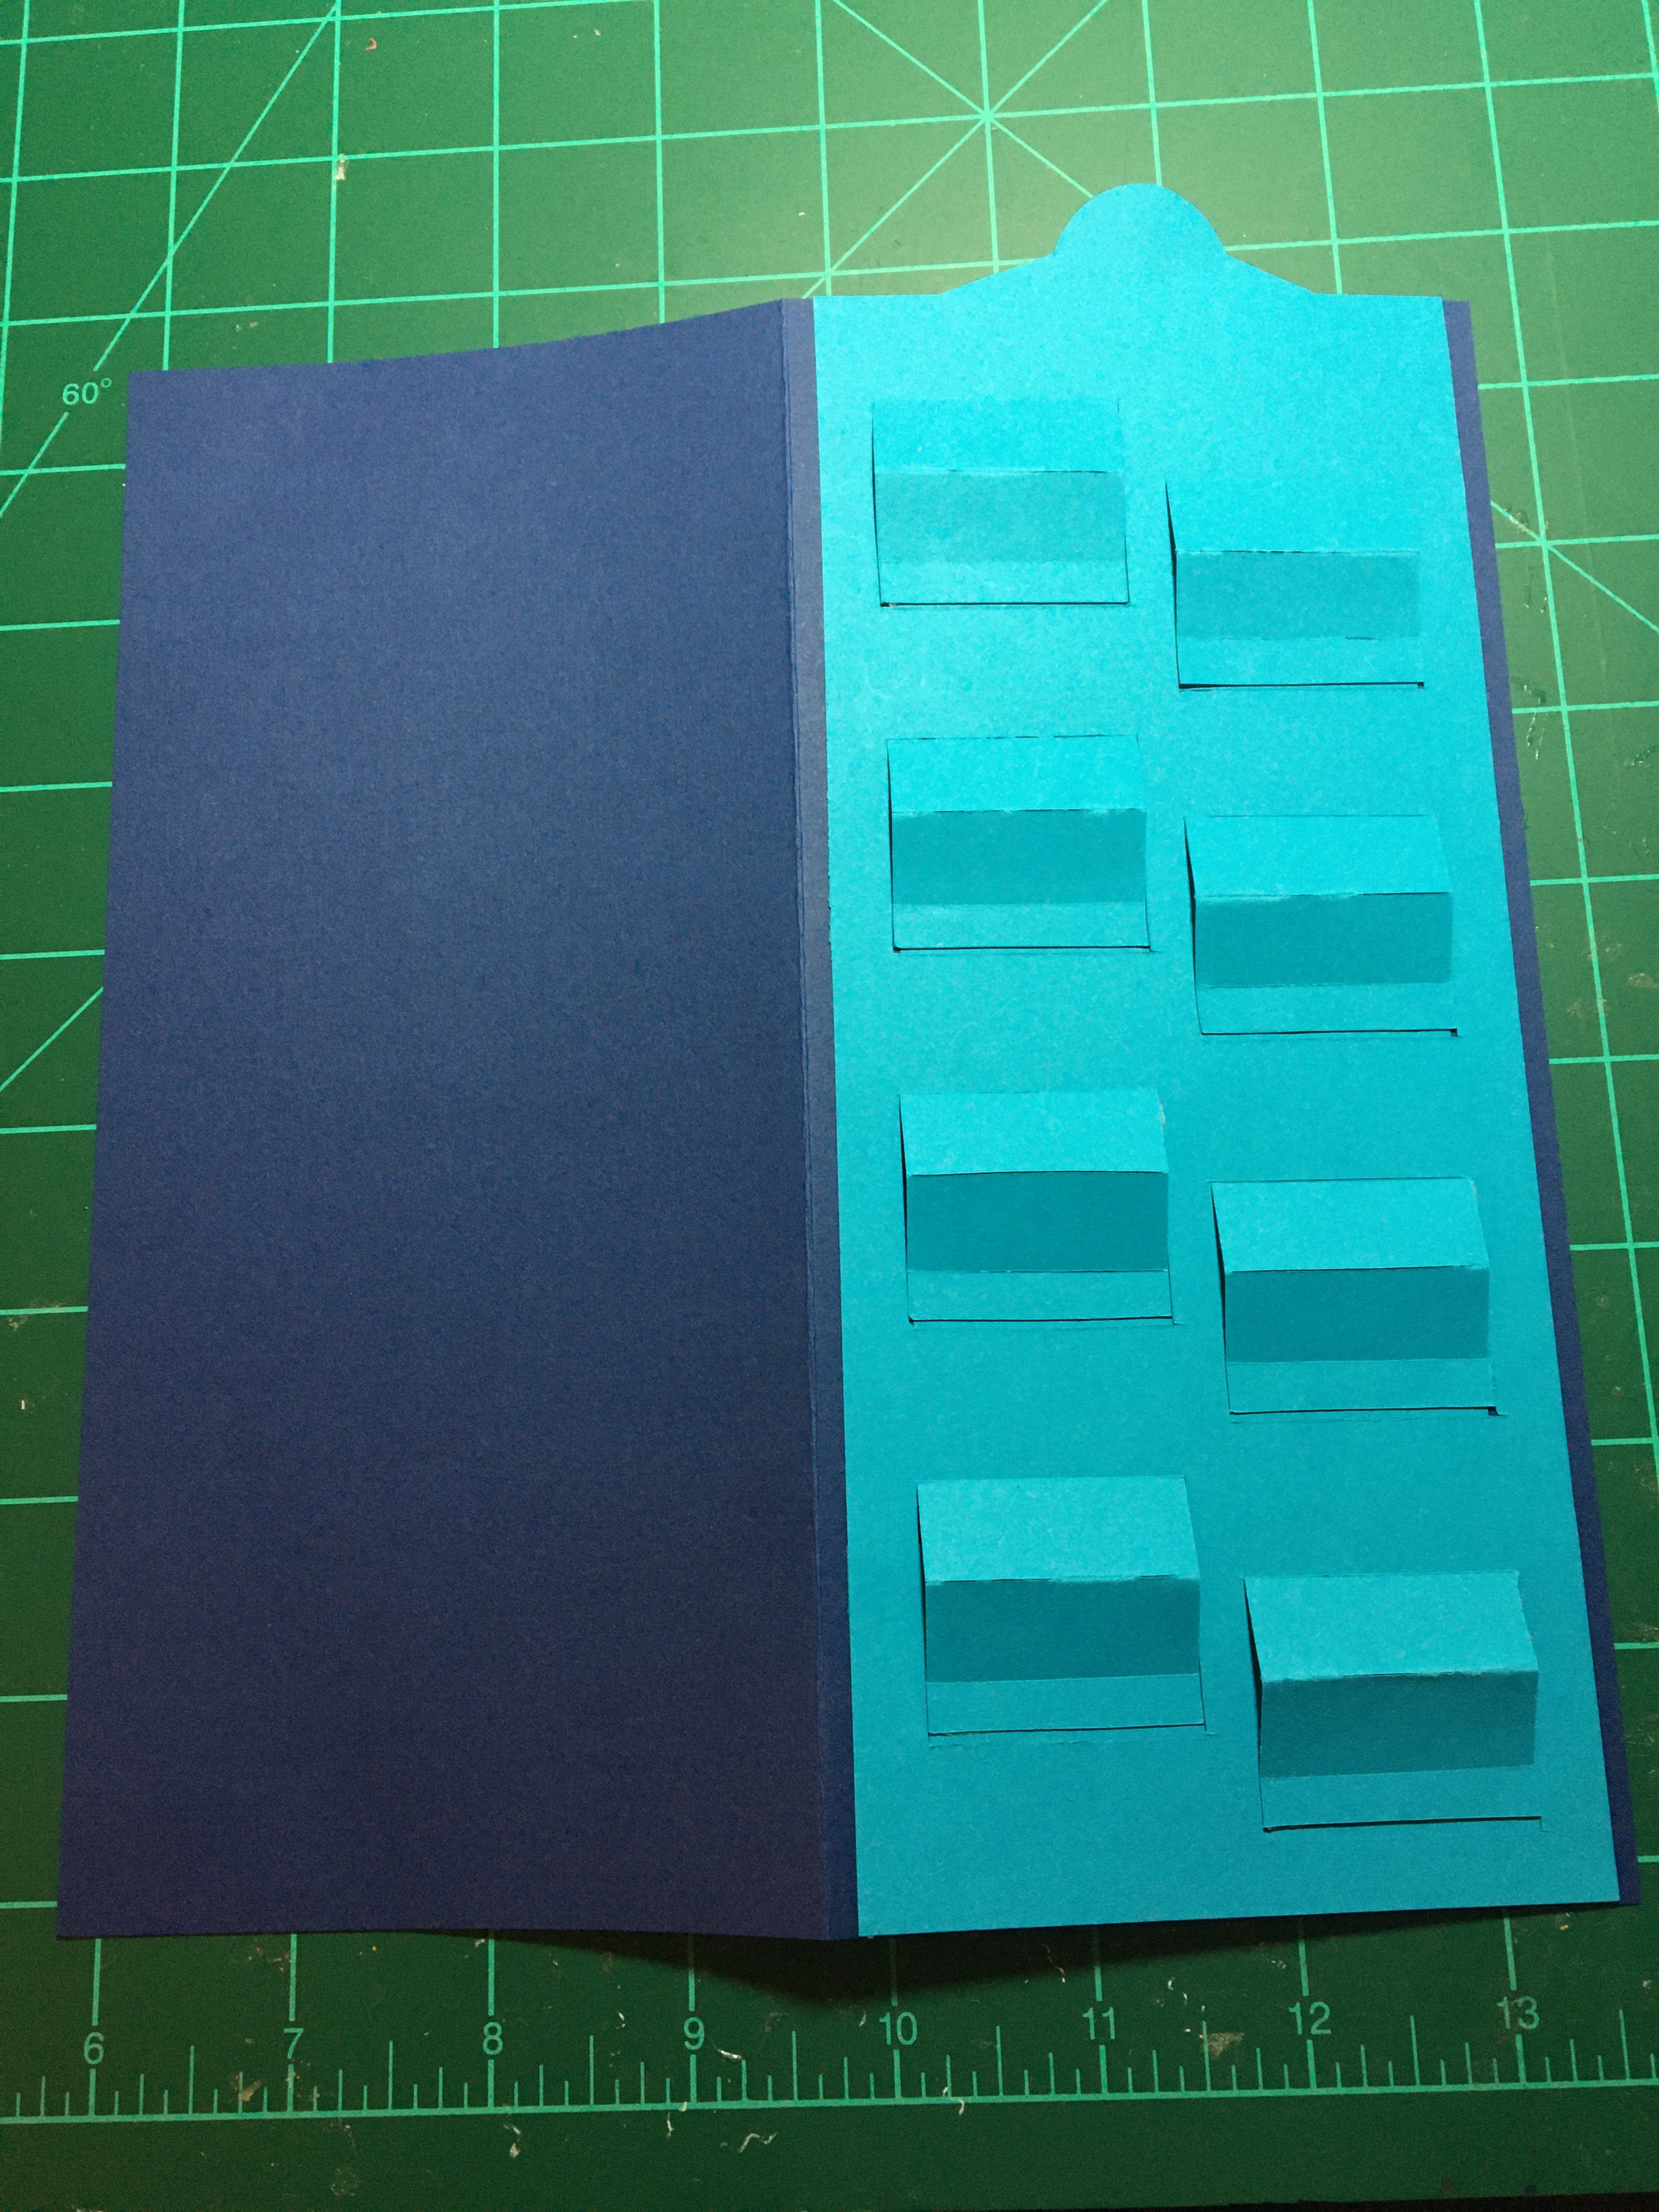
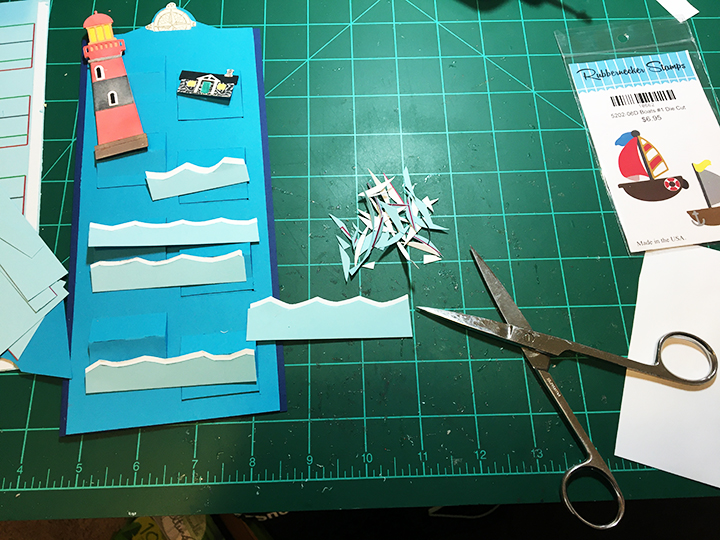
Split-Slider: Print split-slider template (download under Materials Used) onto bright blue lightweight cardstock and then cut out the top panel and slider arm around the outer red cutting lines. (Note: The printed side of the cardstock will be the back of the panel and when assembled will not be seen.) Using a craft knife and a metal ruler, cut the top panel’s eight mini-easels on the red lines. Next, using a scoring tool, score the green and blue fold lines – green being valley folds and blue mountain folds.
Because the top panel is adhered on three sides to the card base and needs to be raised the thickness of the lightweight cardstock slider arm, place two layers of double-sided tape on the long sides and bottom of the panel making sure not to cover the red lines of the easels. A single layer of double-sided tape should be placed on each of the narrow tabs of the eight mini-easels. (If you are using tape that is wider than the tabs, trim off excess.)
To adhere the slider arm to the mini -easel tabs, first, using low-tack tape, tape the front side of the easels shut. (This will ensure that the easels are adhered to the slider arm in the shut/flat position.) Position the slider arm over the back of the panel, making sure there is at least an 1/8 inch/3 mm gap between the tape along the panel edges and the slider arm. Hold the slider arm in place and remove the backing tape on the lowest easel and adhere to the slider panel. Repeat removing tape backing and adhering each easel. Once slider arm is attached to easels, turn over and remove low-tack tape. Test the slider. You may have to help fold the easels into the fully opened position the first time to train them. Once satisfied with the slider/easels’ movement, remove panel backing tape paper and adhere to card base.
Decorating the Easels: For my die-cut lighthouse and boats, I used Distress Oxides and Inks to color the lighthouse and boat flags, a black gel pen for windows and a silver gel pen to color the anchor. The lightkeeper’s house is cut from a pattern paper and colored with pencil for the grey stone. The blue and white layered sea waves are cut freehand as is the rocky land masses for the three easels around the lighthouse. Make sure you don’t glue anything that will impede the easels from moving. (Note the 2nd & 4th waves on my card have been trimmed to allow the easel in front to operate.)
The gold heat embossed compass on the pull-tab of the slider arm, was stamped on a separate peace of cardstock, embossed and them fussy cut. The compass adds sturdiness to the pull-tab. (Depending on the thickness of your cardstock, you may want to add another circle on the bottom of the pull-tab as well.)
The “SEAS the Day” sentiment is attached with foam squares between two easels and is not adhered to any moving parts.
Inside Decorations: You can decorate as you would normally inside the card. Because of the dark card base, I used paper that looks like an old ship’s log, to stamp the inside sentiments “Enjoy life’s journal” and “We cannot control the wind, but we can direct the sails.”
The back flap of the envelope was stamped with a Sara Davies Nautical Collection sentiment “Adventure awaits” to hint at the enclosed card is about.
I enclose a slip of paper with instructions on how to open the card. (See split slider CRX sheet download below.)
Thank you for reading this blog post. Please like and leave comments 😊
A new year is coming and the celebration of it should be festive.
This card is made with the “Let’s Celebrate!” die set from Die-cutting Essentials issue 72 and the “Fabulous Fizz” stamp set from Simply Cards & Papercrafts issue 212.
A piece of double-sided patterned cardstock measuring 8 ¾ inches x 8 inches was folded in half to make a slimline card measuring 4 inches by 8 ¾ inches. Next the “celebrate” die cut the word from the front of the card (with both the word and the waste pies from the letter loops were saved.) It was cut again from mirror cardstock. The single die to cut the splash design was used six times to create a sense of pizzaz to the feeling of celebration. Because of my limited amount of mirror card, the shiny side of a 3 ¼ inches by 8 ¾ inches piece of mirror card was adhered to the underside of the die cut front of the card base. The “celebrate” die cut from mirror card was glued into the opening left from the die cut on the card front. The leftovers from the patterned paper were paper pieced in the openings. The year 2021 was also die cut from mirror card and glued in place.
Because the inside of the card is a patterned paper, a decorative label was cut from white card stock and a larger frame for it from mirror card stock. Using an anti-static pad to dust the white label before being stamped with Versamark watermark ink and then a matte gold embossing powder was applied and heat set. The white label and its mirror card frame were then glued in place on the card base.
Two different colors of embossing power were used on the decorative fireworks and confetti stamped on the white back side of the large mirror card glued to the backside of the card front. These decorations were stamped, and heat embossed in three phases – left fireworks – gold tinsel confetti – right fireworks.
The back flap of the envelop was also heat embossed with the gold tinsel confetti to hint at the celebration to come. The card could be filled with sequins when being placed in the envelope to add to the card recipient’s experience. (In my case, knowing the recipient will not appreciate the mess to clean up, I am omitting this step.)
Thank you for reading this blog post. Please like and leave a comment. 😊
For many graduates of 2020, there were few opportunities to collectively toss their caps in the air and celebrate their accomplishments together. This card is for the class of 2020!
I used the Simon Says Stamp Hat’s Off Grad stamp and die set along with the Quintuple Slider dies to make an interactive card that has the graduates’ caps moving up and down.
To start, I used a stencil to ink (Salty Ocean) a cloudy background with tiny confetti being stamped in Dapper Denim blue up to just below the bottom of the slider slits (as if the confetti was falling out of the caps.) The bold sentiments were stamped with Versamark ink and heat embossed with gold embossing powder.
Next, I stamped the arms and caps using a black ink (Tuxedo Black) that dries fast and doesn’t bleed if water colored. Using the colors of the graduate’s college, a dark blue, I colored the caps and gowns using watercolor pencils and a thin tipped waterbrush.
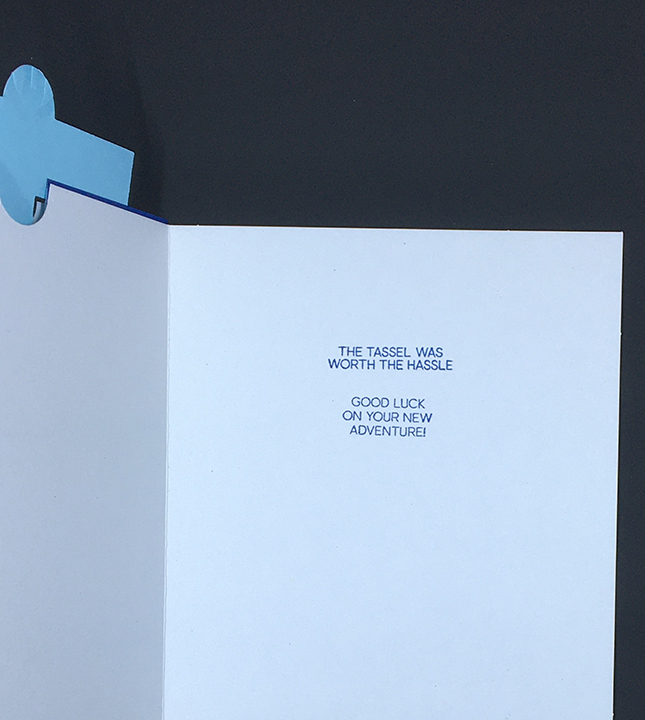
Inside the card base I stamped two of the smaller text sentiments included in the set – “The tassel was worth the hassle” and “Good luck on your new adventure” – in Blueberry Bushel blue.
Next, I did all my die cutting of elements using the matching dies, circle arrow and the squarish quintuple slider. On my test card, I had placed the die that cuts the slots into the background card, upside down. So, making sure that I had all the slots lined up at the top end of my background and using the slider die as a guide to know where the position the slot cutting die, I cut the slots. (Watch the assembly video to see how the alignment is done.)
To assemble the slider mechanism, I suggestion watching another assembly video to understand how the slider flaps wrap around the slots and how best to keep the flaps aligned. Once the tiny foam squares (I cut a square in half to fit the slider flaps) are adhered to the flaps, the decorating of the card can begin. (CRX – Don’t forget to add some hint that the slider tab needs to be pulled up by adding a die cut circle arrow which is included in the slider die set.)
I used two shades of blue cardstock to mat the slider mechanism. I found that I needed to cut a circle notch from all layers of the four layers of cardstock. I started by folding back the top of the slider once I had aligned the circle arrow die up on the background top layer and cut the circle out. Next, I took the two blue layers which I had glued together and aligned the top background layer over the blue mats and used a pencil to mark where the circle die should go. Cut these two layers and trim the top of the cut area to make a “U” shaped notch in blue layers. Position the blue mats over the card base and using a pencil to mark and then cut the circle from card base. Adhere the blue layers to card base with double-sided tape. Adhere the top mechanism using foam tape on sides and bottom. Leave top of mechanism layer free so slider can move up and down.
The back flap of the envelope has a diploma stamped in Blueberry Bushel blue to give a hint as to what was inside.
Thank you for reading this blog post. Please like and leave comments 😊
I love the sentiment “The holidays are a time to open our hearts” that is at the center of this card. The card was stamped with the Alte New stamp set Festive Foliage which allows you to stamp a fir tree with two to four colors.
I stamped this card from a piece of heavy white cardstock 5 ½ inches x 11 inches using a stamping platform so that I could position the stamps easily. I used a different green ink for the tree and the heart foliage stamps. The tree is Tranquil Tide, and the heart is Pear Pizzazz. The sentiments were stamped with VersaMark-Watermark ink and heat embossed with a gold embossing powder. The red heart is stamped using Real Red ink.
To create the tri-fold base I scored and fold the longest edge at 4 ¼ inches and 2 ½ inches. Once the tree was stamped on the front, I opened the card out flat and using a craft knife cut the heart out of the card front. Next, I refold the card and placed the cutout heat back in place and stamped the heart foliage. I also opened the card front, slipped a scrap piece of paper in and stamped the inside flap with the heart in green as well. I then put glue on the inside stamped heart section and with the cut-out heart in the tree front, closed the card and adhered the cut-out heart to inside flap. Once the glue had dried, I also stamped the back side of the flap and heat with green foliage stamp. With the inside flap unfold, but the front fold shut I positioned the solid heart stamp to be stamped directly behind the foliage hearts.
To finish the card, I folded the card and taped the front tightly shut to spray some gold mica mist over the front of the card for added interest and glued a small red ribbon to the top of the tree.
See the gift tags I stamped using the same stamp set by clicking here.
If you enjoyed this tri-fold card, check out some of my other trifolds:
Sometimes simple is best. This embroidery floss filled-tree card has a simple message and design – Shine!
This is a first try at the new Spellbinder’s Large -Die-of-the-Month for November 2020 which has three designs to cut the holes and then using needle and thread to fill-in the designs. I used the full six strands of embroidery floss but think next time I might try three or four strands for the light circles. I followed the assembly video for the die set taping off my loose ends of threads.
Once the tree was stitched, I cut down the blue scrap piece I had die-cut the tree onto 3 7/8 x 3 5/8 inches. Using foam adhesive strips, I adhered the tree onto a green piece of mirror car that was 4 3/8 x 4 1/8 inches. These layers were then placed on a 6 x 5 inches sheet of patterned paper by Craft Consortium that had been adhered to a 6 ½ x 5 inches white card base.
Using a foiled sentiment, I had in my sentiments stash, I set the theme of shing bright for the card. (I like to do my foiling of sentiments in large groups to save time later.)
The inside sentiment is one my favorites from an old Kaisercraft stamp set. I tried a new tinsel embossing powder with it.
For the envelope flap, I used a new embossing folder that has big round dots, much like the candle glow circles stitched on the card.
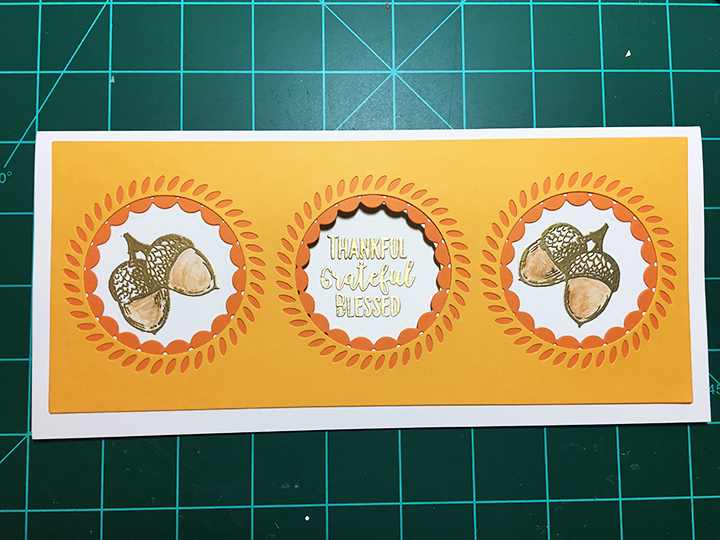
This was a quick card for my post to The Alphabet Game on Craftworld.com for the letter N and the third day in my challenge to myself to make five cards from the Autumn Days stamp set from the most recent Simply Cards and Papercrafts magazine. I had recently gotten two slimline panel circle dies that I also wanted to try out. I grabbed the darkest, what I thought was brown embossing powder from my stash, but when I heated it up it was this lovely smooth gold. (I need to write Craftstash to find out what brand of powder this is, as I highly recommend it for its smooth detail.)
After heat embossing the acorns, I used a brown watercolor pencil waterbrush to color them.
I cut the center circle out of the card base and placed the stamped/embossed sentiment on the inside. This will make a lovely Thanksgiving card with plenty of space inside for a personal note.
The envelope is stamped with brown ink on its back flap.