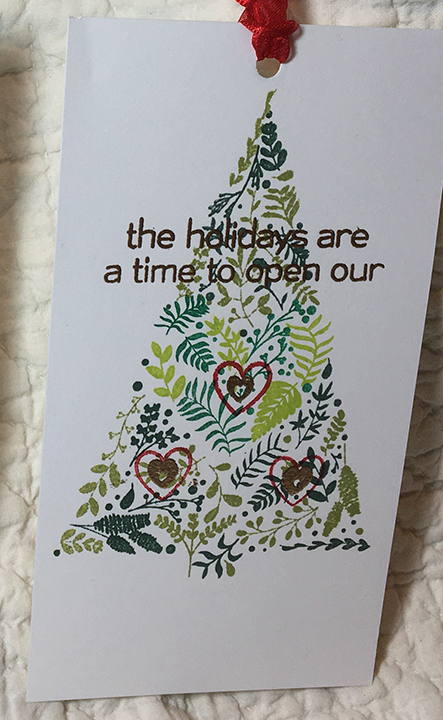
“The holidays are a time to open our hearts” is the sentiment that these festive gift tags have. These tags were stamped with the Alte New stamp set Festive Foliage which allows you to stamp a fir tree with two to four colors. There is a heat in the center of the tree foliage.
I stamped these tags from a scrap piece of heavy white cardstock 5 ½ inches x 3 inches using a stamping platform so that I could position the stamps once and turn the card to stamp a second image. The stamps are labeled tree 1, tree 2, heart1, and heart 2. I used a different green ink for each stamp. The tree is Pear Pizzazz and Tranquil Tide, and the heart is Lemon Lime and Emerald Envy. Two tiny heart stamps from my stash are stamped over the foliage. The smallest and most solid heart stamp was stamped with VersaMark-Watermark ink and heat embossed with a gold embossing powder as was the sentiment. The outline stamp is inked with Real Red.
Using a hole punch at the top of the tree I was able to add some red organza ribbon to finish the tag.
Also see the trifold card made from this same stamp set using the full tree and heart stamps.
CRX – Card Recipient Experience is a topic I’ve written on before. (CRX-Card Recipient Experience) Today I am including some some free downloads to help you with your interactive cards being displayed as you intended them to be displayed.
You’ve made a beautiful easel or double easel card that you fold into its envelope and mail off to your friend. When your friend opens the envelope and tries to open the easel card as if it were a tent fold card, it makes no sense or worse the card gets torn. To alleviate this problem why not include a small drawing of how the easel card opens and stands in the envelope as the first things your friend will see when they open the envelope.
Four panel cards with elements to allow light to shine through such as a house luminaria card can be displayed several ways – as a zig-zag or as a box around a battery powered candle.
I hope this helps you as you go forward with your interactive card making. Please like and write a comment to let me know what other types of CRX issues you’ve had.
Warm and cozy is this small brick house with its white ornate Victorian trim as light streams through its windows. This is the third house luminaria in my blog posts using a battery powered candle.
Made with Impression Obsession’s house die set, this 3-inch tall by 2 3/4 inch square has slight modifications made to original two-dimensional design. I cut two of the brick house die as well as two partial die cuts with the same die to make the side walls. I cut a total of eight square windows and one arched window as well as two doors. The L shaped eaves die I cut twice from white cardstock and the twice more from thicker scrap cardstock. The ornate trim pieces I cut two from regular cardstock, but the ornate porch roof piece I cut once from regular cardstock and twice from thicker cardstock. I also cut two pieces of vellum 2 ¾ inches x 1 inch and five additional 1 inch squares of vellum.
Partial die cutting of side walls by placing die over the edge of cardstock.
I made two templates from purple scrap cardstock of the front and side of the house and using window die cuts I fingered out the window placement. Once I had the placement, I traced around the window frames with a pencil. I cut the windows with the dies. Using the templates, I traced the window placement on to my red die-cut pieces and cut them out with a craft knife and metal ruler cutting inside the pencil lines. For the door I only cut out a rectangle where the windowpanes would be. Next, I glued the vellum pieces to the back of the red sides of the house.
Once the vellum is adhered to the back of the window cut outs, you can turn the house pieces with their fronts facing up and decorate them by gluing on the window frames and doors. I used a gold gel pen to make the doorknobs.
For the L shaped eave pieces, I glued the regular white cardstock to the thicker scrap cardstock. I did similar for the porch roof piece, but I glued two of the thicker scrap cardstock pieces together before adhering the top regular cardstock piece.
To assemble the house sides, I laid all the pieces side by side and tape them together on the back side.
The roof is a 5 inch by 3 inch rectangle of brown cardstock stenciled with a stencil in my stash with Distress Ink and folded in the middle. I taped the roof to inside of my house for stability.
The house and roof will fold to mail in an A2 envelope if the white eaves pieces are trimmed to fit by an 1/8 inch.
Thank you for reading about this little house. Please like and leave a comment. 😊