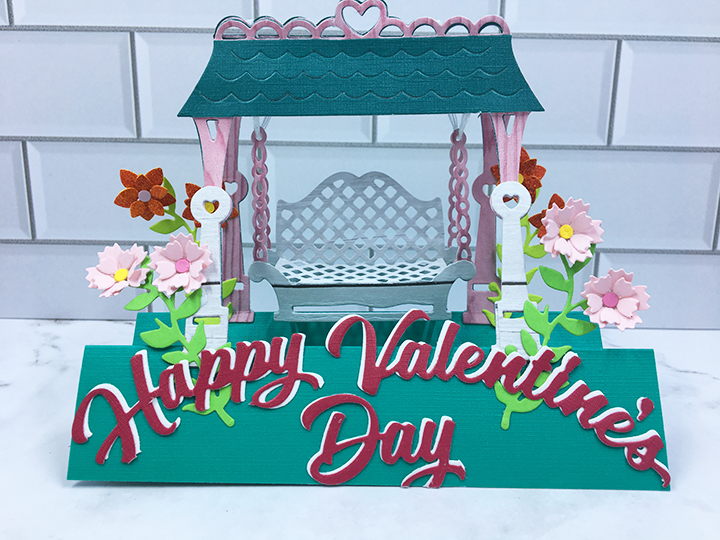
Garden swings have played a role in the courtship of the lovely couple for whom this card was made. So, an interactive card to reminded them of their early days getting to know one another is appropriate.

The starting point for this card is a new Tutti Designs swinging bench die and a “M” fold stepper base.
Die-cut: Cut the whole swing die out six times – 2 green, 2 pink wood, 2 white wood. From these six designate one of each color to be the front section and one of each color to be the back section. The pink wood pieces will be used as the section bases. The chain with the bench attached should be trimmed from the roof of the pink pieces. Cut the rounded bench arms with the chain attached off the pink bench pieces and discard the bench remains.

Front Section: Trimmed off the green roof from the front section and glue the two green posts to the back of the pink wood piece. From the white wood piece, trim off the roof from the chain with bench attached and posts. Then trim down the post pieces to the circles. These shortened white posts glue to the front of the pink wood posts.
Back Section: Trim off the chain with bench attached from the green piece. Glue the green piece to the back of the pink piece to strengthen it. From the white wood piece, trim off the roof from the chain with bench attached and posts. Then trim down the post pieces to the circles. These shortened white posts glue to the front of the pink wood posts. Save the white roof for later.


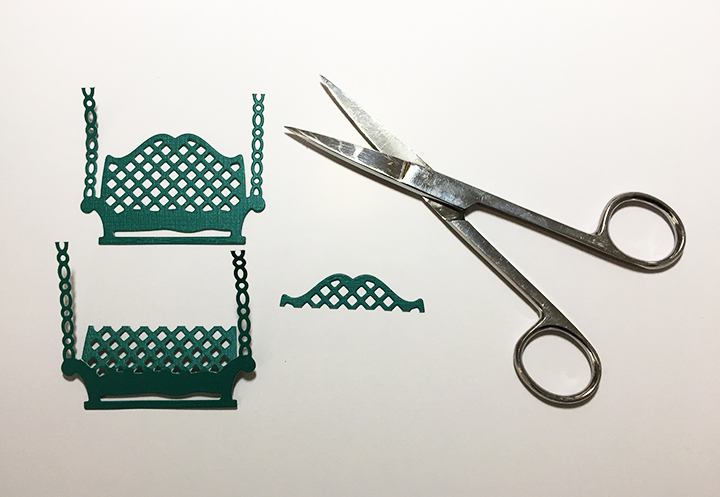
Bench: Trim off the chains from both white bench pieces and discard the chains. On the front bench piece snip the two connecting lattice bars from the arms. (See first photo) Bend down the lattice seat and trim the curved portion off so that the seat is ½ inch deep. (See second photo) From white scrap, cut two strips 1 inch by ¼ inch. Fold ¼ inch tabs at each side of the strips. (See third photo) Glue strips to the back side of front bench under the bend for the seat. Glue the remaining tabs to the front of the back white bench piece. The bench now should have a rectangular frame once which the lattice seat will rest on. (See fourth photo and photo below)

Glue the pink chains to the back sides of the bench arms, keeping the chains perpendicular to the bench seat. Cut two pieces of white embroidery floss at least 5 inches long. Thread a piece of floss through the top chain link and then through the other top chain link. Repeat with second piece of floss on opposite bench side.

Stepper Base: Cut a piece of green cardstock 5 inches by 5 ½ inches. With the 5 ½ side of card vertical, score the shorter side at the middle (2 ½ inches) and at the quarter marks (1 ¼ Inches and 3 ¾ inches). Fold the middle as a valley fold and the quarters as mountain folds. Your folded base should resemble a “M.”

Assembly of Card: Lay the back pink-roof-with-posts piece on your work surface and position the bench and its floss threads as it would hang from the roof. Flatten the bench to see where the chains will move to and adjust bench so threads with reach roof. Tape only the back two threads to front of pink roof. Trim tails off the two taped threads. Glue the white roof piece over the taped threads.

Place the front pink-roof-with-posts piece on top of the back piece aligning the posts. Glue only the top heart and scalloped roof trim of the front and back pieces together. Position the front chain threads over the front pink rood and tape to roof. Open glued front and back to a tent-like shape. Reposition front taped threads to make bench level and free to swing. Glue green roof over the taped threads.
Glue the back posts to the back ‘mountain’ of card base and front posts to front “mountain” of base. Decorate with as desired with flowers and sentiment. Add a white strip of cardstock to back side of base to write a personal message.

The card will fold flat to fit into an envelope, by flipping up bench seat and flatten bench frame.
I decorated my card with some tiny flowers made from a Spellbinders die set and the sentiment (Karen Burniston die) was cut once from red and once from white and then glued slightly askew to give highlights.
As is my style, I stamped the back of the envelope with a BoBunny hearts stamp three times in a cherry red ink to hint as to what is inside.
You can view more Valentines by clicking here.
Thank you for reading this blog post. Please like and leave comments 😊
Materials Used:
Dies
- Karen Burniston in cahoots with Riley and Company – Happy Valentine’s Day Die – 1114
- Tutti Designs – Swinging Bench Die – TUTTI-529
- Spellbinders – 3D Fun Time Cruiser die set -DOML-JUL19
Stamps/Ink
- BoBunny – Clear Acrylic Stamps – I Heart Stars – 12105444
- Stampin’ Up – Classic Stampin’ Pad – Cherry Cobbler
Papers
- Ms. Sparkle & Co. 5.5 in x 7.5 in Woodgrain Color Paper Pad
- Ms. Sparkle & Co. 5.5 in x 7.5 in Woodgrain Neutral Paper Pad
- Recollections – Jewel Tones 12 in x12 in Paper Pad
- 5 ¼ inches x 7 ¼ inches envelope from my stash
Miscellaneous
- Cosmic Shimmer Acrylic Glue
- Scissors
- White embroidery floss
- Clear tape
- Die cutting machine

Wow! I love this! Fantastic instructions, too! Happy New Year! x
LikeLiked by 1 person
Happy New Year!
LikeLike