Sending Love

It’s Sneak Peek week for Karen Burniston’s February 2023 release!

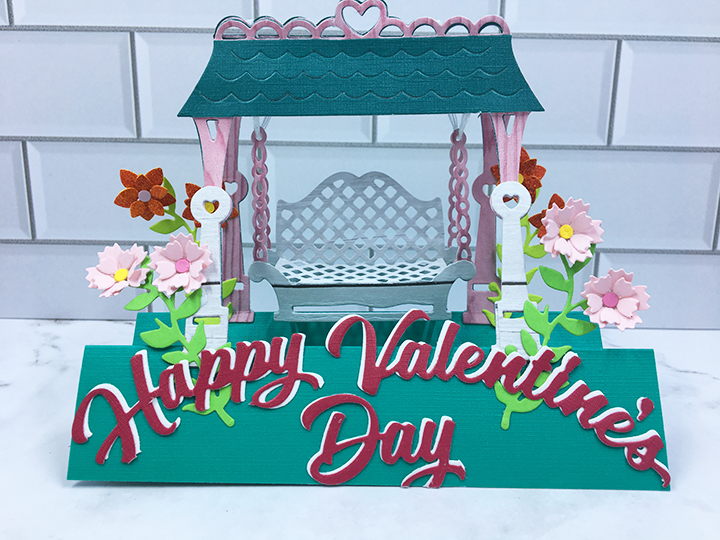
Making sure your loved-one, who is far away, feels love at Valentine’s Day, is what this card is all about. It uses two new die sets from Karen Burniston’s February 2023 release along with some previously released sentiments and collage decorations. 

I started with a 10-inch by 7-inch rectangle and folded in half to make a 5-inch by 10-inch cardbase.

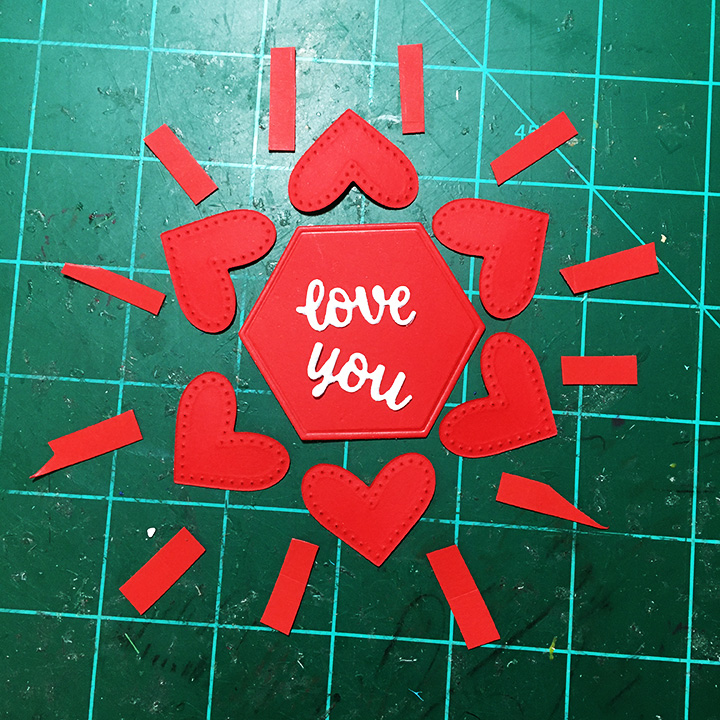
Next, I die-cut all my mats and decorative frames from patterned papers using the crosshatch rectangles from the new Rectangles and Labels – Crosshatch. For the scalloped frame I used white copier paper and heavier white cardstock to cut all the labels and twist mechanism two flag arms. The small, scalloped rectangles and flag arms are dies in the Little Twist Panel Pop-Up die set.

Because my decorative papers were thin paper, I used a sheet of double-sided adhesive to adhere the paper to a piece of cardstock. I did this for the twisting mechanism and the folded panel that is glued to the twisting mechanism. Before I die-cut my Little Twist Panel Pop-Up, I watched the assembly video for the pop-up mechanism.

Using double-sided tape, I covered the inside and outside card panels with coordinating paper mats. (My favorite technique for using double-sided tape is to place around the edge of the card, lift the ends of the tape so corners are sticky, position the covering paper, you can shift the top paper a bit before you pull all the tape backing paper strips. See tutorial post,)

Fold all the scored lines of mechanism piece as directed in video. Using a ruler mark the center of the cardbase fold with a pencil. Glue one side of mechanism to cardbase lining-up the mechanism’s center hole with the pencil mark making sure the folded score lines of the mechanism arms line up with the casebase fold. Fold mechanism shut and glue other side to cardbase.

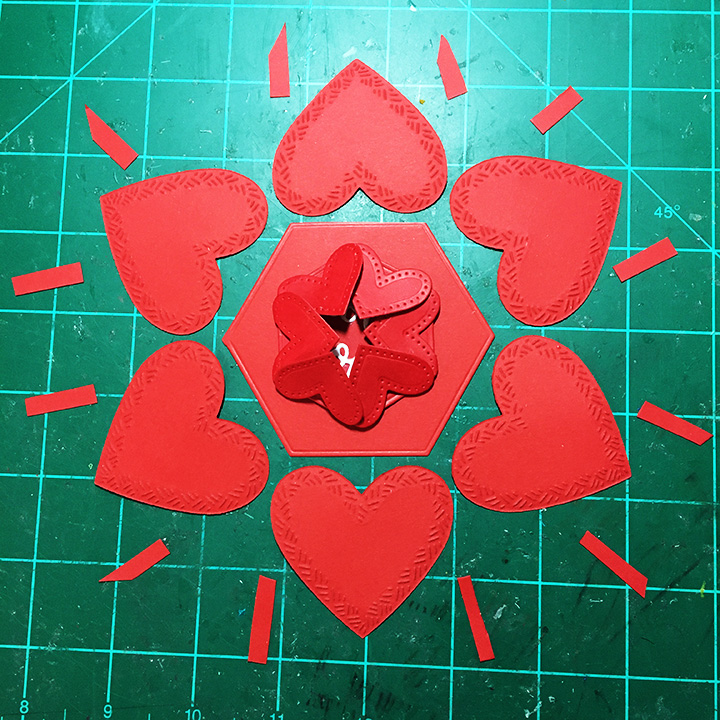
The center heart is cut from the Heart Collage Pop-Up set in two pieces. Slide solid heart into slotted heart and glue the back halves to the mountain fold of the folded panel mechanism making sure that the panel slots are not blocked by heart. Following the video assembly instructions, insert the two flag arms into the slots on the folded panel. Glue the flag tabs onto the back of the other flag. Adhere the panel to the twisting mechanism as directed in assembly video. Test and train the mechanism how to fold inside the card.

The card front is simply decorated with the scalloped frame which is glued only on the straight edge inside of the frame.

To have a white shadow behind the die-cut “Happy Valentine’s Day,” Trace the outer edge of the word die with pencil and fussy cut the shadow.Two tiny hearts from the Sending Love die set complete the front.

The inside decorations include more tiny hearts in corners of the decorative panels as well as two hot air balloons carrying hearts. The balloons are from the Balloon Collage Add-Ons and the hearts on strings are from the Little Twist Panel Pop-Up. The balloons are adhered to the card with foam dimensionals. “Sending Love” sentiment is its own die set. There are two scalloped white labels are from the Little Twist Panel Pop-Up to write a personal message.

As with all my cards that are sent in an envelope, I have decorated the back flap with scalloped heart from the Heart Collage Pop-Up set. The card is A7 envelope.

You can see more Valentines by clicking here.

Thank you for reading this blog post. I hope it inspires you and makes you smile. Please like and leave comments 😊

Materials Used:

Dies

Papers

  • American Crafts – The Color of Memories – 12 x 12 Printed Paper – Heart Flowers -320506
  • American Crafts – The Color of Memories – 12 x 12 Printed Paper – Tumbling Blocks -320330
  • White and Pink Cardstock & White Copier Paper Scraps
  • Fun Stampers Journey – 8.5 x 11 Cardstock – Banana Cream
  • A7 Envelope – Ivory

Miscellaneous

  • Neutral PH Adhesive by LINECO
  • Fine-Tip Glue Bottle
  • Scrapbook.com – Double-Sided Adhesive 1/4 Inch Tape
  • Clear Double-Sided Adhesive 8.5 x 11-Inch Sheets
  • Die Cutting Machine
  • Piercing Tool
  • Pencil
  • Sand Eraser
  • Baker’s Twine
  • Stampin’ Up – Foam Dimensionals

Heart Flower Valentine

It’s the Karen Burniston’s Design Team February 2023 Challenge focusing on LOVE.

This hexagon flower card is a cross between an explosion box and a flower bud slowly opening. It uses two Crosshatch shape dies – Hexagons and Hearts as well as two sentiment dies – Happy Valentine’s Day and Word Set 13. An additional heart is the Circle Charm Pop-Up set.

Center Layer: Cut one of the second smallest of the plain edged hexagon in the Hexagons Crosshatch set of red 65 lb. cardstock. Cut six of the hearts in the Circle Charm Pop-Up set in red 65 lb. cardstock. Cut 12 strips 1-inch by 1/4 inch in red 65 lb. cardstock. (Strips need one squared off end that will be visible when the card is open.) Cut in white cardstock “love you” from Word Set 13.

Adhere “love you” sentiment onto hexagon parallel to a straight edge. Glue squared ends of strips to back side of the rounded tops of hearts. (Each heart should have two strips.) Place heart face up over an edge of hexagon and fold under the attached strips and glue to the underside of the hexagon. Make sure the top of the heart is just at the edge of the hexagon and not overhanging. (Overhanging hearts will make catchpoints that will be hard to open when flower is assembled.) Repeat with the next five hearts.

Fold hearts closed and test for catchpoints. Adjust attached hearts as needed to eliminate catchpoints.

Middle Layer: Cut one of the second largest of the plain edged hexagons in the Hexagons Crosshatch set in Pomegranate 100 lb. cardstock. Cut six of the smaller crosshatch heart in the Heart Crosshatch set in Pomegranate cardstock. Cut 12 strips 1-inch by 1/4 inch in Pomegranate cardstock. (Strips need one squared off end that will be visible when the card is open.)

Using thin foam squares, adhere center layer hexagon onto middle hexagon with points of smaller hexagon pointing towards the middle of each straight edge on larger hexagon. Glue squared ends of strips to back side of the rounded tops of hearts. (Each heart should have two strips.) Place heart face up over an edge of hexagon and fold under the attached strips and glue to the underside of the hexagon. Make sure the top of the heart is just at the edge of the hexagon and not overhanging. (Overhanging hearts will make catchpoints that will be hard to open when flower is assembled.) Repeat with the next five hearts.

Fold hearts closed and test for catchpoints. Adjust attached hearts as needed to eliminate catchpoints.

Outer Layer: Cut two of the largest hexagon in the Hexagons Crosshatch set – one red dotted Swiss and one white. Cut six of the scalloped heart in the Heart Crosshatch set in red dotted Swiss. Cut 12 strips 1-inch by 1/4 inch in red dotted Swiss. (Strips need one squared off end that will be visible when the card is open.)

Using thicker foam squares, adhere middle layer hexagon onto largest hexagon with points of smaller hexagon pointing towards the middle of each straight edge on larger hexagon. Glue squared ends of strips to back side of the rounded tops of hearts. (Each heart should have two strips.) Place heart face up over an edge of hexagon and fold under the attached strips and glue to the underside of the hexagon. Make sure the top of the heart is just at the edge of the hexagon and not overhanging. (Overhanging hearts will make catchpoints that will be hard to open when flower is assembled.) Repeat with the next five hearts.

Fold hearts closed and test for catchpoints. Adjust attached hearts as needed to eliminate catchpoints.

Glue white hexagon over the back of the red hexagon to cover-up strips and to provide a space to write a personal message.

Closing Band: Cut one strip of 12 inches by 3/4 inch in striped cardstock. Wrap loosely around widest part of closed flower. (Make such you can slide off the closed band before gluing closed.)

On white cardstock, trace around the “Happy Valentine’s Day” die to create a shadow for the words. Fussy cut the shadow. Die-cut the sentiment in red and use a pokey tool to weed out the words. Glue to shadow. Adhere the shadowed words to band.

The card will fit in an A2 size (4 3/8 x 5 3/4 inches) envelope. It may require extra US postage for its thickness.

You can see more Valentines by clicking here.

Thank you for reading this blog post. Please like and leave comments 😊

Materials Used:

Dies

Papers

  • Echo Park – 12×12 – A Perfect Christmas by Lori Whitlock – Snow Flack Swirl – APC135009
  • Bazzill – 8.5 x 11 – Embossed Dotted Swiss Cardstock – Red
  • Spellbinders – 8.5 x 11 – Color Essentials Cardstock 100 lb – Pomegranate
  • Recollections – 8.5 x 11 –Cardstock Paper 65 lb – Red
  • White lightweight cardstock

Miscellaneous

Valentine Swing

Garden swings have played a role in the courtship of the lovely couple for whom this card was made. So, an interactive card to reminded them of their early days getting to know one another is appropriate.

The starting point for this card is a new Tutti Designs swinging bench die and a “M” fold stepper base.

Die-cut:  Cut the whole swing die out six times – 2 green, 2 pink wood, 2 white wood. From these six designate one of each color to be the front section and one of each color to be the back section. The pink wood pieces will be used as the section bases. The chain with the bench attached should be trimmed from the roof of the pink pieces. Cut the rounded bench arms with the chain attached off the pink bench pieces and discard the bench remains.

Front Section:  Trimmed off the green roof from the front section and glue the two green posts to the back of the pink wood piece. From the white wood piece, trim off the roof from the chain with bench attached and posts. Then trim down the post pieces to the circles. These shortened white posts glue to the front of the pink wood posts.

Back Section:  Trim off the chain with bench attached from the green piece. Glue the green piece to the back of the pink piece to strengthen it. From the white wood piece, trim off the roof from the chain with bench attached and posts. Then trim down the post pieces to the circles. These shortened white posts glue to the front of the pink wood posts. Save the white roof for later.

Bench:  Trim off the chains from both white bench pieces and discard the chains. On the front bench piece snip the two connecting lattice bars from the arms. (See first photo) Bend down the lattice seat and trim the curved portion off so that the seat is ½ inch deep. (See second photo) From white scrap, cut two strips 1 inch by ¼ inch. Fold ¼ inch tabs at each side of the strips. (See third photo) Glue strips to the back side of front bench under the bend for the seat. Glue the remaining tabs to the front of the back white bench piece. The bench now should have a rectangular frame once which the lattice seat will rest on. (See fourth photo and photo below)

Glue the pink chains to the back sides of the bench arms, keeping the chains perpendicular to the bench seat. Cut two pieces of white embroidery floss at least 5 inches long. Thread a piece of floss through the top chain link and then through the other top chain link. Repeat with second piece of floss on opposite bench side.

Stepper Base:  Cut a piece of green cardstock 5 inches by 5 ½ inches. With the 5 ½ side of card vertical, score the shorter side at the middle (2 ½ inches) and at the quarter marks (1 ¼ Inches and 3 ¾ inches). Fold the middle as a valley fold and the quarters as mountain folds. Your folded base should resemble a “M.”

Assembly of Card:  Lay the back pink-roof-with-posts piece on your work surface and position the bench and its floss threads as it would hang from the roof. Flatten the bench to see where the chains will move to and adjust bench so threads with reach roof. Tape only the back two threads to front of pink roof. Trim tails off the two taped threads. Glue the white roof piece over the taped threads.

Place the front pink-roof-with-posts piece on top of the back piece aligning the posts. Glue only the top heart and scalloped roof trim of the front and back pieces together.  Position the front chain threads over the front pink rood and tape to roof. Open glued front and back to a tent-like shape. Reposition front taped threads to make bench level and free to swing. Glue green roof over the taped threads.

Glue the back posts to the back ‘mountain’ of card base and front posts to front “mountain” of base. Decorate with as desired with flowers and sentiment. Add a white strip of cardstock to back side of base to write a personal message.

The card will fold flat to fit into an envelope, by flipping up bench seat and flatten bench frame.

I decorated my card with some tiny flowers made from a Spellbinders die set and the sentiment (Karen Burniston die) was cut once from red and once from white and then glued slightly askew to give highlights.

As is my style, I stamped the back of the envelope with a BoBunny hearts stamp three times in a cherry red ink to hint as to what is inside.

You can view more Valentines by clicking here.

Thank you for reading this blog post. Please like and leave comments 😊

Materials Used:

Dies

Stamps/Ink

Papers

Miscellaneous

Sundae Shop – You’re So Sweet

2 spoons-CUEX

I scream, you scream, we all scream for ice cream! Ice cream sundaes YUMMY! And even better when shared with two spoons. This is a sweet Valentine’s card made for a special couple.

2 spoons-inside

Made this card using die sets from Karen Burniston and lots of recycled colorful packaging from my stash. The shine on the hot fudge topping and cherries is Nuvo Jewel Drops. The “glass” dish is vellum that has been stenciled using the die with a white paint pen.

IMG_7833

The card front is made with papers from Authentique’s Confection Collection.

IMG_7842-cu 2 spoons

See more Valentines by clicking here.

Supplies

Dies:

Papers:

Miscellaneous:

Flowers for the Pretty Lady

I love creating buildings and 3-dimentional cards. This being said, when I saw the Hero Arts January 2019 My Monthly Hero kit I knew I had to have it.  I looked at all the videos and blogs using the kit while waiting for the kit to arrive. Then I developed an idea for a stand-alone flower booth card.

IMG_3694

I ended up using a fan-fold of about 1.25 inches wide to made the sides of the booth. I used 1/8 inch wide double sided tape to adhere the three brown shelves to the inside of the folds. (See YouTube video from Crafter’s Companion that shows how to do the fan-fold sides and attach shelves.) I cut the striped awning about 1 inch taller than the stamp so I could color it and glue it to the inside back to give the booth a roof.

IMG_3690

Coloring the entire card with watercolor pencils and using a waterbrush to spread the color was a lot of fun.  The “Valentine’s” was stamped and embossed with black sparkle powder and fussy cut. All the flowers and cans where shaped around a fat marker pen to add some dimension. I used foam squares and tape to add more layers and depth.

IMG_3691

The back sentiment was computer generated and cut to look like a poster on the back of the booth. (If I had to choose the adhesive I used to adhere the poster again, I would use glue rather than the doubled-sided tape which shows through the thin copier paper I printed the sentiment on, but I was afraid the ink would run if I used water-based glue. I also could have repositioned the poster more squarely on the back.)

Supplies used:

  • Hero Arts January 2019 My Monthly Hero kit
  • White and green premium cardstock from Darice
  • VersaMark Watermark Stamp Pad
  • Ranger Black Sparkle Embossing Powder
  • Scotch White Foam Squares and Tape
  • Prima Marketing Inc. Watercolor Pencils -The Basics
  • Tim Holtz-Ranger Waterbrush -Detailer Tip
  • Stampabilities Black Dye Ink Pad
  • Poster cut from Lawn Fawn Scalloped Box Pop-Up Die


New Dies!

There is nothing so exciting to a papercrafter as new materials and dies arriving in the mail! I managed to have two such boxes (Karen Burniston and Taylored Expressions) and a raffle goodie basket full of Stampin’Up papers, stickers, cards, inks and stamps all sitting on my crafting table at the same time.

Below is the split personality card that evolved from all these fun items.

IMG_3848

IMG_3846

I used:

Karen Burniston  in cahoots with Riley and Company dies:        karenburniston.com

  • 1043 – Fancy Label Accordian
  • 1044 Fancy Flourish Frames  (These fit nicely over the tabs connecting the frames together and blend the three different colored cardstock.)

Taylored Expressions dies:         www.tayloredexpressions.com

  • TE600 – Golf Ball & Tee
  • TE1089 – Hole in One

Stampin’Up:       www.stampinup.com

  • TeaRoom Memories & More Card Pack
  • Tea Room Copper Vinyl Stickers
  • Baker’s Twine – Bermuda Bay
  • A Nice Cuppa Stamp Set

Cardstock from my stash in

  • Bold Teal Blue
  • Pale Blue
  • Bold Green
  • Pale Green
  • White

Hampton Art’s Pale Blue Ink Pad

CraftSmart’s Light Blue Ink Pad

Tombow Aqua Mono Liquid Glue