Swing Gate Fold

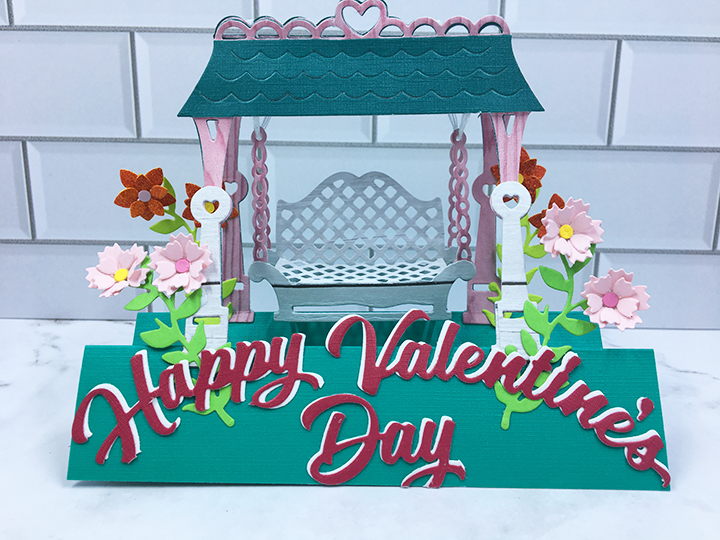
Hi it’s Sue here from the Dies R Us Design Team with another interactive swing gatefold card.

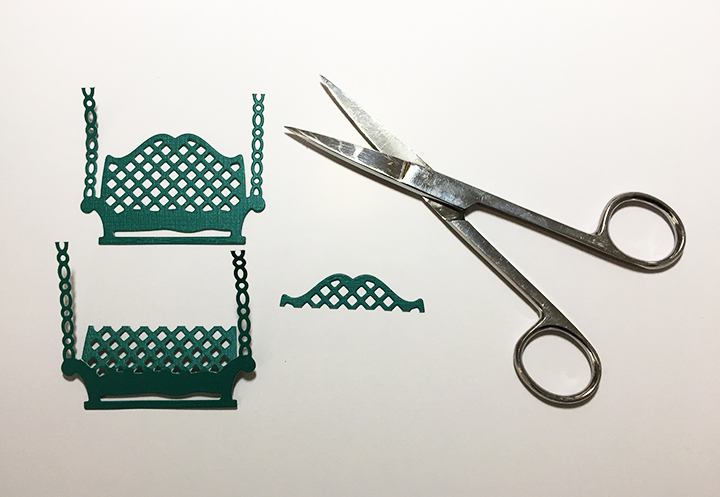
I based this card off of a swing card I made in last week’s blog post. You can get the specific instructions on how to make the bench swing by clicking here.

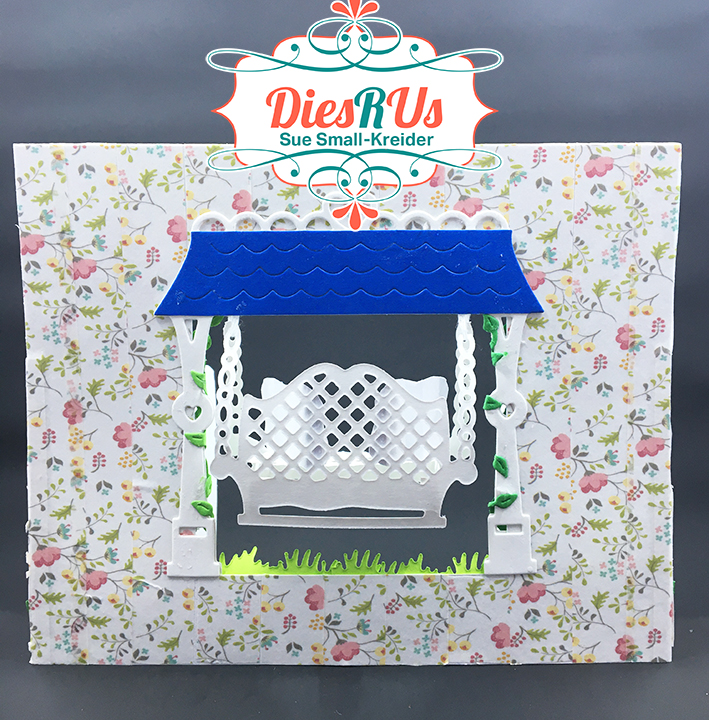
After cutting a 3 inch square opening on a 5 inches x 6 inches piece of heavy white cardstock, ink blend a soft blue sky all over.

Using two pieces of heavy white cardstock 3 inches x 3 1/2 inches, cover with tiny flowered washi tape (you could use patterned paper instead). Next die cut the gate and fence pieces to fit a 3 inch on each side. Before gluing the fence pieces down, use some of the leafy vine from a birdhoue die set to grow up around the fence.

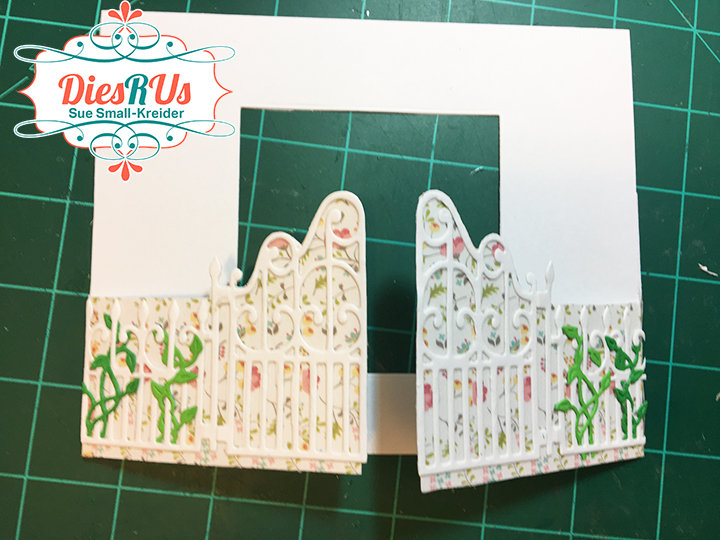
Once the fence and gate pieces are glued to the 3 x 31/2 pieces score and glue the ¼ inch tabs to the back of the 5 x 6 inch base. Cover the back of the base card with washi tape/patterned paper.

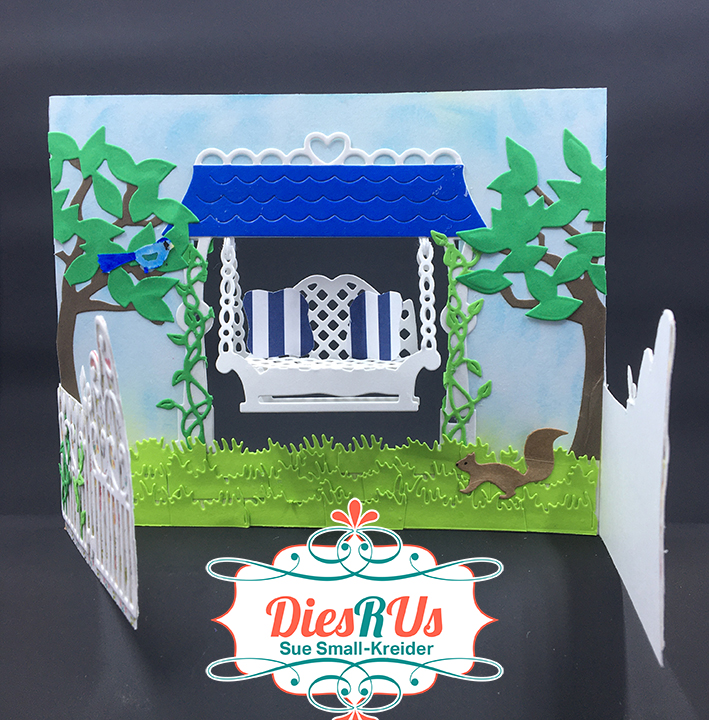
Next glue the swing posts and roof over the cut-out 3 inch square blue inked side. To decorate the posts, glue on more of the leafy vines. Make the bench swing as described in last weeks blog. Attach with tape the threaded chains to the back side of the roof, making sure the bench is hanging even. With the swing in place, glue the second post and roof piece over the 3 inch cut square, matching up the post and roof edges. Glue on dark blue roof pieces to front and back of card.

Back of card

Decorate the scene with trees, birds, squirrels and grass. The swing pillows are cut using the pillow dies from a sofa die set.

You can write a message inside the gates or on the back of the card.

Hope this fun card has put a smile on your face and provided some inspiration for your crafting.

SUPPLIES Used from Dies R Us:

Dies

Inks

Miscellaneous

Other Supplies:

  • Flowered washi tape
  • White embroidery floss
  • Striped and colored paper scraps
  • Black fine tip pen

Don’t forget to come join in the fun at the Dies R Us Challenge Blog. There’s a new challenge theme offered on the 1st and 15th of each month and one lucky randomly drawn winner will receive a gift voucher prize to the Dies R Us Store.  

 For your convenience, all the important Dies R Us links are provided below.

click below for:

STORE

CHALLENGE BLOG

FACEBOOK

INSPIRATION BLOG

FRIENDS OF DIES R US PINTEREST PAGE

A Swinging Anniversary

Today we are making a 3-dimensional swing card using Karen Burniston dies from Dies R Us.

1. Cut two of each color using the swing die. Save the off-cut pieces for bench supports (I find the best piece is right below the bench , about 3/8 inches tall x 2 inches)

2. Trim off two roofs from darkest colour and the four posts from the lightest color. Cut the chains off the middle color. Cut bench support into two strips. (I save all the parts that I’m not using on this card to use on other cards.)

3. Cut words from each of the three colors.

4. Cut four stems from green and ten small flowers and center circles from flower dies.

5. Cut a 5 inch square and four small strips ¼ inches X 1 ¼ inches from sturdy green cardstock for the card base and post tabs.

6. Trim heart and scallop off one of the roof pieces. Glue roofs to yellow bases.

7. Glue heart and scallop trim together, being careful not to glue roofs.

8. Glue white posts ton fronts of yellow base posts.

9. Take one of yellow benches, snip the back at sides and fold down back to become bench seat. Trim of top of the bench as shown.

10. Cut the bench support strip into two side strips Fold ¼ on either end to form two tabs.

11. Trim tabs to fit the bench cut-outs. Glue tabs to lower side of back of seat piece as shown. Then glue other tabs to back bench piece.

12. Take 5 inches green square and fold in half, fold down one side to make a mountain fold, repeat on other side. Base should have two mountain folds in the shape of a “M.”

13. Glue small green support strips to inside of posts. Let dry and then glue posts to inside valley of base as shown in red circles.

14. Trim off top two loops on bench chains.

15. Cut two lengths of thread or embroidery floss. Thread one piece through the two chains on one side of bench. Repeat with other thread on opposite side of bench.

16. Tape threads to underside of roof making sure bench hangs evenly. (Red circles) Trim off tails of thread. Test swinging your bench. Smile.

17.Glue your words together offsetting at least one or both of the back colors. (Off-setting all three gives a blurred effect as shown, but off-setting just one makes the letters look 3D.)

18. Glue your flowers together and then onto the stems/bushes. Glue to base.

Hope this fun card has put a smile on your face and provided some inspiration for your crafting.

Want to see other swing cards I’ve made? Click here.

Thank you for reading this blog post. Please like and leave a comment. 😊

SUPPLIES Used from Dies R Us:

Additional Supplies Used:

  • Stampin’ Up Classic Stampin’ Pads – Early Espresso and Emerald Envy
  • Summer meadow stamp set from Cardmaking & Papercraft Issue 198, August 2019
  • Square envelope from my stash

Don’t forget to come join in the fun at the Dies R Us Challenge Blog. There’s a new challenge theme offered on the 1st and 15th of each month and one lucky randomly drawn winner will receive a gift voucher prize to the Dies R Us Store.  

 For your convenience, all the important Dies R Us links are provided below.

click below for:

STORE

CHALLENGE BLOG

FACEBOOK

INSPIRATION BLOG

FRIENDS OF DIES R US PINTEREST PAGE

Valentine Swing

Garden swings have played a role in the courtship of the lovely couple for whom this card was made. So, an interactive card to reminded them of their early days getting to know one another is appropriate.

The starting point for this card is a new Tutti Designs swinging bench die and a “M” fold stepper base.

Die-cut:  Cut the whole swing die out six times – 2 green, 2 pink wood, 2 white wood. From these six designate one of each color to be the front section and one of each color to be the back section. The pink wood pieces will be used as the section bases. The chain with the bench attached should be trimmed from the roof of the pink pieces. Cut the rounded bench arms with the chain attached off the pink bench pieces and discard the bench remains.

Front Section:  Trimmed off the green roof from the front section and glue the two green posts to the back of the pink wood piece. From the white wood piece, trim off the roof from the chain with bench attached and posts. Then trim down the post pieces to the circles. These shortened white posts glue to the front of the pink wood posts.

Back Section:  Trim off the chain with bench attached from the green piece. Glue the green piece to the back of the pink piece to strengthen it. From the white wood piece, trim off the roof from the chain with bench attached and posts. Then trim down the post pieces to the circles. These shortened white posts glue to the front of the pink wood posts. Save the white roof for later.

Bench:  Trim off the chains from both white bench pieces and discard the chains. On the front bench piece snip the two connecting lattice bars from the arms. (See first photo) Bend down the lattice seat and trim the curved portion off so that the seat is ½ inch deep. (See second photo) From white scrap, cut two strips 1 inch by ¼ inch. Fold ¼ inch tabs at each side of the strips. (See third photo) Glue strips to the back side of front bench under the bend for the seat. Glue the remaining tabs to the front of the back white bench piece. The bench now should have a rectangular frame once which the lattice seat will rest on. (See fourth photo and photo below)

Glue the pink chains to the back sides of the bench arms, keeping the chains perpendicular to the bench seat. Cut two pieces of white embroidery floss at least 5 inches long. Thread a piece of floss through the top chain link and then through the other top chain link. Repeat with second piece of floss on opposite bench side.

Stepper Base:  Cut a piece of green cardstock 5 inches by 5 ½ inches. With the 5 ½ side of card vertical, score the shorter side at the middle (2 ½ inches) and at the quarter marks (1 ¼ Inches and 3 ¾ inches). Fold the middle as a valley fold and the quarters as mountain folds. Your folded base should resemble a “M.”

Assembly of Card:  Lay the back pink-roof-with-posts piece on your work surface and position the bench and its floss threads as it would hang from the roof. Flatten the bench to see where the chains will move to and adjust bench so threads with reach roof. Tape only the back two threads to front of pink roof. Trim tails off the two taped threads. Glue the white roof piece over the taped threads.

Place the front pink-roof-with-posts piece on top of the back piece aligning the posts. Glue only the top heart and scalloped roof trim of the front and back pieces together.  Position the front chain threads over the front pink rood and tape to roof. Open glued front and back to a tent-like shape. Reposition front taped threads to make bench level and free to swing. Glue green roof over the taped threads.

Glue the back posts to the back ‘mountain’ of card base and front posts to front “mountain” of base. Decorate with as desired with flowers and sentiment. Add a white strip of cardstock to back side of base to write a personal message.

The card will fold flat to fit into an envelope, by flipping up bench seat and flatten bench frame.

I decorated my card with some tiny flowers made from a Spellbinders die set and the sentiment (Karen Burniston die) was cut once from red and once from white and then glued slightly askew to give highlights.

As is my style, I stamped the back of the envelope with a BoBunny hearts stamp three times in a cherry red ink to hint as to what is inside.

You can view more Valentines by clicking here.

Thank you for reading this blog post. Please like and leave comments 😊

Materials Used:

Dies

Stamps/Ink

Papers

Miscellaneous

Back into the Swing of Things

Back in the Swing -Inside-CU

Coming home after a long stay in the hospital deserves a cheerful card. Home Sweet Home may have a different meaning for those of us who have been fortunate enough to stay healthy during this year of COVID-19, but to a survivor it truly can be sweet.

Back in the Swing -front

The mechanical base for this card come from Karen Burniston’s House and Fence Pop-Up die set, as does the house. The fence, flowers, grass, tree and swinging girl come from the Xcut “Make Me” die set included in the Homemaker Die Cuts & Digi Stamps All-in-one Die & Digi Stamp Kit.

This is about the eighth time I have made this pop-up platform which is easy to use. I spent time exploring how to get the best embossing impression on the house by using fun foam to act as a shim. I inked the house and decoration on the tree and swinging girl with distress inks. The bushes are a scrap decorated with pink dots from the flowers.

Back in the Swing -Inside-wide

The front sentiment is another Karen Burniston die set which makes it quick and easy to create a stylized sentiment. The strawberry comes from the Park Lane paper pad as does the gingham tag inside the card.

I created the inside sentiment on the computer and used distress ink to color the background. If I were to print the sentiment again, I would ink the paper first and then print the words to minimize the black ink blurring.

The folded size of the card is 5 ½ inches by 5 ¾ inches. For interest, the bottom front edge is fussy cut along the printed scalloped edge.

Video is at https://spark.adobe.com/video/Ah8pNrimuXg8u.

Supplies

Dies

Paper

Inks

Miscellaneous

The Circus is Coming!

Circus-inside

After seeing numerous circus theme cards being made because of Craft Consortium’s Circus collection and Sam Calcott’s Mixed Up Crafts tutorials on circus themed spinner cards. I decided to make my slimline version using some wooden block rubber stamps that I had played with as a child.

The funny thing about these stamps was I thought I had lost them in my last move, but a few days ago the battered box they were in caught my eye as I was looking for something else on my craft shelves. My great aunt who had been a schoolteacher from the 1920s-1960s had given the original of the stamps to my siblings and I. My father having a machine to make rubber stamps, was able to duplicate the stamps so that each of the children in my family could have our own set.

Circus-stamps

As I reacquainted myself with these stamps, I found the lady who I always made ride the prancing horse and the flying trapeze artist. There was my favorite stamp – the cage wagon in which I could stamp whatever animal I wanted to be in the cage. There were seals and bears balancing balls and a dog that would jump through a paper covered hoop. This was definitely a circus from another era with different notions of how to treat animals.

Because I could not find any suitable red and white striped paper in my stash, I used Adobe Illustrator to create the striped paper I needed and to create a number of versions and sizes of the circus sign.

Circus-front

Because the slimline card is 4 inches by 9 inches, it will fit into a #10 business size envelope. With this long and narrow card, I could make my 3-ring circus with two spinners and the flying trapeze artist using nesting circle dies to cut out the three circles and created decorative rings to frame the cut-out circles. I should have taped my two sheets of stripped cardstock together and cut all three holes on both sheets at the same time having them lined up. (I made the mistake of cutting first one and then having to tracing the holes on to the second sheet.)  (NOTE: Don’t glue your backing paper to your front until you attach the spinners.)

I highly recommend watching the spinner videos by Sam Calcott before making one. I used black sewing thread for this card using 2 to 4 strands for the spinners. (NOTE: Don’t glue your backing paper to your front until you attach the spinners.) I also stamped reverse images of the three stamps I wanted for spinners/swingers using a gellie plate. (Sam demonstrates in one of her other videos how to make the reverse image. Sorry I don’t remember which video, but it involves giraffes.) I used the printable glitter paper because it is glitzy, but also it hides bad stamping better.

Circus-inside-flat

Having learned a few tricks since I had last played with these stamps, I masked off parts of the cage wagon before I stamped the bull lion (We always called this stylized creature the bull lion because we didn’t really know which it was.)

I cut a white stitched rectangle from a Lawn Fawn die set to use as a place for a personal message.

To active the spinners, you must twist them before closing the card and placing in the envelope. They will spin when the card is open.

Supplies

Dies

Stamps

  • Rubber stamps designed circa 1920-1960 from my stash

Inks/Watercolors

Paper

Miscellaneous