Mary Berry and Paul Hollywood, icons of British baking and favorites of the person this card is made for, have been hosts for The Great British Baking Show from 2010-2016.
This stand-up U-fold card with crossbars is reminiscent of an old Aga stove. The card uses Paper Discovery by Olga Direktorenko’s Cosy Kitchen collection of dies, stamps, embossing folder and papers. Paper Discovery is a brand from Craftstash-UK or Craftstash-USA

Stove Doors: I wanted the oven doors to have the look of enameled iron, so I cut set of blue doors. (Save the out-cut of door openings for stamping and stove knobs for later) I cut a tiny white circle for the oven gauge and glued it in place on the one door. Next I covered all but the hinges on the doors with Glossy Accents gel and let them dry overnight. Once they were dry, I cut and glued the silver latch and hinges on to them before gluing them on to the doors I had already glued to the stove.
Tile Backsplash: I cut the tiled back splash from white card stock and brushed a light coat of Glossy Accents over the rows of tiles, avoiding the deep embossed grooves between tiles.
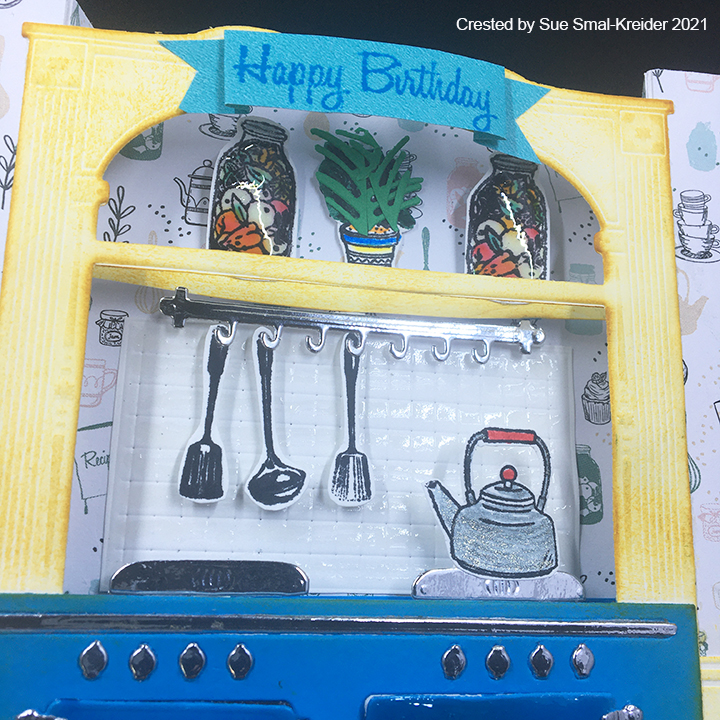
Glass Jars of Fruit: To achieve the look of glass, stamp and color on white cardstock using permanent inks when dry cove with a thick layer of Glossy Accents. When dry curve around your finger or pen to create the curved glass effect.
Dresser: Cut one and use an embossing sandwich for your die-cutting machine to emboss the details into the cardstock. Cut a 1/4 inch x 4 1/2 inches strip of white cardstock for the shelve crossbar. Using an ink blending tool color the crossbar and dresser to bring out the embossed details using a yellow ink. (Don’t ink where the stove is as you will be stamping there.)

Oven Stamping: Using the stove out-cut from cutting the stove doors, trace with pencil where the door openings are onto the dresser back. Remove stove out-cut and using a stamping platform stamp sentiments or baking trays in oven openings. (I masked off the other openings that the rolling pin handles and baking pan that would cover with yellow paper tape.)
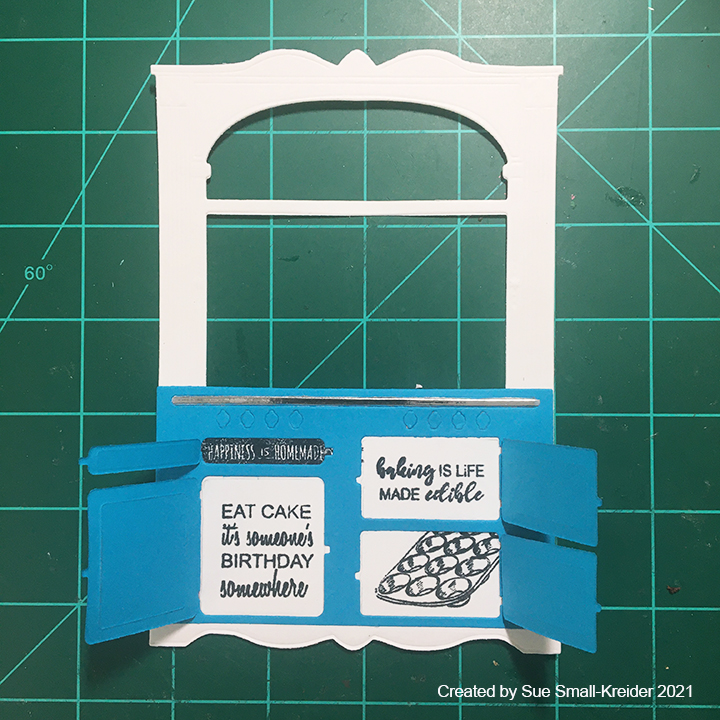
Stove Assembly: Cut another stove from blue cardstock. Glue all the doors to the backs of the “enameled’ doors from first step. Glue the stove front to dresser matching up stamped images with the door openings. Adhere two layers of the blue stove knob cut-outs to top of stove. (This will add some dimension to make the knobs be raised up from stove front.) Cut from silver mirror cardstock the knobs, thin line trim, door hardware, stove burners and utensil rack. Glue silver hardware onto doors and knobs and silver trim in place. Glue door hinges into place on to stove front being careful not to get glue onto stamped images. Once glue is dry, fold doors back to crease hinges. Cut a 1/2 inch x 4 1/2 inches strip of blue cardstock for the stove burners crossbar. Glue dresser on to card base after the shelf and burners step.

U-Fold Card Base: Cut a 6 3/8 inches x 6 15/16 inches rectangle from heavy white cardstock. Score on a scoreboard at 1 inch, 1 1/2 inches, 5 7/16 inches and 5 15/16 inches and fold the outer folds as mountain folds and the inner folds as valley folds. This should create a U-shaped card base.
Wallpaper: Cut pieces of your decorative “wallpaper” to fit the top half of each of the card base’s sections. Allow for black space over the folds. Glue decorative pieces in place. (Note: It might make the crossbars stronger if you glued the narrow inside strips of decorative paper on after the crossbars are attached, but before the dresser is glued in place.)
Wainscoting: Using the kitchen background embossing folder, emboss the wainscoting and floor from a piece of cardstock that is at least 7 inches x 3 inches. Using an ink blending tool, color the wainscoting and floor with yellow ink to match the dresser. Cut pieces to cover the lower half of the card base (two 1-inch panels of wainscoting and first row of floor tile and one 3 7/8 inches x 3 /4 inch of two rows of floor tile and bottom edge of wainscoting.) Glue the two 1-inch panels to the side sections of card base. Cut a 3 7/8 inches x 2 1/2 inches piece of blue cardstock to be glued in place as the back of the stove. With the card base open in the U-shape, position the dresser with stove over the opening and mark with a pencil where the shelf and stove burner crossbars should go on the narrow inside walls. Adhere the large blue stove back to the card base using the pencil mark for the stove burner crossbar for positioning. Glue remaining strip of flooring with wainscoting at the bottom of the stove back.

Shelf and Burners: Stamp color and cut out herb pot, utensils and kettle. With tiny dots of glue, attach the utensils to the silver rack and add tiny piece of foam squares to the back of the rack and utensils. Attach the kettle to the from of a stove burner. Fold 1/4 inch tabs blue crossbar at each end. Using scraps of blue, attach the burners to the blue crossbar centering them over the stove knobs. Glue the backsplash tile onto the card base above the burners. Adhere the utensil rack above the tile backsplash. Assemble the shelf and its contents in the same manor as the stove burners crossbar. Glue in place to card base using pencil marks.

Birthday Banner: Stamp onto a 3-inch x 5/8-inch paper strip a sentiment from the Simply Food stamp set. Cut notches on ends of strip and fold into a ribbon banner. Glue ends of ribbon to top of dresser.

Envelope: I used a 6 x 9 inches envelope for this card that folds flat into 5 3 /4 inches x 6 3/8 inches. The stamps are from the baking set of stamps.
Thank you for reading. If you enjoyed this blog post, please like it and follow the blog. 😊
Dies
- Paper Discovery – Cosy Kitchen – 2D Perfect Kitchen Die Set
- Paper Discovery – Cosy Kitchen – Cooking Up A Storm Die Set
Embossing Folders
Stamps
- Paper Discovery – Cosy Kitchen – Simply Food A5 Stamp Set
- Paper Discovery – Cosy Kitchen – Baking Fun A5 Stamp Set
- Paper Discovery – Cosy Kitchen – Cooking Up A Storm A5 Stamp Set
Inks
- Memento – fade-resistant Dye Ink – Tuxedo Black, Rich Coco
- Ranger – Tim Holtz’s Distress Ink – Salt Ocean, Fossilized Amber
- Silver metallic pen
- Silver gel pen
- Crayola Signature Brush & Detail Dual-ended Markers
Papers
- Heavy weight white card base A7 (5 inches x 7 inches)
- Colored and patterned scrap papers
- Silver mirror card
- Paper Discovery – Cosy Kitchen A5 Paper Pad
- 6 x 9 inch envelope
Additional Supplies:
- Tim Holtz – Tonic Studios – Stamping Platform
- LDRS Creative – Stampendable Stamping Tool
- Stamp Cleaning Cloth
- We R Memory Keepers – Scoring Board and Tool
- We R Memory Keepers – Quickstik Tool
- Foam Squares
- Scor-Pal – Scor-Tape 1/8″
- Ranger – Glossy Accents
- Pencil
- Scissors
- Low tack tape

And Baker of the Week goes to ….Fantastic card Sue, love it! There is a lot of work in your kitchen, with all the intricate detail you’ve added you can see it’s made with lots of love ❤️ xx
LikeLiked by 1 person
Glad you liked it. A bit like playing with a dolls house.🌞
LikeLiked by 2 people
Fab creation Sue👍🏻🙋🏼♀️Great detailed instructions. Love it
LikeLiked by 1 person
I have no words. I am sitting here wirh my mouth open, wondering how you come up with these amazing cards. I know your companies dies are wonderful, but your ideas and the details you so painstakingly include just make your cards fabulous. This may be my all time favorite.
LikeLiked by 1 person
Thank you Donna for your lovely comment. It is all the die and stamp designers. I just figure out how to make them interactive.
LikeLiked by 1 person