Hug In A Mug

It’s Sneak Peek Week for Karen Burniston’s February 2024 release. These dies will be available for purchase on February 19, 2024 on the KB Riley LLC website.

Sometimes a friend, family member or co-worker just needs a bit of comforting. So this small gift of a hug in a mug with a packet of a tea is just what is needed.

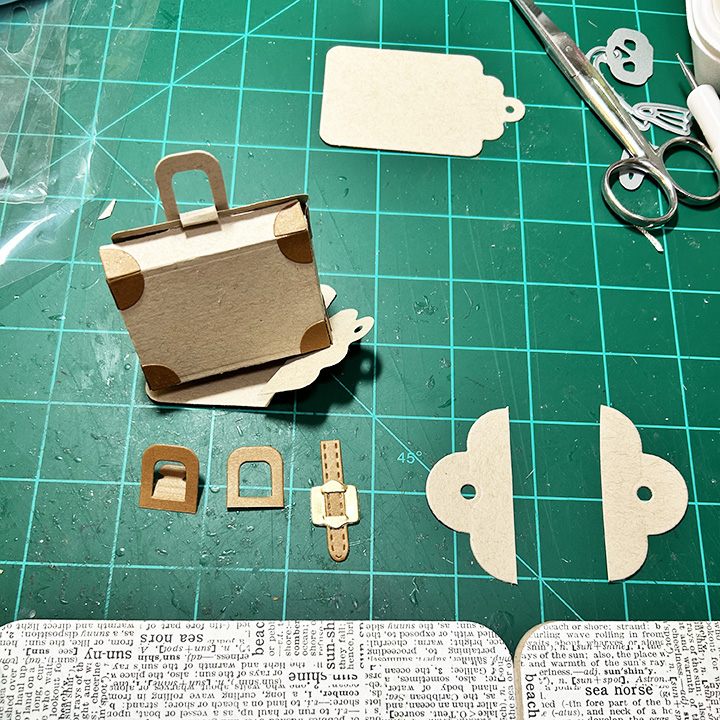
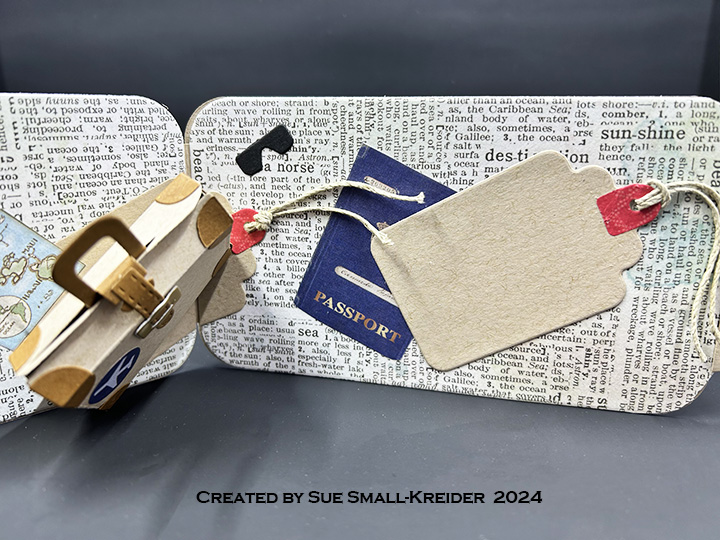
The card and paperclip closure are made with dies by Karen Burniston including her the Tea and Coffee Pop-Up from her February 2024 release.

Card: Β Fold a 3×6-inch rectangle of white cardstock in half to make a 3-inch square. Using the mug die from the Tea and Coffee Pop-Up set, Place the straight side of the mug (the one opposite the handle) with the cutting edge just past the fold of the white cardstock and die cut the mug shape card. Cut one mug from patterned cardstock and a second one from black cardstock. Glue the patterned paper onto the front of the card. Trim off the handle of the black mug and glue it over the patterned paper handle.

Sentiments: Β Cut a heart from coordinating decorative paper using the third smallest die in the Hearts -Crosshatch set. Glue to front of mug. Die cut the words β€œHUG IN A MUG” from black using the Mini Alphabet and Numbers dies. Glue words over heart. (I used the plaid lines on my decorative paper to help me align the letters. You can also use low-tack tape to create straight lines for your letters.)Β  Die cut a tea bag from the Tea and Coffee Pop-Up set to use as a gift tag. Thread embroidery floss through the hole. Write the name of who is receiving the gift on tea bag. Use the inside of the card to write a personal message.

Envelope: Cut a 5-inch square of double-sided decorative cardstock. Using the third largest die in the Squares – Crosshatch or a 3-inch square template center the square inside the 5-inch square so that it creates four, of the same size, triangles at the tips of the larger square. Trace around the die or template with a pencil. Using a ruler extend the lines of the sides of the square to edge of the paper. Using a score board, these lines. Fold the corner in on the cardstock to form an envelope.

Paperclip Closure:Β  Cut a heart from coordinating decorative paper using the second smallest die in the Hearts -Crosshatch set. Glue it to the paperclip. Tie the tea bag to the paperclip and glue the thread tails behind the heart. Tea bag in the Tea and Coffee Pop-Up set.

Thank you for reading this blog post. I hope this inspires you and makes you smile. Please like and leave comments 😊

Materials Used:

Dies

Papers

  • Ink N’ Splatter – 6×6 Double-Sided Cardstock – Rasberry Crush
  • Black and White Cardstock

Ink

  • Pigma – Mircon 01 Fine Tip Pen – Black

Adhesives

Tools

  • Die Cutting Machine
  • Paper Cutter
  • Bone Folder
  • Score Board
  • Scoring Tool
  • Scissors
  • T-Ruler
  • Pencil
  • Tweezers

Miscellaneous

  • Large Paper Clip
  • Packet with Tea Bag

A Pop-Up Cruise Tag Card

It’s Sneak Peek Week for Karen Burniston’s February 2024 release. These dies will be available for purchase on February 19, 2024 on the KB Riley LLC website.

Who doesn’t enjoy a vacation and this tag card is sure to let those going on a cruise vacation know they are in for some fun.

This pop-up tag card uses Karen Burniston dies – specifically the Purse Pop-Up, Topper Tags, Tag Book Pop-Up, Cruise Charms and Tiny Accessories 4.

Tag Cardbase: Cut two of the largest tags in the Topper Tags die set from kraft cardstock. Use the hinge die in the Tag Book Pop-Up or cut a rectangle of 1.5×3.5-inch and fold in half for the card hinge that is glued to the inside of the two tags. Cut two large tags of decorative cardstock and glue over the inside of the tags and hinge. Cut another two large tags of decorative papers and glue to the front and back of the card. (My inside decorative cardstock did not cover the entire tag, so I cut the top scalloped section of the tag from kraft cardstock.)

Pop-Up Suitcase: Follow the assembly video at the bottom of the Purse Pop-Up page link instructions to make the suitcase on a small tag cut from the Tab Book Pop-Up set. I cut the handle again twice, strap once and 20 of the corner pieces from dark brown. Cut the buckle from gold cardstock. (I used a bit of gold foil packaging form some chocolates.) The strap can be glued to the rolled under piece as long as it doesn’t block the movement of the handle as it slides open and closed.

Scuba Gear and Decorations: Using the Tiny Accessories 4 die set, cut the mask and snorkel once from black and once from blue. trim off the top and bottom knobs of the blue snorkel and glue on the black snorkel. Glue the blue mask onto the black mask to give it depth. Save the black center section of the mask to use as sunglasses. Cut a pair of flippers from black. (I had images of a passport and a map of tropical islands that I glued to the inside of the card as well as the airplane sticker on the suitcase. More travel images were added to the back and front of the card.)

Sentiments: The ship and “bon voyage” sentiment on the card from come from the Cruise Charms set while the inside tags come from the Tag Book Pop-Up set. Hemp cord is tied to the tags.

Envelope: The tag card easily fits in a #10 business envelope which I used a paper image to decorate the back flap.

Thank you for reading this blog post. I hope this inspires you and makes you smile. Please like and leave comments 😊

Materials Used:

Dies

Papers

  • 49 and Market – Vintage Artsy Beached 12 x12 Collection
  • Hot Off The Press -Artsy Collage – 240 Paper Art Images – Travel
  • Practical Publishing – So Beautifully Organized April 2019 Box – Travel Paper
  • Fun Stampers Journey – 8.5×11-inch Cardstock – Oatmeal Cookie
  • Red Patterned Paper from Recycle Envelope
  • Gold Foil cardstock from Recycled Candy Packaging
  • Aqua Blue, Black, Brown, Navy Blue and White Cardstock
  • #10 Business Envelope – Kraft Brown

Ink

Adhesives

Tools

Miscellaneous

  • Lawn Fawn – Glow-in-the-Dark Hemp Cord

Bunny Bookmark Pop-Up Easter Card

It’s Sneak Peek Week for Karen Burniston’s February 2024 release. These dies will be available for purchase on February 19, 2024 on the KB Riley LLC website.

Inspired by a bookmark card I recently made, I decided to make a bunny bookmark slimline card using Karen Burniston’s new Animal Add-ons 5, Easter Borders, and Happy Easter.

Cardbase: Start with a 7.25×8.75-inch rectangle of heavy white cardstock and fold to create a slimline card that is slightly larger than 3.5×8.5-inches. (I folded my cardbase crooked and had to even up the sides by trimming off some.) Using decorative Easter papers cover the front and back of the card with full sheets. Use scraps to cover the top and bottom of the inside of the card. Make sure to leave a gap where the card fold is in the inside papers.

Bunny Bookmark: Cut a 2×5-inch rectangle from heavy white cardstock. Round corners with a corner punch. Using the Animal Add-ons 5 set, cut the two large ears, two large oval eyes, one double circle piece, one split square teeth piece, one wavy circle tail piece and four arm pieces from white cardstock. Cut two smaller ear pieces and one triangular nose piece from pink. Cut two smaller eye pieces from black. Using a white gel pen use stencil feature to add white highlight to black portion of eyes. With a fine-tipped black pen add three dots to double circle piece for whiskers. Add three small lines to each paw for nails. Ink the edges of the teeth piece very lightly with a pale yellow ink. Assemble the face of bunny using package picture as a guide onto the top of the rectangle. Glue ears to back of rectangle and arms and hind legs to front of rectangle. (Hint: glue the hind legs to bottom corners of rectangle then glue tail to back side just above the hind leg. Then glue arms so that the paw is just above top of tail.)

Basket Pocket: (Follow directions in assembly video at bottom of linked page.) Make one Wide Woven Basket Box Card panel from brown. Ink the slat pieces with brown ink before weaving into main basket piece and glue in place. Trim off tab. Cut from green cardstock a grassy strip and glue to back side of basket top. Using thin strips of foam tape on the bottom and sides of basket panel, attach to card front to form a pocket. Insert bunny bookmark.

Raising Platform: (Follow directions in assembly video at bottom of linked page the Raising Platform Pop-Up.) Cut one mechanism piece from double-sided decorative cardstock. (I used a carrot and bunny print.) Assemble onto a flattened cardbase. Cut one of the largest fancy label from white cardstock and fold in half. Glue on sentiment. Train the fold with the sentiment. Attach sentiment label to mechanism.

Decorations: Cut two egg borders from Easter Borders set using two different colors of cardstock. Cut two sets of decorative eggs from the same set in a darker color. Trim egg border to width of card and use left over eggs to decorate egg borders along with decorative eggs. Glue to finished borders to bottom and top of card front. Add any extra eggs to basket grass.

Cut two more grass strips from Wide Woven Basket Box Card set and glue to cardbase above bottom decorative paper inside card. Decorate with eggs and basket from the Animal Add-ons 5 set. Cut two of the carrot borders from the Easter Borders set from orange and two sets of carrot tops from green. Assemble carrots using a Quickstik tool or tweezers. Glue carrots to base of carrot paper inside card. (I had to cut the carrot border to cover the edge aesthetically.) Glue extra carrots to the sentiment label. (I cut some carrots from my decorative paper for the label.)

Sentiment: Using the new Happy Easter set, I cut the shadow from pink and the words from blue then cardstock since they are going on top of the platform label and being folded in half. The large β€œJust” with shadow is from Word Set 15 – Just Because. I had to do minor word surgery using Word Set 4 – Just A Note taking the β€œH” from β€œHooray” and replacing the first β€œp” in β€œpopping” with it to make β€œHopping.” The word β€œby” comes from words in both word sets. β€œto say” is from Word Set 4.

Envelope: #10 business envelope back flaps are perfect to use border dies on. I cut the hopping rabbits and grass borders from the Easter Borders set and used fine-tipped pens to add the eyes and noses on the rabbits.

Thank you for reading this blog post. I hope this inspires you and makes you smile. Please like and leave comments 😊

Materials Used:

Dies

Papers

  • Kat Scrappiness –10.75×4-Inches Double-Sided, Slimline Sized Patterned Paper- Easter on Parade
  • Spellbinder’s – 8.5×11 Color Essentials Cardstock – Snowdrift
  • Blue, Brown, Green, Orange, Pink and Yellow Cardstock
  • #10 business Envelope – White

Ink

Adhesives

Tools

  • Die Cutting Machine
  • Scoring Board
  • Bone Folder
  • Craft Mat
  • Sponge Dauber
  • Stamping Blocks used as paperweights
  • Scissors
  • Large Corner Punch

Oh My Hearts

It’s the Karen Burniston design team challenge for February 2024 using the theme of β€œOh My Hearts.”

For this challenge I chose to make some mini valentines that fit into a Candy Hearts Box.

Box: Review the assembly directions on the back of the packaging for the Candy Hearts Box. I used thin double-sided tape to assemble the box. Adhesive sequins were added to the hot air balloon printed on the cardstock. Three hearts were cut from all the hearts without words in the die set from coordinating papers. The top two hearts were attached with a strip of double-sided tape and the sides folded up. Two adhesive backed sequins were glued to the center of the hearts.

Ice Cream Card: A 2-inch by 6-inch rectangle was cut from decorative cardstock and folded in-half for a 2×3-inches top fold card. The inside of the card was covered with decorative cardstock. A second piece 3-inch by 5-inch rectangle of matching cardstock was folded in half and the tiered platform pop-up from the Mini Pops die set was used to cut in to the 3×5 rectangle following the assembly video at the bottom of the link page. Train the main platform’s folds and then center over the top fold card and glue down. Trim excess platform cardstock from edges of card.

Cut the scoop of ice cream from the Sweet Treats Charms set and color in the sprinkles with pens. Cut the silver dish from the bottom of the trophy in the Treasure Charms.

Cut candy hearts with messages using the dies in the Candy Hearts Box set. I cut free-handed the two tiny spoons from silver mirror cardstock. Adhere ice cream assembly to top tier of platform.

Spiral Hearts Card: A 2-inch by 6-inch rectangle was cut from decorative cardstock and folded in-half for a 2×3-inches top fold card. The inside of the card was covered with decorative cardstock. The spiral platform is from the Mini Pops die set and cut from white shimmer cardstock. Follow directions in the assembly video at the bottom of the link page or on back of the packaging for attaching the spiral. Add three sizes of hearts cut from the Candy Hearts Box set and glue to spiral platform. I had leftover hearts and labels from an Easter box project that I used to decorate the card.

Twist Panel Card: A 2-inch by 6-inch rectangle was cut from decorative cardstock and folded in-half for a 2×3-inches top fold card. The inside of the card was covered with decorative cardstock. Using the same patterned cardstock used inside the card, cut one twist panel mechanism using the Little Twist Panel Pop-Up die set. Cut the panel strip and the two banner halves from decorative paper. Follow directions in the assembly video at the bottom of the linked page or on back of the packaging to attach the twist mechanism, panel and banner. Trim the excess paper from edges of card before decorating. The banner ends may need to be trimmed back to fit into the card. Add hearts and check the positioning by closing the card while glue is still wet. I used the tiny heart in the Office Charms die set to decorate, but you could use other tiny hearts from other die sets.

The three cards easily fit into the candy box for a boxed set of mini-Valentines.

_____________________________________________

Thank you for reading this blog post. I hope this inspires you and makes you smile. πŸ˜Šβ€ƒ

Please like and leave comments.

_____________________________________________

Materials Used:

Dies

Papers

  • Craftwork Cards – 8×8 Single-Sided Paper Collection – Flying High
  • Recollections – 8.5×11 White Gold Shimmer Cardstock

Ink

  • Gel Pens – White and Pink
  • Sharpie – Permanent Marker – Ultra Fine Tip – Red
  • Pigma – Mircon 01 Fine Tip Pen – Black

Adhesives

Tools

  • Die Cutting Machine
  • Scissors

Miscellaneous

  • Stampin’ Up – Adhesive Backed Seasonal Sequins

Waving Hello For Valentine’s Day

This card was made for Craft Roulette #201 whose parameters included an easel card, quiet colors, sweets element and bokeh.

Cardbase: Cut one rectangle 3 3/4x 8 1/2-inches from heavy white cardstock. Cut a second white rectangle 3 3/4x 8 3/4-inches. On the largest rectangle score at 1/4 inch at one end and 3-inches at the opposite end. (The 1/4-inch is the tab folded under as the card hinge to card back. The 3-inch tab is the ease for the paper doll.)

Thank you for reading this blog post and watching the video. I hope this inspires you and makes you smile. Please like and leave comments 😊

Materials Used:

Dies

  • Karen Burniston in cahoots with Riley and Company – Hello – 1166
  • Karen Burniston in cahoots with Riley and Company – You’re Sweet – 1087
  • Karen Burniston in cahoots with Riley and Company – Ice Cream Sundae Pop-Up – 1082
  • Studio Light – Misses Dies & Stamps by Karin Joan – Betty
  • Studio Light – Misses Dies & Stamps by Karin Joan – Tasha

Stamps

  • Studio Light – Misses Dies & Stamps by Karin Joan – Betty
  • Studio Light – Misses Dies & Stamps by Karin Joan – Tasha

Papers

  • PhotoPlay – 12×12 Double-Sided Cardstock Collection Pack by Becky Moore – Snail Mail
  • Pink, Brown, Cream Cardstock
  • Heavyweight White 100lb Cardstock
  • Clear Vellum
  • #10 Business Envelope – White

Ink

  • VersaMark Ink – Watermark
  • Simon Says Stamp – Pigment Ink – White
  • Gel Pens – White and Pink
  • Black Glossy Embossing Powder

Adhesives

  • Neutral PH Adhesive by LINECO
  • Fine-Tip Glue Bottle

Tools

  • Die Cutting Machine
  • Bone Folder
  • Scoring Board
  • Stamping Platform
  • LDRS – Stampendable Stamping Tool
  • We R Memories – QuickStick
  • Craft Clips
  • Sponge Dauber
  • Stamping Blocks used as paperweights
  • Kat Scrappiness – Anti-Static Tool
  • Heat Tool
  • Scissors
  • Paper Cutter

Miscellaneous

  • Mini Woobler Spring

A Dog Kiss Valentine

This Valentine was made for Craft Roulette #200 whose parameters included kid’s card, brrrr colors, comic or cartoon element and button(s).

I have had a Peanuts collection of stamps, coordinating dies along with papers and washi tape sheets from Craftstash for a few months and thought the comic parameter was a perfect use of them.

Snoopy has such a cute button nose and the papers have some icy blues. Because a kid’s card needs some interactivity, I used a wiper mechanism by i-crafter to make Snoopy smooch Lucy. The sentiments are all computer generated.

Thank you for reading this blog post. I hope this inspires you and makes you smile. Please like and leave comments 😊

Materials Used:

Stamps & Dies

Papers

Ink

  • StazOn – Solvent Ink – Jet Black
  • Scrapbook.com – Glitter Brush Marker – Frosty Blue
  • Scrapbook.com – Glitter Brush Marker – Red Shimmer
  • Sharpie – Permanent Marker – Chisel Tip – Black
  • Sharpie – Permanent Marker – Ultra Fine Tip – Black

Adhesives

  • Neutral PH Adhesive by LINECO
  • Fine-Tip Glue Bottle
  • Scor-Tape – Double-Sided Tape -1/8-inch wide

Tools

  • Die Cutting Machine
  • Stamping Platform
  • LDRS – Stampendable Stamping Tool
  • Stamping Blocks used as paperweights
  • Scissors