Hoppin’ Poppin’ Bunnies

Inspired by someone who loves bunnies, I made this free-standing pop-up birthday card. I used some dies by i-crafter which sadly is no longer making new products. You can still find some of their dies on ebay, esty and a few on-line stores. Hoping that the designer of these dies – Lynda Kanase will find a new company to work with to produce this fun Box Pops-Oval Base once again.

Watch the process video to see how I made this card.

Bunnies and Grass:  Cut three of the bunnies die from the Box Pops Easter, Add-on set from white and four of the small grass die in white. Cut two pop-up strips from the Box Pops-Oval Base set and trim off tab on each piece. Color the grass on all pieces and tops of pop-up strips with a green alcohol marker. Glue the three bunny piece together. Glue to one side of oval base before glue the base altogether.

Oval Pop-Up Stand:  Cut the main die in the Box Pops-Oval Base twice from heavy patterned cardstock. Follow assembly directions in video. Glue two grass strips to each pop-up strip to form a “T” shape. Place a pop-up strip into slot in oval base and fold tab where it meets the base bottom. Glue in in place. (I added a 1×4.5-inch strip of white to the back for a personal message.)

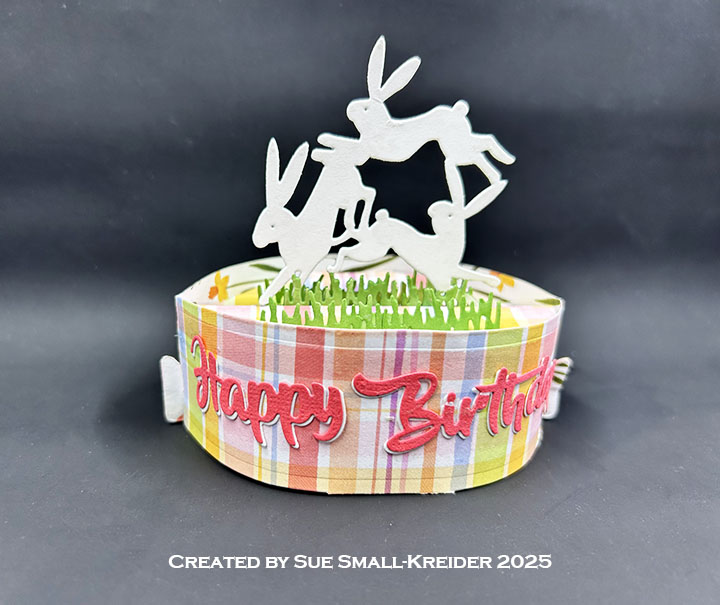
Sentiments:  “Happy Birthday” was cut twice – once from coral and once from white cardstock using Firefly dies The white was off-set slightly as the bottom layer when the two colors were glued together. The words were brushed with a glitter gloss to make them sparkle.

Envelope: The card fits into an A2 (4.25x 5.5-inches) size envelope. I stamped a bunny holding a heart with the words “Especially for you” on the back envelope flap.

___________________________________

Thank you for experiencing this blog post.

I hope this inspires you and makes you smile.

Please like and leave comments 😊

___________________________________

Disclaimer: Karen Burniston products are provided free of charge by the manufacturer for review and use. All other items were personally purchased. Compensated affiliate links used where or when possible, meaning I will receive a small percentage commission from these manufacturers at no cost to you. This will allow me to add more content to my YouTube channel and help out a lot. Thank you.

Materials Used:

Dies

  • i-crafter -metal dies designed by Lynda Kanase – Box Pops, Oval Base – 222133
  • i-crafter -metal dies designed by Lynda Kanase – Box Pops Easter, Add-on – 222146
  • Firefly – metal dies – Celebrate Happy Birthday

Stamps

  • Colorado Craft Company – Clear Stamps designed by Anita Jeram – For You Bunny -AJ950

Papers

  • Echo Park – 12×12 inch Patterned Cardstock – My Favorite Easter
  • Recollections – 8.5×11 65 lb. Cardstock – White
  • Fraser Papers for William House – A2 Envelope – Genesis Text Milkweed Smooth

Ink

  • Sharpie – Permanent Marker – Fine Tip – Green
  • Nuvo – Aqua Shimmer Brush – Glitter Gloss

Adhesives

Tools

  • Die Cutting Machine
  • Paper Trimmer
  • Stamping Platform
  • LDRS – Stampendable Stamping Tool
  • Stamping Blocks used as paperweights
  • Scissors
  • Paper Masking Tape

A Pop-Up Get Well Card – Fishing Themed

IT’S TIME for the Karen Burniston Products – KB Riley LLC January 2025 Release Blog Hop. (See GIVEAWAY details at the end of this post for blog hop list.) The Design Team have come together with Karen today for a fun blog hop to celebrate the release of 8 new dies and 4 new stamp sets. Sneak peeks of the new release started last week, and the dies are available to order NOW!

Watch the video below to see how this card was made.

Cardbase: I started with a 7×10-inch piece of patterned paper folded in half to form an A7 side-fold card. The inside was covered with two rectangles of patterned paper cut using the second largest of the Rectangles and Labels – Crosshatch dies. Color center fold gap with marker close in color to patterned paper. Add decorative stripes for side borders. Decorate the outside with journaling cards and stickers from decorative paper collection.

Basket Pop-Up: Cut the Flower Pot Pop-Up main pot piece twice from a dark brown cardstock. Cut two sets of strips with smiley faces from the same brown cardstock. (Watch Karen Burniston’s assembly video located at the bottom of the linked Flower Pot Pop-Up page.) Cut four sets of the striped side and top pieces from the Popcorn die set from a light brown paper. Save all five waste strips from each of the sides to weave through the decorative side pieces to make the basket. Cut one square base piece with tabs from the Flower Pot Add-Ons set in dark brown cardstock.

Decorations:  From the Fishing Boat Add-Ons die set, cut all three of the fish dies three times from a silver gray cardstock. Cut two of the heart picks from the Bouquet Bits die set in green and save the heart waste pieces to use as greenery in the front corner of the basket. (I ended up only using the heart pick in this card.) Cut one pail and handle from silver mirror cardstock. (Color handle with black alcohol marker.) Cut three cattails from the Bayou Animals die set from green and color cattails brown on both sides. (In the video I call these bulrushes from the gator and frog set.) Cut five green leafy pieces from the Flower Pot Add-Ons set. From the Fishing Boat Add-Ons die set, cut the fishing rod twice. (If using patterned paper, flip paper to backside to cut the mirror image of rod.) Cut one fishing line from silver cardstock.

Sentiments:  “Get Well Soon” is from the Bouquet Sayings stamp set and cut out using the die in the Bouquet Bits die set. The green heart pick that holds the card is also in the Bouquet Bits die set. “Every day is a good day when you’re fishing” is from the Fishing Phrases stamp set and cut out using the second smallest crosshatch die in the Squares – Crosshatch die set.

Envelope: The card fits into an A7 size envelope with one of the jumping fish die cuts. “Here fishy, fishy” is stamped in black ink using the Fishing Phrases stamp set.

___________________________________

Thank you for reading this blog post.

I hope this inspires you and makes you smile.

Please like and leave comments 😊

___________________________________

Materials Used:

Dies

Stamps

Papers

  • Bazzill – 8.5×11 Cardstock – Tiara -18-1002
  • Carta Bella – 12×12 Double-Sided 65 lb Cardstock – Outdoor Adventures
  • Silver Mirror Cardstock
  • Browns, Green, Red and White Cardstock
  • Recollections – A7 Envelope – Cream

Ink

  • Pigma – Mircon 05 Fine Tip Pen – Black
  • Sharpie – Permanent Marker – Fine Tip – Olive Green
  • Sharpie – Permanent Marker – Ultra Fine Tip – Black
  • Scrapbook.com – Shimmer Glitter Brush Marker – Pretty Pink, Key Lime Green, Frosty Blue & White
  • Stampin’ Up – Stampin’ Blends Marker – Chocolate Chip

Adhesives

Tools

GIVEAWAY:

To celebrate the release Karen Burniston and each of the Karen Burniston – KB Riley LLC Design Team members will be giving away a $25 Gift Certificate to some lucky person who comments on our blog posts, so make sure you join the hop and comment on everyone’s blog post. Winners will be randomly chosen from ALL of the blog hop comments received on our blog posts by Monday, 3rd February 2025. Lots of chances to win some goodies, so just leave a comment on this post or any other blog hop posts to enter! Don’t forget to leave some way for us to contact you, in case you are a lucky winner!

Karen Burniston – https://karenburniston.typepad.com/i_am_not_lefthanded/2025/01/karen-burniston-january-2025-release-blog-hop.html

Lois Bak – https://clownmomcreations.blogspot.com/2025/01/karen-burniston-new-release-blog-hop.html

Sue Small-Kreider – YOU ARE HERE

Frances Byrne – https://stampowl.blogspot.com/2025/01/karen-burniston-kb-riley-llc-january.html

Jennifer Webster – https://www.jlwebstercreations.com/2025/01/karen-burniston-january-2025-new_27.html

Suzanne Smit – https://knutselsuus.blogspot.com/2025/01/kb-riley-llc-january-release-blog-hop.html

Nicky Foden – https://mymessycraftroomme.wordpress.com/?p=7490&preview=true

Sandy Diller – https://sandydiller.blogspot.com/2025/01/new-release-bog-hop-january-2025.html

Ken Chien – https://www.instagram.com/gogoro_bricks/

Triple The Fun With Mini Mini Slimline Pop-Up Cards

This card was made for Craft Roulette #251 whose parameters included for a slimline card, lumberjack colors, hat(s) or cap(s), and lace or doily.

Watch the process video to see how I made this card.

Cardbase:  Each card is made from a 2×6-inch piece of double-sided patterned paper, folded into a top-fold 3×2-inch card.  The box to hold them is made using Karen Burniston’s Candy Hearts Box die.

Sentiments:  The sentiments were all stamped in black ink using the Craft Roulette Funn Sentiments #01 set except for the “Hats off to you” which was handwritten.

Envelope:  The flatten box with three cards will fit into an A2 (4.25x 5.5-inches) size envelope.

___________________________________

Thank you for experiencing this blog post.

I hope this inspires you and makes you smile.

Please like and leave comments 😊

___________________________________

Disclaimer: Karen Burniston products are provided free of charge by the manufacturer for review and use. All other items were personally purchased. Compensated affiliate links used where or when possible, meaning I will receive a small percentage commission from these manufacturers at no cost to you. This will allow me to add more content to my YouTube channel and help out a lot. Thank you.

Materials Used:

Dies

Stamps

  • Craft Roulette – Clear Stamps – Funn Sentiments #01

Papers

  • Scrapbook.com – 6×8 Double-Sided Cardstock – Noel Patterned Collection
  • Simple Stories – 6×8 Double-Sided Cardstock – What’s Cookin’?
  • Black, Brown, Red, White and Yellow Cardstock Scraps
  • Fraser Papers for William House – A2 Envelope – Genesis Text Milkweed Smooth

Ink

  • Memento – Fade Resistant Dye ink – Tuxedo Black
  • Crafter’s Squares – Metallic Markers .05 in – Blue and Silver
  • Pigma – Mircon 01 Fine Tip Pen – Black
  • Pigma – Mircon 005 Fine Tip Pen – Black
  • Sakura – Gelly Roll Pen – Medium – White
  • Sharpie – Permanent Marker – Ultra Fine Tip – Black, Blue, Brown, Red

Adhesives

Tools

Miscellaneous

  • Nuvo – Aqua Shimmer Brush Marker – Glitter Gloss
  • Ranger – Glossy Accents
  • Cotton String

Take Me Out To The Ball Game!

It’s Sneak Peek Week for Karen Burniston’s January 2025 release of eight new dies and four new clear stamps sets. For this baseball card I used several of the new die sets including: Paper People, Popcorn and Flower Pot Add-Ons along with the previously released Flower Pot Pop-Up, Tiny Accessories 3, Easter Charms, Space Charms and Rectangles – Crosshatch. The new release will be available on January 27, 2025.

Watch the video below to see how this card was made.

Cardbase: I started with an 8 1/2 x 5 1/2-inch piece of patterned paper folded in half to form an A2 side-fold card. The inside was covered with two rectangles of striped paper cut using the largest of the Rectangles – Crosshatch dies.

Baseball Player: Using the Paper People die set Cut one body, one hair piece, one mustache, one t-shirt and one pants. From the Tiny Accessories 3 set cut one of the engineer’s cap. Watch the process video above to see how to style these pieces into a baseball player.

Cracker Jack Box Pop-Up:  Follow the assembly video directions (located at the bottom of the linked page) for the Flower Pot Pop-Up, but add the Popcorn decorator pieces to the pot before installing it in the card. (I made the caramel corn “Cracker Jacks” by coloring the popcorn pieces with alcohol markers and coating with Glossy Accents a clear gel. The peanuts are cut using the jelly bean charm from the Easter Charms set.) The box is attached to the card using the Flower Pot Add-On set’s square scalloped doily with tabs. The Cracker Jack prize packet is a computer generated piece of paper torn open to reveal a pink plastic alien toy charm cut using the Space Charms die set.

Sentiments:  All the sentiments are from the patterned papers and the “Cracker Jacks” was computer generated.

Envelope: The card fits into an A2 size envelope.

___________________________________

Thank you for reading this blog post.

I hope this inspires you and makes you smile.

Please like and leave comments 😊

___________________________________

Materials Used:

Dies

Papers

  • Carta Bella – 12×12 Double-Sided 65 lb Cardstock – Baseball
  • Carta Bella – 6×6 Double-Sided 65 lb Cardstock – Home Run
  • Echo Park – 12×12 Double-Sided 65 lb Cardstock – Baseball
  • Spellbinders – 8.5×11 100 lb. Cardstock – Pomegranate
  • Assorted Colored and Decorative Paper Scraps
  • White Computer Paper

Ink

  • Pigma – Mircon 05 Fine Tip Pen – Black
  • Sharpie – Permanent Marker – Fine Tip – Red
  • Sharpie – Permanent Marker – Ultra Fine Tip – Red
  • Spectrum Noir – Tri-Blend Alcohol Marker – Gold Brown Blend

Adhesives

Tools

Miscellaneous

  • Ranger – Glossy Accents

Bon Voyage and Smooth Seas

It’s Sneak Peek Week for Karen Burniston’s January 2025 release of eight new dies and four new clear stamps sets. For this Bon Voyage card I used several of the new sets including: Ocean Edges and Cruise Ship Add-On along with the previously released Boat Pop-Up and Rectangles and Labels – Crosshatch die sets and the new Cruise Greetings stamp set. The new release will be available on January 27, 2025.

Watch the process video to see how I made this card.

Cardbase: Using a 8.5×5.5-inch rectangle of double-sided patterned cardstock, fold rectangle in half to form a 4.25-inch wide by 5.5-inch tall side fold card. Decorate the inside with wavy ripples using the Ocean Edges dies. (I choose to let the cardbase paper pattern be one shade of the ocean waves while the other waves are cut from decorative cardstock with white water ripples on them. If you make several layers of waves the card will be very thick and hard to close. If this happens use the special die in the Cruise Ship Add-On set to cut two slots on either side of the fold to slide a paper clip through to hold the card open.)

Cruise Ship: Follow the directions to assemble the basic Boat Pop-Up (Assembly video at the bottom of the die set’s linked page.) Watch the video above for how to assemble the Cruise Ship Add-Ons. (I had an issue the first time I glued in the ship to the card. So, there are also tips on how to fix bent U-support pieces and ship’s tabs in the video.)

Sentiments: The inside stamped sentiments are from the Cruise Greetings stamp set and the fancy labels are the smaller label die in the Rectangles and Labels – Crosshatch set. Decorative paper journaling cards are the outside card sentiments.

Envelope: The card fits into an A2 (4.25x 5.5-inches) size envelope with an anchor and chain glued to the back flap. The anchor is from the Cruise Add-Ons die set.

___________________________________

Thank you for experiencing this blog post.

I hope this inspires you and makes you smile.

Please like and leave comments 😊

___________________________________

Disclaimer: Karen Burniston products are provided free of charge by the manufacturer for review and use. All other items were personally purchased. Compensated affiliate links used where or when possible, meaning I will receive a small percentage commission from these manufacturers at no cost to you. This will allow me to add more content to my YouTube channel and help out a lot. Thank you.

Materials Used:

Dies

Stamps

Papers

  • Carta Bella – 12×12 inch Double-Sided Cardstock – Bon Voyage – Bouy Bash
  • Carta Bella – 12×12 inch Double-Sided Cardstock – Bon Voyage – Journaling Cards
  • Bazzill – 8.5×11 Cardstock – Tiara -18-1002
  • Recollections – 8.5×11 65 lb. Cardstock – White
  • Blue and Yellow Cardstock
  • Fraser Papers for William House – A2 Envelope – Genesis Text Milkweed Smooth

Ink

Adhesives

Tools

  • Die Cutting Machine
  • Paper Trimmer
  • Bone Folder
  • Stamping Platform
  • LDRS – Stampendable Stamping Tool
  • Stamping Blocks used as paperweights
  • Scissors

Miscellaneous

  • Cotton Ball

Flower Pot Pop-Ups

Karen Burniston’s Flower Pot Pop-Up die is so versatile and can be decorated to be many types of containers. Here are just a few that I’ve made recently. She has come out with some add-on dies in her January 2025 release that help transform the Flower Pot Pop-Up into many things.

Click here to see the post on the hot cup of cocoa.

Watch for a sneak peek posts later this week for the Cracker Jacks and Fishing basket cards.

Look for Ken Chein’s take away food container on his Instagram.

A Reel-y Great Father’s Day Card

It’s Sneak Peek Week for Karen Burniston’s January 2025 release of eight new dies and four new clear stamps. For this Father’s Day card I used several of the new sets including: Paper People and Fishing Boat Add-Ons along with the previously released Boat Pop-Up dies and the new Fishing Phrases stamps. The new release will be available on January 27, 2025.

Watch the video below to see how this card was made.

Cardbase: I started with an underwater pattern cardstock rectangle that was 5.5 x 8.5-inches and folded it in half to form a top-fold horizontal 4.25 x 5.55-inch slimline card. Next, I cut two of the largest die in the Rectangles – Crosshatch set from blue and white checkered paper and covered the inside panels. The outside panels used journaling cards from the coordinating paper collection.

Fisherman: Using the Paper People die set cut one figure from flesh colored paper. (It is best to use your thinnest cardstock and decorative papers as the figure will need to be covered on both front and back from the waist up.) Cut hair and clothes to suit your card recipient. The hat with a fishing lure attached comes from the Fishing Boat Add-Ons set.

Fish and Fishing Rod: The Fishing Boat Add-Ons set includes dies to cut three different fish as well as a pail with a handle and a fishing rod, fishing line and three hooks. (It also includes an outboard motor, motor mount, and a hat.) I cut all the fish twice for this card from a greenish gray cardstock and colored the fish with glitter brush makers. The rod I cut twice from a dark green cardstock and the line once from silver cardstock. the line is sandwiched between the two layers of the rod. Take two of the jumping fish and glue them back to back except at the mouth. Feed the fish onto the hook and glue shut. The pail I cut twice from silver cardstock and the handle just once. (The handle knob is colored with a black marker.) There is a slot at the top of the pail that you can slide the small fish through.

Boat Pop-Up:  Using the Boat Pop-Up die set, cut one of the boat’s hull or sides and one of the boat deck from matte silver cardstock (or use my trick of dulling the shine with dried layer of glue.) Cut two of the tabbed mechanism strips from a lightweight cardstock. (Assembly video for Boat Pop-Up set is at the bottom of the linked page.) Follow the directions to assemble boat except replace the rowboat seat with the fishing seat and use the pail of fish to cover front tab. Attach outboard motor using the slotted mount strip. No need for oar locks or oars.

Sentiments:  There are two sentiments on the card – “Every day is a good day when you’re fishing” and “Have A Reel-y Great Father’s Day.” Both were stamped using the Fishing Phrases clear stamp set with black ink onto white copier paper and die cutting with the smallest fancy label in the Rectangles and Labels- Crosshatch set.

Envelope: The card fits into an A2 size envelope which was has the last of the die-cut jumping fish glued to the back flap.

___________________________________

Thank you for reading this blog post.

I hope this inspires you and makes you smile.

Please like and leave comments 😊

___________________________________

Materials Used:

Dies

Stamps

Papers

  • Carta Bella – 12×12 Double-Sided Cardstock – Gone Camping
  • Crafter’s Companion – 12×12 Double-Sided Cardstock – Gone Camping
  • DCWV – 4.5×6.5 Cardstock Mat Stack – The Spooky Time
  • Keep It Simple – 12×12 Double-Sided Cardstock – Signature Collection by Sara Davies – Enchanted Ocean
  • Recollections – 8.5×11 65 lb. Cardstock – White
  • Silver Cardstock
  • Colored Cardstock Scraps
  • White Copier Paper
  • Fraser Papers for William House – A2 Envelope – Genesis Text Milkweed Smooth

Ink

  • Memento – Fade Resistant Dye ink – Tuxedo Black
  • Pigma – Mircon 005 Fine Tip Pen – Black
  • Sakura – Gelly Roll Pen – Medium – White
  • Sharpie – Permanent Marker – Ultra Fine Tip – Black & Blue
  • Nuvo – Aqua Shimmer Brush – Glitter Gloss
  • Scrapbook.com – Shimmer Glitter Brush Marker – Pretty Pink, Frosty Blue & White

Adhesives

Tools

  • Die Cutting Machine
  • Paper Trimmer
  • Stamping Platform
  • LDRS – Stampendable Stamping Tool
  • Stamping Blocks
  • Scissors
  • Craft Mat
  • Paper Masking Tape
  • We R Memories – QuickStick

Boat Pop-Ups

Karen Burniston’s Boat Pop-Up can become many different types of boats and ships using her different add-on sets. In her January 2025 there are two new add-on sets – Fishing Boat Add-Ons and Cruise Ship Add-Ons. There is also a new Paper People so you can add people to your cards.

Click on the pictures to see their posts. The last image will have will be posted in March.

Popcorn Lover’s Birthday Card From All of Us

It’s Sneak Peek Week for Karen Burniston’s January 2025 release of eight new dies and four new clear stamps. For this Birthday card I used several of the new sets including:  Popcorn, Paper People and Triple Platform Pop-Up die sets and the Popcorn Phrases clear stamp set. The new release will be available on January 27, 2025.

Watch the video below to see how this card was made.

Cardbase: I started with a white 65lb cardstock rectangle that was 7.5 x 8.75-inches and folded it in half to form a top-fold horizontal 3.75 x 8.75-inch slimline card. Next, I cut four of the largest die in the Long Rectangles – Crosshatch set from striped red paper and cover each of the card panels.

Snapshots of People: Using the Paper People die set create six people from the waist up. Cut six white photo frames and back rectangles using the Photo Collage Pop-Up die set. Follow the instructions in the video on how to make the snapshots of people and how to install them onto the pop-up platforms.

Triple Platform Pop-Up:  Using the Triple Platform Pop-Up die set, cut two of the large mechanism die from lightweight white cardstock. Cut six sets of the parallelograms and four sets of the triangles from pattered paper and two additional sets of parallelograms from white cardstock. Watch the video for how to assemble and install the mechanisms into the cardbase.

Sentiments:  There are three sentiments on the card – “Hope your Birthday is poppin”, “from all of us” and “Happy Birthday.” The first was stamped using the Popcorn Phrases clear stamp set with black ink onto white cardstock and die cutting it using the fancy stitched label in the Triple Platform Pop-Up die set. The second phrase was die cut from the Word Set 18 – Connectors while the third was cut using the Happy Birthday die. All the die-cut words were cut from upcycled cardboard packaging/junk mail. Popcorn kernels (highlighted with a yellow marker) were added as decorations to the front and back of the card from the Popcorn die set.

Envelope: The card fits into a #10 business size envelope which was stamped with another sentiment from the Popcorn Phrases stamp set – “You make everything Butter!”

___________________________________

Thank you for reading this blog post.

I hope this inspires you and makes you smile.

Please like and leave comments 😊

___________________________________

Materials Used:

Dies

Stamps

Papers

  • Recollections – 8.5×11 65 lb. Cardstock – White
  • Stampin’ Up – 12×12 Specialty Designer Series Paper – Marbled Elegance
  • Assorted Colored and Decorative Paper Scraps

Ink

  • Memento – Fade Resistant Dye ink – Tuxedo Black
  • Pigma – Mircon 01 Fine Tip Pen – Black
  • Stampin’ Up – Stampin’ Blends Marker – Light Daffodil Delight

Adhesives

Tools

  • Die Cutting Machine
  • Bone Folder
  • Stamping Platform
  • LDRS – Stampendable Stamping Tool
  • Stamping Blocks used as paperweights
  • Scissors
  • We R Memories – QuickStick