Bottom Fold Purse Pop-Up Birthday Card

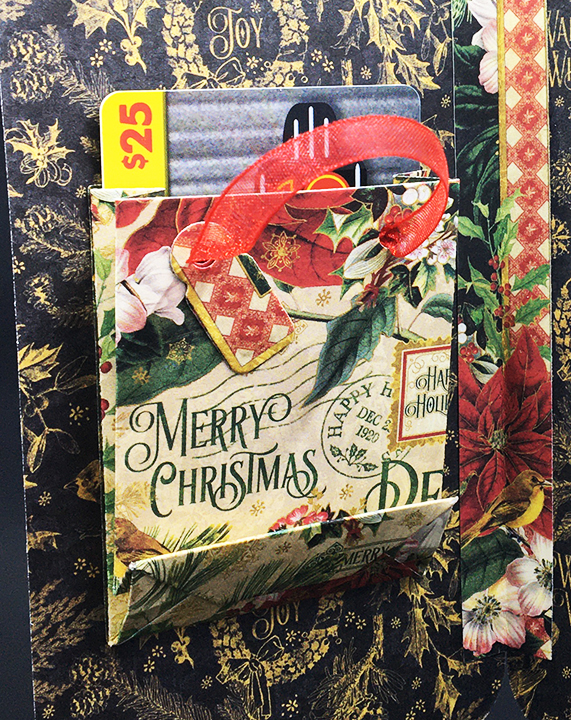
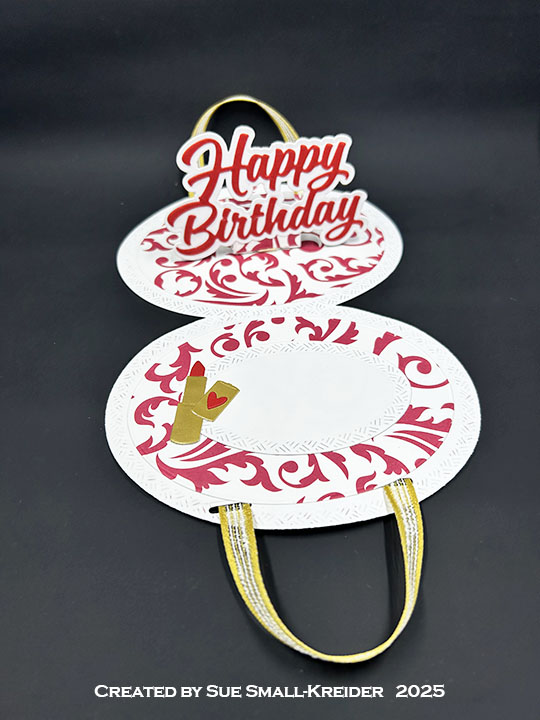
It’s the Karen Burniston design team challenge for August 2025 using the theme of bottom fold pop-up card. I chose to make a purse card using the Ovals – Crosshatch, Happy Birthday words & shadow, Dolled Up Charms, Bam Box Pop-Up and Display Helpers die sets as well as the Birthday Magic stamp set.

Watch the process video to see how I made this card.

Cardbase & Handles: Start with a 8.5×5.5-inch piece of patterned cardstock and fold in half to form a side-fold A2 (4.25×5.5-inch) card. Place the largest Oval-Crosshatch die on the folded card with a tiny bit of the long edge of the oval die hanging off the folded edge. Die cut to have a shaped oval card base. Use the Display Helpers large paperclip die to cut the slots to thread the ribbon handles through as shown in the video above. Weave in the ribbon handles and clasp strip before gluing down the inside decorative ovals. (These ovals are the second largest dies in the Oval-Crosshatch set and are used to cover the ribbon raw edges and the clasp edge.)

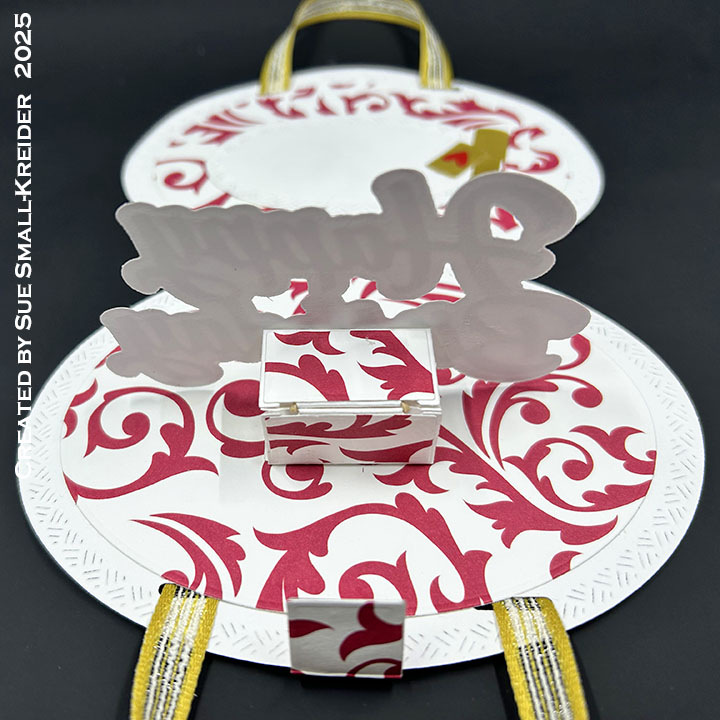
Bam Box Pop-Up & Clasp: Watch the assembly video for the Bam Box Pop-Up. Cut out one of the Bam Box strip mechanism. Cut five of the decorative rectangles from paper matching the cardbase paper. Make Bam Box as show in the assembly video at the bottom of the linked page. Glue three of the decorative panels on to the Bam Box as shown in the video above. Glue the two remaining rectangles back to back and fold slightly off center to form the clasp. Glue clasp and Bam Box in as directed in the video above. Adhere two magnets using double-sided tape as shown in the video above. Stamp “Lift” on the front of the clasp using the Display Helpers stamp set.

Lipstick:  Using the Dolled Up Charms die set to cut out the four pieces of the lipstick tube from gold and red cardstock. Follow the directions in the video above and glue to the white oval cut with the third largest crosshatch die in the Oval-Crosshatch set.

Sentiments:  All the stamped sentiments come from the Birthday Magic stamp set and are stamped in black ink. The die-cut “Happy Birthday” uses the word die and its matching shadow die to make the pop-up Bam Box greeting.

Envelope:  The card fits into an A2 (4.25x 5.5-inches) size envelope stamped with “You bring the Sparkle” on the back flap in black ink.

___________________________________

Thank you for experiencing this blog post. I hope this inspires you and makes you smile. Please like and leave comments 😊

___________________________________

Disclaimer: Karen Burniston products are provided free of charge by the manufacturer for review and use. All other items were personally purchased. Compensated affiliate links used where or when possible, meaning I will receive a small percentage commission from these manufacturers at no cost to you. This will allow me to add more content to my YouTube channel and help out a lot. Thank you.

Materials Used:

Dies

Stamps

Papers

  • Darice – 8.5×11 Cardstock – Red Prints
  • Red and White Cardstock
  • Gold Matte Cardstock – Junk Mail
  • Fraser Papers for William House – A2 Envelope – Genesis Text Husk Smooth

Ink

  • Memento – Fade Resistant Dye ink – Tuxedo Black
  • Pigma – Mircon 05 Fine Tip Pen – Black

Adhesives

Tools

  • Die Cutting Machine
  • Paper Trimmer
  • Stamping Platform
  • LDRS – Stampendable Stamping Tool
  • Stamping Blocks
  • Scissors
  • Pencil
  • Paper Masking Tape
  • We R Memories – QuickStick

Miscellaneous

  • Nuvo – Aqua Shimmer  Brush – Glitter Gloss
  • Stampin’ Up – Rustic Striped Ribbon – 3/8-inch wide
  • Scrappy Tails – Two Craft Magnets

Winter Bag Bear

Needing something cute to put a gift card in with a winter theme, I quickly created this mini gift bag with a polar bear holding a heart.

Karen Burniston’s December 2023 release includes the Mini Gift Bag die set that makes a collapsing bag that will hold a gift card and fit in the palm of your hand.

If you use a patterned paper that doesn’t have a design with a distinct up and down to it, you can cut the entire bag from a 6×6 piece of paper.

I use red vellum to cut a heart with the heart die in the set.  The bear is from the Winter Animals set and the tiny heart he holds comes from the Safari Animals sets.

For the bag handles, I used 1/4-inch wide organza ribbon tied as a loop for each side with the knots hidden inside the bag.

Thank you for reading this blog post. I hope this inspires you and makes you smile. Please like and leave comments 😊

Materials Used:

Dies

Papers

  • Ink N’ Splatter – 6×6 Double-Sided Paper Pad – Winter Blues
  • The Paper Studio – 8.5×11-inch – Red Vellum
  • White, Red and Gray Cardstock

Ink

Adhesives

Tools

Miscellaneous

  • Blue Organza Ribbon – 1/4-inch wide

Bagged and Tagged

Beautiful holiday papers inspired this gift card holder/Christmas card.

It uses two of the new die sets in Karen Burniston’s December 2023 release – Mini Gift Bag and Topper Tags.

Cardbase: Cut two tags using the largest die in the topper tags set from decorative paper. From the same double-sided paper cut a strip 5×1/2-inch and fold lengthwise in half for the card hinge. Glue the hinge to the tag edges to form the inside of the card. Tie ribbon through the tag hole on each side of the card.

Gift Bag: Plan out what images you want to see on the mini gift bag when it is attached. Center the larger of the two bag dies using the square opening over your desired image making sure the top flat die edge with holes is at the top of your image. (I have a few upside-down paper bags in my stash.) Assemble bag as shown on the packaging. Glue the flat side of the bag to the inside of the card. Add the ribbon handle by threading ribbon through the holes and knotting it inside the bag.

Sentiments: The main sentiments of “Merry & Bright,” “Merry Christmas,” and “Warm Wishes” are all on the decorative cardstock. The white tag label inside for a personal message is cut from smallest tag in the tag set and uses the heart hole protector also in the set.

Envelope: The tag card easily fits into a #10 business envelope.

Thank you for reading this blog post. I hope this inspires you and makes you smile. Please like and leave comments 😊

Materials Used:

Dies

Papers

  • Graphic 45 – 8×8 Double-Sided Paper Pad – Warm Winter Wishes
  • White and Red Cardstock
  • #10 Business Envelope – Kraft

Adhesives

Tools

Miscellaneous

  • Red Organza Ribbon – 1/4-inch wide

12 Days of Christmas Gift Bags Tree

Need a fun way to give gift cards? Make a gift bag tree.

I used the new Mini Gift Bag die set by Karen Burniston to make 12 bags using patterned papers from a 12 Days of Christmas collection. You could use a jewelry tree or any other style of tree that would hold a number of bags. I made my own tree from foam core board and clear glitter. I plan to add gift cards, candy, crafting supplies and jewelry to my mini gift bags.

Bags: Cut out the bag pieces using the two bag dies for each bag. (If you use pattern paper with a design that has a top and bottom make sure the flat top of the die with the holes is at the top of your paper’s design top too.) Train the folds of the pieces. (I start with the tabs and fold that goes across near the bottom of the bag and then do the diagonal folds on the side that make the bag bottom fold up.) Fold the large back piece as directed on packaging and then add glue to the long side tabs. Glue front onto tabs. Fold in the tabs on bag bottom and glue shut. (You could use narrow double-sided tape instead of glue.) Let glue dry before adding ribbon or cording for handles. (I threaded the cording through the holes and tied knots to hold the cording inside the bag.) Using the Mini Alphabet and Numbers set, I glued gold numbers onto the front and backs of the bags.

Tree: Trace two of the trees from the downloadable pattern below onto foam core. (Pattern was cut from an 8.5×11-inch sheet of paper.) On one tree I made the slit go from the middle up and the other tree the slit go from the middle down. Using a craft knife cut out the trees. Fit the two trees together and adjust the fit by trimming off bits of the slits as needed. Use white paint (I used gesso) to cover any pen or pencil marks. Place the tree on a large sheet of paper to catch extra glitter. Cover a section of the tree with glue and sprinkle clear glitter over the tree to cover. Use the large sheet of paper to put extra glitter back into its container. Repeat gluing and glittering a new section until tree is covered with glitter.

Thank you for reading this blog post. I hope this inspires you and makes you smile. Please like and leave comments 😊

Materials Used:

Dies

Papers

  • Crafter’s Companion – 6×6 Double-Sided Paper Pad – 12 Days of Christmas
  • Matte Gold Cardstock
  • White Foam Core Board

Ink

  • Stampin’ Up – Classic Stampin’ Pad – Early Espresso
  • Memento – Fade-Resistant Dye ink – Tuxedo Black
  • Ranger – Tim Holtz – Distress Ink- Walnut Stain
  • Dark Green Fine Tipped Marker
  • Farber-Castell – Pitt Artist Pen- Bullet Nib – White-101 Marker – Snow
  • Sharpie – Permanent Marker – Ultra Fine Tip – Black
  • Pigma – Mircon 01 Fine Tip Pen – Black
  • Recollections Opaque Marker – Snow
  • Sakura – Gelly Roll Pen – Medium – White
  • Nuvo – Aqua Shimmer – Glitter Gloss

Adhesives

Tools

Miscellaneous

  • Cording – Thin Gold and Thick Gold/Green/Red
  • Ranger – Tim Holtz Distress – Rock Candy Clear Glitter

Sneak Peek – Bag and Box It Up!

It’s the start of SNEAK PEEK Week for Karen Burniston’s December 2023 Release. Today we’ll focus on the Mini Gift Bag and the Candy Heart Box die sets.

These bags and boxes go together quickly and have two main surfaces that allow for creative decorations. It doesn’t matter whether you use solid colored cardstock or decorative patterned papers, the bags are great fun for tucking in gift cards and other small items like jewelry, small toys, car keys, candy, or crafting supplies.

12 Days of Christmas Gift Tree
Valentine’s Day Candy Hearts Box and Mini Gift Bag – both fit a gift card
Tag Card with Mini Gift Bag to hold a gift card

Look for tutorials on these projects in the coming weeks.

Thank you for reading this blog post. I hope this inspires you and makes you smile. Please like and leave comments 😊

Chevron Bag – Part II

Quick and clever gift bags for small treats were needed and the Divinity Designs Chevron Background die provided the visual pop required.

I cut three the background die three times from coordinating papers to make each of these bags. Then I placed each pattern paper pieces in separate bags so as not to lose any of the pieces especially the tiny triangles. I also kept the thin L-shaped scrap pieces from the edges of the die-cutting to be used as bag handles.

Next, I glued the frame onto a 4 1/4 x 5 1/2 inch piece of thin white paper placing dots of glue at the zig-zag points and the outside frame. (You will see that I used scrap paper for the backing that had black printing on it knowing that it would be covered with a another backing paper.)

Then the fun part of deciding on the positioning of the different papers within the frame and making a duplicate frame as well.

(I found that laying out the chevron strips and gluing the strips in place from the bottom up worked well with the duplicate frame as a guide in case of the strips being mixed-up.)

Once the glue has dried, trim the backing paper overhang away from the frame on both pieces.

Depending on the size of your paper, you may have enough scrap pieces to make the sides and/or a bottom of the bag. (I found that using 4.5 x 6.5 inches sized paper made me use two additional pieces to cut the sides (2 1/4 inches by 5 1/4 inches) and a bottom piece of 2 1/4 inches by 4 1/2 inches.)

The bottom piece is scored at 1/8 inch on the long sides and 1/4 inch along one end of the piece while the other end is marked where it needs to be folded by holding the bottom piece up to the bottom edge of the chevron frame.

Scoring the long edges of the side pieces at 1/ 8 inch is the first step for marking the sides. Using a pencil and a ruler draw a pencil line down the center each side piece. Mark a dot at 1 1/2 inches from the bottom of the center line and draw a line from the center dot to each of the corner bottom edges to from a triangle. Erase the line that is in the center of the triangle. Score along the remaining pencil lines. Mountain fold the 1/8 inch edges. Valley fold the pencil line folds.

Glue the tabs of the bottom piece to the insides of the chevron pieces and side bottom pieces.

Glue the side tabs to one of the chevron pieces, using your finger to adhere the tabs to the front pierce. Glue the remaining side tabs using a long tool such as a pencil or pen to adhere the tabs to the back piece.

Glue the L-shape scraps to the inside of the chevron pieces. Then adhere two 3 7/8 inches by 5 1/8 inches pieces of white paper to cover the bottom and side tabs and handle ends on the inside of the chevron pieces.  If you have a piece of leftover decorative paper that will fit the bottom of the bag glue it into place as well.

Like this bag? Check out this week’s other bag.

Thank you for reading this blog post. Please like and leave comments 😊

Materials Used:

Dies

Papers

  • WRF Studio – Romance 4.5” x 6.5” Design Paper Pad (230gsm Heavyweight Cardstock)
  • White paper

Miscellaneous