Going Wild for a Double Rainbow Birthday!

Itโ€™s Day One of Sneak Peek Week for Karen Burnistonโ€™s June 2025 release of ten new dies and five new clear stamps. For this double rainbow birthday card, I used several of the new sets including Arch Pop-Up and Rainbow Add-Ons die sets and Rainbow Greetings stamp set. This card was also made using Craft Roulette #270โ€™s parameters of an A7 card, 1980s colors, interjection!!!, and include an arch.

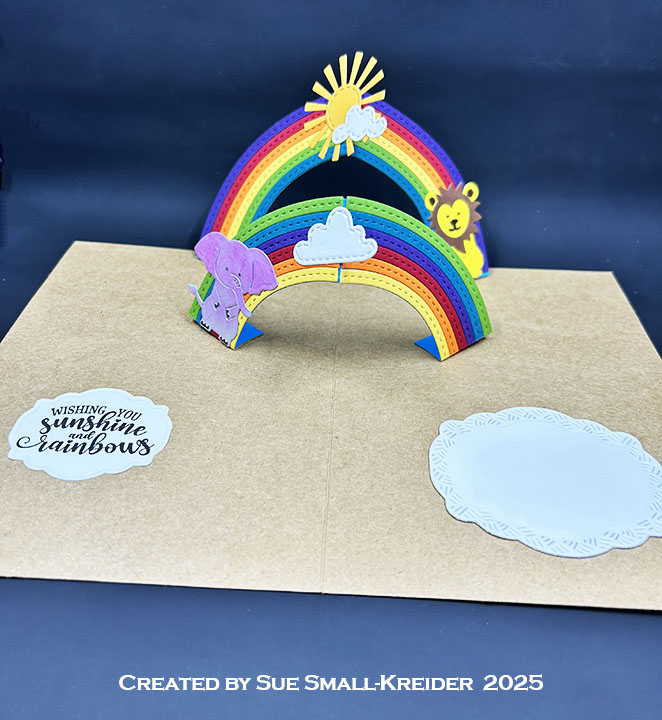
Cardbase:  I used an A7 (5×7-inch) purchased kraft cardbase and matching envelope. The front panel is covered with a 4.5×6.5 sheet of decorative paper.

Arch Pop-Up: ย Cut out the two large arch dies in the Arch Pop-Up from solid 65-80lb. cardstock. Assemble the arch by gluing the two halves together and then adding the rainbow strips which were cut using double-sided adhesive tape and the Rainbow Add-Ons die set. Make a second arch. Trim off the bottom tabs of the second rainbow and fold the feet of the arch to form tabs of a similar size to what was cut-off. Glue the largest arch into the card first and add the second rainbow checking for catchpoints. Decorate with the rainbows with the sun and clouds in the Rainbow Add-Ons.

Animals:  The animals come from the previously released the Monkey and Lion and the Safari Animals die sets.

Sentiments: ย Other than the die-cut โ€œGo Wild!โ€ all the sentiments were stamped using the Rainbow Greetings stamp set in black ink on white cardstock. Inside the card, โ€œWishing you sunshine and rainbowsโ€ was cut out using the smallest fancy label die in the Rectangles and Labels โ€“ Crosshatch die set with the larger crosshatch fancy label being used for the personal message label. On the card front, โ€œHappy Birthdayโ€ was cut out using the oval die in the Lorna Label Pop-Up die set.

Envelope:  The card fits into A7 (5×7-inches) size envelope with the back flap covered with decorative paper.

__________________________

Thank you for experiencing this blog post.

I hope this inspires you and makes you smile.

Please like and leave comments ๐Ÿ˜Š

__________________________

Disclaimer: Karen Burniston products are provided free of charge by the manufacturer for review and use. All other items were personally purchased. Compensated affiliate links used where or when possible, meaning I will receive a small percentage commission from these manufacturers at no cost to you. This will allow me to add more content to my YouTube channel and help out a lot. Thank you.

__________________________

Materials Used:

Dies

Stamps

Papers

  • Concord & 9th โ€“ 8.5×11-inch Solid 80 lb Cardstock โ€“ Poppy, Marmalade, Buttercup, Clover, Peacock, Eggplant, Spout, Oceanside
  • Spellbinders โ€“ 8.5×11-inch 80 lb Cardstock โ€“ White
  • The Paper Studio โ€“ 12×12-inch Single-Sided Patterned Paper โ€“ B/W Mirrored Polka โ€“ Bright Yellow
  • A7 Cardbase & Envelope – Kraft

Ink

  • Memento โ€“ Fade Resistant Dye ink โ€“ Tuxedo Black
  • Pigma โ€“ Mircon 03 Fine Tip Pen โ€“ Black
  • Stampinโ€™ Up – Stampin’ Write Dual Tipped Marker – Chocolate Chip

Adhesives

Tools

  • Die Cutting Machine
  • Paper Trimmer
  • Bone Folder
  • Score Board
  • Stamping Platform
  • LDRS โ€“ Stampendable Stamping Tool
  • Stamping Blocks used as paperweights
  • Scissors
  • Pencil
  • Paper Masking Tape

Square Pop-Up Birthday Card

This card was made for Craft Roulette #269 whose parameters included a square card, butterfly colors, cloud element, and tied.

Front of Card

Watch the process video to see how I made this card.

Back of Card

Cardbase: Start with a 4 x 8-inch piece of double-sided patterned cardstock and fold in half to form a top-fold 4-inch square card.

Pop-Up: ย Watch the assembly videos for the Little Twist Panel Pop-Up. Cut from double-sided patterned paper one of the pop-up base, two large, rounded corners panel, one of the strip panel and the two flag banner pieces. Add flag banner pieces to strip panel before attaching the strip panel to pop-up base arms. Stamp and decorate large panels before attaching them to strip panel.

Sentiments: ย All the sentiments used on the card come from the Bouquet Sayings stamp set except for the card front’s โ€œCelebrate your big awesome super dayโ€ which is from the Photo Memories set. All are stamped in black ink. Clouds and hearts come from the Long Nature Edges 2 die set.

Envelope: ย The card fits into an A2 (4.25x 5.5-inches) size envelope. A piece of decorative paper and stamps from the Craft Roulette Basics stamp set decorate the back of the envelope.

___________________________________

Thank you for experiencing this blog post.

I hope this inspires you and makes you smile.

Please like and leave comments ๐Ÿ˜Š

___________________________________

Disclaimer: Karen Burniston products are provided free of charge by the manufacturer for review and use. All other items were personally purchased. Compensated affiliate links used where or when possible, meaning I will receive a small percentage commission from these manufacturers at no cost to you. This will allow me to add more content to my YouTube channel and help out a lot. Thank you.

___________________________________

Materials Used:

Dies

Stamps

Papers

  • Carabelle Studio โ€“ 12ร—12 Double-Sided Cardstock โ€“ Sorbet designed by Azoline
  • Pale Gray Cardstock
  • Fraser Papers for William House โ€“ A2 Envelope โ€“ Genesis Text Milkweed Smooth

Ink

  • Memento โ€“ Fade Resistant Dye ink โ€“ Gray Flannel and Tuxedo Black
  • Pigma โ€“ Mircon 01 Fine Tip Pen โ€“ Black

Adhesives

Tools

  • Die Cutting Machine
  • Paper Trimmer
  • Bone Folder
  • Score Board
  • Stamping Blocks
  • Scissors
  • Pencil
  • Paper Masking Tape
  • We R Memories โ€“ QuickStick
  • We R Memories โ€“ Piercing Tool
  • Pear Blossom Press โ€“ Cardmakerโ€™s T-Square A2 Ruler

Miscellaneous

  • Yellow Satin Ribbon Bow

Small Quilt Themed Pop-Up Birthday Card

This card was made for Craft Roulette #267whose parameters included a 4 Bar card, craft store colors, se(s)/(ing)/sewn element, and stencil. I made a birthday card using dies by Karen Burniston and PinkFresh and sentiment stripes by Waffle Flower

Watch the process video to see how I made this card.

Cardbase:  Score and fold a 7×5-inch piece of heavy white cardstock into 3.5×5-inch side fold card. 

Stenciled Quilt Top Background:  Follow directions in video to stencil the background. To create the stencils use 6×8.5-inch sheets of 100lb cardstock that have the stitched diamond die cut into the center of each of the four sheets. Using the stitch marks as your guide, cut the stencils using a craft knife and a metal straight edge or ruler.

Pop-up Twist Panel:ย  Watch the assembly video at the bottom of the linked page. Stamp the quilt stamp onto medium weight cardstock. Die-cut the large mechanism from the Little Twist Panel Pop-Up set out of the stamped cardstock. Cut the panel from white cardstock. Cut decorative panels using the dies in set with your stamped cardstock.

Sewing Charms: ย Assemble as directed in Karenโ€™s assembly video located at the bottom of the linked page for the Sewing Charms.

Envelope:  The card fits into an A2 (4.25x 5.5-inches) size envelope.

___________________________________

Thank you for experiencing this blog post.

I hope this inspires you and makes you smile.

Please like and leave comments ๐Ÿ˜Š

___________________________________

Disclaimer: Karen Burniston products are provided free of charge by the manufacturer for review and use. All other items were personally purchased. Compensated affiliate links used where or when possible, meaning I will receive a small percentage commission from these manufacturers at no cost to you. This will allow me to add more content to my YouTube channel and help out a lot. Thank you.

___________________________________

Materials Used:

Dies

Stamps

  • Spellbinders โ€“ Cling Stamp Set โ€“ Stephanie Low – Designer Series โ€“ Cool Vibes โ€“ SBS-150

Papers

  • Waffle Flower โ€“ Sentiments โ€“ Birthday Die Cutโ€“ SCP240
  • Waffle Flower โ€“ Sentiments ย โ€“ View Die Cut โ€“ SCP253
  • White 100lb. Cardstock

Ink

  • Ranger โ€“ Tim Holtz โ€“ Distress Ink โ€“ Blueprint Sketch, Dried Marigold, Saltwater taffy, Salvaged Patina

Adhesives

Tools

  • Die Cutting Machine
  • Paper Trimmer
  • Scissors
  • Paper Masking Tape
  • Tweezers
  • Blending Brushes
  • Craft Knife
  • Metal Ruler or Straight Edge

Four Pop-Up Birthday Cards

Here is a quick way to get four pop-up birthday cards using just three sheets of double-sided patterned cardstock.


Watch the process video to see how I made this card.


Cardbase: Start with a 8.5×5.5-inch piece of double-sided patterned cardstock and fold in half to form a side-fold A2 (4.25×5.5-inch) card.


Flip Frame Pop-Up: Watch the assembly video for the Flip Frame Pop-Up located at the bottom of the linked page. Cut out one of the mechanism from cardstock matching the inside of each cardbase. Use the journaling or tags in the paper collection for the piece that flips up on the mechanism. Decorate with cutout pieces and scraps from the paper collection.


Sentiments: All the sentiments were stamped in black ink using Karen Burniston’s Birthday Belated and Photo Memories stamp sets. The stitched white rectangles are cut from white cardstock using a die from the Flip Frame Pop-Up die set.


Envelope: The cards fit into A2 (4.25x 5.5-inches) size envelopes.

_______________________________________


Thank you for experiencing this blog post.

I hope this inspires you and makes you smile.

Please like and leave comments ๐Ÿ˜Š

_______________________________________


Disclaimer: Karen Burniston products are provided free of charge by the manufacturer for review and use. All other items were personally purchased. Compensated affiliate links used where or when possible, meaning I will receive a small percentage commission from these manufacturers at no cost to you. This will allow me to add more content to my YouTube channel and help out a lot. Thank you.

_______________________________________


Materials Used:


Dies
โ€ข Karen Burniston in cahoots with Riley and Company โ€“ Flip Frame Pop-Up – 1134

Stamps
โ€ข Karen Burniston in cahoots with Riley and Company โ€“ Clear Stamps – Birthday Belated
โ€ข Karen Burniston in cahoots with Riley and Company โ€“ Clear Stamps – Photo Memories

Papers
โ€ข Carabelle Studio โ€“ 12×12 Double-Sided Cardstock โ€“ Sorbet designed by Azoline
โ€ข White Cardstock
โ€ข Fraser Papers for William House โ€“ A2 Envelope โ€“ Genesis Text Husk Smooth


Ink
โ€ข Memento โ€“ Fade Resistant Dye ink โ€“ Tuxedo Black
โ€ข Sakura – Gelly Roll Pen โ€“ Medium – White
โ€ข Sharpie โ€“ Permanent Marker โ€“ Fine Tip โ€“ Red

Adhesives
โ€ข Neutral PH Adhesive by LINECO
โ€ข Fine-Tip Glue Bottle

Tools
โ€ข Die Cutting Machine
โ€ข Paper Trimmer
โ€ข Bone Folder
โ€ข Score Board
โ€ข Stamping Platform
โ€ข LDRS โ€“ Stampendable Stamping Tool
โ€ข Scissors
โ€ข Pencil
โ€ข Paper Masking Tape
โ€ข We R Memories โ€“ QuickStick

Oval Flip Birthday Card

This card was made for Craft Roulette #265 whose parameters included an A7 card, floral wreath colors, lyrics element, and cinco (5). I used a Funny Bone Stamps by Riley & Co. along with a Karen Burniston die set released by Elizabeth Craft Designs.

Watch the process video to see how I made this card.

___________________________________

Thank you for experiencing this blog post.

I hope this inspires you and makes you smile.

Please like and leave comments

___________________________________

Disclaimer: Karen Burniston products are provided free of charge by the manufacturer for review and use. All other items were personally purchased. Compensated affiliate links used where or when possible, meaning I will receive a small percentage commission from these manufacturers at no cost to you. This will allow me to add more content to my YouTube channel and help out a lot. Thank you.

Materials Used:

Dies

  • Elizabeth Craft Designs – Karen Burniston Pop It Ups โ€“ Oval Pull Card โ€“ 1109

Stamps

  • Riley & Co. โ€“ Funny Bones – Clear Stamp – A Year Older – RWD-1144
  • Riley & Co. โ€“ Funny Bones – Rubber Stamp – Happy Birthday To You – RWD-1251

Papers

  • Stampinโ€™Up โ€“ 12ร—12-inch Designer Series Paper โ€“ Masterfully Made
  • White Cardstock

Ink

  • Memento โ€“ Fade Resistant Dye ink โ€“ Espresso Truffle
  • Pigma โ€“ Mircon 05 Fine Tip Pen โ€“ Black

Adhesives

Tools

  • Spellbinders โ€“ Platinum Die Cutting Machine
  • Scrapbook.com โ€“ Magic Mat
  • i-crafter โ€“ Shim
  • Paper Trimmer
  • Stamping Platform
  • LDRS โ€“ Stampendable Stamping Tool
  • Scissors
  • Paper Masking Tape
  • We R Memories โ€“ QuickStick

Miscellaneous

  • Two Satin Ribbon Bows
  • Five Gold Gems

Letting Sleeping Dogs Lie

Itโ€™s the Karen Burniston design team challenge for May 2025 using the theme of fluffy. I chose to make a card celebrating the three-headed dog, Fluffy, from the book and movie Harry Potter and the Sorcererโ€™s Stone using the Heart Collage Pop-Up, Cat and Dog as well as the Paper People die sets.


Watch the process video to see how I made this card.

Cardbase: Start with a 8.5×5.5-inch piece of cardstock and fold in half to form a side-fold A2 (4.25×5.5-inch) card. Cover the four panels with decorative papers. (I used Ciao Bellaโ€™s Wizard Academy paper pad.)


Fluffy Pop-Up: Watch the assembly video for the Heart Collage Pop-Up. Cut out one of the collage mechanism from black cardstock as well as three dogs using the Cat and Dog die set. Assemble as instructed in the video above. Use a white gel pen to add eyes, nose and mouth to the dogโ€™s heads before attaching.

Ron, Harry & Hermione: Watch the video above to see how I transformed the Paper People into these well-known characters. Harry’s glasses come from the Tiny Accessories 1 die set. (My academic robe pattern is pictured above.)


Sentiments: All the sentiments used on the card are stamped using brown ink and Crackerbox Stamps.


Envelope: The card fits into an A2 (4.25x 5.5-inches) size envelope stamped with a Crackerbox Stamps castle and an owl post stamp on the back in brown ink.

_________________________________________


Thank you for experiencing this blog post.

I hope this inspires you and makes you smile.

Please like and leave comments ๐Ÿ˜Š


________________________________________

Disclaimer: Karen Burniston products are provided free of charge by the manufacturer for review and use. All other items were personally purchased. Compensated affiliate links used where or when possible, meaning I will receive a small percentage commission from these manufacturers at no cost to you. This will allow me to add more content to my YouTube channel and help out a lot. Thank you.

______________________________________


Materials Used:
Dies
โ€ข Karen Burniston in cahoots with Riley and Company โ€“ Paper People โ€“ 1299
โ€ข Karen Burniston in cahoots with Riley and Company โ€“ Heart Collage Pop-Up โ€“ 1193
โ€ข Karen Burniston in cahoots with Riley and Company โ€“ Tiny Accessories 1 โ€“ 1025
โ€ข Karen Burniston in cahoots with Riley and Company โ€“ Cat and Dog โ€“ 1024


Stamps
โ€ข Crackerbox Stamps โ€“ Rubber Stamps โ€“ Harry Potter Collection


Papers
โ€ข Bazzill โ€“ 8.5ร—11 Cardstock โ€“ Tiara -18-1002
โ€ข Ciao Bella โ€“ 8×8-inch Double-Sided Paper โ€“Wizard Academy
โ€ข Concord & 9th โ€“ 8.5ร—11 Cardstock โ€“ Dove
โ€ข Craft Consortium -6×6-inch Double-Sided Paper โ€“ Wood textures
โ€ข Black, Blush, Browns, Orange and White Cardstock
โ€ข Fraser Papers for William House โ€“ A2 Envelope โ€“ Genesis Text Husk Smooth


Ink
โ€ข Memento โ€“ Fade Resistant Dye ink โ€“ Rich Cocoa
โ€ข Pigma โ€“ Mircon 005 Fine Tip Pen โ€“ Black
โ€ข Sakura – Gelly Roll Pen โ€“ Medium – White
โ€ข Sharpie โ€“ Permanent Marker โ€“ Ultra Fine Tip โ€“ Green, Red, Yellow


Adhesives
โ€ข Neutral PH Adhesive by LINECO
โ€ข Fine-Tip Glue Bottle
โ€ข Temporary runner dot tape


Tools
โ€ข Die Cutting Machine
โ€ข Paper Trimmer
โ€ข Bone Folder
โ€ข Score Board
โ€ข Stamping Platform
โ€ข LDRS โ€“ Stampendable Stamping Tool
โ€ข Stamping Blocks
โ€ข Scissors
โ€ข Pencil
โ€ข Paper Masking Tape
โ€ข We R Memories โ€“ QuickStick

Pop-Out Birthday Tag Card

This card was made for Craft Roulette #265 whose parameters included gift card, train colors, science element, and add a flower. I used a Craft Roulette stamp set and three Karen Burniston dies die sets.

Watch the process video to see how I made this card.

Cardbase: ย Using Karen Burnistonโ€™s Tag Book Pop-Up die set, I cut two of the large tag frames from oxidized blue mirror cardstock and two more from oxidized copper-colored mirror cardstock. The rectangular hinge die I cut once from white cardstock.

Pop-Up Panels: I glued my thin decorated paper to a piece of thin white cardstock and let dry before cutting out the Flower Pivot Panels piece. (Follow the assembly instructions in her video on the die set’s linked page.) The six small flowers are cut from solid colored cardstock scraps using the dies from the same die set as the panels.

Sentiments: ย  The framed โ€œHappy Birthdayโ€ on the tag front is from the Happy Birthday Lorna Add-Ons die set. The stamped “itty bitty gift” on the back tag pocket is in brown ink using the Craft Roulette Funn Sentiments #01 stamp set.

Envelope: ย The card fits into a purchased A6 (4.5x 6-inches) size envelope or larger.

___________________________________

Thank you for experiencing this blog post.

I hope this inspires you and makes you smile.

Please like and leave comments

___________________________________

Disclaimer: Karen Burniston products are provided free of charge by the manufacturer for review and use. All other items were personally purchased. Compensated affiliate links used where or when possible, meaning I will receive a small percentage commission from these manufacturers at no cost to you. This will allow me to add more content to my YouTube channel and help out a lot. Thank you.

Materials Used:

Dies

Stamps

  • Craft Roulette โ€“ Funn Sentiments Clear Stamps โ€“ #01

Papers

  • Hunkydory – A4 Mirri Sheets of Cardstock – Oxidised Metals Collection
  • Hot Off The Press โ€“ Paper Pizazz – 12ร—12 Single-Sided Paper โ€“ Burgundy Collage
  • My Favorite Things โ€“ 8.5ร—11 65 lb. Cardstock โ€“ White
  • Green, Orange, Red and Yellow Cardstock

Ink

  • Memento โ€“ Fade Resistant Dye ink โ€“ Rich Cocoa
  • Pigma โ€“ Mircon 005 Fine Tip Pen โ€“ Black
  • Sharpie โ€“ Permanent Marker โ€“ Fine Tip โ€“ Black

Adhesives

Tools

  • Spellbinders โ€“ Platinum Die Cutting Machine
  • Scrapbook.com – Magic Mat
  • i-crafter – Shim
  • Paper Trimmer
  • Stamping Platform
  • LDRS โ€“ Stampendable Stamping Tool
  • Stamping Blocks used as paperweights
  • Scissors
  • Paper Masking Tape
  • Tweezers
  • We R Memories โ€“ QuickStick

Miscellaneous

  • Cording or Twine 8-inches long

Celebrate with Flowers!

This card was made for a Scappโ€™n Savvy Card Challenge for KB Bundlers April 2025 using Karen Burnistonโ€™s Purse Pop-Up, Flip Frame Pop-Up, Flutter Charms and Celebrate die sets. I also used Karen Burnistonโ€™s Photo Memories clear stamp set.

Watch the video for instructions on the construction of the card.

Read more below on specifics of this card.

Cardbase:ย  Cut a 10 x7-inch rectangle of green cardstock, score at 5-inches, fold in half and burnish with a bone folder. Cover inside with two 4.5×6.5-inch rectangles of patterned paper. Save scraps of pattern paper to decorate card front. Die cut large frame from Flip Frame Pop-Up die set from red dotted paper. Cut bee and small flower pieces from Flutter Charms die set and assemble as shown in process video above.

Flower Planter Pop-Up: ย Watch the assembly video for the Purse Pop-Up located at the bottom of the linked page. Cut one large, stitched rectangle from the Flip Frame Pop-Up die set from a journal card. Follow directions in the process video above for how to die cut tabs into red rectangle. Die cut one purse base from striped paper and follow directions in process video above. Using the flower and stem dies in the Flip Frame set, die-cut flowers from patterned paper and stems from green cardstock. (Save patterned paper with flowers cut out for card back.)

Sentiments: ย Die cut the โ€œCelebrateโ€ once from, orange, red and black. (I use a shiny black piece of junk mail.) From the KB April Zoom class kit use the pre-printed โ€œHappy Birthdayโ€ sentiment rectangle label. (Alternative is to stamp the sentiment using Karen Burnistonโ€™s Bouquet Sayings clear stamp set on to white cardstock.) Die cut sentiment label with smallest rectangle die from Flip Frame Pop-Up die set. Cut the smallest stitched rectangle from the same set, in pale blue. Glue sentiment label onto blue rectangle.

Envelope: ย This card fits into an A7 (4.25×5.5-inch) envelope with โ€œCelebrate your big awesome dayโ€ stamped in red on the back flap. Stamps is from Karen Burnistonโ€™s Photo Memories.

___________________________________

Thank you for experiencing this blog post.

I hope this inspires you and makes you smile.

Please like and leave comments ๐Ÿ˜Š

___________________________________

Disclaimer: Karen Burniston products are provided free of charge by the manufacturer for review and use. All other items were personally purchased. Compensated affiliate links used where or when possible, meaning I will receive a small percentage commission from these manufacturers at no cost to you. This will allow me to add more content to my YouTube channel and help out a lot. Thank you.

Materials Used:

Dies

Stamps

Papers

  • Scappโ€™n Savvy โ€“ Card Challenge Paper Pack
  • 8X12-inch Cardstock – Orange, Pale Blue and Green
  • Journaling Cards with Red Polka Dots on Back
  • Patterned Paper with Clouds and Colorful Pinwheels/ Rainbow stripes
  • Red & Yellow Cardstock Scraps
  • Shiny Black Junk Mail
  • Clear Vellum

Ink

  • Pigma โ€“ Mircon 005 Fine Tip Pen โ€“ Black
  • Memento โ€“ Fade-Resistant Dye Ink โ€“ Rose Bud

Adhesives

Tools

  • Die Cutting Machine
  • Paper Trimmer
  • Bone Folder
  • Score Board
  • Stamping Blocks used as paperweights
  • Scissors
  • Pencil
  • Paper Masking Tape
  • We R Memories โ€“ QuickStick

Miscellaneous

  • Yellow Enamel Dots
  • Three Pre-Cut & Inked Flowers from Flutter Charms

Ticket Shaped, Tri-Fold Easel, Birthday Card

This card was made for Craft Roulette #261 whose parameters included an A2 size card, amusement ride colors, JD element, and ticket(s).

Watch the process video to see how I made this card.

Cardbase: Start with a 4.25 x 11-inch piece of heavy cardstock, score at 5.5-inches and fold in half to form a top-fold A2 (4.25×5.5-inch) card. Cut a 4.25×6-inchpanel of heavy cardstock and score and fold at .5-inch to form a narrow tab. Glue the tab to one end of the A2 cardbase to form a tri-fold card. Using a 1-inch circle hole punch, cut notches out of each panel’s corners. Create a gold and white ticket for the front of the card as show in video.

Box of Chocolates: The easel stop is a heart shaped box of chocolates made using Trinity Stamps’ Bon Bon Box stamps & dies, colored using glitter markers and popped up on thin foam tape.

Sentiments: The “Ticket to Funn” was computer generated while the inside sentiments were stamped in dark brown ink using Craft Roulette’s Funn Sentiments #01 stamp set. All the stamping on the card back comes from Craft Roulette’s The Basics stamp set.

Envelope: The card fits into an A2 (4.25x 5.5-inches) size envelope stamped with a sentiments from Craft Roulette’s The Basics stamp set on the back flap in dark brown ink.

___________________________________

Thank you for experiencing this blog post.

I hope this inspires you and makes you smile.

Please like and leave comments ๐Ÿ˜Š

___________________________________

Disclaimer: Karen Burniston products are provided free of charge by the manufacturer for review and use. All other items were personally purchased. Compensated affiliate links used where or when possible, meaning I will receive a small percentage commission from these manufacturers at no cost to you. This will allow me to add more content to my YouTube channel and help out a lot. Thank you.

Materials Used:

Stamps

  • Craft Roulette โ€“ Clear Stamps โ€“ The Basics
  • Craft Roulette โ€“ Clear Stamps โ€“ Funn Sentiments #01
  • Trinity Stamps – Clear Stamps & Dies – Bon Bon Box

Papers

  • Scrapbook.com โ€“ 8.5×11 inch 110lb Cardstock โ€“ White
  • Matte Gold Cardstock
  • White Computer Paper

Ink

  • Stampin’ Up – Classic Stampin’ Pad – Copper Clay & Early Espresso
  • Nuvo – Glitter Marker – Lemon Drizzle
  • Pigma โ€“ Mircon 01 Fine Tip Pen โ€“ Black
  • Pigma โ€“ Mircon 05 Fine Tip Pen โ€“ Brown
  • Scrapbook.com – Glitter Brush Markers – Deep Blue, Coral, Red Shimmer

Adhesives

Tools

  • Die Cutting Machine
  • Paper Trimmer
  • Bone Folder
  • Stamping Blocks
  • Scissors
  • Paper Masking Tape
  • 1″ Hole Punch