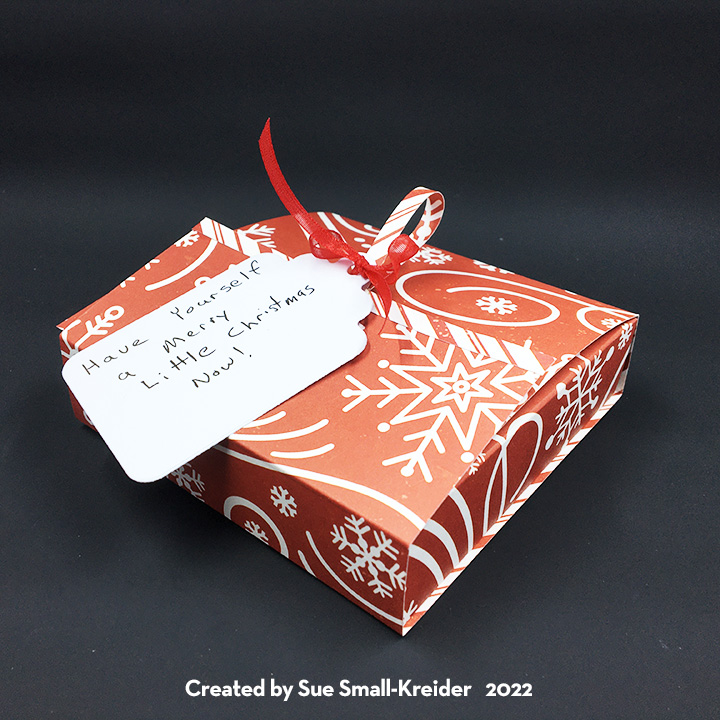
This isthe Bonus Day in the Week of Good Cheer Christmas Card series featuring cups and mugs of winter cheer as beverages. Today’s card and gift box features Simply Made Crafts die set and a template by Hot Off The Press made up as a cup of coffee with cream.(GIVEAWAY opportunity near end of post.) This also was made for Craft Roulette episode #282.
Watch the video below to see how the card and gift box were made.
The spoon is a tiny shaped card while the cream is a gift box inside the cup.
___________________________________
Thank you for experiencing this blog post.
I hope this inspires you and makes you smile.
Please subscribe to the email notices, like and leave comments 😊
___________________________________
GIVEAWAY
I’m cleaning out my dies and stamps and will be giving away crafting bundles to 8 lucky crafters who follow, subscribe and comment on my Week of Good Cheer Christmas Cards posts on Facebook, Instagram, YouTube and my website. (If you comment on all 4 platforms, each day, you have over 28 opportunities to be picked for a crafting bundle.)
Tell me why you like each cup or which is your favorite cup. Winners will be picked by September 2, 2025.
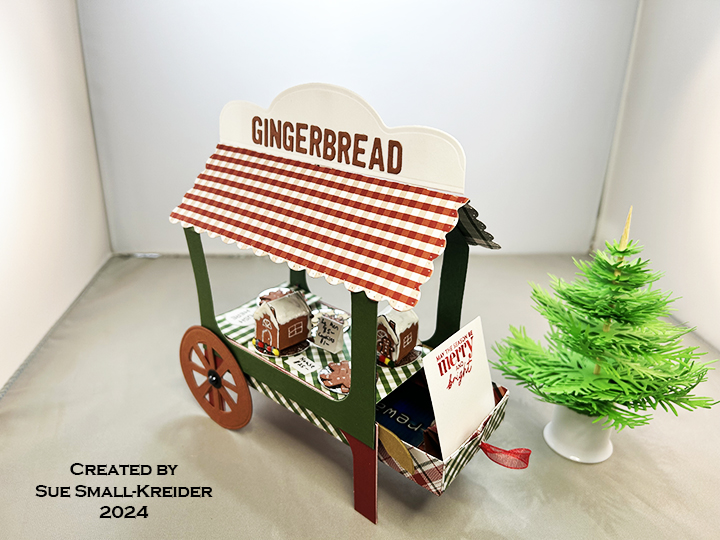
This card was made for Craft Roulette #231 whose parameters included for Project – Outside/Inside, tulip colors, festival element and checks.
Watch the video to see how I made this cart.
___________________________________
Thank you for experiencing this blog post.
I hope this inspires you and makes you smile.
Please like and leave comments 😊
___________________________________
Disclaimer: Karen Burniston products are provided free of charge by the manufacturer for review and use. All other items were personally purchased. Compensated affiliate links used where or when possible, meaning I will receive a small percentage commission from these manufacturers at no cost to you. This will allow me to add more content to my YouTube channel and help out a lot. Thank you.
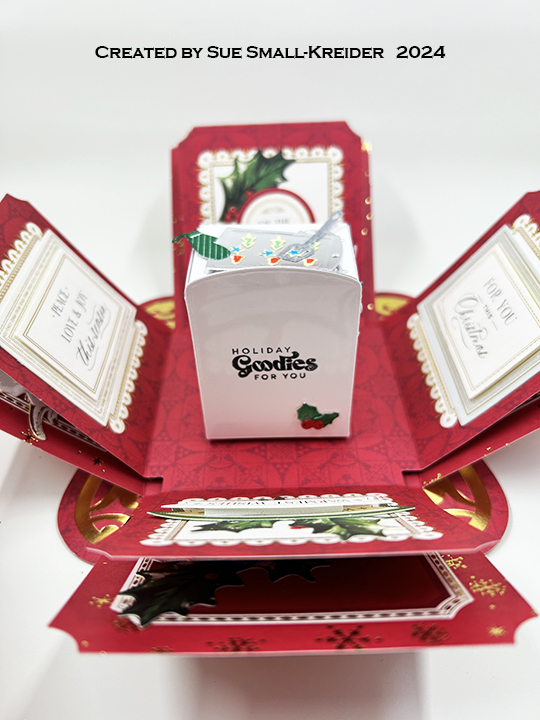
Watch video above for a tutorial on how I made the Box.
___________________________________
Thank you for experiencing this blog post.
I hope this inspires you and makes you smile.
Please like and leave comments 😊
___________________________________
Disclaimer: Karen Burniston products are provided free of charge by the manufacturer for review and use. All other items were personally purchased. Compensated affiliate links used where or when possible, meaning I will receive a small percentage commission from these manufacturers at no cost to you. This will allow me to add more content to my YouTube channel and help out a lot. Thank you.
Materials Used:
Dies
The Greetery – Wafer Thin Steel Dies – Bake Someone Happy
Stamps
The Greetery – Clear Stamps – Bake Someone Happy
Papers
Anna Griffin – Gingerbread House Explosion Box
Anna Griffin – Present Pop-Up Card making Kit – Ephemera & Sentiment Stickers
Anna Griffin – Carte Noel – Sentiment Stickers
The Paper Cut – 8.5×11 Glossy 10 PT Kromekote Cardstock – White
Silver Foil Cardstock
Acetate/Clear Plastic
Ink
Stampin’ Up – Classic Ink Pad – Real Red & Shaded Spruce
StazOn – Solvent Ink – Jet Black
American Crafts – Metallic Marker – Silver
Gel Pens – Blue, Green and Red
Mont Marte – Dual Tip Art marker – E2 Raw Sienna
Sharpie – Permanent Marker – Ultra Fine Tip – Black, Green & Red
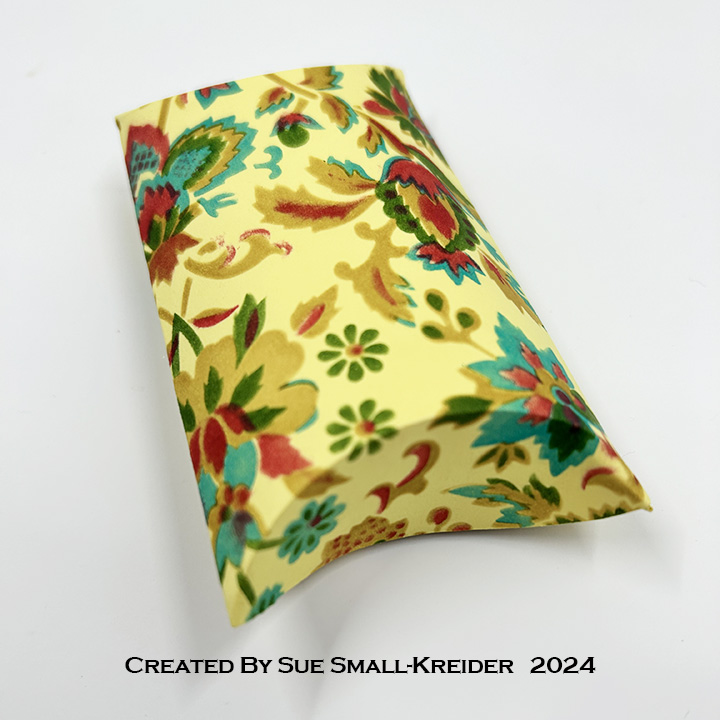
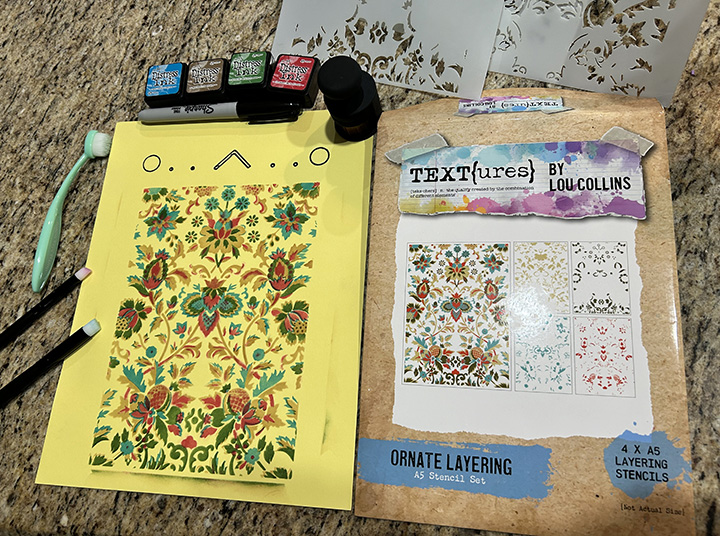
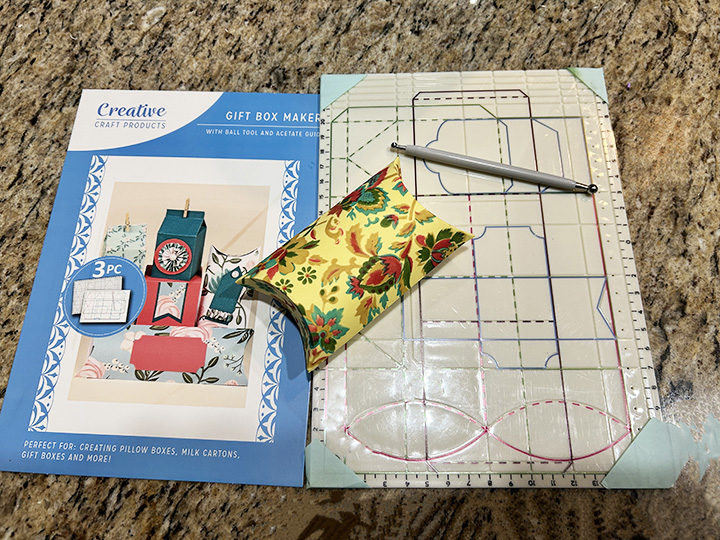
I just got a lovely shipment from Craftstash of papercrafting tools. Included in the package were a layered tapestry stencil set by Lou Collins in her TEXT{ures} brand and a Creative Craft Products gift box maker scoring board with ball tool. Below is a stenciled pillow gift box that I made with these tools.
Stenciling: The four layering stencils in Lou Collins’ Ornate Layering A5 Stenciling Set creates a multi-color tapestry design in the William Morris style. Because I don’t have a stenciling platform or jig that works with the stencils, I taped the first stencil onto the center of my 8 1/2 x 11-inch piece of cardstock and used a marker to trace the jig holes at the top of the stencil onto the cardstock, so I could line-up the various stencils each time. I used a variety of small ink blending brushes to ink in each stencil. I found the small detail brushes worked well as did the larger surface brush on all areas of the stencils. (Sorry I don’t know the brands of the various brushes I used.)
Pillow Box: I used the stenciled piece of cardstock to create a pillow box for a gift card using the Creative Craft Products gift box maker scoring board with ball tool. First I trimmed the cardstock to the 15cmx15cm recommended size and then sandwiched the cardstock between the acetate and scoring board and taped the edges of the acetate at the corners. Next, I used the small end of ball tool to trace over the red pillow box template lines and then turn the cardstock 180 degrees to mark the opposite end’s eye shaped fold/cut lines. After trimming off the excess cardstock, I adhered the side tab to the other edge with double-sided tape.
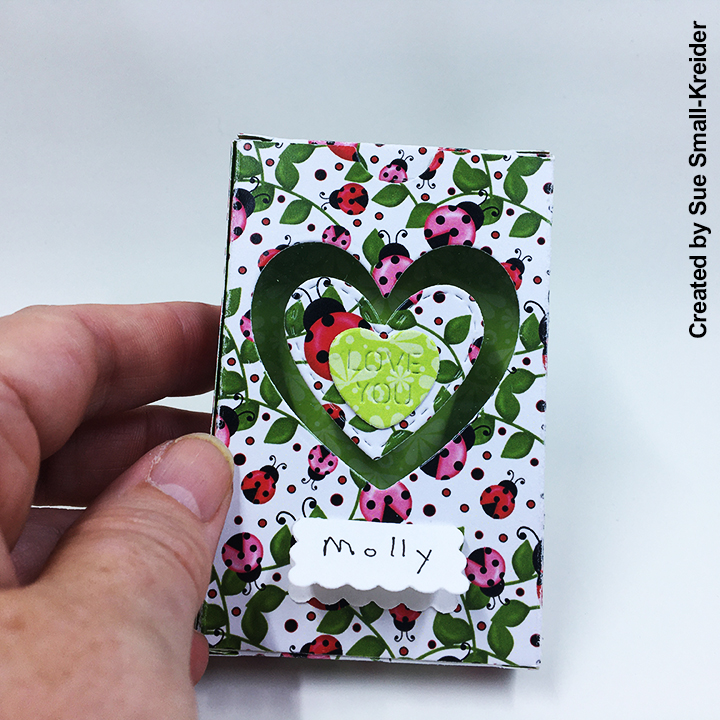
I’ve had some flat back fish embellishments in my stash for awhile and the Candy Hearts Box in the December 2023 release by Karen Burniston begged to be the container for these candy-like fish.
The box is cut in one piece. (I was able to cut it from an A5 (5.83 x 8.27 inches/14.8 x 21 cm) piece of blue water patterned paper.) Before assembling, cut out the window with the largest of the square dies in the set and back it with a scrap of clear acetate or plastic packaging. Then, adhere the cut-out inside the box as a backdrop for the window.
The sentiment of “HB2U” (Happy Birthday to You) are cut using the Mini Alphabet and Numbers die set. Use the stitched medium size square die from the box set for the white label on the back of the box.
Thank you for reading this blog post. I hope this inspires you and makes you smile. Please like and leave comments 😊
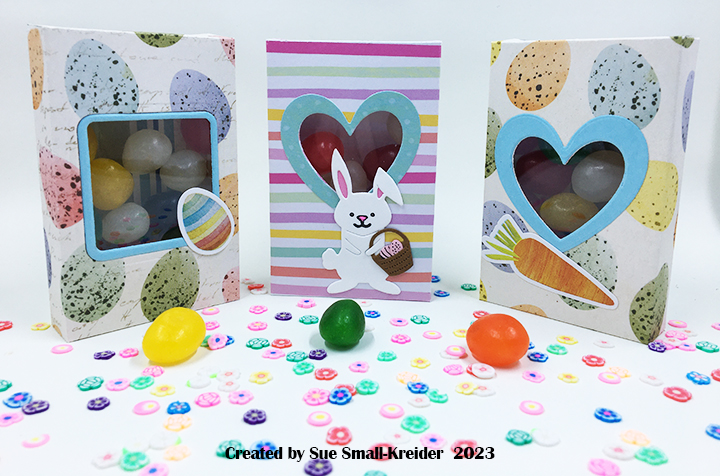
It’s the start of SNEAK PEEK Week for Karen Burniston’s December 2023 Release. Today we’ll focus on the Mini Gift Bag and the Candy Heart Box die sets.
These bags and boxes go together quickly and have two main surfaces that allow for creative decorations. It doesn’t matter whether you use solid colored cardstock or decorative patterned papers, the bags are great fun for tucking in gift cards and other small items like jewelry, small toys, car keys, candy, or crafting supplies.
12 Days of Christmas Gift Tree
Valentine’s Day Candy Hearts Box and Mini Gift Bag – both fit a gift card
Tag Card with Mini Gift Bag to hold a gift card
Look for tutorials on these projects in the coming weeks.
Thank you for reading this blog post. I hope this inspires you and makes you smile. Please like and leave comments 😊
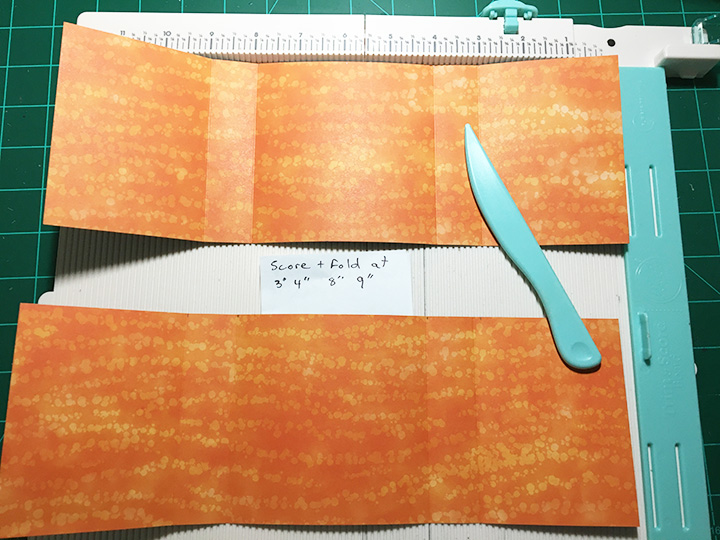
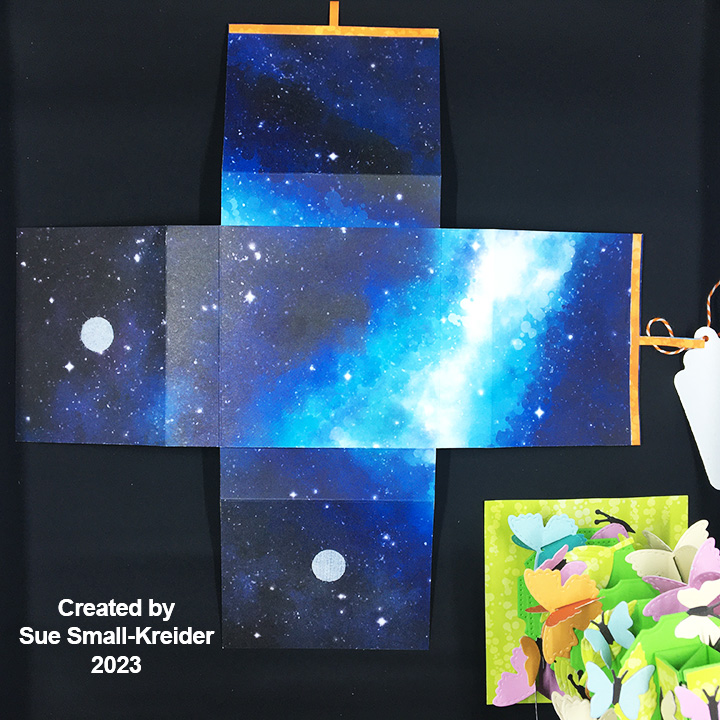
Box: The box is made of double-sided decorative cardstock cut into two 12 x 4 inches rectangles scored and folded at 3 inches, 4 inches, 8 inches and 9 inches. The middle squares are glued together to form a cross. Using strips of decorative paper for pull ribbons glued to the middle of each flap, I glued the remainder of the strips as a bottom flap border. Two adhesive-backed hook and ladder fasteners are the closures.
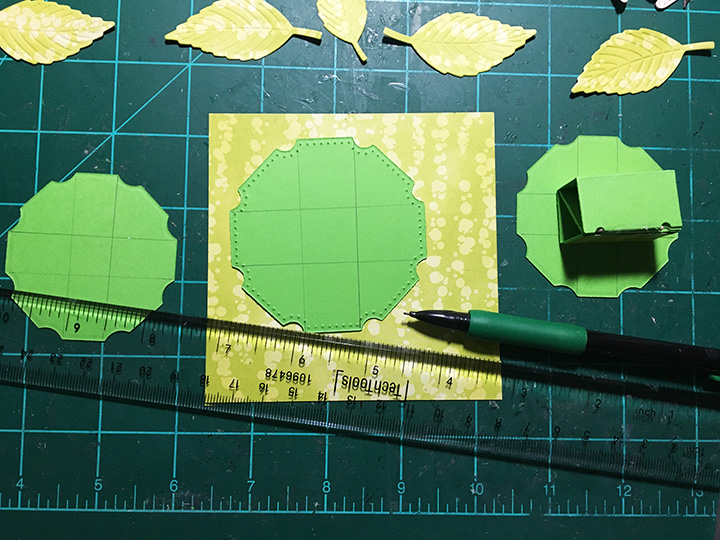
Tree: Utilizing the Bam Box die set, I cut six of the bam box strips, 13 of the bam box decorative rectangles and three each of the largest two fancy circles in the set from green cardstock. Because I like to let the glue dry before adding the rubber bands to bam boxes, I glue in stages. (See assembly video located at the bottom of the linked page and source of tiny rubber bands.)
Glue the decorative panels to the sides of each bam box for added thickness. (By sides I mean the sides that have the diagonal flap beside them. Not the side that has the smiley face or its parallel side.) These will be the sides seen between the layers of circles.
To assemble the tree, mark in pencil the location of the bam boxes on the bottom of each circle except one of the largest. Glue bam boxes to bottoms of five circles. The sixth bam box will be the top and the leftover, large circle will be the bottom.
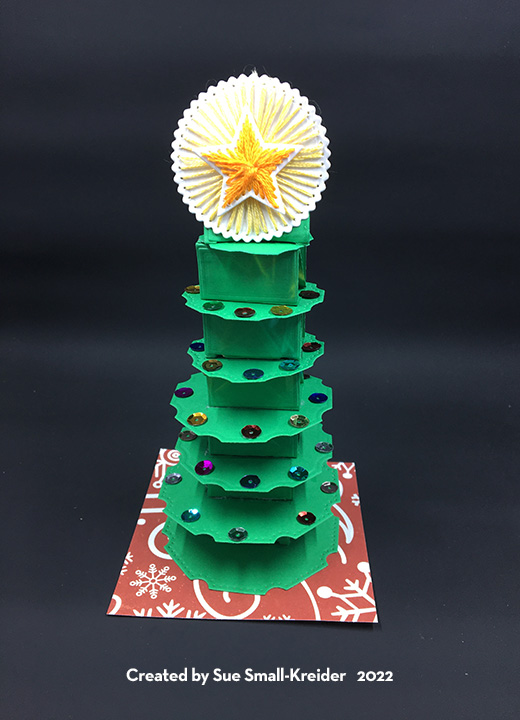
To finish the tree assembly, alternate the direction of the diagonal inside flaps of the bam boxes, so that they make a zig-zag pattern when looked at from the side. By alternating the direction, the bam boxes will fold flat, and the tree will flatten into an oval shape. Use glue to attach each level. Once the tree is assembled, close or flatten the tree to position it on to a 4-inch square of green decorative paper that acts as the base for when the tree is in the box. Glue the tree to the square base.
Butterflies: (Watch the video at the bottom the linked page before starting.) Using the Butterfly Collage Add-ons die set, die cut all the dies from one color of doubled sided paper. Repeat with three other colors of paper. Die cut from black all non-moving butterflies four times.
Assembling the non-moving butterflies, use the black pieces as the base that the trimmed colored paper wings are glued to. On the double-winged one bend the wings up from the black body.
To attach the butteries to the tree, play with the positioning of the fluttering large butterflies on the tree in the closed position. If the butterfly stays within the green square base, it can be glued in place. I found that the flutter butterfly piece with the slot cut into it needs to be the piece glued to the tree, making sure the slot is not obstructed so the other piece can freely flutter.
I used green leaves cut from the decorative base paper to fill-in areas of the circles that were too close to the square’s edge when closed. Add in non-moving butterflies checking their position when tree is closed and that they are not creating catchpoints for fluttering butterflies.
Tag: My favorite gift tag to use for sentiments is in the Tag Book Pop-Up set. I stamped and heat embossed the sentiment. Baker’s twine was used to tie the tag onto the pull-up loop.
Thank you for reading this blog post. I hope it has provided some inspiration.
Sometimes you just need to cheer someone up at Christmas time.
This was a quick make for a friend who found out that they would be unable to be with family over the holiday weekend. It uses the Bam Box die set from Karen Burniston’s December 2022 release and a tag die from a previously release die set. The stitched star and circle were leftover from a previous project. They were die cut from Karen’s Circle Charm Pop-Up die set.
I cut seven of the bam box strips, 14 of the bam box decorative rectangles and two of each of the four different sized fancy circle labels in the set from green cardstock. Because I like to let the glue dry between before adding the rubber bands to bam boxes, I glue in stages. (In the photo the middle flaps have been glued.) (See website for assembly video and source of tiny rubber bands.)
Glue the decorative panels to the sides of each bam box for added thickness. (By sides I mean the sides that have the diagonal flap beside them. Not the side that has the smiley face or its parallel side.) These will be the sides seen between the layers of circles.
To assemble the tree, mark in pencil the location of the bam boxes on the top and bottom of each circle except one of the smallest. Add double-sided tape to the tops of the circles and bam boxes. (By top of the bam box I mean the side where the smiley face is glued to the last flap of the box.)
Alternate the direction of the diagonal inside flaps of the bam boxes, so that they make a zig-zag pattern when looked at from the side. By alternating the direction, the bam boxes will fold flat and the tree will flatten into an oval shape.
The stitched star and circle are thick (1/4 inch each) with the three strands of embroidery floss stitched through the punched holes that the die makes and a center hole made with a needle. They are backed with the smallest fancy circle label and glued to the top bam box on its side.
Sequins are glued to the edges of the circles to represent ornaments or colored lights.
The outer box is made of two 12 x 4 inches rectangles scored at 4 inches, 5 inches, 9 inches and 10 inches. The middle squares are glued together to form a cross. Using strips of the decorative paper for pull ribbons glued to the middle of each flap, I glued the remainder of the strips as decorative trim. Two adhesive-backed hook and ladder fasteners are the closures.
Thank you for reading this blog post. I hope it has provided some inspiration.
Counting down to when Santa comes can be a fun for little ones with a chest of numbered drawers full of surprises.
This non-traditional color schemed chest has 25 drawers that can be filled with treats, notes on an activity to do that day, etc. It is made with Karen Burniston’s newly released Slider Box die set and decorated with her Christmas themed dies.
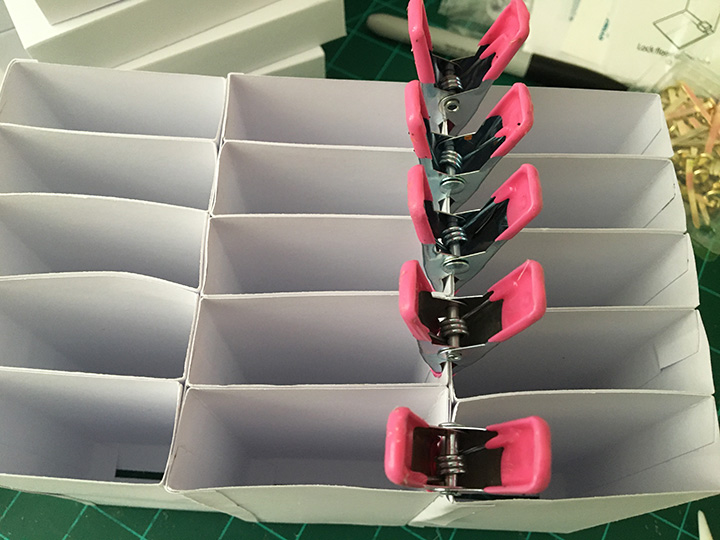
I used 16 sheets of 12×12 inch sheets of 85lb. cardstock to construct the chest with brass brads as drawer pulls. Using a large box as a jig to glue the slider sleeves together I found worked best when also adding a 5×4 3/8 inch siding strip to each tower.(Gluing up the slider sleeves around a drawer also helps to make them more uniform in size and shape.)
Once the five towers of five drawers each are made they can be glued together. To hide the unevenness of the towers, I covered the The base is 4 5/8×12 1/4 inches. The top is 4 1/2×12 1/4 inches. I covered the sides and top with a Snowflake patterned vellum which was only 12 inches wide, so I used 1/2 inch strips of silver glitter paper on the edges of the top to hide the gaps. I used the same silver glitter paper to cover the drawers. Karen Burniston’s Mini Alphabet’s numbers are the perfect size to fit on the drawer fronts.
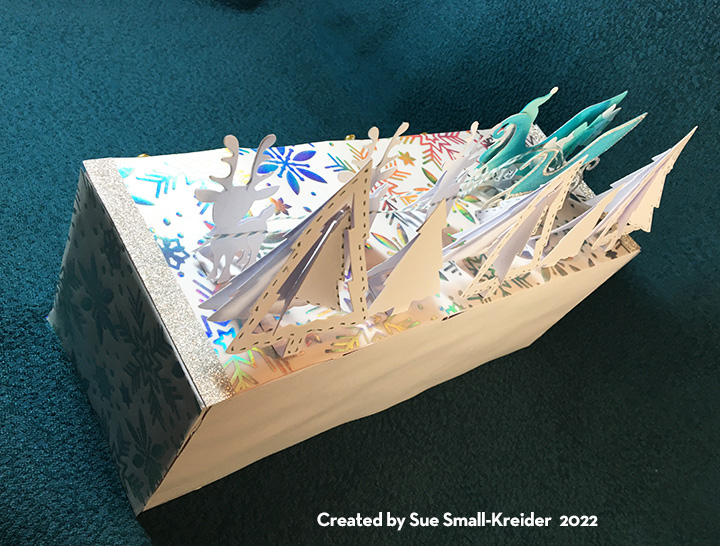
To create the snowy scene on top, I used four of Karen Burniston’s previously released die sets – Sleigh Pop-Up, Christmas Animals, Christmas Trees Pop Stand, and Gnome and Santa. I had to reverse the direction of the sleigh to make it work with the reindeer dies. The trees are assembled as usually, but with narrow strips of cardstock forming “U” shaped bases for the tree trunks to be glued onto. The reindeer are each made up of two die cuts that are glued together at their antlers and have the face colored on the front side only. the use the same “U” shaped bases as the trees.
I apologize for the wonkiness of the chest as it was my first attempt at constructing the towers of drawers. My suggestions to use a large box as a jig to shape the towers and a strong cardstock that does not absorb the glue as mine did may help you construct a chest that is more uniform.