It’s time for the Karen Burniston Design Team January 2026 Challenge whose theme is BUGS.
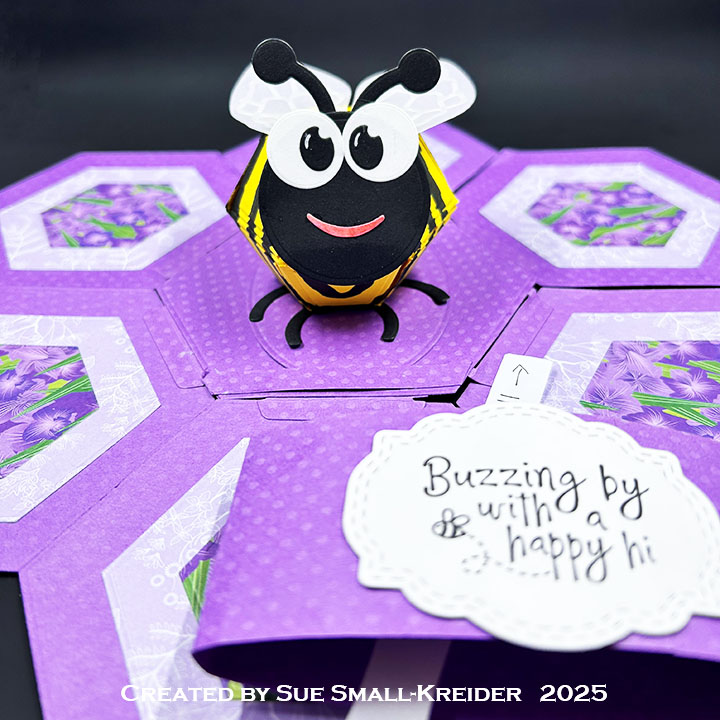
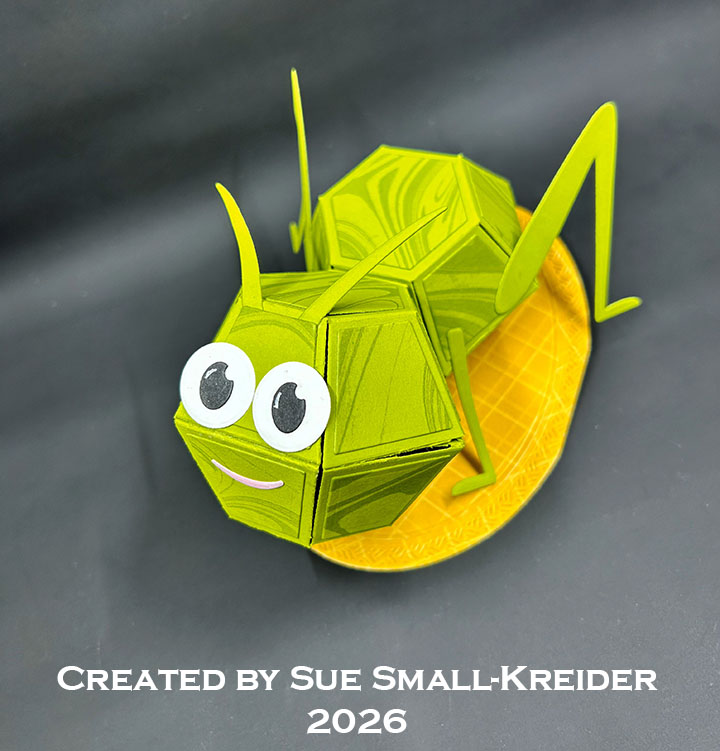
I made a Bitty Ball sized pop-up grasshopper in a bug decorated box using the die sets – Bitty Ball Pop-Up, Animal Add-Ons 6, Bitty Ball Double-Ups, Bitty Ball Access Tabs, Bug Borders, Happily Ever After along with the Oval – Crosshatch and Circles – Crosshatch.
Watch the process video to see how I made this card.
Box: Cut from 12×12 sheets of cardstock one 10-inch square and on 10.25-inch square. On a score board, score on all sides of each square at .5-inch and 1-inch. Cut the corners as shown in video above to form four tabs. Assemble the two box pieces as shown in the video and glue to the inside bottom an 8-inch square of decorative cardstock. Add another 8-inch square of decorative cardstock to the box lid. Decorate the box lid with the Bug Borders insects cut into individual insects. (I used the second largest Circles -Crosshatch die as a guild in the center of the box lid to aid in the symmetrical layout of the bugs.) Uses twine or ribbon to tie the box closed.
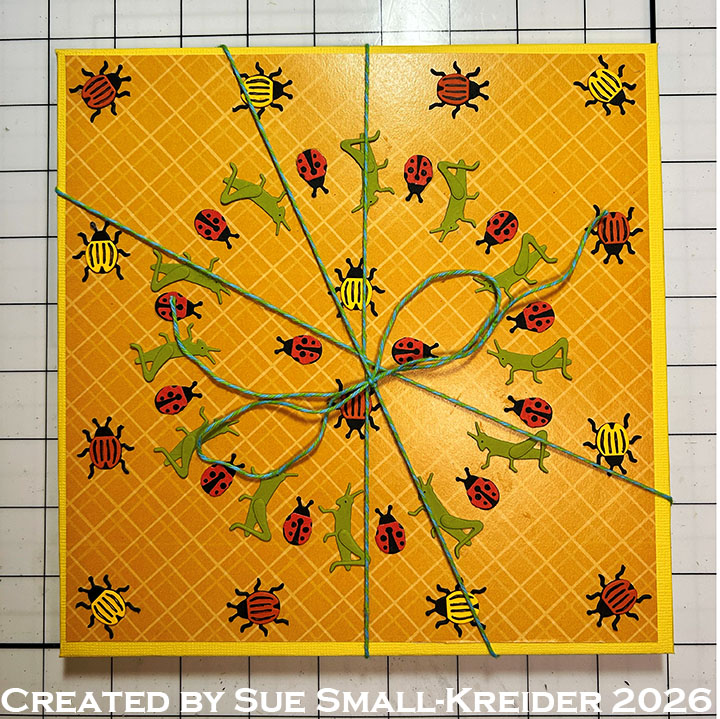
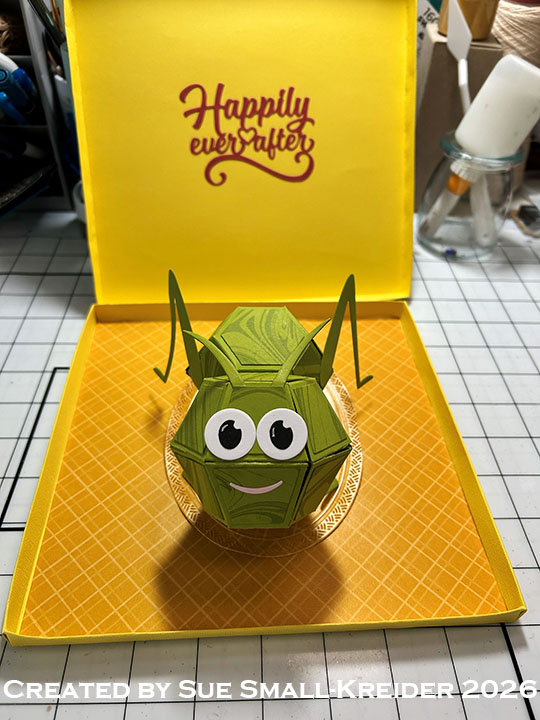
Sentiments: Cut from red paper “Happily Ever After” using the die set of the same name and glue to the underside of the box lid.
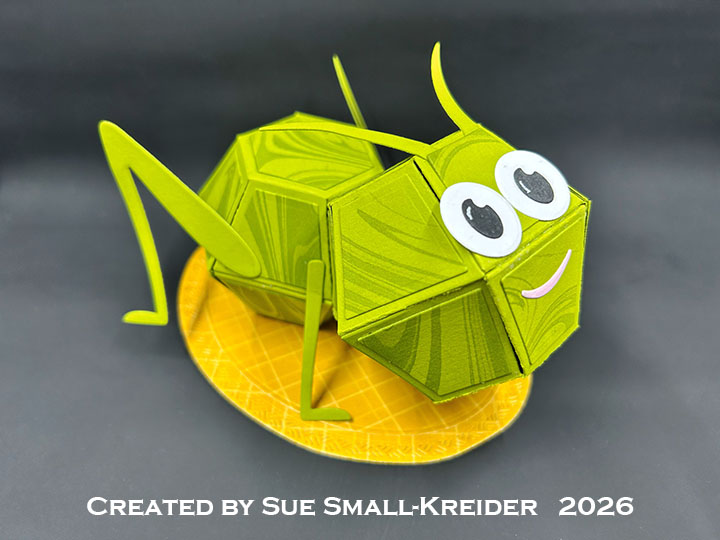
Grasshopper: (Watch the assembly video located at the bottom of the linked page for Bitty Ball Access Tabs.) Using the Bitty Ball Pop-Up, Bitty Ball Access Tabs and Bitty Ball Double-Ups die sets, cut enough pieces to make two pop-up balls. Assemble as show in the assembly video. (Hopefully you won’t have to replace the rubber band as I did, but think through the locations of the access tabs when you assemble your grasshopper, for easy access.) Cut the grasshopper legs, mouth and eye pieces using the Animal Add-Ons 6 die set. glue in place as shown in the video above. (Remember to not glue the top edge of the decorative panel under the eyes so you can slide the antenna under it and glue in place.)
Cut the two largest ovals from the Oval – Crosshatch die set from patterned cardstock and glue together. Glue the grasshopper onto the oval making sure that it is centered when open on the oval. Use a Velcro circles to attach the oval to the bottom inside of the box.
___________________________________
Thank you for experiencing this blog post.
I hope this inspires you and makes you smile.
Please subscribe, like and leave comments 😊
Follow my YouTube channel, Instagram and Pinterest as well.
___________________________________
Disclaimer: Karen Burniston products are provided free of charge by the manufacturer for review and use. All other items were personally purchased. Compensated affiliate links used where or when possible, meaning I will receive a small percentage commission from these manufacturers at no cost to you. This will allow me to add more content to my YouTube channel and help out a lot. Thank you.
Materials Used:
Dies
- Karen Burniston in cahoots with Riley and Company – Animal Add-Ons 6 – 1325
- Karen Burniston in cahoots with Riley and Company – Bitty Ball Access Tabs – 1323
- Karen Burniston in cahoots with Riley and Company – Bug Borders – 1321
- Karen Burniston in cahoots with Riley and Company – Bitty Ball Double-Ups – 1215
- Karen Burniston in cahoots with Riley and Company – Bitty Ball Pop-Up – 1131
- Karen Burniston in cahoots with Riley and Company – Circles – Crosshatch – 1057
- Karen Burniston in cahoots with Riley and Company – Ovals – Crosshatch – 1055
- Karen Burniston in cahoots with Riley and Company – Happily Ever After – 1032
Papers
- Bazzill – 8.5×11-inch Solid Colored Cardstock – Candy Corn
- Bazzill – 12×12-inch Double-Sided Cardstock – Easter Grass Marble
- Keep It Simple – 12×12-inch Double-Sided Cardstock – Lucky Day Collection
- Black, Pink, Red, White and Yellow Cardstock
Ink
- Pencil
- Pigma – Mircon 05 Fine Tip Pen – Black
- Sakura – Gelly Roll Pen – Medium – White
Adhesives
Tools
- Die Cutting Machine
- Paper Trimmer
- Bone Folder
- Score Board
- Stamping Blocks used as paperweights
- Scissors
- Paper Masking Tape
- Tweezers
- We R Memories – QuickStick
Miscellaneous
- Blue Baker’s Twine
- Velcro 1-inch Circles