This card was made for Craft Roulette #207 whose parameters included an A2 size card, ice cream store colors, tasty or tastes element and a banner.
I wanted to make a pop-up or 3-dimensional A2 size card for this episode of Craft Roulette, so I modified a 3D postal truck I had made for my mail carrier to say thank you to fit into an A2 size envelope (4.25×5.5 inches.) (See Mail Truck blog post.)
This card was made for Craft Roulette #201 whose parameters included an easel card, quiet colors, sweets element and bokeh.
Cardbase: Cut one rectangle 3 3/4x 8 1/2-inches from heavy white cardstock. Cut a second white rectangle 3 3/4x 8 3/4-inches. On the largest rectangle score at 1/4 inch at one end and 3-inches at the opposite end. (The 1/4-inch is the tab folded under as the card hinge to card back. The 3-inch tab is the ease for the paper doll.)
Thank you for reading this blog post and watching the video. I hope this inspires you and makes you smile. Please like and leave comments 😊
Materials Used:
Dies
Karen Burniston in cahoots with Riley and Company – Hello – 1166
Karen Burniston in cahoots with Riley and Company – You’re Sweet – 1087
Karen Burniston in cahoots with Riley and Company – Ice Cream Sundae Pop-Up – 1082
Studio Light – Misses Dies & Stamps by Karin Joan – Betty
Studio Light – Misses Dies & Stamps by Karin Joan – Tasha
Stamps
Studio Light – Misses Dies & Stamps by Karin Joan – Betty
Studio Light – Misses Dies & Stamps by Karin Joan – Tasha
Papers
PhotoPlay – 12×12 Double-Sided Cardstock Collection Pack by Becky Moore – Snail Mail
I did an all day virtual workshop from Scrapbook and Cards Today with instructors Cathy Zielske, Mindy Eggen, Meghann Andrew and Jennifer McGuire. The dies and stamp set was designed by Lisa Hetrick.
Thankfully my family was kind to allow me to do this all day workshop.
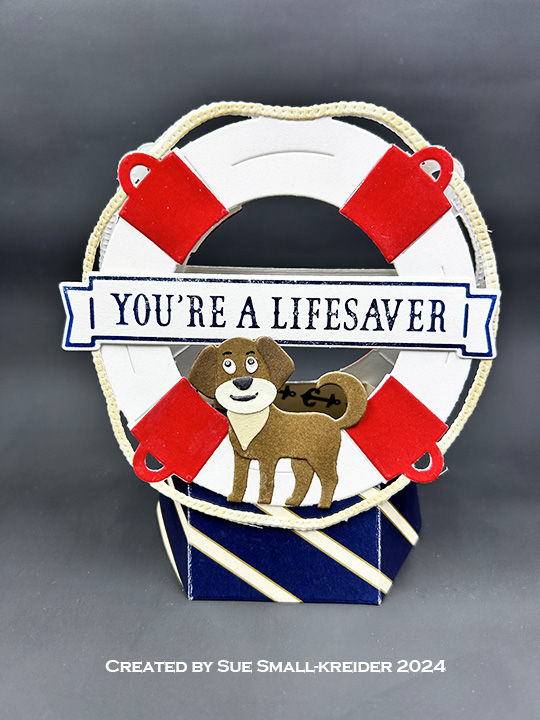
This pop-up display card sail-ebrating life was made for Craft Roulette #196 whose parameters were a celebration project with apple farm colors, preserve(s) element and a dog.
This card was made for Craft Roulette #192 whose parameters included a thank you card, roadside market colors, yard(s) element and confetti.
Heartfelt thanks is the emotion that this accordion-fold card expresses. Inspired by Karen Burniston’s December 2023 release Heart Add-ons pivoting panel, the card features a shaker element filled with confetti. Other Karen Burniston dies were used including: Fence Add-Ons, Thank You and Fancy Label Accordion.
Before starting, watch the assembly videos of the pop-ups which are usually near the bottom of the linked pages for the various die sets used.
Accordion Frames: Cut three accordion frames from heavy blue cardstock using the main large die in the Fancy Label Accordion set. Train the folds of each frame and set aside. (You will cut a fourth accordion frame under the Shaker section using the same heavy cardstock.)
Fence Panel: Using the largest of the label die in the Fancy Label Accordion set, tape it inside the accordion frame die and cut two from decorative paper. Save the inner fancy labels for use on the fence panel. From the decorative paper accordion frames, trim the smaller panel frames away from the larger frame leaving the small tabs attached to the frames. Set both accordion frames and small frames aside for later use. From brown decorative paper cut one fence using the fence die in the Fence Add-Ons set. Cut flowers and grass to decorate fence with using dies also in the Fence Add-Ons set.
Attach a fancy label to the center panel of one of the blue accordion frames. Trim fence to fit panel and adhere to panel. Decorate the fence with grass and flowers. Glue the remaining fancy label to the reverse side of center panel. Set the piece aside.
Heart Pivot Panel: Glue the tab of one blue accordion frame to the backside of the remaining blue accordion frame. Cut from a lightweight teal blue cardstock the Hearts-Add-Ons panel. Train the folds of the hearts panel. From the blue accordion frames cut off half of the center panel leaving them attached at their pivot points. (See photo)
Put glue on the left back side edge of the teal blue hearts panel before attaching to the left blue center panel of the blue accordion frame. Match up the fancy curved edges of the panels. With the blue connecting post of the accordion frame behind the teal blue hearts panel, attach the right side of the hearts panel to the right accordion frame panel.
Cut a hearts panel from decorative paper. Trim out the string of hearts and save to decorate the backside of hearts. Glue decorative panel to the front side of hearts panel. Using the smaller decorative heart dies in the set, cut a number of hearts from patterned paper. Decorate both front and back sides of panel.
Glue the panel frames to the front of the hearts panel with the panel tabs being covered with decorative paper. Trim off the parts of the frames at the center of the hearts panel that are not attached. Set piece aside.
Shaker: Using the largest of the label die in the Fancy Label Accordion set, tape it inside the accordion frame die. Cut the fourth frame piece from the blue heavy cardstock. Keep the dies tapped together to cut four heavy cardstock frames and two decorative paper frames. Use smaller pieces of the heavy cardstock for the four panel frames. Cut the full accordion frame with the decorative paper. Trim the panel frames from the accordion frames and save the decorative paper frames for later. Cut two squares of clear acetate or plastic slightly larger than the panel frames.
To assemble, glue two blue panel frame pieces together. Using 1/8-inch wide double-sided tape around the blue frame, adhere the acetate to frame. Trim off overhanging acetate. Attach decorative pink paper frame over the acetate with more double-sided tape matching up edges. Glue the assembly to the accordion frame panel matching blue frame to blue frame. Repeat with the remaining two blue frames, pink decorative paper frame and acetate piece, but DO NOT attach to accordion frame panel.
Using an anti-static tool, swipe powder over all of the acetate inside the frame and the sides of the shaker frames. Add confetti/sequins to the frame attached to the accordion frame. Glue the remaining shaker frame over the confetti filled frame. Leave undisturbed until glue dries. (To listen to commentary about the anti-static products I used go to my video.)
Accordion Assembly: With all the accordion frames decorated, assembly can begin. Collect the four decorative paper accordion frames previously cut in the Shaker and Fence Panel sections. Cut four more frames from decorative paper, trimming out the inner panels which can be saved for later. Glue the fence panel accordion frame tab to the backside of the first heart panel accordion frame. Glue the second heart panel accordion frame tab to the backside of the shaker accordion frame. Trim off the unused tab on the shaker accordion frame. Cover the backs of all the accordion frames with the decorative paper frames. (This should hide all the tabs.) Glue decorative paper frames to fronts of the accordion frames.
Once all the decoration of frames is completed, glue the center panels of fence and shaker accordion frames to the heart panels. (Note: the tabs that attach to the shaker panel are glued to the front of the shaker panel, while the fence tabs are glued to the back of the hearts panel.)
Cut one of the decorative paper inner panels in half to cover the backsides of the panels cut in half that the hearts panel is attached to. (Green paper in the photo.)
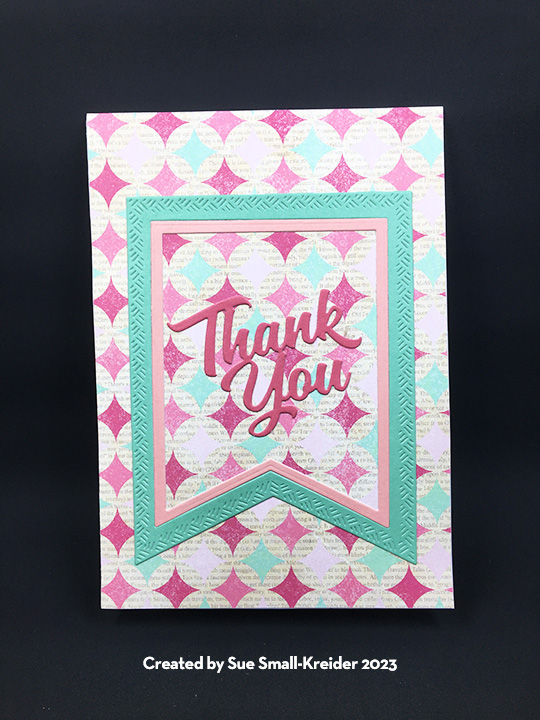
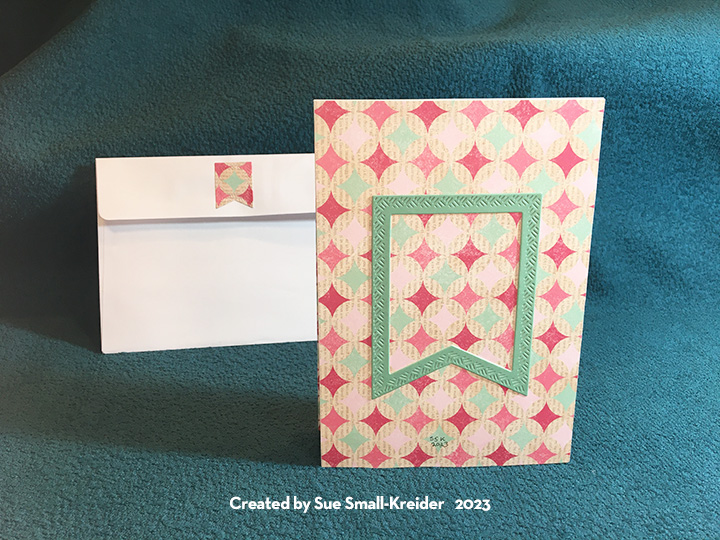
Sentiment: “Thank You” is a die-cut that was cut twice from the same double-sided paper with the blue side used as an off-set shadow behind the pink patterned paper.
Envelope: The card is thick and would require a padded bubble envelope if not hand delivered.
Thank you for reading this blog post. I hope this inspires you and makes you smile. Please like and leave comments 😊
Materials Used:
Dies
Karen Burniston in cahoots with Riley and Company – Heart Add-Ons – 1257
This card was made for Craft Roulette. #188 whose parameters included a gift card, coffee shop colors, go wild element and number(s).
Have a friend who finds it hard to get going without coffee? This is the card for them complete with a coffee gift card.
It is made with Karen Burniston’s Coffee Cup Pop-Up that includes tabs to hold a gift card on the back side of the cup. The sweet dragon having his morning cuppa on the card front and the knight in shiny armor atop the coffee cup are also Karen Burniston dies.
Cardbase: Cut from green cardstock one 5×7-inch rectangle and one 5×7.5-inch rectangle. Score and fold 1/2-inch on the 5×7.5-inch rectangle to have a 5×7-inch rectangle with a tab. Glue the tab to the other green piece to make a 5×7-inch top fold card. Cut decorative papers to cover panels inside and out.
Dragon: (Watch the assembly video for the Knight and Dragon die set first.) I cut the dragon from two shades of green cardstock and inked some shading on him. I used the die stencil feature for his eyes, mouth and wings. His red cup is from the Coffee Charms die set.
Knight: (Watch the assembly video for the Knight and Dragon die set first.) I cut two bodies for the knight gluing them back-to-back but sandwiching the red plume behind the helmet first. Add his shield and sword before gluing on his gloves.
Coffee Cup: (Watch the assembly video towards the bottom of the link page Coffee Cup Pop-Up before starting.) I chose to use patterned paper with names of coffee drinks for the body of the cup, white cardstock for the cup lid and kraft cardstock for the cup band. The band die embossed the ridges on it, and I enhanced the ridges with brown ink. Yellow ink was used to shade the cup lid. I used the circle dies in the die set for the logo.
Sentiments: The “Go Wild!” is cut from brown paper using the die set of the same name by Karen Burniston. Th yellow banner inside says “and Slay the Day with Excalibur coffee,” which was computer generated.
Thank you for reading this blog post. I hope this inspires you and makes you smile. Please like and leave comments 😊
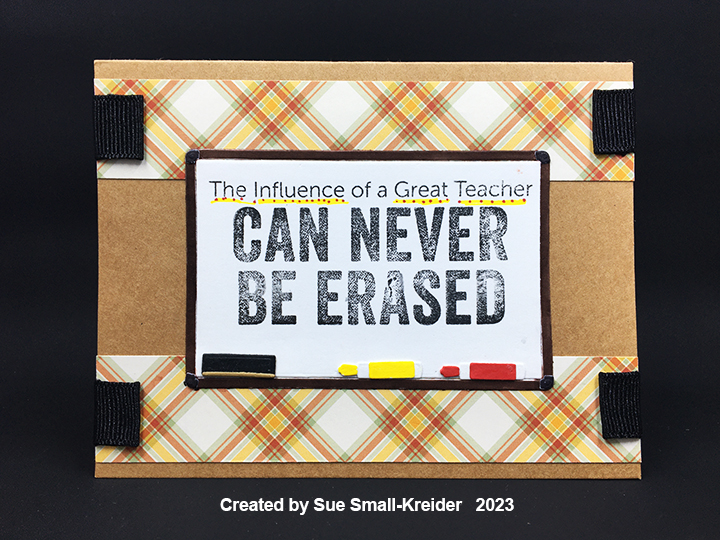
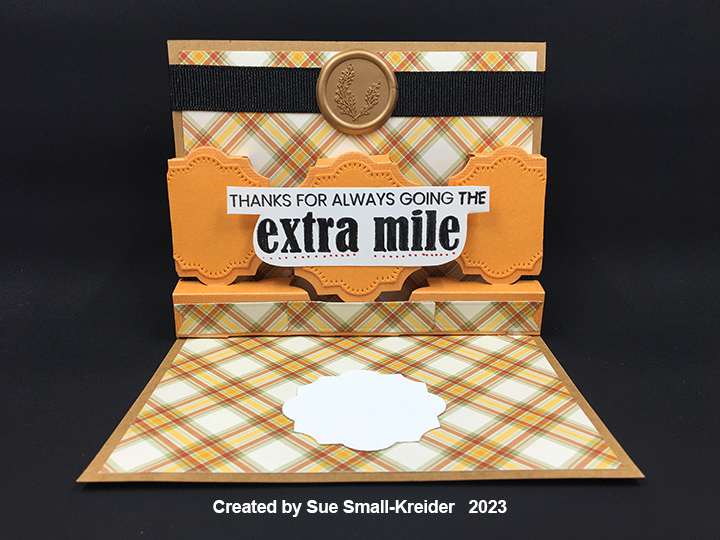
This card was made for Craft Roulette #184 whose parameters included a card for a teacher, tartan colors, Autumn or Spring scene and wrap.
Everyone has influenced someone’s life. Teachers specifically help shape lives with their explanation of the way things work. This is a card to say thank you and offer encouragement to teachers who may feel under appreciated in public schools.
I used My Favorite Things Dry Erase, Whiteboard die set along with their clear stamp set Teach, Sleep, Repeat for this card along with Karen Burniston’s Little Label Pop-Up to make the inside sentiment feel like a special award.
To decorate the envelope, I glued strips of the plaid paper to the back flap.
Thank you for reading this blog post. I hope this inspires you and makes you smile. Please like and leave comments 😊
Materials Used:
Dies
My Favorite Things – Die-Namics – Dry Erase, Whiteboard -MFT-2532
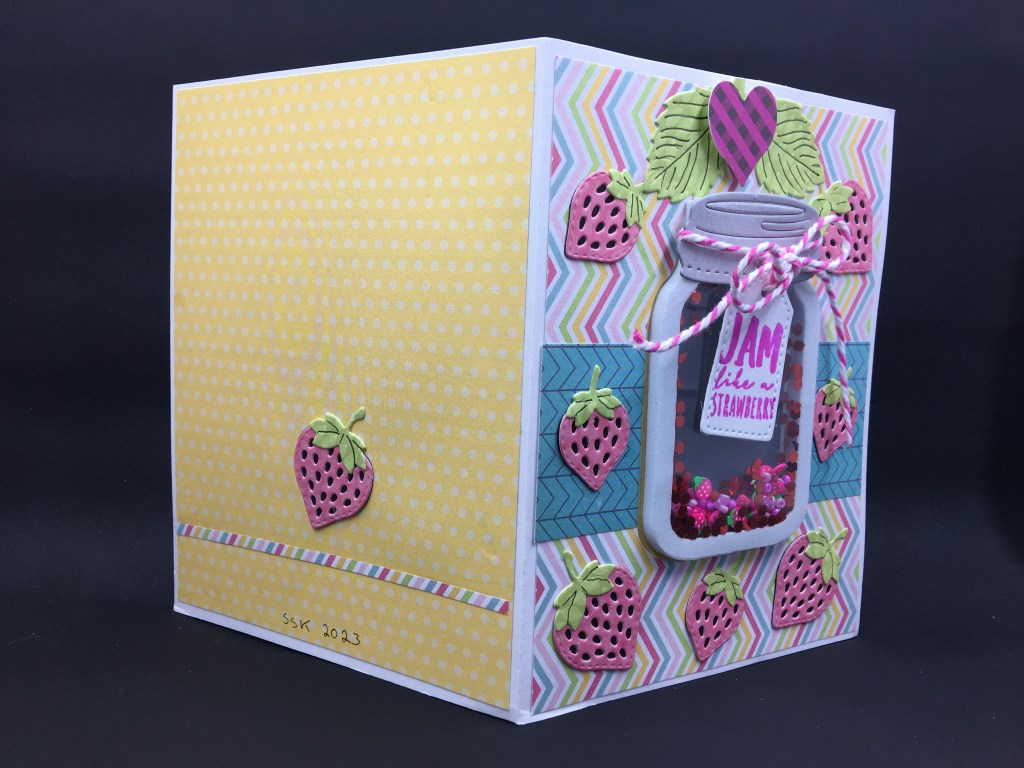
This card was made for Craft Roulette #176 whose parameters included: a split in the middle, jolly colors, a fruit element and a heart.
My inspiration for this card came from the Berry Special die and stamp set that came in the Die Cutting Essentials, issue 103. (This magazine is available on the Craftstash website. Note that there are different country based websites for this online vender. Use the one that works for youto avoid unnecessary currency/customs fees.) It has a stamp that says “Jam like a strawberry” so I immediately thought of a jam jar shaker and went to my Queen and Company stash of shaker kits.
Cardbase: Using a 8.5×5.5 inch rectangle of heavy white cardstock for the cardbase, I folded it in half and used a bone folder to burnish the card into a 4.25×5.5 inch A2 size. The front and back panels of the card are covered with 4×5.25 inch decorative paper rectangles. The front has an additional strip of blue decorative paper near its middle. The back uses a thin strip cut from the front panel paper as decoration. I used the jar frame die to cut the aperture into the card front when only the front decorative papers had been attached. Next, I glued on the inside decorative papers and cut the aperture again.
Shaker: Queen and Company are known for their shaker kits which use pre-cut foam shaker frames with adhesive on both sides and clear acetate covers which take the tediousness out of making shaker cards. For the jar I used two acetate pieces and one foam frame that all had been dusted with an anti-static brush. I peeled off one side of the frame’s adhesive backing and attached a pre-cut piece of acetate. Adding the glitter, seed beads and strawberry slices to the frame, I dusted the next acetate sheet again and peeled off the adhesive backing on the foam frame and attached the acetate to enclose the shaker elements. (The chucky glitter had a lot of static electric charge and jumped to the tiny bits of adhesive at the foam edges.) The shaker is attached to the card by gluing a jar frame cut from the front of the card to the inside of the card and then gluing the shaker to the jar frame.
Decorations: Eight layered strawberries were cut using the Berry Special die set from pink and green patterned paper and black cardstock. The dies cut two stems, large and small strawberry outlines and fronts with seeds cutout as well as a plant stem with large leaves. I also used two of the large leaves on the card front. Seven strawberries are scattered on the card front and one large strawberry on the back. A red plaid paper sticker on a foam dot is at the top of the card front.
Sentiments: Using the stamps from the Die-Crafting Essentials gift set, I stamped in purply-pink ink the sentiment “Jam like a strawberry” on the jar tag which is tied around the jar lid with baker’s twine, and the inside sentiment “Thank you berry much!”
Envelope: Stamped on the envelope flap is “You’re the sweetest!” in purply-pink ink.
Thank you for reading this blog post. I hope this inspires you and makes you smile. Please like and leave comments 😊
Materials Used:
Dies
Queen & Company – Steel Dies – Love Jar
Die Cutting Essentials, issue 103 – Dies – Berry Special
Stamps
Die Cutting Essentials, issue 103 – Clear Stamps – Berry Special
Shaker Elements and Frame
Queen & Company –Foam Shaker & Acetate – Love Jar
Red Chunky Glitter
Pink Seed Beads
Dress My Craft – Polymer Clay – Strawberry Slices
Papers
Queen & Company – 6×6 Double-Sided Mat Stack – Flirty Florals
Crate Paper – 6×6 Single-Sided Patterned Paper Pad – Cool Kid
Cardbase: I started with a purchased 5×7 cardbase and cut it on its scored fold-line to make two panels that I reattached with paper tape at the short edge sides to make a top fold card. I used tape on both sides of the cardbase. Next, I covered all four panels with decorative papers.
Banners: Three colors of solid cardstock came in the paper collection, and I cut a nested set of banner shapes using the five largest dies in the Banners – Crosshatch set from each color. After playing with mixing and matching the various color combinations, I settled on my choices and glued the frames onto the cardbase allowing some of the patterned papers to show through.
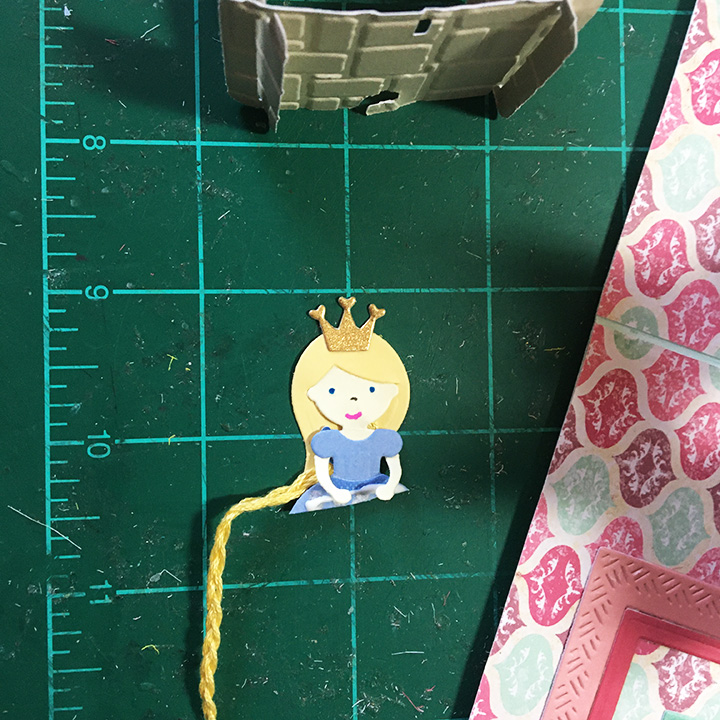
Princess and Knight: The princess, I had made some time ago, from scraps using the Princess and Mermaid die set. I braided three strands of yellow embroidery floss that matched the princess’ hair color and glued it between her hair and the back of her dress. The knight was cut from two types of silver foil cardstock and some blue scraps using the Knight and Dragon die set. (You can watch the assembly video for these dies by clicking on their dies and looking for video on the link page towards the bottom of the website page.)
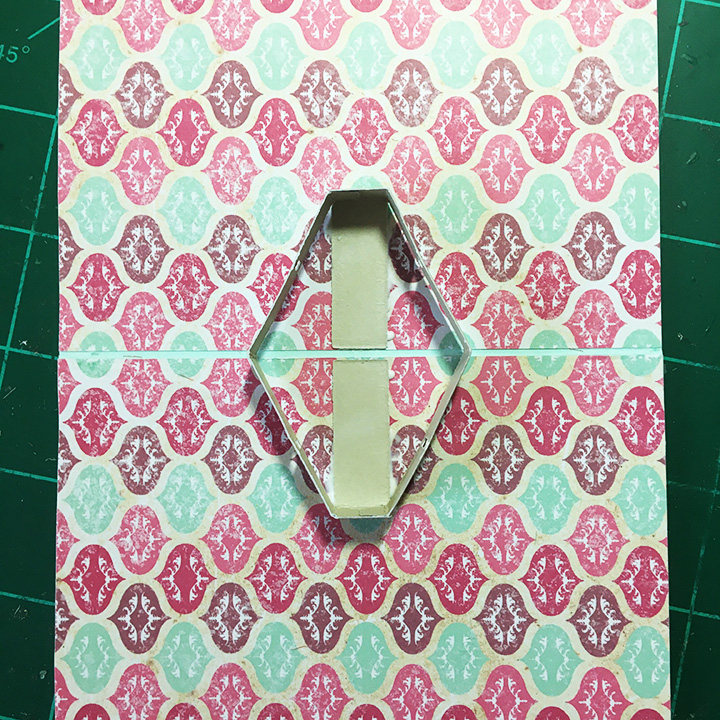
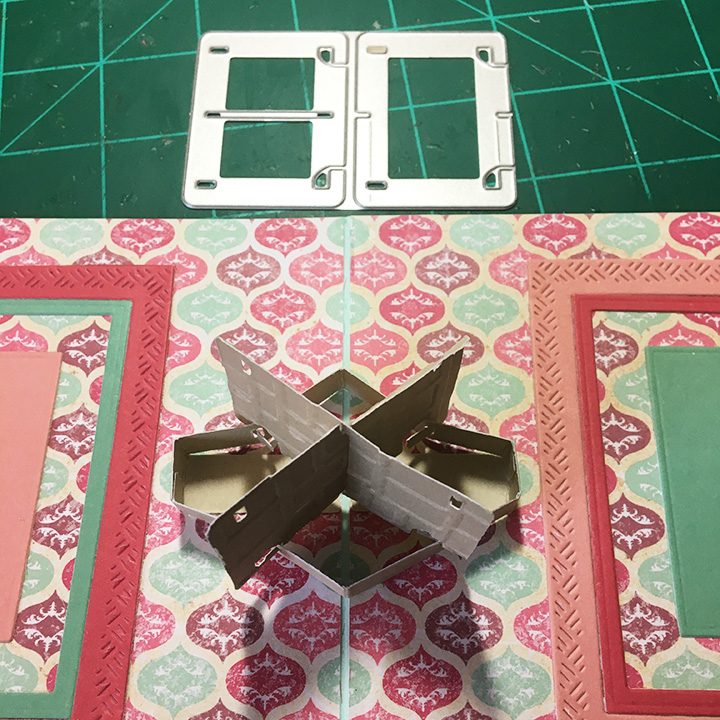
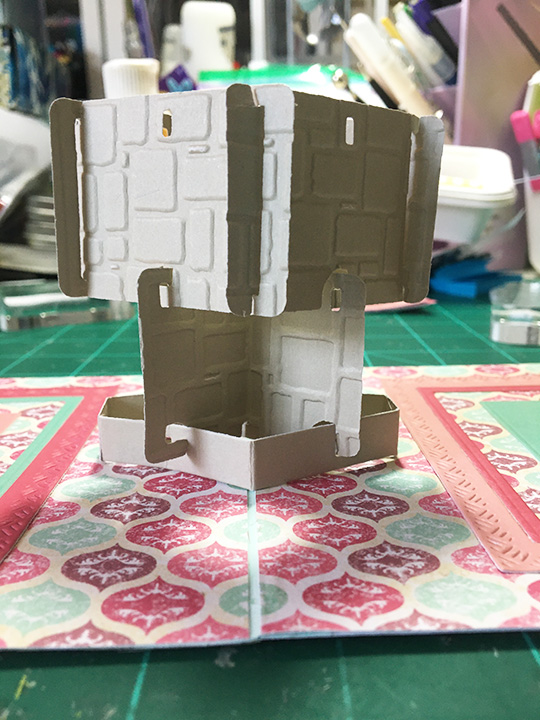
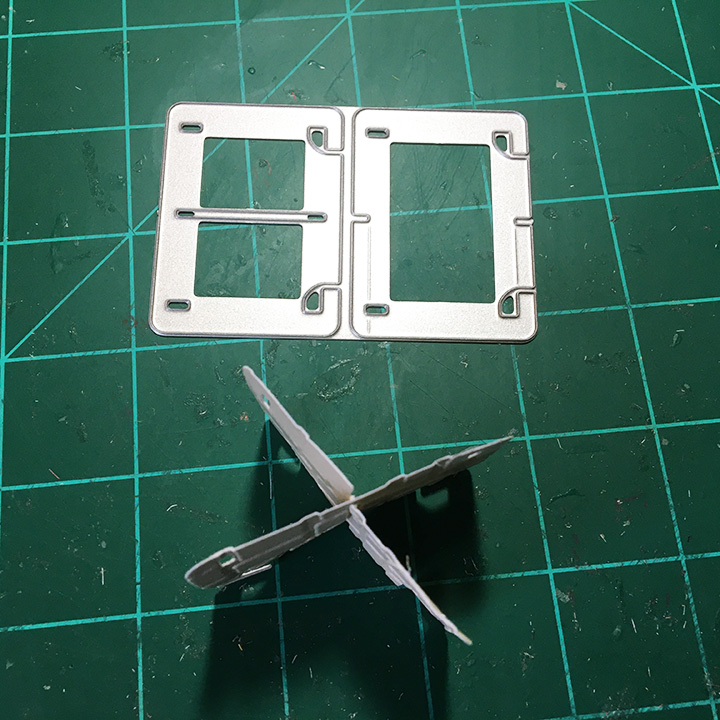
Tower: For the four-story tower, I cut each of the card panel dies twice from heavy gray cardstock using theHouse of Cards Pop-Up die set. Next, I embossed each card using a cobble stone embossing folder. I cut the two base pieces and glued the small tabs to the other piece to for a six-sided polygon. The long tabs I glued inside the card along the fold. (This base is much like Karen Burniston’s palm tree or Christmas tree bases and the attachment of what goes on top of them involves tabs poked through holes. For an assembly video check the bottom of the page linked.)
To build the tower assemble two “Xs” and two squares. Attach one “X” to the base, then attach a square followed by an “X.” Loosely attach the last square and place the princess in it with temporary tape. Close card and if the princess sticks-out of the card, you will need to cut a window in one panel of the top square. (I cut a lip/tab that folded over and was glued to give strength to the card.) You will have to trim off the lower half of the princess to fit in the window and the card. Glue her onto the window lip making sure her gown does not cover the notch used to attach the square to the tower. Make sure her long braid does not hamper the opening and closing of the tower.
Glue the knight to the small side of the tower base making sure he is not attached to any of the playing card panels. Test opening and closing the card to look for catch-points before the glue dries.
Sentiments: “Thank You” is die-cut using a die set of the same name. The inside sentiment “For coming to my aid” was computer generated, printed on thin printer paper and then die cut with a banner die. A blank banner was also cut from printer paper for a personal message.
Envelope: The smallest banner in the die set was used to cut the printed paper banner glued to the back envelope flap. It hints at the heraldry to come inside.
Thank you for reading this blog post. I hope this inspires you and makes you smile. Please like and leave comments 😊