A Golfer’s Dream Birthday Card

A golfer’s dream is playing Hole 7 at the Pebble Beach Links course in California which is a hole that is next to the crashing ocean surf. Skill is needed to play this windy par 3 hole, but hole-in-ones have happened.

For this special birthday card, I used a layered stamp set by The Ton with dies by Karen Burniston.

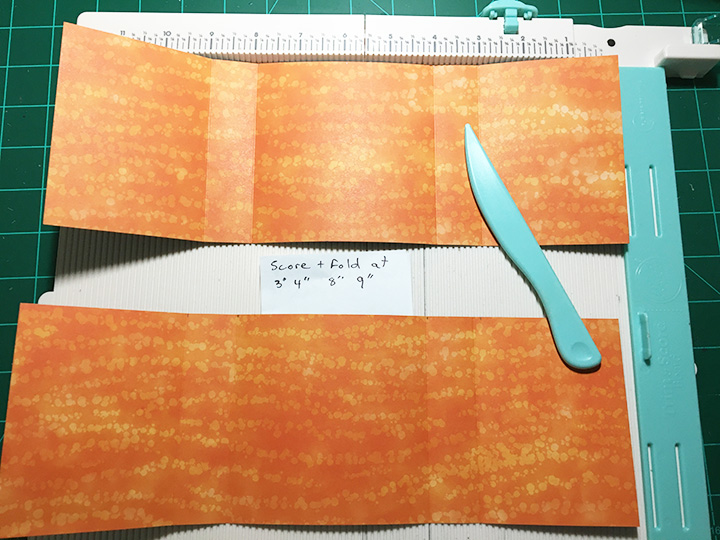
Cardbase: Starting with a 11x 5 1/2-inch rectangle green cardstock, score and fold at 5-inches, 3-inches and 2-inches.

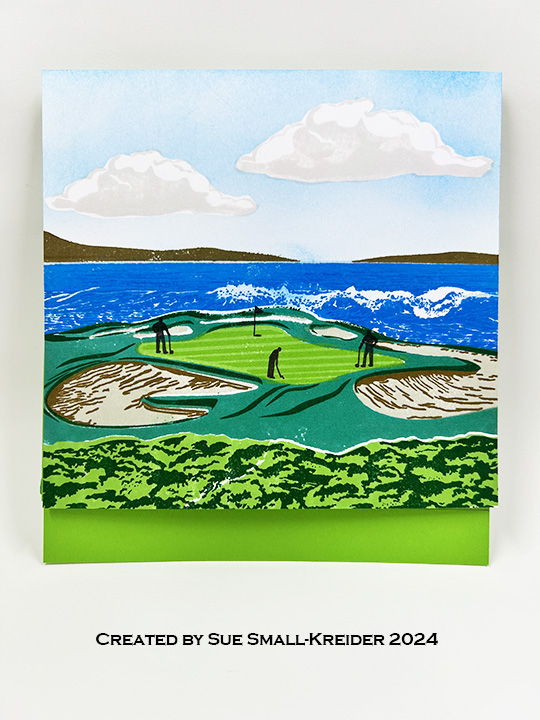
Stamped Scene: Watch the assembly video (Google YouTube video March 2018 Flash Release – Golf Course Layered Stamps) for stamping The Ton’s Golf Course Layering Stamps. Cut a 6×6-inch panel of thick white cardstock to stamp onto. (I masked off the clouds before ink blending the blue sky from the top down, keeping the horizon line almost white.) Trim off stamped panel to 5×5-inches and adhere to the smaller fold edge of cardbase.

Bam Box Golf Tee: (Watch assembly video at the bottom of each of these linked die sets before starting.) Using the smaller of Karen Burniston’s bam boxes, make one from the same green cardstock as the cardbase. From the Sports Charms die set, cut the golf ball charm from white cardstock and emboss using an embossing sandwich on your die-cutting machine. Cut three of the blue tees and glue together with golf ball sandwiched between layers. Cut two of the grassy strips from the Easter Borders set in darker green and glue them slightly askew so that there are two layers of grass blades visible.

Attach bam box to cardbase positioning it so that the stamped panel will cover it when folded shut. Adhere the grass strip to bam box side with glue. Trim off any excess grass at card edges. Glue golf ball on tee to grass covered bam box.

Sentiment: Using the two shades of green cardstock, cut two of the Happy Birthday Shadow from the cardbase green and one of the Happy Birthday words from the darker green.  Glue together. Position the thick sentiment so that it will act as the easel stop to hold the stamped panel upright.

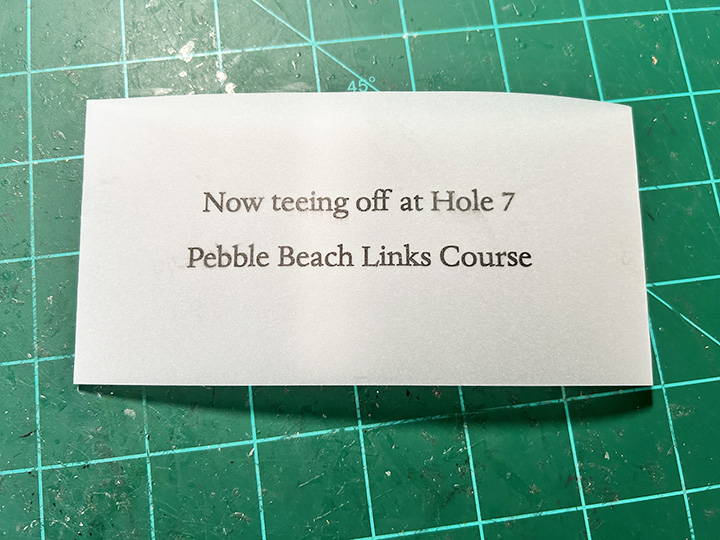
Belly Band: The “Now teeing off at Hole 7 of the Pebble Beach Links course” was digitally printed onto a 3x 8 1/2-inch stripe of clear vellum. Next the strip was wrapped around the closed card and glued in back.

__________________________________________

Thank you for reading this blog post. I hope this inspires you and makes you smile.

Please like and leave comments 😊

__________________________________________

Materials Used:

Dies

Stamps

  • The Ton – Clear Stamps – Golf Course Layering Stamps

Papers

  • Blue, Greens and White Cardstock
  • Clear Vellum

Ink

  • Hero Arts – Alcohol-Marker Friendly Ink Pad – Intense Black
  • Simon Says Stamp – Premium Dye Ink Pad – Aegean, Fairway, Fog & Surf Blue
  • Stampin’ Up – Classic Ink Pad – Blueberry Bushel, Pacific Point, Sahara Sand, Shaded Spruce & Soft Suede
  • Ranger – Tim Holtz – Distress Ink- Salty Ocean

Adhesives

Tools

  • Die Cutting Machine
  • Paper Cutter
  • Bone Folder
  • Craft Mat
  • Craft Clips
  • Stamping Platform
  • Blending Brush
  • Paper Masking Tape
  • Scissors

Miscellaneous

Butterfly Tree Pop-UP

This card was made for Craft Roulette #175 whose parameters included a 4.25-inch project, Craft Roulette colors, a night element and a bottom border.

For this pop-up butterfly tree in a box, I used Karen Burniston’s large Bam Box Pop-Up, Butterfly Collage Add-ons, and leaves from Fun Flowers and Twist Flower Pop-Up. The tag is from the Tag Book Pop-Up. (I have made a Christmas tree like this project. Click here to see blog post.)

Box: The box is made of double-sided decorative cardstock cut into two 12 x 4 inches rectangles scored and folded at 3 inches, 4 inches, 8 inches and 9 inches. The middle squares are glued together to form a cross. Using strips of decorative paper for pull ribbons glued to the middle of each flap, I glued the remainder of the strips as a bottom flap border. Two adhesive-backed hook and ladder fasteners are the closures.

Tree: Utilizing the Bam Box die set, I cut six of the bam box strips, 13 of the bam box decorative rectangles and three each of the largest two fancy circles in the set from green cardstock. Because I like to let the glue dry before adding the rubber bands to bam boxes, I glue in stages. (See assembly video located at the bottom of the linked page and source of tiny rubber bands.)

Glue the decorative panels to the sides of each bam box for added thickness. (By sides I mean the sides that have the diagonal flap beside them. Not the side that has the smiley face or its parallel side.) These will be the sides seen between the layers of circles.

To assemble the tree, mark in pencil the location of the bam boxes on the bottom of each circle except one of the largest. Glue bam boxes to bottoms of five circles. The sixth bam box will be the top and the leftover, large circle will be the bottom.

To finish the tree assembly, alternate the direction of the diagonal inside flaps of the bam boxes, so that they make a zig-zag pattern when looked at from the side. By alternating the direction, the bam boxes will fold flat, and the tree will flatten into an oval shape. Use glue to attach each level. Once the tree is assembled, close or flatten the tree to position it on to a 4-inch square of green decorative paper that acts as the base for when the tree is in the box. Glue the tree to the square base.

Butterflies: (Watch the video at the bottom the linked page before starting.) Using the Butterfly Collage Add-ons die set, die cut all the dies from one color of doubled sided paper. Repeat with three other colors of paper. Die cut from black all non-moving butterflies four times.

Assembling the non-moving butterflies, use the black pieces as the base that the trimmed colored paper wings are glued to. On the double-winged one bend the wings up from the black body.

To attach the butteries to the tree, play with the positioning of the fluttering large butterflies on the tree in the closed position. If the butterfly stays within the green square base, it can be glued in place. I found that the flutter butterfly piece with the slot cut into it needs to be the piece glued to the tree, making sure the slot is not obstructed so the other piece can freely flutter.

I used green leaves cut from the decorative base paper to fill-in areas of the circles that were too close to the square’s edge when closed. Add in non-moving butterflies checking their position when tree is closed and that they are not creating catchpoints for fluttering butterflies.

Tag: My favorite gift tag to use for sentiments is in the Tag Book Pop-Up set. I stamped and heat embossed the sentiment. Baker’s twine was used to tie the tag onto the pull-up loop.

Thank you for reading this blog post. I hope it has provided some inspiration.

Materials Used:

Dies

Stamps

  • Waffle Flower – Clear Stamps – Sweet Sentiments -271296

Papers

  • Stampin’ Up – 12 x12 Double-sided Designer Series Papers – Stargazing
  • Craft Consortium – A4 Solids Double-Sided Paper Pad – Candy Christmas
  • Green 110 lb. Cardstock
  • Black Cardstock Scraps

Ink

  • VersaMark – Watermark Stamp Pad

Embossing Poweder

  • Cosmic Shimmer – Detail Embossing Powder – Detail Bright Gold

Adhesives

Tools

  • Die Cutting Machine
  • We R Memories – QuickStick
  • We R Memories – Scoring Board and Trimmer
  • Bone Folder
  • Small Clips
  • Stamping Platform
  • LDRS – Stampendable Stamping Tool
  • Stamping Cloth
  • Kat Scrappiness – Anti-Static Tool

Miscellaneous

Mother’s Day Flower Cart

It’s time for the Karen Burniston design team challenge for May 2023 with the theme of BEJEWELED.

My inspiration for this card was drawn from a similar cart made by a crafting friend Diana Bentham several years ago and a video by Anna Griffin.

Cart Drawer: The cart is based around the Slider Box. Watch the assembly video before die-cutting pieces. I used blue 100 lb. cardstock for the box and 65 lb. white cardstock for the drawer. A piece of sheer blue ribbon was used as a drawer pull. A Bam Box (see assembly video) is what pops up the message of “Thank you love you.” The sentiment is from Word Set 13 – Snow and Word Set 1 – Greetings while the rectangle is cut using one of the slider box decorative dies. Another decorative die with crosshatches was used to line the drawer with a polka dotted pink paper. The front of the drawer is decorated with the scrap from cutting the scalloped roof.

Cart Base: The cart’s frame made by die-cutting two of the Fancy Label Accordion panels and removing the center pivot panel to create a square frame with a tab on one side. Fold in half with tab side facing up. Glue the u-shape together. I took the two smallest of the off-cuts from the die cut to make the cart handles. (Glue the pieces back-to-back for stability.) Glue handles on to slider box at open end before adhering the u-shape frame to slider box.

Flowers and Pails: The flowers were cut from two shades of pink greeting card envelopes that I upcycled. The dies used come from three different sets – Flutter Charms, Flowers and Bee, and Flower Pot Pop-Up. (The flowers in Flowers and Bee and the Flower Pot Pop-Up are the same.) I used yellow posy flatback gems as the larger flower centers and sparkly resin gems for the smaller flowers. You can create some dimension to the flowers by shaping them with your fingers. I glued flowers on to scrap pieces of green cardstock that were glued into the silver pails.

The pails are cut from another upcycled envelope of holographic silver using the pail from the Adirondak Chair Pop-Up. I cut a front and a back for each pail, plus four more single-sided pails, cutting 16 pails total. Flowers are glued on both front and back of the six pails that line the cart’s sides. Four pails are glued to a small cube I made from matte silver cardstock and adhered to the center of the cart’s tabletop.

Roof Frame: The striped roof awning is cut from some digital striped paper using the large scalloped edged rectangle in the Rectangles and Labels – Crosshatch set. It is held up by a frame made by die-cutting two of the Fancy Label Accordion in white cardstock and cutting off the center pivot panel and side tab. (My cardstock was lightweight, so I cut a third frame and cut it in half to back the lower portion of my frames.)

Fold each of the frames at 2 3/4-inches. Glue the frames on to the sides of the cart base, lining up the bottom edge of the white frame to the inside edge of the blue cart frame.

Cut three strips of white cardstock 1 1/2-inches long by 1/2-inch wide. Fold each strip in half. Pinch the top halves of the roof frames towards each other to form triangular frame. Glue together with the three strips. Scraps from the die-cutting of the scalloped roof were used to decorate the cart sides.

Roof Sign: For the roof sign the “Happy Mother’s Day” was die cut twice using a deep blue foiled cardstock glued to two of the crosshatch fancy label from the Rectangles and Labels – Crosshatch set. A strip of white cardstock 5-inches long by 1/2-inch wide was folded in half and then the folded end was sandwiched between the two fancy labels and the labels adhered together. (You now have the equivalent of a large paper brad with two legs.) A slit was cut in the roof fold center for the legs of the sign to slide through and be glued to the underside of the roof.

Message Label:  A personal message can be written on the front of the cart’s label made from the smallest of the fancy labels in the Rectangles and Labels – Crosshatch set and the green mat from the dotted label from the Label Charm Pop-Up set.

Wheels: For the wheels I made a template using middle plain and crosshatched circles from the Circles – Crosshatch set. Cut the plain circle from scrap paper and the place the crosshatch circle die in the middle of the paper circle. Trace around the center of crosshatch die. Fold the paper in half, then half again and once more in half to come up with eight sections of the circle. Using a see-through ruler, mark and draw 5mm wide spokes interesting in the middle of the circle.

Die-cut from brown mirror or foil cardstock two plain circles. On the back side of the circles use the paper template to trace the triangles that need to be cute out using a craft knife and straight edge. Color the back of the wheels with black marker.

Die cut two black circles using the larger of the circles from either the Flowers and Bee or the Flower Pot Pop-Up set. These will be the wheel hubs. Top hubs with Nuvo Drops and flat-backed pearls.(Allow Nuvo Drops to dry 24 hours before gluing onto cart.)

Glue wheels onto cart’s front posts. Trim off posts just below wheel hubs.

Finished Measurements: This is card/gift box is designed to hand delivered and measures 8-inches high, 6 1/2-inches wide and 3-inches deep.

Thank you for reading this blog post. I hope this inspires you and makes you smile. Please like and leave comments 😊

For more Slider Box creations click here.

Materials Used:

Dies

Papers

  • Spellbinders-Color Essentials Cardstock – 100 lb – Raindrop -CS-019
  • White, Black and Green Cardstock Scraps
  • Pink and Silver Holographic Recycled Envelopes
  • Brown and Deep Blue Mirror/Foil Cardstock
  • Matte Silver Cardstock
  • Ully Cat Designs – Digital 8.5×11 Cardstock – Blue Awning Stripes

Pens/Gels

  • Sharpie – Permanent Marker Chisel Tip – Black
  • Nuvo Jewel Drops – Coco Blush

Adhesives

Tools

  • Die Cutting Machine
  • Quickstik Tool
  • Scissors
  • Tweezers
  • Metal Ruler
  • Craft Knife
  • Pencil

Bling

  • Queen & Co. – Posies Topping – Golden
  • Craft Consortium – Designed by Hackney & Co. – Enamel Dots – Gardener Delight
  • Stampin’ Up – Wonderful Gems
  • Blue Sheer Ribbon 5/8-Inch Wide

A Poppin’ Birthday Card From Cats

A Poppin’ Birthday Card From Cats

Every so often, I get a commission’s from cats for cards for their human family. This card was a birthday card for their cat mom.

My inspiration for the card is from the stamped image on the back of the card by Dominic Phillips called Bad Cats Club which has a preciously stacked set of wooden crates with cats perched on them. (I also drew engineering inspiration from Karen Burniston’s March 4, 2023 virtual class for the stacked cubes.) To recreate this image in a 3D form, I used Karen Burniston’s Surprise Cube Pop-Up and Bam-Box Pop-Up dies and cats cut from paper and washi tape. The card is a gusseted slimline card with string wrapped closure.

Card Base: Because I was using specialty cardstocks that were 5 1/2 x 8 1/2-inches, I cut two 3 3/4 x 8 1/2-inches pieces and one gusset strip of 3/4×8 1/2-inches. The gusset strip was scored and folded lengthwise at 1/4-inch and 1/2-inch. The 1/4-inch tabs on the gusset strip were glued to the long backsides of the bronze metallic piece and woodgrain piece. Next, I worked on the flap closure. The inside of the card base is covered with a wide map pattern washi tape.

Flap: I watched the assembly video for the Long Flap and Closure before I began the flap assembly. A long flap and six spacers were cut from brown cardstock using Karen Burniston’s Long Flap and Closure die set. A decorative flap inset piece was cut from the woodgrain cardstock and another for the inside of the flap from brown cardstock. I used two long brass brads that I had to trim the legs to make them fit the card using metal cutting snips. The star decorative piece under the brads is from the Surprise Cube Pop-Up and pushed up from the cardbase by three spacers glued together. (Remember to think through the assembly of the card so that you have papers to cover over the brad legs. Also remember to add your string before covering the brad legs with a decorative paper.)

Tower of Crates: For the pop-up cubes I watched the Surprise Cube assembly video and Bam Box assembly video before starting. From discussion with Karen Burniston on her Pop-Up Peeps Facebook page, I learned that as long as the cubes would fit into the cardbase when folded flat, you could glue the cubes in any manner. (Let the glue set-up before you test your cube tower opening….I had to glue my tower a few times because I was impatient and the power of three rubber bands was pretty strong.) I cut the decorative woodgrain papers from scraps I had in my stash. The cats were fussy cut from some printed papers in my stash and from some washi tape. The top cat is glued to a Bam Box which is glued to the top cube. (I attached the tower with a brad through the bottom cube and card base, much like you would for a ball pop-up animal that you want to be able to turn.)

Sentiments: I used the Happy Birthday die set by Karen Burniston and the paw prints from the Doghouse Tiny House Add-ons for the inside sentiments. The stamped sentiments outside came from the Bad Cats Club set and a Happy Meowther’s Day set.

This card will be delivered in person, so no envelope was created for it.

Thank you for reading this blog post. I hope this gives you inspiration and makes you smile. Please like and leave comments 😊

Materials Used:

Dies

Stamps

  • AALL & CREATE – Designed by Dominic Phillips – Bad Cats Club – #793
  • Simon Says Stamp – Clear Stamps – Happy Meowther’s Day – sss202293c

Papers

Ink

  • Stampin’ Up – Classic Stampin’ Pad – Early Espresso

Adhesives

Tools

  • Die Cutting Machine
  • Scoring Board and Tool
  • Stamping Platform
  • Scissors
  • Piercing Tool
  • Metal Cutting Snips
  • Small Crafting Clips

Miscellaneous

  • #8 Rubber Bands
  • Fun Stampers Journey – Journey Thread – Beach Breeze
  • Washi Tape – Old Maps – 2 3/8-Inches Wide
  • Washi Tape – Cat Life – 1 3/8-Inches Wide