Trimming the Christmas Tree

Welcome to our Karen Burniston Products – KB Riley LLC October 2024 Release Blog Hop. (See GIVEAWAY details at the end of this post for blog hop list.) The Design Team have come together with Karen today for a fun blog hop to celebrate the release of 10 new dies and 5 new stamp sets. Sneak peeks of the new release started last week, and the dies are available to order NOW!

This is a special card that creates a 6×6-inch miniature scene of trimming the Christmas tree. (I think the people must have stepped out to get some hot cocoa.) There are dangling ornaments (or baubles) along with a colorful paper chain and a strand of lights. These are all created with dies from the new release – Christmas Tree Add-Ons, Charm Rings, Snow Charms and Penguin and Reindeer Snowman Add-Ons. The stamped sentiment is from the new Season of Cheer stamp set.

(While it uses multiple die sets, you could make a smaller card with the tree and furniture or the tree next to the fireplace.)

Watch the process video to see how I made this card.

Cardbase: From 100 lb. cardstock cut two 6 x 6 1/2-inch rectangles, one 6 x12-inch rectangle, and one 6 x 5 1/2-inch rectangle. Watch video to see the order of assembly of pieces and when to cover pieces with decorative paper.

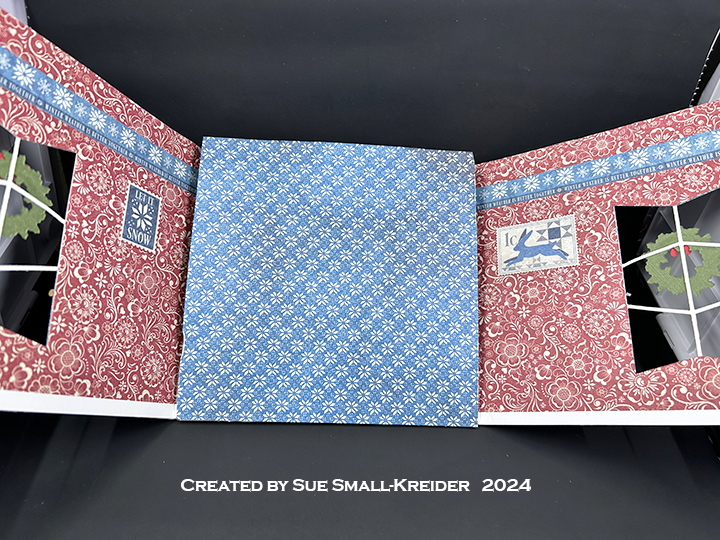
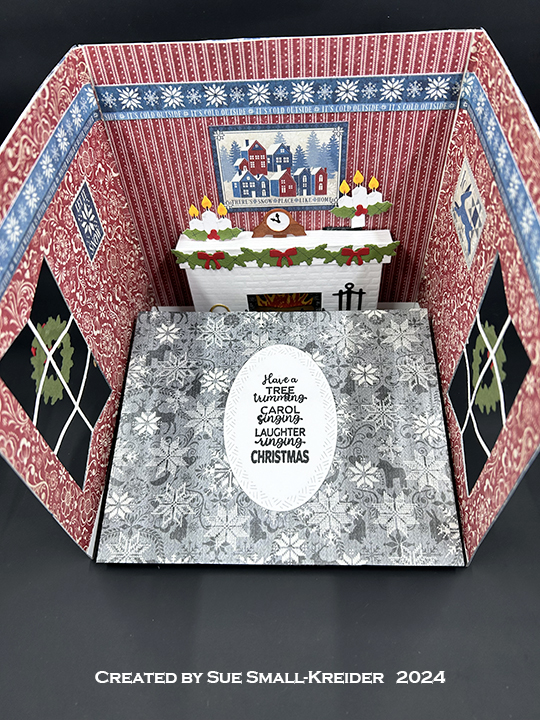
Windows: Using the Bitty Ball Double-Ups large die, cut windows into the two 6 x 6 1/2-inch rectangles of the card base. Wreaths from Fireplace Extras 2 and bows from Fireplace Extras 1 decorate the windows while a sled from the Snow Charms decorates the wall.

Fireplace: The fireplace is made and decorated using the Fireplace Pop-Up, Fireplace Extras 1 and Fireplace Extras 2 die sets. (Watch assembly videos on the dies’ linked pages.)

Sofa and Table: The sofa and table are made using the Family Room Pop-Up die set and modifying the chair into a table by not adding the chair seat and back piece. The tabletop is the waste piece from the sofa section of the base. For the plate of gingerbread men, cut the plate using the smallest circle die in the Crosshatch Circles die set. There are three different die sets that have gingerbread men of about the same size. Any set will work – Gingerbread Tiny House Add-Ons, Winter Charms or Christmas Borders 1. (Watch assembly videos on the dies’ linked pages.)

Tree: The Christmas tree is made using the Christmas Tree Pop-Up with the Christmas Tree Add-Ons and Charm Rings. (The colorful paper chain is made up of all three sizes of paper jump rings in the Charm Rings die set.) For the string of colored lights that is draped across the floor comes from the Penguin and Reindeer Snowman Add-Ons set.

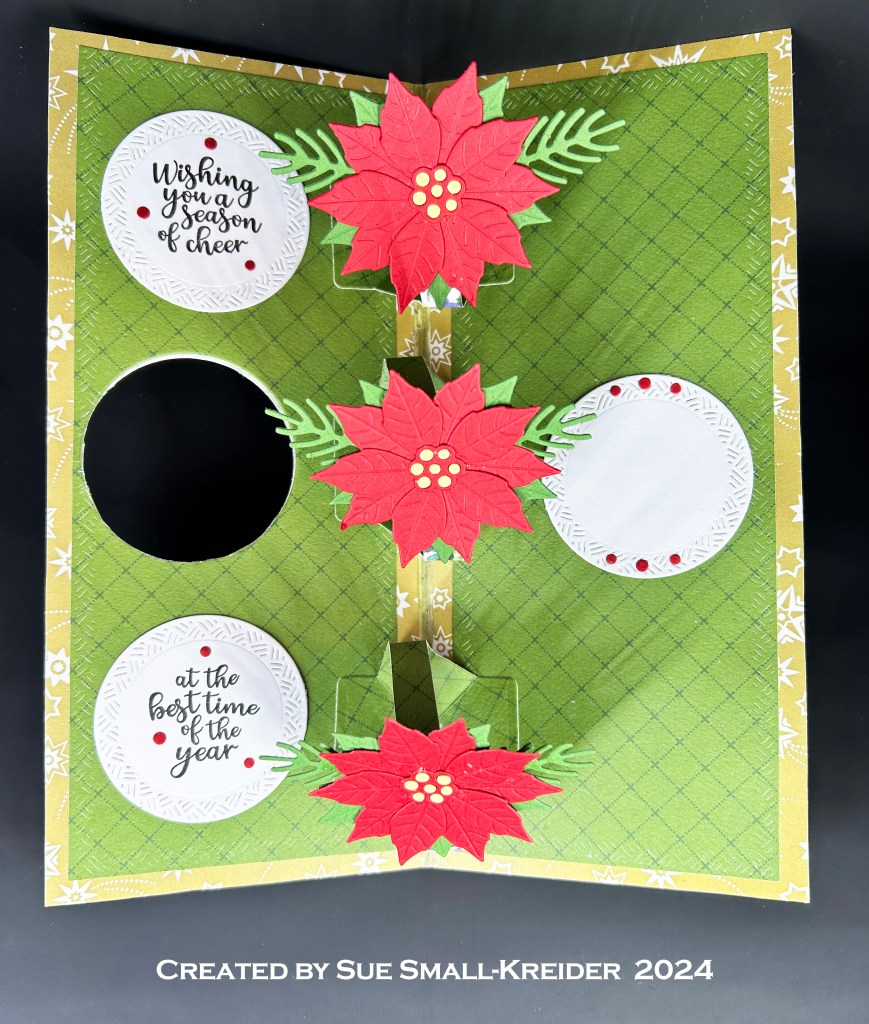
Sentiments: The card uses many sentiments from the Graphic 45 paper collection, but the main inside sentiment comes as the card is opened to reveal the fireplace with β€œHave a tree trimming, carol singing, laughter ringing Christmasβ€œ stamped on an oval rug using the Season of Cheer stamp set.

Envelope:  The card is thick, so a special padded envelope is needed to mail it.

___________________________________

Thank you for experiencing this blog post.

I hope this inspires you and makes you smile.

Please subscribe, like and leave comments 😊

Follow my YouTube channel, Instagram and Pinterest as well.

___________________________________

Disclaimer: Karen Burniston products are provided free of charge by the manufacturer for review and use. All other items were personally purchased. Compensated affiliate links used where or when possible, meaning I will receive a small percentage commission from these manufacturers at no cost to you. This will allow me to add more content to my YouTube channel and help out a lot. Thank you.

Materials Used:

Dies

Stamps

Papers

  • Bazzill – 12×12 inch Cardstock – Cream
  • Bazzill – 8.5×11 Textured Cardstock – Rain Forest
  • Carta Bella – 12×12 Double-Sided Cardstock – Flora No. 4 – Bold Stems
  • Graphic 45 – 8×8 Double-Sided Cardstock – Back to Basics Lemon Collection Pack
  • Blue, Gold, Green, Magentia, Orange, Red and Silver Foil Cardstock
  • Clear Plastic Packaging
  • Black, Brown and White Cardstock
  • Gold, Greens, Orange, Red and Yellow Cardstock

Ink

  • Catherine Pooler – Premium Archival Ink – Neutral Collection – Midnight
  • Ranger – Tim Holtz – Distress Ink – Lost Shadow and Walnut Stain
  • Creative Craft Products – Alcohol Markers – Dual Tipped – 15 Geranium, 23 Orange, 33 Melon Yellow, 35 Lemon Yellow, CG5 Cool Grey
  • Paper Mate – Liquid Paper – White
  • Mont Marte – Dual Tip Art Marker – B7 Aegean Blue, G7 Kelly Green
  • Nuvo – Alcohol-Marker – 428 Blueprint
  • Pigma – Mircon 01 Fine Tip Pen – Black
  • Sharpie – Permanent Marker – Ultra Fine Tip – Black and Red
  • White Chalk
  • Nuvo- Glitter Gloss

Adhesives

Tools

  • Die Cutting Machine
  • Paper Trimmer
  • Bone Folder
  • Score Board
  • Stamping Blocks
  • Scissors
  • Pencil
  • T-Ruler
  • Craft Mat
  • Sponge Daubers
  • Paper Masking Tape
  • Tweezers
  • We R Memories – QuickStick

Miscellaneous

  • Green Embroidery Floss

GIVEAWAY:

To celebrate the release Karen Burniston and each of the Karen Burniston – KB Riley LLC Design Team members will be giving away a $25 Gift Certificate to some lucky person who comments on our blog posts, so make sure you join the hop and comment on everyone’s blog post. Winners will be randomly chosen from ALL of the blog hop comments received on our blog posts by Monday,4th November 2024. Lots of chances to win some goodies, so just leave a comment on this post or any other blog hop posts to enter! Don’t forget to leave some way for us to contact you, in case you are a lucky winner!

Karen Burniston – https://karenburniston.typepad.com/i_am_not_lefthanded/2024/10/karen-burniston-october-2024-release-blog-hop.html

Lois Bak – https://clownmomcreations.blogspot.com/2024/10/karen-burniston-kb-riley-llc-october.html

Sue Small-Kreider – YOU ARE HERE

Frances Byrne – https://stampowl.blogspot.com/2024/10/karen-burniston-kb-riley-llc-october.html

Jennifer Webster – https://www.jlwebstercreations.com/2024/10/karen-burniston-kb-riley-llc-october.html

Suzanne Smit – https://knutselsuus.blogspot.com/2024/10/kb-riley-llc-october-release-blog-hop.html

Nicky Foden – https://mymessycraftroomme.wordpress.com/?p=7257&preview=true

Sandy Diller – https://sandydiller.blogspot.com/2024/10/blog-hop-and-new-release.html

Ken Chien – https://www.instagram.com/gogoro_bricks

A Light-Up Christmas Card

This card was made for Craft Roulette #238 whose parameters included collage, Italian restaurant colors, short element and diagonal lines.

Watch the video to see how I made this card.

Cardbase: I used a 11 x 4 1/4-rectangle folded in half to form a top-fold A2 (4 1/4 x 5 1/2-inch) card. The top panel was folded in half to form the easel.

Lights: Use one Pear Blossom Press Halo Light attaching to the front of the easel cardbase with double-sided tape. Cut a piece of white cardstock to cover the battery and button. Stamp the “Press Here” over where button is and attach with double-sided tape to battery case.

Wreath: Cut at least 20 pine tree branches from different shades of green. Cut a circle frame using the fourth and fifth larges circle dies and glue the pine branches around the circle. Attach the wreath to halo light with foam squares. Decorate with red dots and robin cut from decorative papers.

Sentiments: β€œWishing you a season of cheer” is from a new Karen Burniston stamps set Season of Cheer. The “Press Here” stamp is from Pear Blossom Press.

Envelope: The card fits into an A2 (4 1/4 x 5 1/2-inch) size envelope.

___________________________________

Thank you for experiencing this blog post.

I hope this inspires you and makes you smile.

Please subscribe, like and leave comments 😊

Follow my YouTube channel, Instagram and Pinterest as well.

___________________________________

Disclaimer: Karen Burniston products are provided free of charge by the manufacturer for review and use. All other items were personally purchased. Compensated affiliate links used where or when possible, meaning I will receive a small percentage commission from these manufacturers at no cost to you. This will allow me to add more content to my YouTube channel and help out a lot. Thank you.

Materials Used:

Dies

Stamps

Papers

  • Stamperia – 12×12 Double-Sided Papers- Winter Botanic
  • White Cardstock
  • Fraser Papers for William House – A2 Envelope – Genesis Text Milkweed Smooth

Ink

  • Hero Arts – Alcohol-Marker Friendly Ink Pad – Intense Black
  • Pigma – Mircon 01 Fine Tip Pen – Black

Adhesives

Tools

  • Die Cutting Machine
  • Paper Trimmer
  • Bone Folder
  • Stamping Platform
  • LDRS – Stampendable Stamping Tool
  • Scissors
  • Paper Masking Tape

Miscellaneous

  • Pear Blossom Press – Halo Light

Celebrating the New Year of 2025!

It’s Sneak Peak Week for Karen Burniston’s October 2024 release of new dies and sentiment stamps. These dies will be available for purchase on October 28, 2024 on the KB Riley LLC website.

Celebrate the new year early with this glittery card that fills the night sky with fireworks and a fun celebration.

Watch the process video to see how this card was made.

Cardbase: The cardbase is an 8.5x 5.5-inch rectangle of black cardstock that was scored and folded in half to form a side-fold A2 (4.25x 5.5-inches) card.

Fireworks Pop-Up: Inside the card is a fireworks pop-up made with the Fireworks and Photo Fan Pop-Up sets.

Sentiments: β€œ2025” was cut using the Numbers dies set while the β€œHappy New Year” used the new layered Happy New Year set. The card is decorated with stars from the Fireworks set and confetti streamers from the Photo Fan Pop-Up set.

Envelope:  The card fits into an A2 (4.25x 5.5-inches) size envelope.

___________________________________

Thank you for experiencing this blog post.

I hope this inspires you and makes you smile.

Please subscribe, like and leave comments 😊

Follow my YouTube channel, Instagram and Pinterest as well.

___________________________________

Disclaimer: Karen Burniston products are provided free of charge by the manufacturer for review and use. All other items were personally purchased. Compensated affiliate links used where or when possible, meaning I will receive a small percentage commission from these manufacturers at no cost to you. This will allow me to add more content to my YouTube channel and help out a lot. Thank you.

Materials Used:

Dies

Papers

  • American Crafts – 12×12 Patterned Paper – Starry Night – 320409
  • DCWV – Mat Stack 6×6 – Glitter Cardstock – Glitter Pastels
  • DCWV – Mat Stack 4.5×6.5 – Glitter Cardstock – The Spooky Time
  • Black and White Cardstock
  • A2 Envelope

Ink

Adhesives

Tools

  • Die Cutting Machine
  • Paper Trimmer
  • Score Board
  • Stamping Blocks used as paperweights
  • Scissors
  • Paper Masking Tape
  • Glue Eraser

Triple Poinsettia Slimline Card

It’s Sneak Peak Week for Karen Burniston’s October 2024 release of new dies and sentiment stamps. These dies will be available for purchase on October 28, 2024 on the KB Riley LLC website.

Today’s card uses the new Poinsettia dies set and the Season of Cheer and Special Delivery stamp sets with the previously released Twist Flower Pop-Up die set.

Watch the process video to see how this card was made.

Cardbase:  Cut a 7 3/4 x 8 3/4-inch rectangle from light weight cardstock. Fold in half to form a 3 7/8 x 8 3/4-inch side-fold card. Cover the inside panels with gold patterned paper then use the largest of the Long Rectangles – Crosshatch dies to cut two green patterned paper mats for the inside. Cover the outside panels with holly patterned paper. Using the second smallest crosshatch circle in the Circles – Crosshatch die set to cut a window thru the card front by centering the circle die between 3 1/4-inches and 5 1/2-inches from the top of the card and 1/4-inch from the right side of the card.

Poinsettias: Cut six of the smaller flower die from red using the new Poinsettia die set. Cut three of the smaller flower from green. Cut 3 of the flower center from red and three more from yellow backed with double-sided adhesive. (You can glue these yellow dots in if you don’t have double sided adhesive.) Cut six of the small pine branches from green.  Watch YouTube video above for assembly instructions.

Flower Twist Pop Mechanisms:  Cut three mechanisms using the Twist Flower Pop-Up die set. (If using a double-side paper, cut three 1/2-inch by 1 1/2-inch strips of the same paper.) Assemble as shown in assembly video at the bottom of this linked page. Attach center mechanism to show flower through the front circle window. Space out the other two mechanisms on either side and check for catchpoints before permanently gluing into card.

Sentiments:  β€œMerry Christmas” is a previously released die set by Karen Burniston. The inside stamps come from the new stamp set Season of Cheer. The red dots are leftover from the flower centers. The “Made with Love” stamp on the card back is from the new Special Delivery stamp set.

Envelope:  The card fits into #10 business size envelope. I decorated the back flap by covering it with gold paper and leftover fir branches and red dots from the flower centers.

___________________________________

Thank you for experiencing this blog post.

I hope this inspires you and makes you smile.

Please subscribe, like and leave comments 😊

Follow my YouTube channel, Instagram and Pinterest as well.

___________________________________

Disclaimer: Karen Burniston products are provided free of charge by the manufacturer for review and use. All other items were personally purchased. Compensated affiliate links used where or when possible, meaning I will receive a small percentage commission from these manufacturers at no cost to you. This will allow me to add more content to my YouTube channel and help out a lot. Thank you.

Materials Used:

Dies

Stamps

Papers

  • Bazzill – 8.5×11 Cardstock – Gumdrop 5-5154
  • Carta Bella – 12×12 Double-Sided Cardstock – Flora No. 4 – Bold Stems
  • Craft Consortium – 12×12 Double-Sided Cardstock designed by Linsey Kelly – Tis the Season
  • Fun Stampers Journey – 8.5×11 Cardstock – Cranberry Bliss
  • Yellow and White Cardstock
  • #10 Business Envelope – Ivory

Ink

  • Hero Arts – Alcohol-Marker Friendly Ink Pad – Intense Black
  • Ranger – Tim Holtz – Distress Oxide- Forest Moss and Lumberjack Plaid
  • American Crafts – Metallic Marker – Gold
  • Pigma – Mircon 005 Fine Tip Pen – Black

Adhesives

Tools

  • Die Cutting Machine
  • Paper Trimmer
  • Bone Folder
  • Score Board
  • Stamping Platform
  • LDRS – Stampendable Stamping Tool
  • Stamping Blocks used as paperweights
  • Scissors
  • Pencil
  • Craft Mat
  • Sponge Daubers
  • Paper Masking Tape
  • Metal Ruler
  • We R Memories – QuickStick
  • Tweezers

Special Delivery Pop-Up Card

It’s Sneak Peak Week for Karen Burniston’s October 2024 release of new dies and sentiment stamps. These dies will be available for purchase on October 28, 2024 on the KB Riley LLC website.

For this baby card I used the new Postage Pop-Up die set and Special Delivery stamp set along with the previously released Baby Charms, Welcome and Mini Alphabet and Numbers die sets.

Watch the process video to see how I made this card.

Cardbase: Cut a 7 1/2 x 5-inch piece and three 7 x 5-inch pieces of decorative cardstock. Score and fold the larger piece at 7-inches to form a tab. Glue the tab to one of the other pieces of decorative cardstock to form a horizontal or landscape side-fold card.  Glue the remaining pieces to the inside of the card.

Pop-up Blocks: From the Postage Pop-Up die set, cut four of the square block pop-up mechanisms from kraft cardstock and four of the tabbed pull strips from the decorative cardstock to match the inside of cardstock of the card. Install as shown in the video.

Decorations:  The bottle, onesie outfit and duck are all cut using the Baby Charms die set.

Sentiments: Β β€œMy heart soars with joy for you” on the card front comes from the Special Delivery stamp set as does the β€œMade with Love” circle stamp on the card back.Β  The β€œWelcome Baby” inside is all die cut using the Mini Alphabet and Welcome die sets.

Envelope:  The card fits into an A7 (5 x 7-inch) size envelope. The back flap is decorated with a yellow die-cut duck from the Baby Charms set.

___________________________________

Thank you for experiencing this blog post.

I hope this inspires you and makes you smile.

Please like and leave comments 😊

___________________________________

Disclaimer: Karen Burniston products are provided free of charge by the manufacturer for review and use. All other items were personally purchased. Compensated affiliate links used where or when possible, meaning I will receive a small percentage commission from these manufacturers at no cost to you. This will allow me to add more content to my YouTube channel and help out a lot. Thank you.

Materials Used:

Dies

Stamps

Papers

  • Carta Bella – 12×12 inch Double-Sided Cardstock – Farmhouse Living Collection – Farm Grown
  • Bazzill – 12×12 inch Cardstock – Sand Dollar
  • Craft Consortium – A4 Double-Sided Solids Cardstock – Little Red Robin
  • Craft Consortium – A4 Double-Sided Solids Cardstock – Tis The Season
  • White Cardstock
  • Recollections – A7 Cardbase and Envelope – Cream

Ink

  • Hero Arts – Alcohol-Marker Friendly Ink Pad – Intense Black
  • Ranger – Tim Holtz – Distress Ink – Fossilized Amber, Lost Shadow, Salty Ocean and Twisted Citron
  • Pigma – Mircon 005 Fine Tip Pen – Black
  • Sharpie – Permanent Marker – Ultra Fine Tip –Light Green, Orange and Yellow

Adhesives

Tools

  • Die Cutting Machine
  • Paper Trimmer
  • Bone Folder
  • Score Board
  • Stamping Platform
  • LDRS – Stampendable Stamping Tool
  • Stamping Blocks
  • Scissors
  • Craft Mat
  • Sponge Daubers
  • Blending Brush
  • We R Memories – QuickStick
  • Paper Masking Tape

Reindeer Games

It’s Sneak Peak Week for Karen Burniston’s October 2024 release of new dies and sentiment stamps. These dies will be available for purchase on October 28, 2024 on the KB Riley LLC website.

This card was inspired by the age-old question pertaining to the Rudolph-The-Red-Nose-Reindeer song – What are reindeer games? My interpretation is Winter games Olympic style with Rudolph winning the sledding race!

Watch the process video to see how this card was made.

Cardbase: The cardbase is an A7 size (5 x 7-inch) purchased card base with decorative papers glued to the four panels. I used the largest rectangle in the Rectangles and Labels – Crosshatch die set to cover the inside of the card and leftover pieces for the outside of the card.

Finish Line Flag Pop-Ups: Two Photo Fans Pop-Ups were created using white cardstock brushed with glitter gloss the arms and decorator pieces. the arm decorator pieces were cut in black and the two sided flags come from the Pirate Ship Add-Ons set. (You can also find a single flag in the Castle Pop-Up set.)

Sitting Reindeer: The sitting reindeer uses the body of the Snowman Pop-Up with the face, antlers, legs and tail from the Penguin and Reindeer Snowman Add-Ons set. The sled is from the Snow Charms set. (If I were to make this card again I would make two sleds and glue them into the card first, placing them so they overlap under the reindeer trimming off the excess front and back sled pieces before gluing the reindeer base over them and into the card.)

Standing Reindeer: Two reindeer were cut using the Christmas Animals die set. One reindeer is assembled on the reverse side so that the reindeer can face each other.

Sentiments: “Reindeer Games” was created using the Mini Alphabet die set while the inside “You’re so Cool” was stamped on a fancy label from the Rectangles and Labels – Crosshatch set with a stamp from the Winter Hugs stamp set. The “Made with Love” circle image on the back of the card is from the Special Delivery stamp set. The blank personal message label is also from the Rectangles and Labels – Crosshatch set. (I didn’t have a piece of matching cardstock wide enough for this label die, so I elected to center the die and cut with flat top and bottom of the label.)

Envelope:  The card fits into an A7 size envelope with the back flap decorated with leftover blue flags.

___________________________________

Thank you for experiencing this blog post.

I hope this inspires you and makes you smile.

Please like and leave comments 😊

___________________________________

Disclaimer: Karen Burniston products are provided free of charge by the manufacturer for review and use. All other items were personally purchased. Compensated affiliate links used where or when possible, meaning I will receive a small percentage commission from these manufacturers at no cost to you. This will allow me to add more content to my YouTube channel and help out a lot. Thank you.

Materials Used:

Dies

Stamps

Papers

  • Carnation Crafts – Merry and Bright from PaperCrafter issue 40
  • Echo Park – 12×12 Double-Sided Cardstock – Bundle of Joy -Peek-A-Boo
  • Silver Foil Cardstock
  • Black, Browns, Cream, Teal Blue, White and Yellows Cardstock
  • Park Lane Paperie – A7 Cardbase and Envelope – White

Ink

  • Hero Arts – Alcohol-Marker Friendly Ink Pad – Intense Black
  • Ranger – Tim Holtz – Distress Ink- Scorched Timber
  • Pigma – Mircon 005 Fine Tip Pen – Black
  • Sharpie – Permanent Marker – Ultra Fine Tip – Black and Red
  • Sakura – Gelly Roll Pen – Medium – White

Adhesives

Tools

  • Die Cutting Machine
  • Paper Trimmer
  • Bone Folder
  • Paperweight
  • Stamping Blocks used as paperweights
  • Scissors
  • We R Memories – QuickStick
  • Sponge Dauber
  • Paper Masking Tape
  • Glue Eraser
  • Pencil

A Gothic Classic Pop-Up Book

This card was made for Craft Roulette #237 whose parameters included a pop-up card, Trick or Treat colors, boutique, and jewelry.

I chose to make Mary Shelley’s gothic novel Frankenstein as a pop-up book card using dies by Scrappy Tails.

Watch the process video to see how I made this card.

Cardbase: The card base is made using the Scrappy Tails A7 Pop up Book die set. (I apologize for not having included video of the frame assembly.) The accordion fold pages frame that goes inside the book card can be seen in an assembly video by the designer by clicking here.

Sentiments: The β€œHalloween Greetings” is a stamp from PoppyStamps. The β€œBoo-tique Books specializing in Gothic Novels” was computer generated and die using a label die from the Scrappy Tails Life is a Story die set.

Envelope: The card fits into a catalog (6×9-inches) size envelope. β€œThis book belongs to…” is stamped in black on the envelope flap.

___________________________________

Thank you for experiencing this blog post.

I hope this inspires you and makes you smile.

Please like and leave comments 😊

___________________________________

Materials Used:

Dies

  • Scrappy Tails – Metal Dies – A7 Pop up Book – Parts 1 & 2
  • Scrappy Tails – Metal Dies – Frankenstein Tomb Stone
  • Scrappy Tails – Metal Dies – A7 Frankenstein CP
  • Scrappy Tails – Metal Dies – Life is a Story CDΒ 

Stamps

  • Papercraft Essentials Magazine Issue 183, January 2020 – The Next Chapter
  • PoppyStamps – Clear Stamps – Bugs and Hisses -CL512

Papers

  • Bazzill – 8.5×11 Cardstock – Tiara -18-1002
  • Concord & 9th – 8.5×11 Cardstock – Dove
  • Craft Perfect – 8.5×11 Pearlescent Cardstock – Glazed Chestnut
  • Fun Stampers Journey – 8.5×11 Cardstock – Tin Pail
  • Recollections – 12×12 inch Glitter Cardstock – White Marble
  • Recollections – 12×12 inch Embossed Cardstock – Kraft
  • The Paper Studio – 12x12Faux Leather – Football
  • Clear Plastic Packaging
  • Black, Blue, Brown, Greens, Purple, Red, White and Yellow Cardstock
  • Catalog (6×9) Envelope – White

Ink

  • Hero Arts – Alcohol-Marker Friendly Ink Pad – Intense Black
  • Simon Says Stamp – Pawsitivity Saturated Ink – Aegean
  • Ranger – Tim Holtz – Distress Ink – Dried Marigold, Forest Moss, Hickory Smoke, Mowed Lawn, Rusty Hinge, Seedless Preserves
  • Pigma – Mircon 005 Fine Tip Pen – Black
  • Sakura – Gelly Roll Pen – Medium – White
  • Sharpie – Permanent Marker – Fine Tip – Black, Yellow
  • Sharpie – Permanent Marker – Ultra Fine Tip –Blue, Greens, Orange, Red,

Adhesives

Tools

  • Die Cutting Machine
  • Paper Trimmer
  • Bone Folder
  • Score Board
  • Stamping Platform
  • Stamping Blocks used as paperweights
  • Scissors

A CAS’ed Birthday Card

This card was made for Craft Roulette #236 whose parameters included use a small bag, cornucopia colors, CAS a card from Craft Roulette #235 submissions and splatters.

Cardbase: I used a purchased 5×7 gatefold cardbase and envelope.

Card Front: Terre’s card in the Craft Roulette #235 Contributions Gallery was the card I based my card front on. I changed up the dark starry paper to a more colorful ink blended background with white splatters instead of star shapes. I used a red ringed planet instead of earth as the center focal point but stamped β€œHBD2U” in the upper left corner, where Terre had put her sentiment, and also in the lower right corner to balance the elements.

Pop-Up Bag: Inside the card is a small gift bag that pops-up to hold a small sealed bag of sequins and shaker elements. The dies that make the bag and the pop-up mechanism arm are by Karen Burniston. The mechanism arm if installed just as it is in the assembly video for the Flip Frame Pop-Up but the Mini Gift Bag back is attached to the arm rather than the frame and the bottom of the bag is glued to the cardbase. The bag is made from thin decorative paper and the handles are hemp cording.

Sentiments: β€œHBD2U” Happy Birthday” and β€œAn itty-bitty gift for your big day!” are all stamped in black ink using the Craft Roulette Funn Sentiments #01 stamp set. The β€œInspired by Craft Roulette, Made by” and cat head stamps are from the Craft Roulette The basics set.

Envelope: The card fits into an A7 (5x 7-inches) size envelope.

___________________________________

Thank you for experiencing this blog post.

I hope this inspires you and makes you smile.

Please like and leave comments 😊

___________________________________

Disclaimer: Karen Burniston products are provided free of charge by the manufacturer for review and use. All other items were personally purchased. Compensated affiliate links used where or when possible, meaning I will receive a small percentage commission from these manufacturers at no cost to you. This will allow me to add more content to my YouTube channel and help out a lot. Thank you.

Materials Used:

Dies

  • Karen Burniston in cahoots with Riley and Company – Mini Gift Bag – 1255
  • Karen Burniston in cahoots with Riley and Company – Flip Frame Pop-Up – 1134

Stamps

  • Craft Roulette – Clear Stamps – Funn Sentiments #01
  • Craft Roulette – Clear Stamps – The Basics

Papers

  • Hot Off The Press – 12×12 Single-Sided Paper – Sun’s Border – HOTP-20551
  • White Cardstock
  • Park Lane Paperie – A7 Cardbase and Envelope – White

Ink

  • Hero Arts – Alcohol-Marker Friendly Ink Pad – Intense Black
  • Ranger – Tim Holtz – Distress Ink- Dried Marigold, Fossilized Amber, Lumberjack Plaid, Twisted Citron
  • Avery Elle – White Ink Spray
  • Pigma – Mircon 01 Fine Tip Pen – Black

Adhesives

Tools

  • Die Cutting Machine
  • Paper Trimmer
  • Bone Folder
  • Stamping Platform
  • LDRS – Stampendable Stamping Tool
  • Stamping Blocks
  • Scissors
  • Craft Mat
  • Paper Masking Tape
  • Blending Brushes
  • Water Mister

Miscellaneous

  • Cousin – D.I.Y. – Natural Hemp Cord #20

Cloth Flower Birthday Card

This card was made for Craft Roulette #234 whose parameters included a 6×6-inch card, rainbow colors, single flower, and cloth.

Watch the process video to see how I made this card.

Cardbase: Β A 6 x 6 1/4-inch rectangle was scored to form a 1/4-inch tab on a 6×6-inch square. The tab was glued onto a 6×6-inch square of white glitter cardstock. Stamped/written on the card back is the “Inspired by Craft Roulette #234, made by SSK 2024” using the stamp from Craft Roulette’s The Basics stamp set. I drew three balloons above th

Sentiments: Β I used the new stamp and dies from Craft Roulette – Funn Sentiments #001 for the outside die-cut “HBD” and inside stamped sentiments.

Envelope: Β The card fits into a catalog (6×9-inch) size envelope that I drew balloons on to the back.

___________________________________

Thank you for experiencing this blog post.

I hope this inspires you and makes you smile.

Please like and leave comments 😊

___________________________________

Disclaimer: Karen Burniston products are provided free of charge by the manufacturer for review and use. All other items were personally purchased. Compensated affiliate links used where or when possible, meaning I will receive a small percentage commission from these manufacturers at no cost to you. This will allow me to add more content to my YouTube channel and help out a lot. Thank you.

Materials Used:

Dies

  • Craft Roulette – Dies – Funn Sentiments #001

Stamps

  • Craft Roulette – Clear Stamps – Funn Sentiments #001
  • Craft Roulette – Clear Stamps – The Basics (used to stamp the back of the card)

Papers

  • PinkFresh Studio – Essentials 8.5×11 inch Glitter Cardstock – Glacier
  • Decorative Packaging Scrap
  • White Cardstock
  • 6×9-inch Envelope – White

Ink

  • Hero Arts – Alcohol-Marker Friendly Ink Pad – Intense Black
  • Pigma – Mircon 01 Fine Tip Pen – Black
  • Scrapbook.com – Shimmer Glitter Brush Marker – Red, Orange Juice, Sunshine Yellow

Adhesives

Tools

  • Die Cutting Machine
  • Paper Trimmer
  • Bone Folder
  • Score Board
  • Stamping Platform
  • LDRS – Stampendable Stamping Tool
  • Stamping Blocks used as paperweights
  • Scissors
  • Paper Masking Tape

Miscellaneous

  • Green Metallic Trim 1/2-inch wide