A Laundry Explosion Box Card for mother’s Day

This card was made for Craft Roulette #213 whose parameters included for hello project, robust colors, workplace element and mixed media. It is intended for young children to give to their mother.

I wanted to use a new Craft Roulette inspired laundry die and stamp set from Trinity Stamps called Loads of Fun.

Box: From a 12 x12-inch square of cardstock, draw lines every 3 7/8-inches on all sides. Draw a 1/4-inch tab on one side flap. Cut as shown on video. On a 6-inch square of cardstock draw lines 1-inch from edge on all sides. Cut lid as shown on video. Assemble as directed on video.

Washing Machine: Cut from glossy white cardstock one washing machine from the laundry die set. Cut the knobs and buttons from black and silver and glue in place. For the box piece the forms the 3D washing machine, cut a piece 8 1/2 x 2-inches. Fold at 3 1/8-inches, 4 1/2-inches and 7 1/2-inches. Cut a piece that will cover the side of the box from glossy white cardstock. Cut another piece of glossy cardstock the width of the top of the washing machine and the length of the top of the box, plus 1/2-inch for the two 1/4-inch tabs. Assemble as shown in video.

Table: Cut a piece of white cardstock 1×6-inches. Score and fold at 1/4-inches, 1 5/8-inches, 3 1/4-inches, and 4 5/8-inches. Glue tab to other end to form cube. Glue onto washer side and floor.  Die-cut, color and assemble laundry soap bottle and box. Using foam squares, attach them to wall atop table.

Basket: Cut four of the laundry basket from the laundry die set in green. Trim off the sides from two of the baskets, fold sides into tabs and glue onto sides of other two basket pieces to form a four-sided box. Cut fabric scraps and form into folded laundry. Glue laundry onto box base and then add glue to inside of basket before placing around folded laundry.

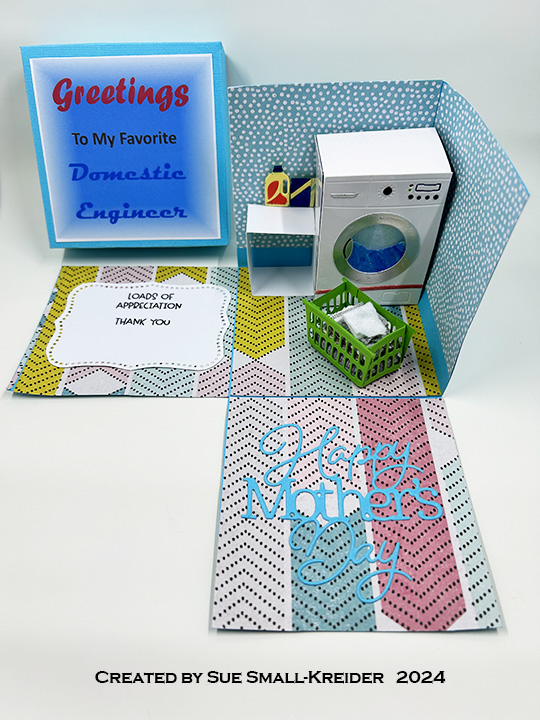
Sentiments: “Loads of Appreciation” and “Thank You” were stamped in black on a white die cut fancy label before being glued onto a box flap. “Happy Mother’s Day” was die cut from a scrap of the blue box cardstock. The “Greetings To My Favorite Domestic Engineer” on the box lid was computer generated.

____________________________________________

Thank you for experiencing this blog post.

I hope this inspires you and makes you smile.

Please like and leave comments 😊

____________________________________________

Materials Used:

Dies

Stamps

Papers

  • American Crafts – 12×12 inch Single-Sided Papers – 341467
  • Core’dinations – 12×12 inch Textured 80lb. Cardstock – Candy Shop Canvas
  • The Paper Cut – 8.5×11 Glossy 10 PT Kromekote Cardstock – White
  • The Paper Studio – 8.5×11 Printed Paper – Random Dot – Robin’s Egg Blue
  • Silver Matte Cardstock
  • Clear Plastic Packaging
  • Black, White and Yellow Cardstock

Ink

  • StazOn – Solvent Ink – Jet Black
  • Scrapbook.com – Glitter Brush Marker –Deep Blue, Frosty Blue, Red Shimmer
  • Sharpie – Permanent Marker – Fine Tip – Black
  • Sharpie – Permanent Marker – Ultra Fine Tip – Black, Green, Red

Adhesives

  • Neutral PH Adhesive by LINECO
  • Fine-Tip Glue Bottle
  • Double-Sided Tape – 1/8-inch wide
  • Foam Squares
  • Clear Tape

Tools

  • Die Cutting Machine
  • Bone Folder
  • Stamping Blocks
  • Scissors
  • Pencil
  • We R Memories – QuickStick
  • T-Ruler
  • Tombow – Mono – Sand Eraser -512A
  • Craft Clips

Miscellaneous

  • Red & White Checkered Ribbon

Time Flies When You Are Having Fun

This card was made for Craft Roulette #211 whose parameters included good tidings, summer colors, mechanical element and tie closure.

This is a retirement card for someone who loves working with mechanical action.

(Please note that the Tonic Craft Kit 59 used in this card is no longer available. The Karen Burniston dies however are still available and links are provided to them.)

Cardbase: I used a purchased A7 (5×7-inch) cardbase and matching envelope. Each of the four panels were covered with coordinating papers in either watermelon pink or rind green. The circle was cut thru the front panel using the clock dial circle die.

Clock: Using three different green cardstock, they were cut with the main clock base die from the Tonic Craft Kit 59. The darkest green was trimmed to just the bottom and side trims, while the green patterned paper had the clock dial circle cut out and two bottom art-deco corner die-cut as well. Matching up the patterned green piece with the light green piece, the clock dial circle was cut in the light green piece. The dark green trim was attached to the patterned green piece before having a piece of clear plastic packaging adhered with thin double-sided tape to its backside. Sandwiching the plastic between the patterned green piece and light green piece by using double-sided tape again. The clock was glued onto the card front matching up the circle apertures.

Moving Gears: I watched Karen Burniston’s Double Spinner video at the bottom of her Mailbox Pop-Up page before adding the spinning gears pop-up to my card. I switched out gear dies from the Tonic Craft Kit 59 set for her fancy labels and gardening charms, but I followed her technique exactly to create the spinning gears. Gears were cut from steel blue and cooper oxidized foil cardstock.

Sentiments: All the sentiments on the front of the card “Time flies when you’re having fun,” and “Happy Retirement” are from the Tonic Craft Kit 59. All stamped in black ink. The sentiments were stamped before the inside mechanical pop-ups were added. The personal message circle uses a large gear cut in blue oxidized metal foil cardstock (Tonic Craft Kit die) and a circle of pale gray cardstock using Karen Burniston’s Crosshatch Circles die set.

Envelope: The back flap was stamped in black ink “TIME to celebrate.”

Thank you for reading this blog post. I hope this inspires you and makes you smile. Please like and leave comments 😊

Materials Used:

Dies

Stamps

  • Tonic Studios – Tonic Craft Kit 59 – Clocks & Cogs

Papers

  • Bazzill – 8.5×11 Textured Cardstock – Easter Grass and Gumdrop
  • Core’dinations – 12×12 inch Single-Sided Paper – Light Green Crosshatch
  • Craft Consortium – A4 Solid Colour Double-Sided Paper – Gardener’s Delight
  • Hunkydory – A4 Single-Sided Mirri Cardstock – Oxidised Metals Collection
  • Keep It Simple – 6×9 Double-Sided Cardstock – Back To Basics Collection Pack – Ruby
  • Keep It Simple – 12×12 Double-Sided Cardstock – Jade Collection Pack – Spearmint: Linen
  • Gold Foil cardstock
  • Green Cardstock
  • Plastic Packaging
  • Park Lane Paperie – A7 Cardbase and Envelope – White

Ink

  • StazOn – Solvent Ink – Jet Black
  • Scrapbook.com – Glitter Brush Marker – Key Lime Green and Pretty Pink
  • Pigma – Mircon 01 Fine Tip Pen – Black

Adhesives

Tools

  • Die Cutting Machine
  • Bone Folder
  • Stamping Platform
  • LDRS – Stampendable Stamping Tool
  • Tweezers
  • Stamping Blocks used as paperweights
  • Scissors

Miscellaneous

  • Organza Ribbon – 1/4-inch wide – Green

Caffeinated Fun!

This card was made for Craft Roulette #210 whose parameters included Project must include action, Northern Lights colors, blackboard element(s) and oval(s).

Below is a recorded live video (37 minutes) that demonstrates how the inside-out card is made.

For a shorter experience watch the Craft Roulette process video below.

___________________________________

Thank you for experiencing this blog post.

I hope this inspires you and makes you smile.

Please like and leave comments 😊

__________________________________________

Materials Used:

Dies

Stamps

  • Crackerbox Stamps – Rubber Stamp – Coffee Cup
  • Riley & Co. – Funny Bones Rubber Stamps – Coffeeology
  • Riley & Co. – Funny Bones Rubber Stamps – If Your Eyes Hurt After Drinking Coffee

Papers

  • Memory Box – 8.5×11 Woodgrain Embossed Cardstock – Kraft
  • Black Cardstock

Ink

  • Ranger – Tim Holtz – Distress Ink- Walnut Stain
  • VersaMark – Watermark Ink Pad
  • American Crafts Embossing Pen
  • White Gel Pen
  • Hero Arts – Embossing Powder – White
  • Stampendous! – Glitter Embossing Powers Kit –  Mermaid Sea

Adhesives

Tools

  • Die Cutting Machine
  • Bone Folder
  • Stamping Platform
  • LDRS – Stampendable Stamping Tool
  • Dry Brush
  • Tweezers
  • Craft Mat
  • Stamping Blocks used as paperweights
  • Kat Scrappiness – Anti-Static Tool
  • Heat Tool
  • Craft Knife
  • Scissors
  • T-Ruler
  • Metal Ruler/Straight-Edge
  • Pencil
  • Tombow – Mono – Sand Eraser -512A

A Card For Craft Roulette Fans

This card was made for Craft Roulette #209 whose parameters included a tri-fold card, sleigh ride colors, joke(s)or funny element and out of proportion. It has a number of insider jokes in it for that Craft Roulette fan to get.

The card uses a purchase A6 cardbase (4.625 in x 6.25 in) as a top fold and two pieces of decorative 6 in x 8 in paper.

_________________________________________________________________

Thank you for experiencing this blog post.

I hope this inspires you and makes you smile.

Please like and leave comments 😊

__________________________________________________________________

Materials Used:

Dies

  • Craft Roulette – Metal Dies – Wheel Factory
  • Sizzix – Tin Holta – Thinlits – Tiny Travel Globe

Stamps

  • Craft Roulette – Clear Stamps – The Basics

Papers

  • BoBunny – 6 in x 8 in Single-Sided Cardstock – Family Heirlooms Collection
  • Park Lane Paperie – A6 Cardbase and Envelope – White
  • Colored and White Cardstock

Ink

  • Hero Arts – Alcohol-Marker Friendly Ink Pad – Intense Black
  • Sharpie – Permanent Marker – Fine Tip – Red
  • Pigma – Mircon 01 Fine Tip Pen – Black

Adhesives

  • Neutral PH Adhesive by LINECO
  • Fine-Tip Glue Bottle
  • Double-Sided Tape -1/2-inch wide
  • Foam Squares

Tools

  • Stamping Blocks
  • Scissors
  • T-Ruler
  • Pencil
  • Tombow – Mono – Sand Eraser -512A
  • Needle Nose Pliers with Wire Cutter

Miscellaneous

  • Tiny Googlie Eyes
  • Striped Paperclip
  • Orange Craft Wire

Egg Shaker Card for Easter

I saw a side-fold of like this card on social media and decided to make my own version using a top fold A6 (4 1/2 x 6 1/4-inches) purchased card base and the egg die from Karen Burniston’s Spring Animals die set.

Cardbase: Using a purchased A6 card base, I used double sided patterned paper from Kat Scrappiness to make a mat frame on the front panel, piecing it together as the patterned paper was 1/2-inch smaller than the card height. Added a yellow 5 3/4 x 4 1/4-inches panel over mat frame. On the back panel, I used the leftover pieces to make an interesting symmetrical design utilizing both patterned sides of the paper.

Egg Panel: A 4×5 1/2-inches rectangle cut from white cardstock, I lightly marked in pencil lines at 1 1/8-inches, 2 3/4-inches and 4 3/8-inches. Along the tops and bottoms of these lines I marked 5/16-inches from the edge. These “T” marks where to center the top or bottom of the egg die. I used the center crack in the egg die to center on the vertical lines.  After die-cutting out the six eggs, I erased the pencil marks. (I found it easier to sketch out the egg placement on the back side of the card, tracing around the die to see if it looked right before die-cutting from the front of the panel.) (I added two clay flower shaker elements to the front of the card.)

Shaker Assembly: Position the white panel over the yellow panel and mark the corners of the white panel on the yellow as well as tracing the egg cut-outs onto the yellow. Using double-sided tape, adhere a 4×5 1/2-inches rectangle of clear acetate/film to the back of the white panel. Add strips of narrow foam tape to create boxes around the traced eggs on yellow panel. Using an anti static tool to apply powder to the inside of each box (including the sides of the sides of the foam tape) and back side of acetate/film on white panel. Add confetti and clay sprinkles to each box, avoid putting too much in each box and level out any high points to below the foam tape level. Holding the card base, carefully peel off the backing paper on the foam tape. Remove any confetti from tape. Using the corner marks on the yellow panel line-up the white panel and adhere to foam tape, sandwiching the confetti inside the boxes. (I like to use the confetti sequins from This Calls For Confetti who have a variety of colors, sizes and finishes and have wonderfully quick customer service/delivery time. They also have the best anti-static tool for making shaker cards.)

Sentiment: I cut out the words only using Karen Burniston’s Happy Easter word die from purple cardstock for the inside of the card.

Envelope: I cut out a sticker from the decorative paper to embellish the back of the envelope flap.

__________________________________________________________

Thank you for reading this blog post. I hope this inspires you and makes you smile.

Please like and leave comments 😊

__________________________________________________________

Materials Used:

Dies

Papers

  • Kat Scrappiness – Slimline Sized Patterned Paper (10.75×4 inches)– Easter on Parade
  • White and Yellow Cardstock
  • Dura-Lar .0005 Clear Film Acetate
  • Park Lane Paperie – A6 Cardbase and Envelope – White

Shaker Elements

  • This Calls For Confetti – Bokeh Bliss Teeny Tiny Mix
  • This Calls For Confetti – Crystal Metallic Aqua Violet
  • This Calls For Confetti – Opaque Iridescent Blue
  • This Calls For Confetti – Opaque Iridescent Blush
  • This Calls For Confetti – Opaque Iridescent Celadon
  • This Calls For Confetti – Opaque Iridescent Scarlet
  • This Calls For Confetti – Opaque Iridescent Vanilla
  • This Calls For Confetti – Opaque Iridescent Blue
  • This Calls For Confetti – Opaque Iridescent Blue
  • Hobby Lobby – Inclusions – Flowers
  • Spellbinders – Sweet Sprinkles

Adhesives

Tools

  • Die Cutting Machine
  • We R Memories – QuickStick
  • Tweezers
  • This Calls For Confetti – It’s No Secret Anti Static Powder
  • Stamping Blocks used as paperweights
  • Scissors
  • T-Ruler
  • Pencil
  • Tombow – Mono – Sand Eraser -512A

Potted Pets Baby Pop-up Card

This card was made for Craft Roulette#206 whose parameters included Project type of card with a heart, vintage colors, plant(s) element and lace on the base.

In honor of Craft Roulette’s host Mary Gunn’s new grandchild, I made a new baby card using the parameters listed above.

Cardbase: I used a 5×7-inch purchase cardbase and covered all four panels with vintage green patterned paper. The decorative stripes and lacy decorations were scraps from the opposite side of the paper.

Potted Plants: I decorated the panels with potted animal planters that were made from solid color cardstock using My Favorite Things Potted Pets die set.

Pop-Up Twist Panel: I used Karen Burniston’s Twist Panel Pop-Up die set. Watch video below for instructions.

Sentiments: I used Karen Burniston Welcome and Baby Charms die sets to create the “Welcome Baby.” In the video above I explain how I used Karen Burniston’s Connectors word set dies to perform “word surgery” to create the phrase “oh baby.”

_____________________________________

Thank you for experiencing this blog post. I hope this inspires you and makes you smile.

Please like and leave comments 😊

____________________________________________

Materials Used:

Dies

Papers

  • Hot Off The Press – 12×12 Double-Sided Paper Pack – Spice Market
  • Bazzill – 8.5×11 Textured Cardstock – Tiara -18-1002
  • Black, Browns, Greens, Pink and White Cardstock
  • Park Lane Paperie – A7 Cardbase – White

Ink

  • Sharpie – Permanent Marker – Ultra Fine Tip – Black
  • Spectrum Noir – Tri-Blends – Orange Blend
  • Stampin’ Up – Stampin’ Blends Marker – Dark Daffodil Delight

Adhesives

Tools

  • Die Cutting Machine
  • Bone Folder
  • We R Memories – QuickStick
  • Tweezers
  • Craft Clips
  • Stamping Blocks used as paperweights
  • Corner Punch
  • Scissors
  • T-Ruler
  • Pencil

Waving Hello For Valentine’s Day

This card was made for Craft Roulette #201 whose parameters included an easel card, quiet colors, sweets element and bokeh.

Cardbase: Cut one rectangle 3 3/4x 8 1/2-inches from heavy white cardstock. Cut a second white rectangle 3 3/4x 8 3/4-inches. On the largest rectangle score at 1/4 inch at one end and 3-inches at the opposite end. (The 1/4-inch is the tab folded under as the card hinge to card back. The 3-inch tab is the ease for the paper doll.)

Thank you for reading this blog post and watching the video. I hope this inspires you and makes you smile. Please like and leave comments 😊

Materials Used:

Dies

  • Karen Burniston in cahoots with Riley and Company – Hello – 1166
  • Karen Burniston in cahoots with Riley and Company – You’re Sweet – 1087
  • Karen Burniston in cahoots with Riley and Company – Ice Cream Sundae Pop-Up – 1082
  • Studio Light – Misses Dies & Stamps by Karin Joan – Betty
  • Studio Light – Misses Dies & Stamps by Karin Joan – Tasha

Stamps

  • Studio Light – Misses Dies & Stamps by Karin Joan – Betty
  • Studio Light – Misses Dies & Stamps by Karin Joan – Tasha

Papers

  • PhotoPlay – 12×12 Double-Sided Cardstock Collection Pack by Becky Moore – Snail Mail
  • Pink, Brown, Cream Cardstock
  • Heavyweight White 100lb Cardstock
  • Clear Vellum
  • #10 Business Envelope – White

Ink

  • VersaMark Ink – Watermark
  • Simon Says Stamp – Pigment Ink – White
  • Gel Pens – White and Pink
  • Black Glossy Embossing Powder

Adhesives

  • Neutral PH Adhesive by LINECO
  • Fine-Tip Glue Bottle

Tools

  • Die Cutting Machine
  • Bone Folder
  • Scoring Board
  • Stamping Platform
  • LDRS – Stampendable Stamping Tool
  • We R Memories – QuickStick
  • Craft Clips
  • Sponge Dauber
  • Stamping Blocks used as paperweights
  • Kat Scrappiness – Anti-Static Tool
  • Heat Tool
  • Scissors
  • Paper Cutter

Miscellaneous

  • Mini Woobler Spring