Halloween Tri-Fold Pop-Up Card

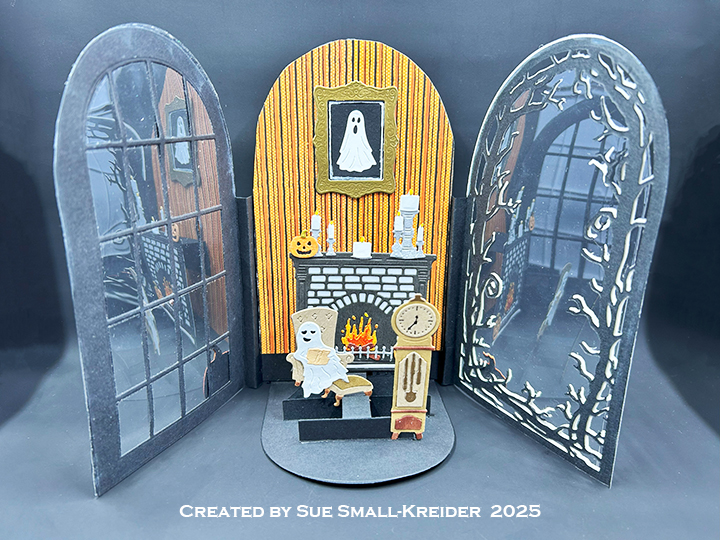
I recently purchased some new Scrappy Tails Halloween dies to make some pop-up tri-fold cards. Here is my first go at making one of Sabrina Leavell’s tri-fold cards. I watched a few of her YouTube lives before I began.

Watch the video below to see how I made this card.

___________________________________

Thank you for experiencing this blog post.

I hope this inspires you and makes you smile.

Please subscribe to the email notices, like and leave comments 😊

___________________________________

Disclaimer: Karen Burniston products are provided free of charge by the manufacturer for review and use. All other items were personally purchased. Compensated affiliate links used where or when possible, meaning I will receive a small percentage commission from these manufacturers at no cost to you. This will allow me to add more content to my YouTube channel and help out a lot. Thank you.

Materials Used:

Dies
β€’ Scrappy Tails – Metal Craft Dies – Ghost Gallery
β€’ Scrappy Tails – Metal Craft Dies – Ghost Study
β€’ Scrappy Tails – Metal Craft Dies – Halloween Tri-Fold Window Add-On

β€’ Scrappy Tails – Metal Craft Dies – Spooky Fireplace
β€’ Scrappy Tails – Metal Craft Dies – A7 Tri-fold Pop Up Card Base


Stamps
β€’ Colorado Craft Company – Clear Stamps – Scary Pumpkin – BB704


Papers
β€’ Bazzill – 8.5Γ—11 Cardstock – Tiara -18-1002

β€’ Graphic 45 – 8Γ—8 Double-Sided Papers – Midnight TalesFull Moon

β€’ Grafix – 8.5Γ—11 Dura-Lar Acetate .005 – Clear Film

β€’ Concord & 9th – 8.5Γ—11 Cardstock – Mushroom

β€’ Fun Stampers Journey – 8.5Γ—11 Cardstock – Tin Pail

β€’ Black, Browns, Oranges, Tans, White and Yellow Cardstock

β€’ #10 Business Envelope – White


Ink
β€’ Memento – Fade Resistant Dye ink – Tuxedo Black
β€’ Pigma – Mircon 01Fine Tip Pen – Black
β€’ Sakura – Gelly Roll Pen – Medium – White
β€’ Stampin’ Up – Stampin’ Blends Marker – Dual Tip – Dark Copper Clay & Dark Wild Wheat


Adhesives
β€’ Neutral PH Adhesive by LINECO
β€’ Fine-Tip Glue Bottle

β€’ Scrapbook.com – Double-sided Tape – 4-inch wide


Tools
β€’ Die Cutting Machine

β€’ Paper Trimmer

β€’ Stamping Platform

β€’ Scissors

β€’ Pencil

β€’ Paper Masking Tape

β€’ Riley and Company – Pick & Poke Tool

β€’ This Calls For Confetti – It’s No Secret Anti-Static Powder Brush

β€’ Microfiber Cloth

Time Flies When You Are Having Fun

This card was made for Craft Roulette #211 whose parameters included good tidings, summer colors, mechanical element and tie closure.

This is a retirement card for someone who loves working with mechanical action.

(Please note that the Tonic Craft Kit 59 used in this card is no longer available. The Karen Burniston dies however are still available and links are provided to them.)

Cardbase: I used a purchased A7 (5×7-inch) cardbase and matching envelope. Each of the four panels were covered with coordinating papers in either watermelon pink or rind green. The circle was cut thru the front panel using the clock dial circle die.

Clock: Using three different green cardstock, they were cut with the main clock base die from the Tonic Craft Kit 59. The darkest green was trimmed to just the bottom and side trims, while the green patterned paper had the clock dial circle cut out and two bottom art-deco corner die-cut as well. Matching up the patterned green piece with the light green piece, the clock dial circle was cut in the light green piece. The dark green trim was attached to the patterned green piece before having a piece of clear plastic packaging adhered with thin double-sided tape to its backside. Sandwiching the plastic between the patterned green piece and light green piece by using double-sided tape again. The clock was glued onto the card front matching up the circle apertures.

Moving Gears: I watched Karen Burniston’s Double Spinner video at the bottom of her Mailbox Pop-Up page before adding the spinning gears pop-up to my card. I switched out gear dies from the Tonic Craft Kit 59 set for her fancy labels and gardening charms, but I followed her technique exactly to create the spinning gears. Gears were cut from steel blue and cooper oxidized foil cardstock.

Sentiments: All the sentiments on the front of the card β€œTime flies when you’re having fun,” and β€œHappy Retirement” are from the Tonic Craft Kit 59. All stamped in black ink. The sentiments were stamped before the inside mechanical pop-ups were added. The personal message circle uses a large gear cut in blue oxidized metal foil cardstock (Tonic Craft Kit die) and a circle of pale gray cardstock using Karen Burniston’s Crosshatch Circles die set.

Envelope: The back flap was stamped in black ink β€œTIME to celebrate.”

Thank you for reading this blog post. I hope this inspires you and makes you smile. Please like and leave comments 😊

Materials Used:

Dies

Stamps

  • Tonic Studios – Tonic Craft Kit 59 – Clocks & Cogs

Papers

  • Bazzill – 8.5×11 Textured Cardstock – Easter Grass and Gumdrop
  • Core’dinations – 12×12 inch Single-Sided Paper – Light Green Crosshatch
  • Craft Consortium – A4 Solid Colour Double-Sided Paper – Gardener’s Delight
  • Hunkydory – A4 Single-Sided Mirri Cardstock – Oxidised Metals Collection
  • Keep It Simple – 6×9 Double-Sided Cardstock – Back To Basics Collection Pack – Ruby
  • Keep It Simple – 12×12 Double-Sided Cardstock – Jade Collection Pack – Spearmint: Linen
  • Gold Foil cardstock
  • Green Cardstock
  • Plastic Packaging
  • Park Lane Paperie – A7 Cardbase and Envelope – White

Ink

  • StazOn – Solvent Ink – Jet Black
  • Scrapbook.com – Glitter Brush Marker – Key Lime Green and Pretty Pink
  • Pigma – Mircon 01 Fine Tip Pen – Black

Adhesives

Tools

  • Die Cutting Machine
  • Bone Folder
  • Stamping Platform
  • LDRS – Stampendable Stamping Tool
  • Tweezers
  • Stamping Blocks used as paperweights
  • Scissors

Miscellaneous

  • Organza Ribbon – 1/4-inch wide – Green

Pop-Up Clock Retirement Card

This retirement card was made for Craft Roulette #198 whose parameters included a spanner project, butterfly colors, centerpiece element and dial(s).

Thank you for spending time with this blog post. I hope it inspires you and makes you smile. Please like and leave comments 😊

Materials Used:

Dies

Embossing Folder

  • Memory Box – Open Studio – 3D Embossing Folder – EF1018

Stamps

  • Tonic Studios – Tonic Craft Kit 59 – Clocks & Cogs

Papers

  • Dare 2B Artzy – 12×12 Double-Sided Cardstock – Honey Bloomz by Andie Hanna – English Garden – PP1045
  • Bazzill – 12×12 inch Cardstock – Travertine
  • Gold Matte Cardstock
  • Black, Light Blue and White Cardstock
  • Park Lane Paperie – A7 Cardbase and Envelope – White

Ink

  • StazOn – Solvent Ink – Jet Black
  • Pigma – Mircon 01 Fine Tip Pen – Black

Adhesives

Tools

  • Stamping Blocks used as paperweights
  • Scissors

Miscellaneous