It’s Sneak Peek Week for Karen Burniston’s February 2024 release. These dies will be available for purchase on February 19, 2024 on the KB Riley LLC website.
Your co-worker is leaving for a new job and you need a card for others in the office to sign for her. That is the brief for this accordion card.
This card was made for Craft Roulette #192 whose parameters included a thank you card, roadside market colors, yard(s) element and confetti.
Heartfelt thanks is the emotion that this accordion-fold card expresses. Inspired by Karen Burniston’s December 2023 release Heart Add-ons pivoting panel, the card features a shaker element filled with confetti. Other Karen Burniston dies were used including: Fence Add-Ons, Thank You and Fancy Label Accordion.
Before starting, watch the assembly videos of the pop-ups which are usually near the bottom of the linked pages for the various die sets used.
Accordion Frames: Cut three accordion frames from heavy blue cardstock using the main large die in the Fancy Label Accordion set. Train the folds of each frame and set aside. (You will cut a fourth accordion frame under the Shaker section using the same heavy cardstock.)
Fence Panel: Using the largest of the label die in the Fancy Label Accordion set, tape it inside the accordion frame die and cut two from decorative paper. Save the inner fancy labels for use on the fence panel. From the decorative paper accordion frames, trim the smaller panel frames away from the larger frame leaving the small tabs attached to the frames. Set both accordion frames and small frames aside for later use. From brown decorative paper cut one fence using the fence die in the Fence Add-Ons set. Cut flowers and grass to decorate fence with using dies also in the Fence Add-Ons set.
Attach a fancy label to the center panel of one of the blue accordion frames. Trim fence to fit panel and adhere to panel. Decorate the fence with grass and flowers. Glue the remaining fancy label to the reverse side of center panel. Set the piece aside.
Heart Pivot Panel: Glue the tab of one blue accordion frame to the backside of the remaining blue accordion frame. Cut from a lightweight teal blue cardstock the Hearts-Add-Ons panel. Train the folds of the hearts panel. From the blue accordion frames cut off half of the center panel leaving them attached at their pivot points. (See photo)
Put glue on the left back side edge of the teal blue hearts panel before attaching to the left blue center panel of the blue accordion frame. Match up the fancy curved edges of the panels. With the blue connecting post of the accordion frame behind the teal blue hearts panel, attach the right side of the hearts panel to the right accordion frame panel.
Cut a hearts panel from decorative paper. Trim out the string of hearts and save to decorate the backside of hearts. Glue decorative panel to the front side of hearts panel. Using the smaller decorative heart dies in the set, cut a number of hearts from patterned paper. Decorate both front and back sides of panel.
Glue the panel frames to the front of the hearts panel with the panel tabs being covered with decorative paper. Trim off the parts of the frames at the center of the hearts panel that are not attached. Set piece aside.
Shaker: Using the largest of the label die in the Fancy Label Accordion set, tape it inside the accordion frame die. Cut the fourth frame piece from the blue heavy cardstock. Keep the dies tapped together to cut four heavy cardstock frames and two decorative paper frames. Use smaller pieces of the heavy cardstock for the four panel frames. Cut the full accordion frame with the decorative paper. Trim the panel frames from the accordion frames and save the decorative paper frames for later. Cut two squares of clear acetate or plastic slightly larger than the panel frames.
To assemble, glue two blue panel frame pieces together. Using 1/8-inch wide double-sided tape around the blue frame, adhere the acetate to frame. Trim off overhanging acetate. Attach decorative pink paper frame over the acetate with more double-sided tape matching up edges. Glue the assembly to the accordion frame panel matching blue frame to blue frame. Repeat with the remaining two blue frames, pink decorative paper frame and acetate piece, but DO NOT attach to accordion frame panel.
Using an anti-static tool, swipe powder over all of the acetate inside the frame and the sides of the shaker frames. Add confetti/sequins to the frame attached to the accordion frame. Glue the remaining shaker frame over the confetti filled frame. Leave undisturbed until glue dries. (To listen to commentary about the anti-static products I used go to my video.)
Accordion Assembly: With all the accordion frames decorated, assembly can begin. Collect the four decorative paper accordion frames previously cut in the Shaker and Fence Panel sections. Cut four more frames from decorative paper, trimming out the inner panels which can be saved for later. Glue the fence panel accordion frame tab to the backside of the first heart panel accordion frame. Glue the second heart panel accordion frame tab to the backside of the shaker accordion frame. Trim off the unused tab on the shaker accordion frame. Cover the backs of all the accordion frames with the decorative paper frames. (This should hide all the tabs.) Glue decorative paper frames to fronts of the accordion frames.
Once all the decoration of frames is completed, glue the center panels of fence and shaker accordion frames to the heart panels. (Note: the tabs that attach to the shaker panel are glued to the front of the shaker panel, while the fence tabs are glued to the back of the hearts panel.)
Cut one of the decorative paper inner panels in half to cover the backsides of the panels cut in half that the hearts panel is attached to. (Green paper in the photo.)
Sentiment: “Thank You” is a die-cut that was cut twice from the same double-sided paper with the blue side used as an off-set shadow behind the pink patterned paper.
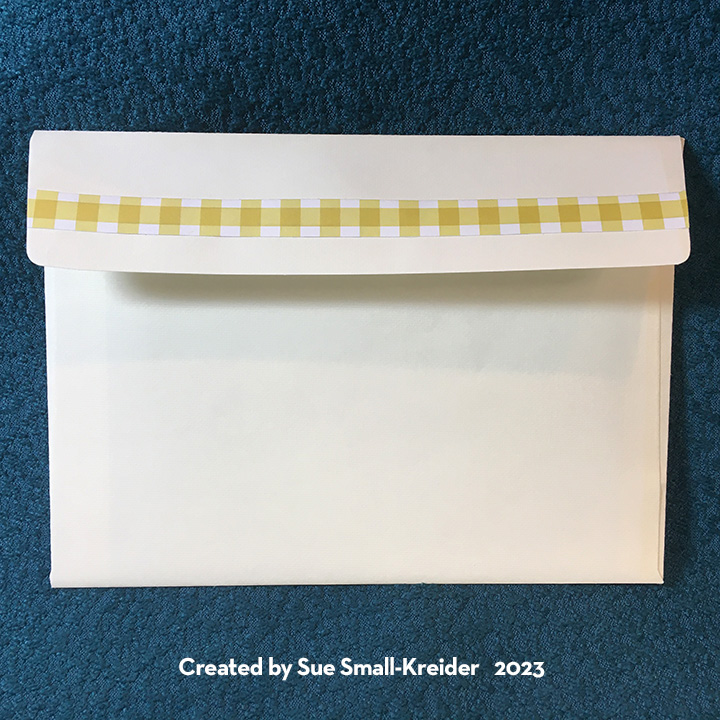
Envelope: The card is thick and would require a padded bubble envelope if not hand delivered.
Thank you for reading this blog post. I hope this inspires you and makes you smile. Please like and leave comments 😊
Materials Used:
Dies
Karen Burniston in cahoots with Riley and Company – Heart Add-Ons – 1257
(Please watch the assembly videos for the various dies that are located toward the bottom of each die set’s link page before starting a card.) For a detailed tutorial of a sympathy basket click here.
The folded card fits into a catalog 6×9 inch envelope. To mail the card, I fold a sheet of 8 1/2 x 11-inch white cardstock in half to fit inside the envelope and cushion the card in the mail.
Thank you for reading this blog post. I hope this inspires you and makes you smile. Please like and leave comments 😊
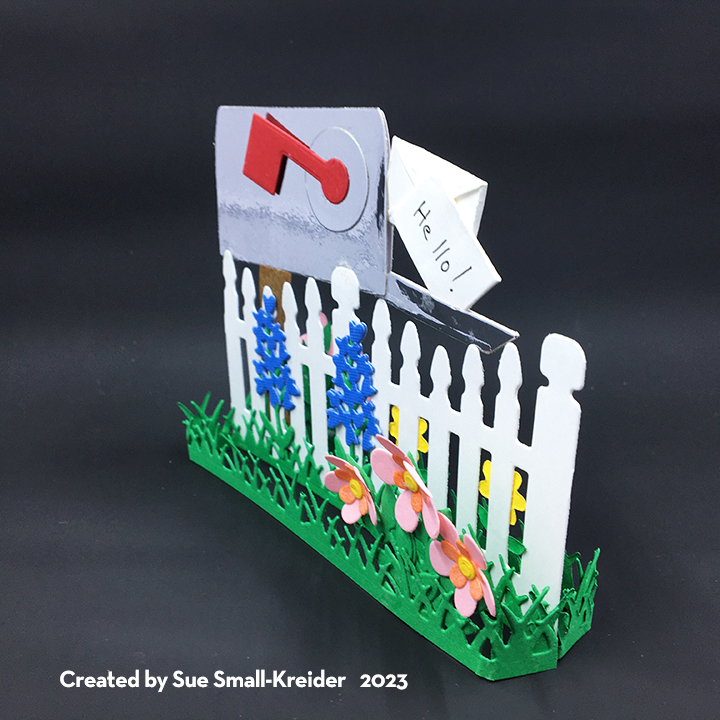
While more of a rarity to get a card in the mailbox these days, why not send a simple hello to someone you haven’t seen in a while. (Otherwise known as Happy Mail.)
This card was made using two of Karen Burniston’s new June 2023 release dies – Fence Landscape Accordion Add-On and Fun Flowers – and several previously released dies – Mailbox Pop-Up and Nature Edges. (The Nature Edges grassy strip is the longest of the straight grassy strips in all of KB’s dies. You could glue several together from the Fence Add-on, if you don’t have the Natures Edge set.)
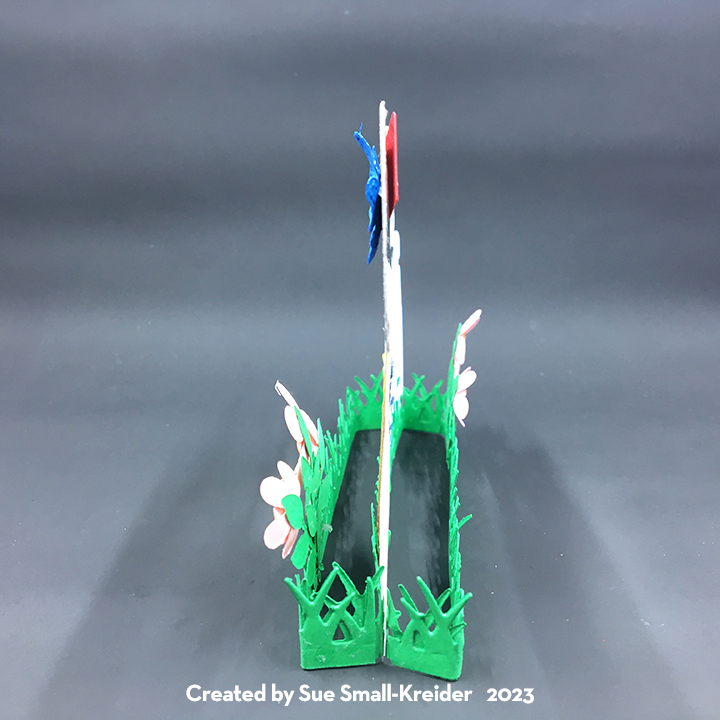
Fence and Base: Cut one fence from the Fence Add-On set from white cardstock and trim off the four side tabs. Cut four of the grassy strips from the Nature Edges set from green cardstock. Lay grassy strip over the fence with an even amount of grass extending beyond the fence. Fold the excess grass over to form two tabs. Repeat for the remaining three grassy strips. Take two strips and glue the tabs over the tabs on the other strip to form a rectangular shape. Glue one side of the rectangle to the bottom of fence. Repeat with remaining grassy strips and glue to bottom of the other side of fence.
Mailbox: Using the Mailbox Pop-Up, cut two of the mail mailbox shape from silver foil cardstock. Cut two of the lids, making sure to reverse the foil side of the cardstock for one of them. Cut one wooden post from brown cardstock and one red flag. Cut one circle from silver foil cardstock. Cut two envelopes from white cardstock. Assemble envelopes as shown in assembly video and write “Hello” on the fronts. Glue front lid to bottom edge of main mailbox piece. Glue envelopes to side and lid of mailbox so that one envelope faces front and the other faces back. Glue wooden post to back of mailbox. Glue back lid piece matching notch to front so silver shows on both sides. Glue back mailbox piece onto front covering the post top. Position on back side of fence and glue in place. Adhere silver circle and red flag over hole on front of mailbox. Cut a butterfly from the Fun Flowers set and glue over the hole on back of mailbox. (I inked my butterfly with a dark blue ink and filled in its body with a black marker.)
Flowers: The flowers glued to the fence are cut from the Fence Add-On set. Cut two of the bluebell flowers in blue and two of the tall stem in green and glue stems to the flower backs. Cut once the two small flowers from yellow, the two circles from brown and the two stems from green. Glue brown circles to the flower centers and the stems to the back of the yellow flowers. The pink bush flowers that are glued to the opposite corners of the grassy rectangle base are from pieces in the Fun Flowers set. For each bush, cut four of the long leafy stem from green, the five flowers in one die from pink and the tiny circles from yellow. (I inked the three smallest flowers to be darker pink.) glue the four stems together to form a bush. Add a dot of glue to the three largest flowers and using a pick-up tool place one small dark pink flower in the center of a large flower, making sure to alternate the flower petals so no gaps show. Add another drop of glue to the center of small flower and drop in a tiny yellow circle. Fold all petals up to form a just opening flower. Glue to a top leaf on bush. Repeat steps until you have two bushes, each with three flowers. Glue bushes to opposite corners of the base rectangle so weight is evenly balanced and when the base is folded closed no leaf or flower overhangs the grass base.
Envelope: The folded card fits into an A2 (4.5 x 5.5-inch) invitation size envelope. I enclose the following CRX sheet to let the recipient know how to open the card.
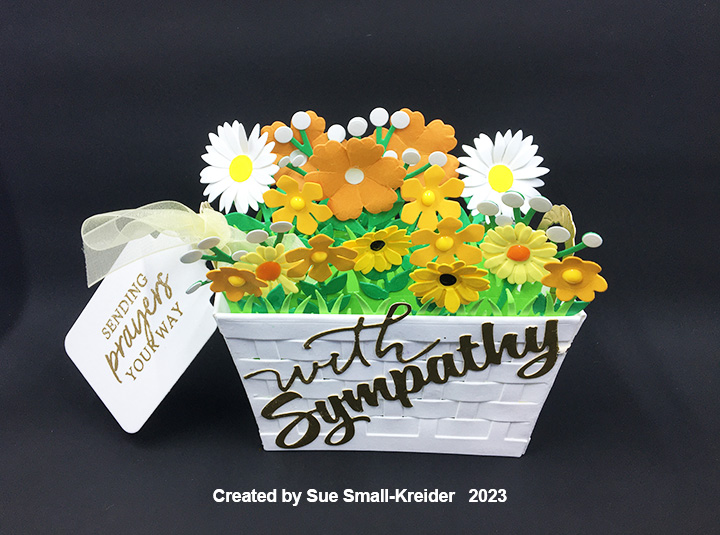
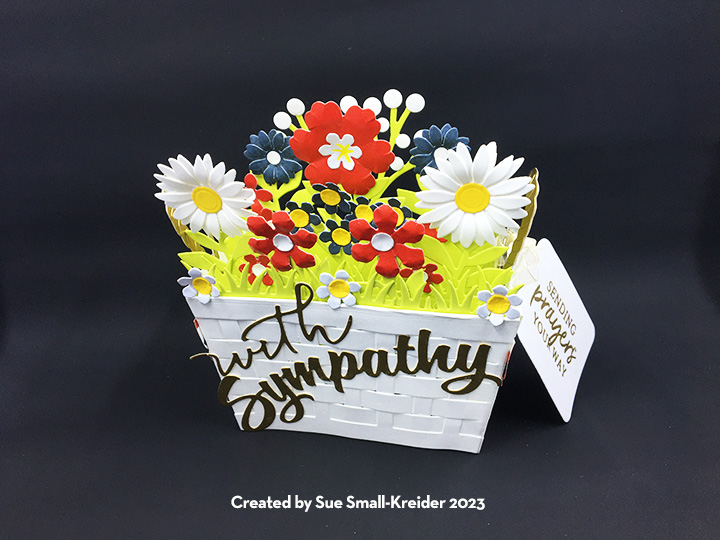
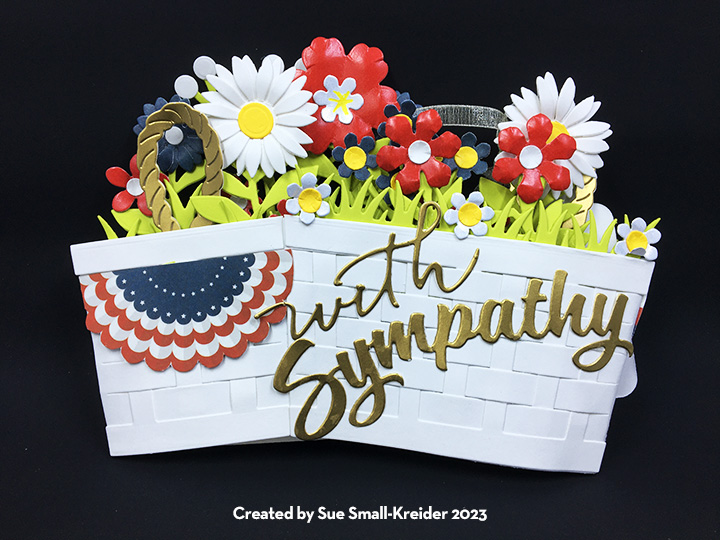
One of my cardmaking friends lost her husband to cancer recently. He was career military. I wanted to make a flower basket for the card with a nod to his military career, so I did the colors of red, white and blue with some flag bunting on the sides of the basket.
Please watch the assembly videos for the various dies that are located toward the bottom of each die set’s link page before starting a card.
When assembling the woven basket, I like to make the rims of the basket fold by lining up a metal ruler from pointed edge to pointed edge. This make a straight fold that is more rounded to cover the top edges of the basket.
When making the flowers, I like to use some flower shaping techniques such as using a tool with a round ball on its end to push the center of the flower into foam to create depth. I most often use my fingers to curl the petal tips under. On the large hibiscus-like flower I used the ball tool to shape the undersides of the petals. Many flowers, such as daisies, have two layers of petals.
The arrangement of the flowers always scares me, but I tried to remember my flower arranging class tricks from years ago. Start with the largest flowers first, creating a tall focal point in the center and shorter to the sides. Fill-in with smaller flowers symmetrically and finish with baby’s breath to fill-out the empty spaces.
I cut the “with Sympathy” sentiment from matte gold cardstock and curved the word sympathy to fit the front of the basket. In addition, I cut a white tag from the Tag Book Pop-Up and stamped and heat embossed the tag with “Sending prayers your way” in matte gold embossing powder. A narrow ivory organza ribbon was used to tie the tag on to a basket handle. A personal message can be written on the tag back.
The folded card fits into a catalog 6×9 inch envelope. To mail the card, I fold a sheet of 8 1/2 x 11-inch white cardstock in half to fit inside the envelope and cushion the card in the mail.
Thank you for reading this blog post. I hope this inspires you and makes you smile. Please like and leave comments 😊
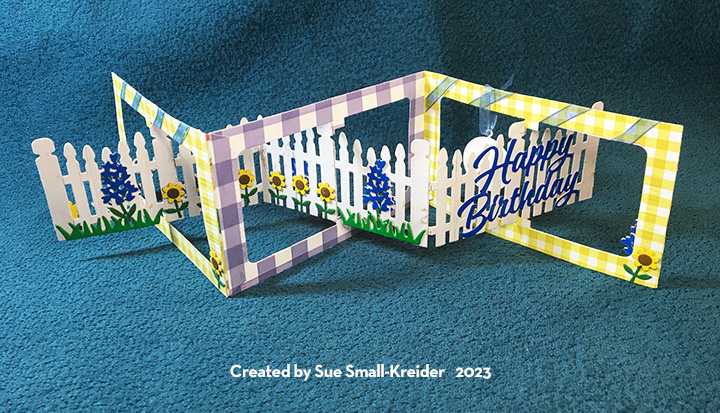
Today I’m featuring a picket fence accordion card using the new Fence Landscape Accordion Add-On die set which includes two kinds of flowers and some grass. Along with the previously released Landscape Rectangle Accordion set, this add-on lets you make a two or more panel interactive card. (I have made a similar card before, but I had to fussy cut the fence out. This die is a time saver.)
Cardstock needed for fence and frame should be of a heavyweight if cut in one layer, but lighter weight patterned papers can be used, but you will need to back them with more cardstock. (I used double-sided cardstock for my gingham frames and a single sided woodgrain paper for my fence and cut two layers for fence and frame.)
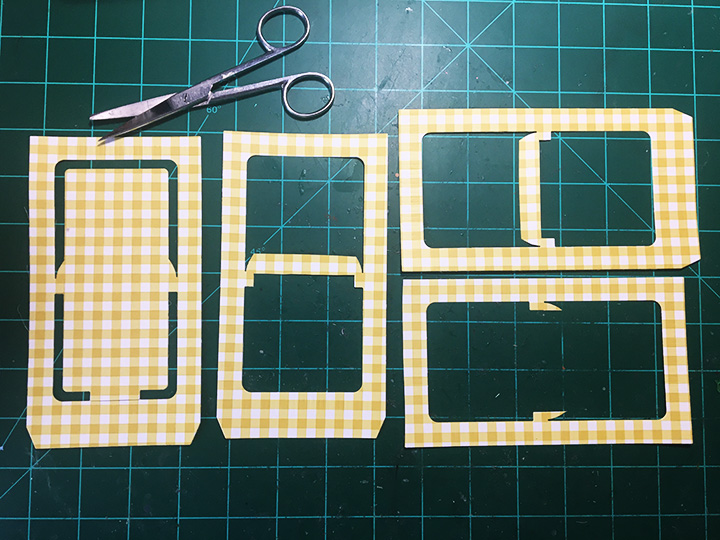
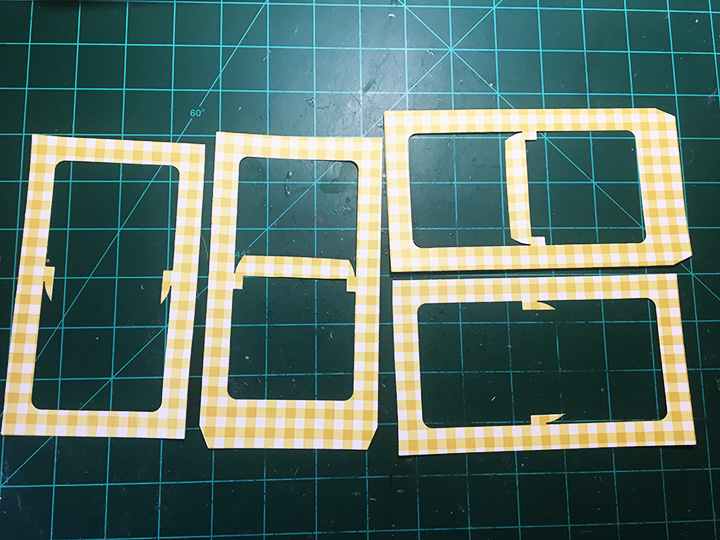
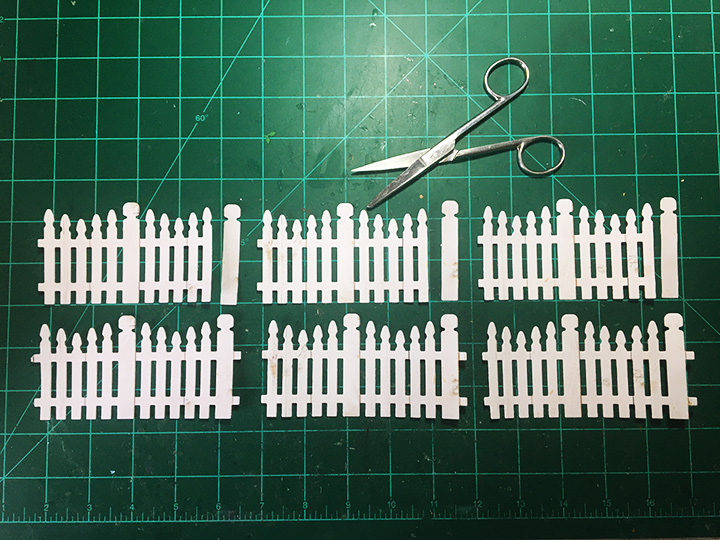
Accordion Frames: I cut four frame panels from a yellow-green gingham cardstock and two frame panels from a larger blue gingham cardstock. Two of the frame panels I trimmed the inside rectangle panel down to a center bar for the fence post to be glued onto. The other two panels I cut away the entire rectangle, leaving only the small pivot wings. (While I cut off the tabs on the pivot wings only frames, I would recommend waiting to trim off the tabs until you are ready to assemble the three panels together. I made a mistake in my assembly and had to patch in a tab that I had cut off earlier.)
The other two panels I cut away the entire rectangle, leaving only the small pivot wings. (While I cut off the tabs on the pivot wings only frames, I would recommend waiting to trim off the tabs until you are ready to assemble the three panels together. I made a mistake in my assembly and had to patch in a tab that I had cut off earlier.)
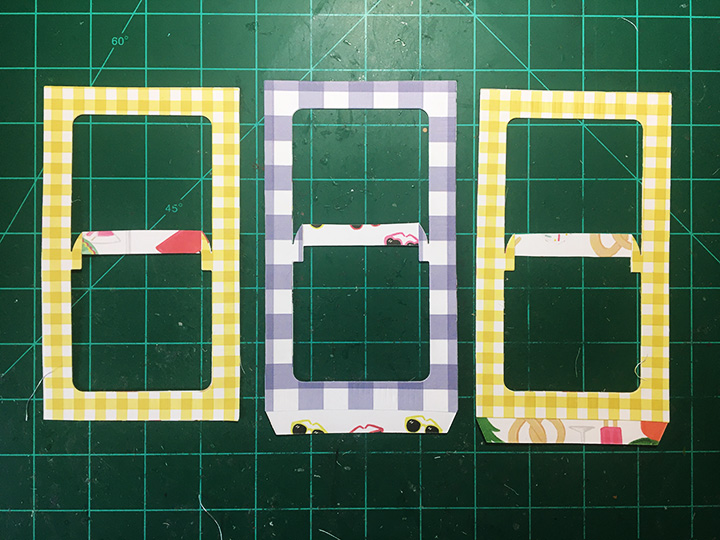
Repeat the trimming of the blue checked frames to have one frame with the center bar and one frame with the pivot wings.
Glue three sides of each set of frames (one center bar and one pivot wings) together leaving the tab side with no glue. (You will need to be able to hide the tab of the adjacent panel by gluing it between the layers of the frame.)
Fence: I cut six fence panels from woodgrain paper. (If I had to do it again, I would use a single layer of solid white card stock to eliminate the need for the next step.)
I trimmed of the end fence post on the three fence pieces that would be backing pieces, removing the tabs as shown.
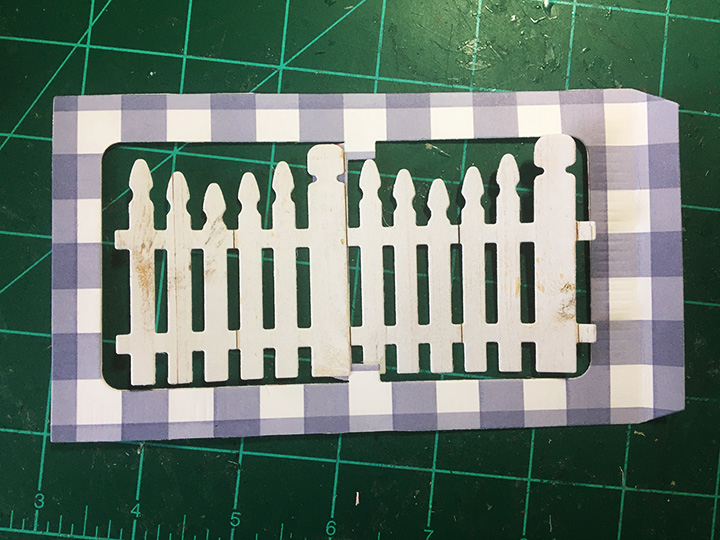
Glue the front fence piece to the center bar. You may want to trim the center bar some to be hidden behind the fence post. Turn over panel and glue the back fence piece to the front piece, piecing in the separted post.
Place weights over glued fence layers so they dry flat. (I used clear stamping blocks and my cell phone as weights.)
I forgot and glued shut my layers on the frames, so I covered over the tabs with the tabs that had been cut off. I recommend decorating the fence before you glue the fence tabs together.
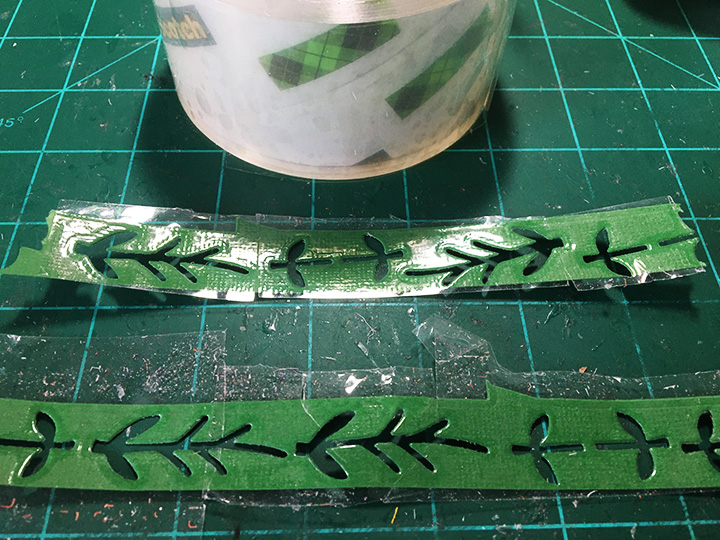
Flowers: I tried something I had seen Karen Burniston do in one of her videos where she covered her cardstock with clear packing tape before die-cutting into it to get shiny pieces. I did this for my green leaves and stems. For the grass I used shiny green cardboard packaging.
For the flower heads, I used shiny cardboard packaging from a well know yellow cereal box and a shiny piece of blue junk mail. I cut a front and a back for each flower head as some will show through the fence. (This made for thick, dimensional flower heads.) The stems were sandwiched between the flower heads’ front and back layers. I made an assembly line for making the 12 yellow flowers using glue and a Quikstick to pick-up and place the tiny brown centers on the flowers. When placing your flowers on the fence, remember not to place anything that will be a catchpoint below the fence or above the fence post. (I had thought about adding a small bird to the top of the fence, but it was too tall.)
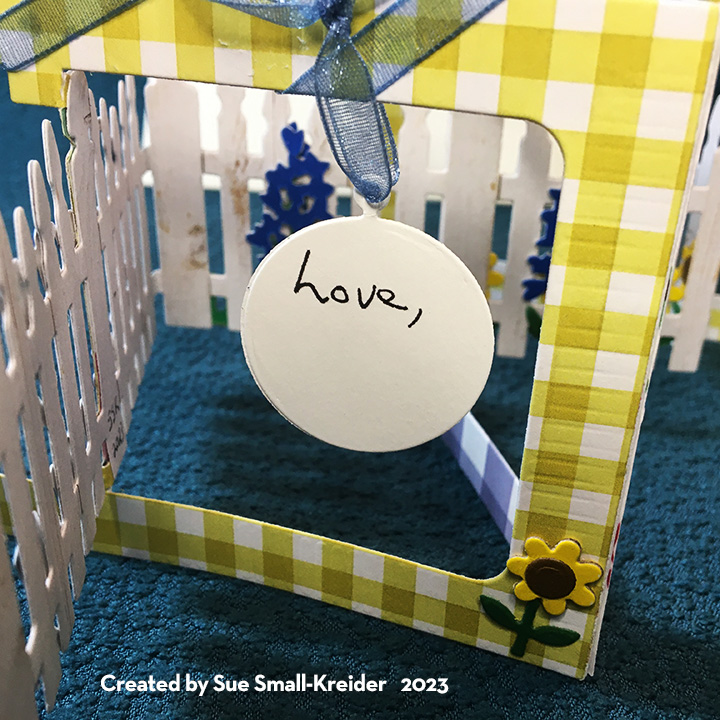
Sentiments: For the front of the card, I used the “on your Big Day” from the newly released Word Set 17 – Congratulations. On the back of the card, I used the previously released “Happy Birthday” die set. I also added a circle charm from the new Game Charms to write a personal message with a piece of ribbon. (You could also use the large circle charm in the Sports Charm set.)
Envelope: This card fits into an A6 envelope that I glued a strip of gingham cardstock to its back flap.
Thank you for reading this blog post. I hope this inspires you and makes you smile. Please like and leave comments 😊
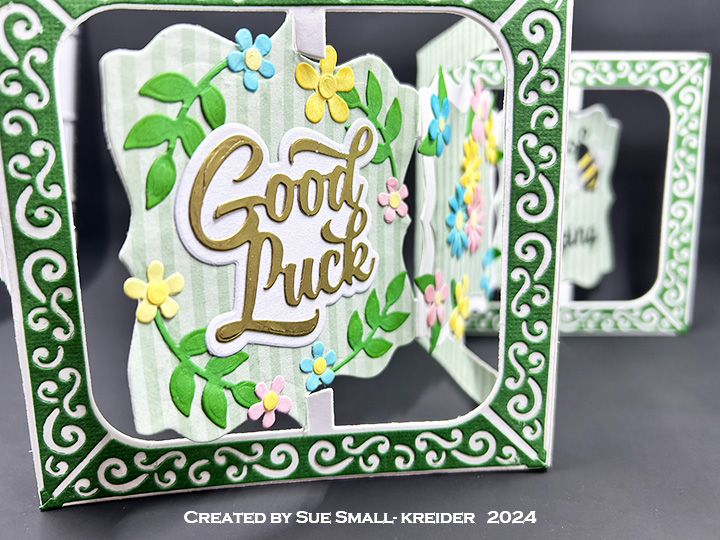
Cardbase: Cut a 7 1/4 inch x 8 1/2 inch rectangle of lime green cardstock. Fold in half longways to form a 8 1/2 inch tall by 3 5/8 inch wide side-fold card.
Flowers: Cut three sets of the large flower die in the Twist Flower Pop-Upset once in yellow, again in pink and lastly in reddish orange. (Total of nine flowers.) Cut four center circles from yellow and two center circles from dark green. Cut six of the tiniest flower die from dark green and three from yellow. (You may wish to cut enough pieces to assemble one more, large flower for the back of the card. I used some of my leftover pieces for the flower on the card back.) Glue the tiny flower to the circle and then the circle onto a large flower. Repeat until six flowers are assembled. Save the remaining three tiny flowers to decorate the envelope.
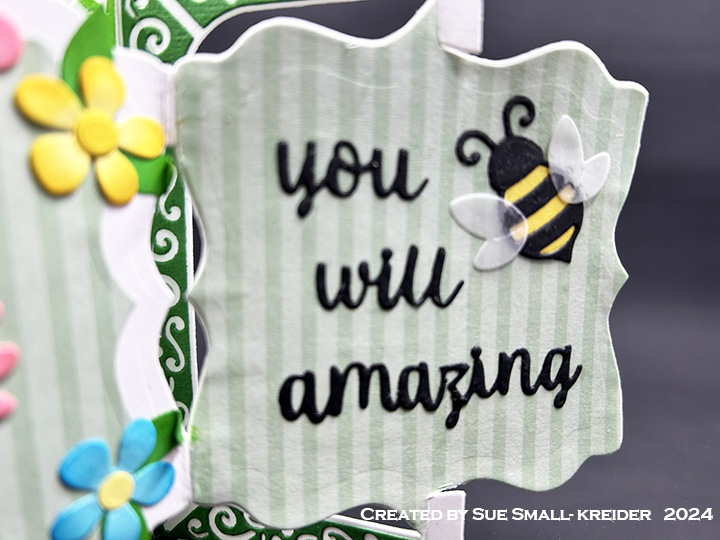
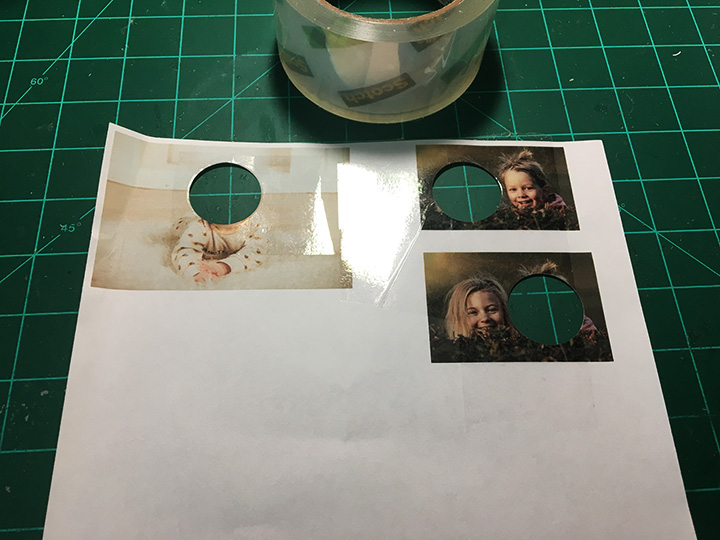
Print photos of faces that have been sized to fit inside a 1-inch square. (I used the software Publisher to make a 1-inch grid and then insert the photos to the correct size and printed onto an 8 1/2 x 11 inch sheet of printer paper.) Cover the printed faces entirely with clear packing tape. Cut faces out using the center circle die. Glue faces to three different colors of the large die-cut flowers.
Twist Bases: Cut three of the twist mechanisms from lime green cardstock using die in Twist Flower Pop-Upset. Train all the folds. Fold mechanism into the bunny face (middle of photo) and glue the small tab at the end of an ear onto the other ear. When unfolded it should look like a basket handle (left in photo.)
Using temporary tape attach the flowers to mechanisms. Layout the mechanisms making sure nothing goes outside the cardbase when folded closed. Glue one triangular side of the mechanism and then close card to glue the second triangle side. Add leaves to flowers using temporary tape to check for catch-points. Glue flowers and leaves in their final spots after decorating the rest of the card. (I found that flower petals can rub against the mechanism making the card creak as it is open and closed, so check for catch-points before gluing the flowers onto the mechanism. My finished card has several catch-points or creaky points as noted in red on the photo below.)
Decorations: Die-cut a border for the card front using the two largest dies in the Long Rectangles – Crosshatch set. The leftover center rectangle can be used on the back of the card. (Because my remaining piece of the green dotted cardstock was not big enough to cut a whole new frame, I just cut four stripes using the dies still taped together for the frame.) These border stripes are used inside the card to cover the mechanism edges and create a trellis effect for the three large flowers used as decoration beside the pop-up flowers. Along with the sentiment, three of the large flowers with leaves are used on the card front. Cut three hearts using the die in the Twist Flower Pop-Up set to place above a white personal message label. (I cut my label using the fourth largest die in the Long Rectangles – Crosshatch set and trimmed it to needed width.) From the Twist Flower set cut two of the daisy border from white cardstock. Add flower centers either by die-cutting tiny circles using the die that will cut 12 circles or use enamel drops. (I used Nuvo drops that I had to let dry overnight before gluing them in place.) The back of the card is decorated with leftover pieces.
Sentiment: Using the shadow die from the Happy Mother’s Day set, cut one from shimmer cardstock. Cut the words from green cardstock. Glue together.
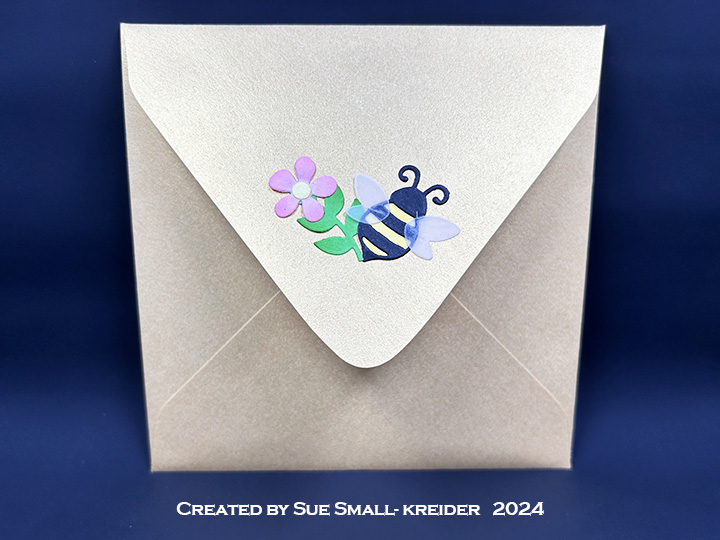
Envelope:Glue the three tiny flowers to the back of the envelope flap.
Thank you for reading this blog post. I hope this inspires you and makes you smile. Please like and leave comments 😊
It’s time for the Karen Burniston Design Team Challenge for June. We were asked to use the theme of wedding or baby. I have chosen to welcome a new baby.
Cardbase and Pop-Stands: Cut an 11×4.25-inch piece of pink cardstock and fold to form a 5.5×4.25-inch top fold cardbase. (Watch Christmas tree pop-stand assembly videoat the bottom of the die’s page.) Cut two pieces of decorative paper as 5.25×4-inches and use clear tape on the back side for placement in card. Use the hexagon for the cradle stand to determine placement of the pop-stand die-cuts. Using decorative paper scraps, cover the four holes that pop-stands leave on back side of paper.
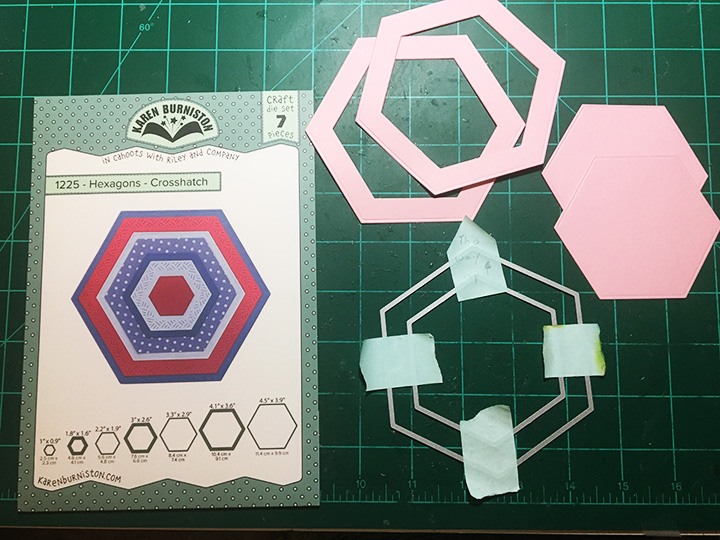
Cradle Stand: taping the largest two plain hexagons from the crosshatch hexagon set, die cut two from heavy pink cardstock. Trim bottom edge .25-inch so that it will measure 4.25-inches or less to fit into cardbase.
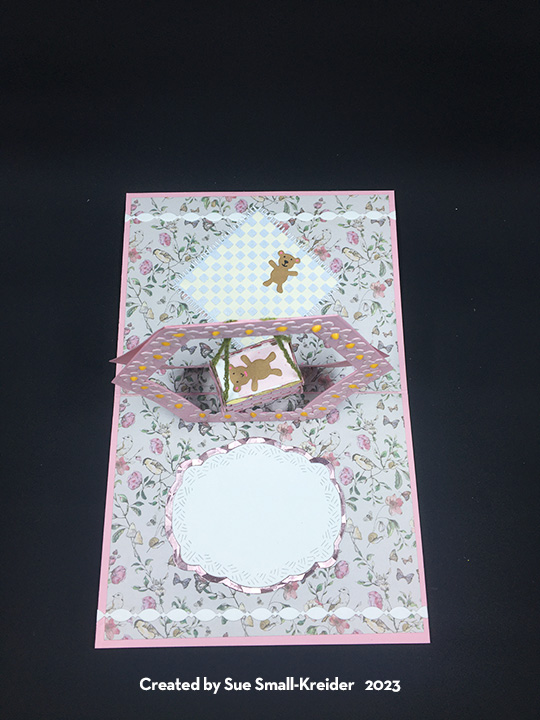
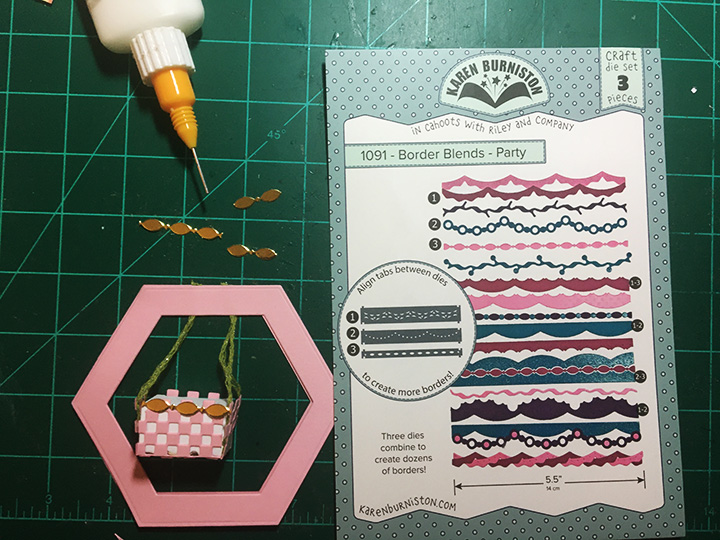
Cradle: From the two leftover hexagons, die cut the checker grid from the blanket in the picnic elements set. (Watch assembly video at the bottom of the bam boxpage.) Create a white bam box and cut four pieces of the checker grid to be the sides of the bam box cradle. Cut two 6-inch pieces of green floss or cord. Glue floss/cord to bottom of bam box. Tape square pink end pieces to bottom of bam box with the floss glued to checker grid pieces. (I would recommend cord as the floss unraveled on me. Also I would glue the checker grid onto thin white copier paper to make less catch-points on the cradle.) Glue longer pink sides to bam box sides to form cradle. Use a border from the party border blends to create a finished edge of the cradle from gold foil cardstock. Glue the floss between the top bar of the two hexagons. Pull floss to make cradle hang straight before glue sets. Trim off excess floss once glue has dried. Cut one bam box decorator side piece from pink speckled paper and trim to fit the cradle as a blanket.
To make the cradle close, flatten bam box and fold in the square ends with floss. Hold flat as card is closed.
Blanket and Bears: Cut from pearlescent paper the fringed picnic blanket and from cream paper the checkered grid. glue together. Cut three teddy bears from light brown cardstock using bear die from the holiday charms set. Using the stencil features in the bear die, ink in eyes, nose and mouth with a black gel pen and the ears with a pink gel pen. One bear is in the cradle and other is on the blanket. The last bear is on the envelope flap.
Decorations: Flower borders cut from pink speckle paper using the long nature borders 2 set, are used on the cradle stand frame and card front and back. (Front with yellow Nuvo drops centers and back with pink gel pen stenciling.) More of the party border blends borders,cut from white cardstock, are used on all card panels. (See assembly video explaining how to get the border on the card back.)
Personal Message Label: The largest crosshatch label die from the rectangles and labels die set was cut in white.The thin metallic pink frame was made by using the largest label frame and the crosshatch label dies taped together. (This was a leftover piece I had saved from another project.)
Sentiment: Two sentiments were used to create the “Welcome BABY” on the card front. Welcome is its own die set with word (white) and shadow (pink speckle) dies. BABY is from the baby charms set which was cut once each from white and from pink and blue speckled papers. The blocks base is cut from white. Some paper piecing was done using pieces from the different papers to created the colorful blocks.
Envelope: The card fits an A2 size envelope.with the back flap decorated with a strip of the decorative paper and the last teddy bear.
Thank you for reading this blog post. I hope this inspires you and makes you smile. Please like and leave comments 😊
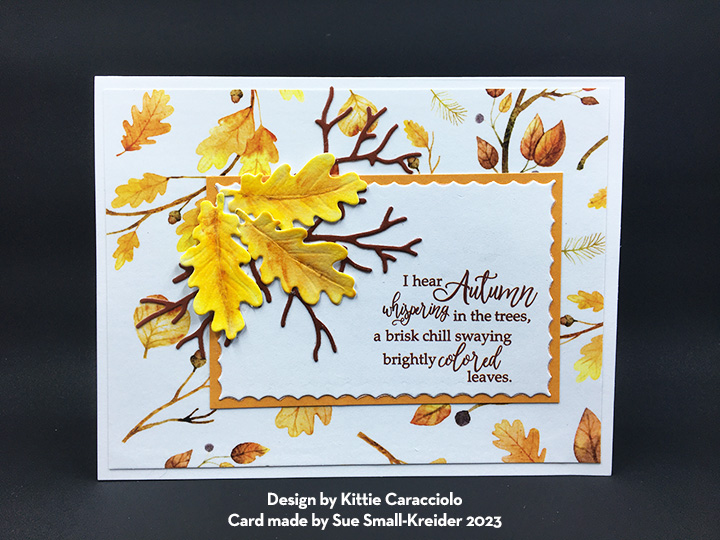
Recently, I had the honor of attending a workshop taught by Kittie Caracciolo who makes wonderful and detailed dimensional cards using Rubbernecker Stamps products. The workshop was part of the Stamp and Scrapbook EXPO – Orlando.
Rubbernecker Stamps makes some wonderful dies to create scenes that fit an A2 size card (4 1/4 x 5 1/2-inches). Using a sponge tool similar to an eye shadow applicator, Kittie showed us how to color our die-cuts using Color Fuse Inks to create shading that rounded objects and gave dimension to animals. Foam strips helped with the physical layering on the snowy scene and to make the white scalloped rectangle stand out on the pink flowers in the watering can.
I added eyes to both deer and a nose with a ultra fine tipped black pen and white spots to the fawn with a gel pen.
I added yellow Nuvo Crystal Drops to the flower centers.
As Kittie suggested, I went home and heat embossed the leaves with clear embossing powder to give them some shine.