Staying Out of The Doghouse

Pets are great companions and always eager to greet us when we come home. This card is for a pet to their owner who is recuperating from an illness.

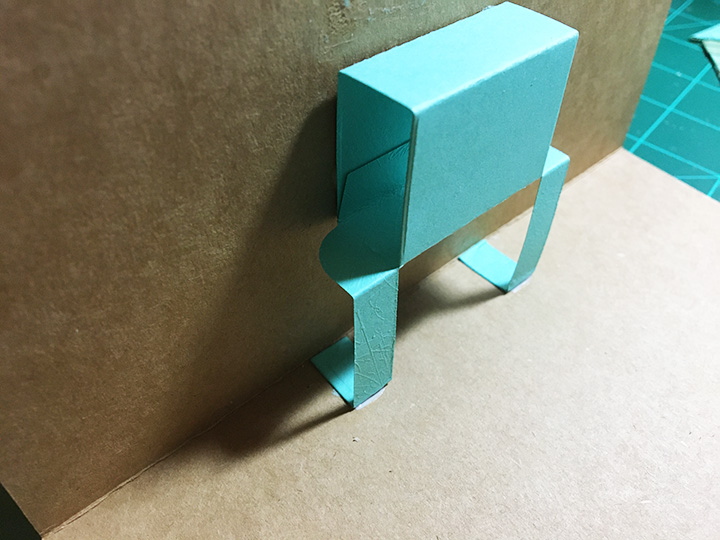
For this card, I’ve used two die sets from the August 2022 release by Karen Burniston Fireplace Pop-Up and Word Set 15 – Just Because. The fireplace is the lower half of the doghouse with half a crosshatch square for the roof.  (I highly recommend watching the assembly video for the fireplace before starting the card.)

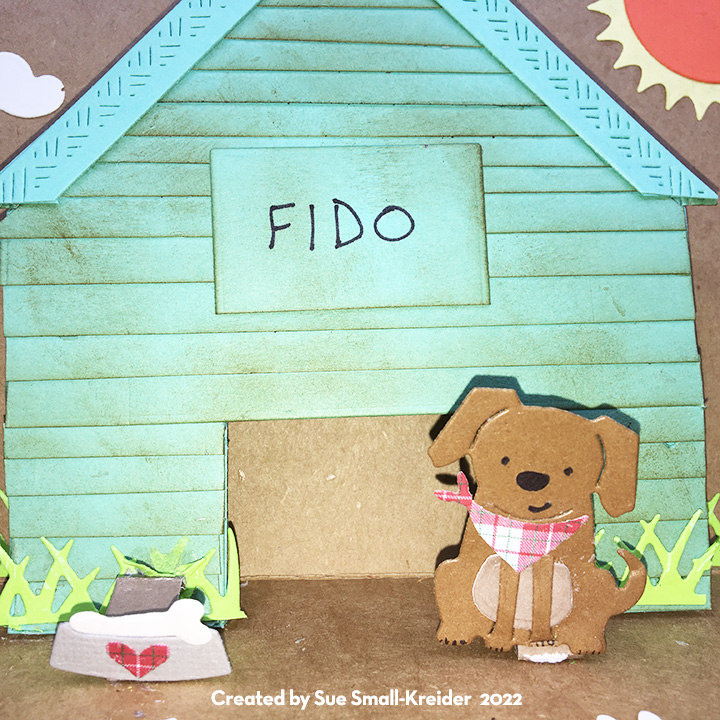
The fireplace mechanism is also used to make the doghouse pop-up. You need to adhere it first before assembling the doghouse. You will need a 5×7 inch card base.

To make the doghouse, I cut the medium crosshatched square diagonally to have a triangle. You should glue the triangle onto the fireplace base so that the height of the house is 4.5 inches high. (I had to trim off the tip of the house to fit into the card when assembled onto the mechanism.)

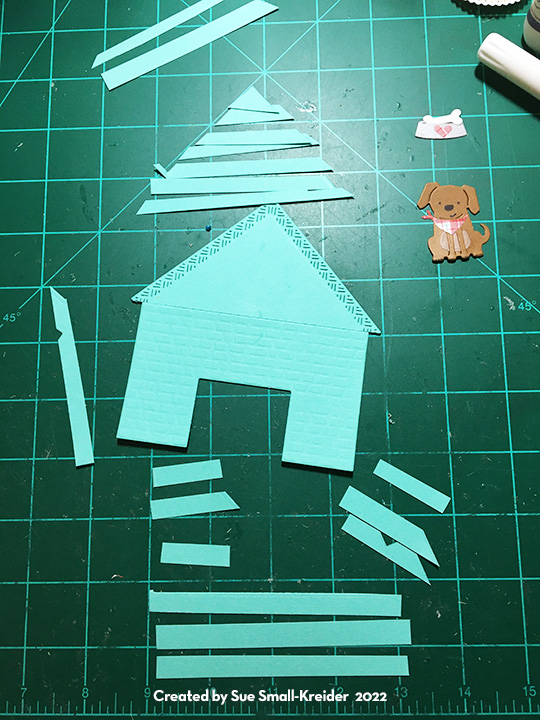
I cut strips of the blue cardstock to become siding on the house. Start gluing strips on at the bottom and overlap them to cover the house, trimming the siding on the triangle to fit the slatted roof eaves.

Use the cut out from the fireplace to make a sign for the doghouse. Using a brown ink, rubbing ink on a sponge from the bottom to top to weather the house.

To create the eaves, use the medium crosshatch square with the next size down square to cut a square frame. Then snip at opposite corners to from two crosshatch eves that cane be glued together and then glued over the eaves and siding on the house.

Glue the house to the mechanism matching up the opening.  Decorate with grass, clouds, sun from various nature decorative die sets by Karen Burniston. The puppy and dog dish with bone are from her Cat and Dog set. (See assembly video for the dog.) They are made to pop-up away from the house using the small pop-up mechanism from the fireplace set. (You could also angle them using KB’s Mini Pops Pop-Up die set.)

The sentiments are from two die sets – Word Set 15 – Just Because and Word Set 10 – Thinking of You.

For the front of the card, I used a rectangle of plaid paper cut a half-inch smaller than the card dimension and used a fine tipped black marker and metal ruler to draw two lines around the paper to frame it. White stich marks were added to the plaid paper with a white gel pen.

The sentiment is another of Karen Burniston’s die sets called Home Sweet Home. The grass and dog were left over from the inside of the card and the hearts are from the “Os” in the front sentiment.

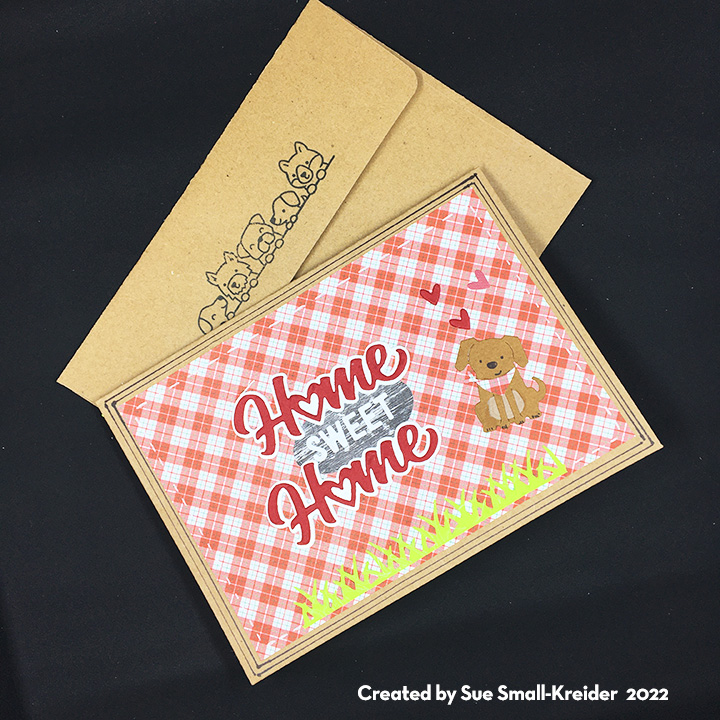
The envelope flap is stamped with a Lawn Fawn stamp with dogs and other critters to hint at what’s to come inside.

Thank you for reading this blog post. Please like and leave comments 😊

Materials Used:

Dies

Papers

  • Colored cardstock and patterned paper scraps
  • American Crafts – 5 x7 Kraft card & A7 envelope

Pens, Crayons, Inks & Coatings

  • Sharpie – Permanent Marker – Ultra Fine Point – Black
  • Sakura – Gelly Roll Pen– 08 -White
  • Memento – Fade-Resistant Dye Ink – Tuxedo Black
  • Ranger – Tim Holtz -Distress Ink – Vintage Photo

Stamps

  • Lawn Fawn – Simply Celebrate Critters

Miscellaneous

A Fairy Tale Story

Hello, it’s Sue of the Dies R Us Design Team and today we are making a slimline pop-up New Home card from the castle collection by Karen Burniston.

You will need:

  • One lightweight green cardstock 9 inches x 4 inches
  • One lightweight black cardstock 9 inches x 4 inches (Or fold one 9 inches x 8 inches green piece in half instead of using two separate pieces)
  • Two starry night patterned paper9 inches x 4 inches 
  • Cut from Castle Pop-Up set
    • One large castle in medium gray cardstock
    • Two Tabbed tower pieces from medium gray cardstock
    • Six decorative large wall pieces using embossing pads from light gray cardstock
    • Two decorative small wall pieces using embossing pads from light gray cardstock
    • Two decorative tower pieces using embossing pads from light gray cardstock
    • Two decorative drawbridge tower pieces using embossing pads from light gray cardstock
    • Two decorative window tower pieces from light gray cardstock
    • Two decorative tower roof pieces from blue paper
    • Four flags from red paper
    • One drawbridge door piece from brown paper
    • One 4-5 piece of thin baker’s twine
  • Cut from Slim Flaps and Frames Set
    • Three top-fold pieces from green cardstock
    • Two side-fold pieces from green cardstock (You don’t need this piece if you are using a single piece of cardstock, folded base)
  • Cut from Mini Pops Pop-Up Set
    • Two large-angled platforms from green cardstock
    • Three small-angled platforms from green cardstock
  • Cut from Winter Charms set
    • Three small fir trees from light green cardstock (filling in hole with cardstock)
    • Two large fir trees from dark green cardstock (trimming off charm ring)
  • Cut from Princes and Mermaid set
    • One head and arms piece from skin-colored cardstock (using stencil on die and fine tipped markers color in facial features)
    • One hair piece from colored cardstock
    • One dress underskirt from dark blue cardstock
    • One dress from light blue cardstock
    • One belt from dark blue cardstock
    • One crown from gold cardstock
  • Cut from Knight and Dragon set
    • One dragon from green pearlescent paper (using stencil on die and fine tipped markers color in wings and facial features)
    • One dragon tummy from white pearlescent paper (using stencil on die and fine tipped markers color in tummy stripes)
    • One flame from yellow cardstock (using stencil on die and fine tipped markers color in flame with red)
    • One heart from red foil card
    • One knight from silver foil card
    • One set of visor, gloves, shoe tips and shoulders from silver foil card
    • One large shield from silver foil card
    • One sword from silver foil card (color handle black with a permanent marker)
    • One helmet plume from red paper
    • One small shield from red paper (Draw a cross on shield using a black marker and ruler)
  • Cut from Word Set 2 – Birthday
    • “a wish” from gold card
  • Cut from Word Set 4 – Just a Note
    • “ing” from gold card
  • Cut from Happily Ever After
    • “Happily, Ever After” from gold card
  • Cut from Nesting Circles Set
    • One circle the size of the castle from green card stock
    • One circle at least a half inch larger all round the size of the castle from blue paper

There are two ways to create the card base – one using two single side flaps in the center of the card acting as the hinge with the top black 9 x 4 piece, and the second way using a single piece folded to form the 9x 4 card base. (I will be showing the first way in photos.) Glue top-flaps to short sides of the green card base. With these flaps closed, glue the two side flaps to the center of card base. Glue the final top-fold flap to front side of the two center flaps.

Castle – Lightly ink the embossed tower and wall pieces with a grey or black Distress Ink. Folded the six score lines on the castle piece.

Adhere all decorative pieces to front and back of castle piece except for back/inside short wall and back/inside drawbridge tower pieces. (You will adhere these pieces once the castle is installed to card base so they can cover over the green and twine pieces.)

Glue tab to undecorated side of castle to form a six-side circle.

Fold both the green circle and the blue circle in half and cut along fold. Glue one half of blue circle to center of the center flaps along the center fold. Adhere the other side of blue circle to other side of fold allowing a small gap along the fold so that the card can open easily. Center the green circle pieces over the blue circle and tape the green circle at sides using removable tape. Using the pop-up die with the nubs, center the nubs over the fold or gap on the green circle and tape. Move the taped green circle with die taped to it to die cutting machine. Remove all the tape from the die and green circle after cutting. Fold up the cut tabs in the circle. Glue the green circle on to the blue circle with the tabs up.

Match the drawbridge tab to the inside of the castle and glue in place with the door/bridge open. Thread twine through top holes in tower. Adhere the solid tab to the inside of castle opposite of drawbridge opening. Glue brown door to top of drawbridge matching up holes.  Thread twine through drawbridge holes and glue to underside of bridge and then adhere bridge open to blue circle. Glue remaining decorative pieces to inside of castle to hide the green tabs and twine.

From scrap green cardstock cut rectangles to hide the blue showing from where tabs fold up. (An alternative would be to cut circle slightly smaller than the green circle of a thin paper that would mimic grass or stone of a castle floor to cover the holes.)

(If your tallest tower hangs out when the card is closed, you can trim the tower some and reglue the flag. I decided that I could live with the hint of the flag showing.)

Knight, Princess and Dragon – Assemble figures following package directions. To attach the figures and trees to the card, first glue any decorative background papers to the back of the three flaps. Layout the position of the figures and trees with angles platforms making sure none of the figures will show when the card is closed. Adhere the figures to platforms and then to the card base following the die package instructions.

Card Front – Adhere a starry night paper panel to black front card base and the other piece to the back side of card base hiding the flaps’ tabs. With card closed, glue black side of front panel to center flaps.

Secure the inside of black panel to card base with washi tape. Glue “ing” to “wish” to form the word “wishing.” Adhere sentiments to front of card.

A personal message can be added above and below the castle.

The finished card will fit into a #10 business envelope.

Hope this pop-up card has put a smile on your face and provided some inspiration for your crafting. 😊

Dies from Dies R Us:

Additional Supplies:

Don’t forget to come join in the fun at the Dies R Us Challenge Blog. There’s a new challenge theme offered on the 1st and 15th of each month and one lucky randomly drawn winner will receive a gift voucher prize to the Dies R Us Store.  

 For your convenience, all the important Dies R Us links are provided below.

click below for:

STORE

CHALLENGE BLOG

FACEBOOK

INSPIRATION BLOG

FRIENDS OF DIES R US PINTEREST PAGE