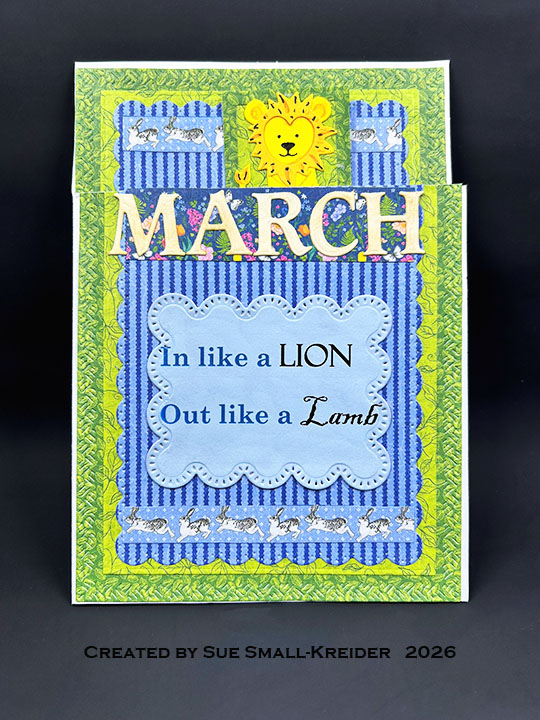
This card was made for Craft Roulette #311 whose parameters were: a card with a tag, aquarium colors, march/March element and twist(s). I created this 5×7-inch card using Karen Burniston stamps and dies as well as Graphic 45 papers.
Watch the process video to see how I made this card.
Cardbase: Watch the assembly video above for how to create the cardbase from a purchased 5×7 cardbase. I trimmed off 1.75-inches from the top of the card front. From the paper collection I used three different designs to cut the mats used on the front and inside of the card. Using the Rectangles and Labels – Crosshatch die set, I cut two of the largest crosshatch border die from dark green, two of the largest plain die from light green and the scalloped rectangle from blue. From the green rectangles I used the medium plain rectangle die to cut out the centers for use elsewhere in the card.The paper collection has a sheet of borders that I cut apart and used to decorate the card.
Lion and Lamb: Watch assembly videos at the bottom of the linked pages for the Chicken, Pig and Lamb and the Monkey and Lion die sets. I used markers to add dimension and texture to the animals.
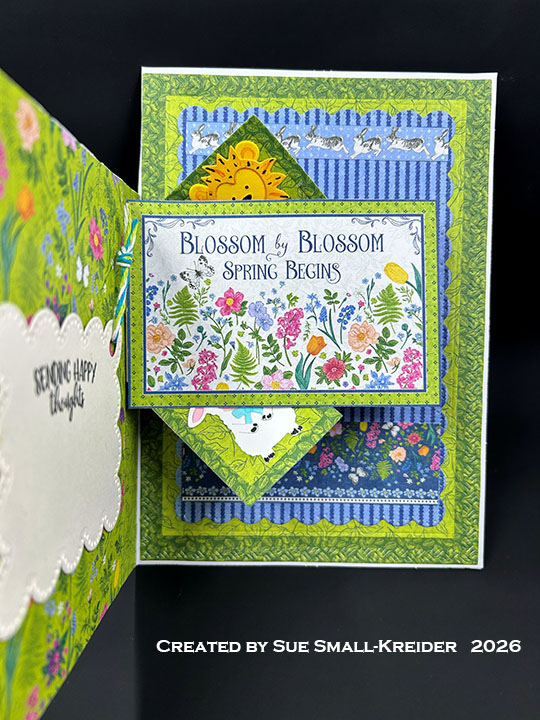
Pop N’ Swap Mechanism: (Watch the assembly video at the bottom of the linked Pop N’ Swap page.) Cut one of the mechanism from a light to medium weight cardstock. Using the two small rectangle dies in the Pop N’ Swap, cut two of the large die from light green and another two using the smaller die inside the larger die to cut frames of dark green. Assemble the framed rectangles with the lion and lamb as shown in the video above. Test placement of rectangles and trim as necessary before gluing the rectangles onto the mechanism arms.
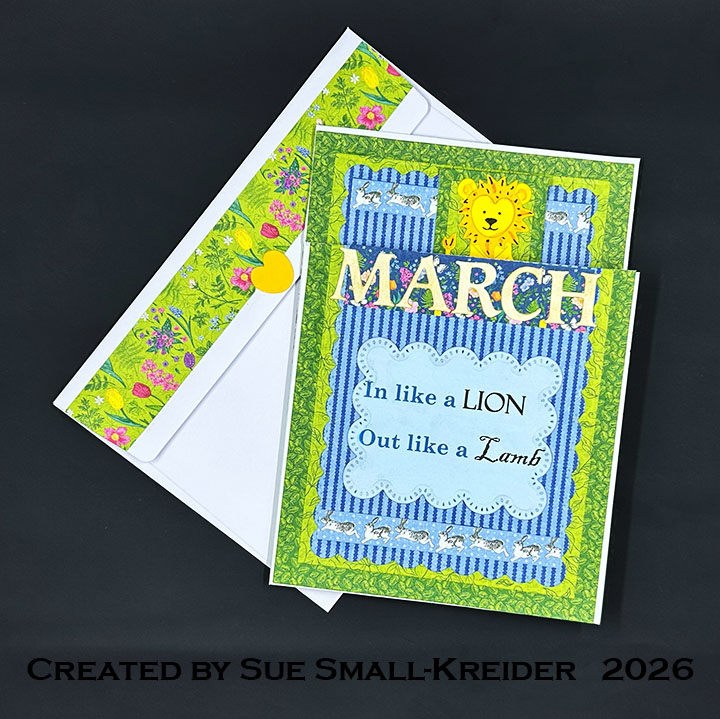
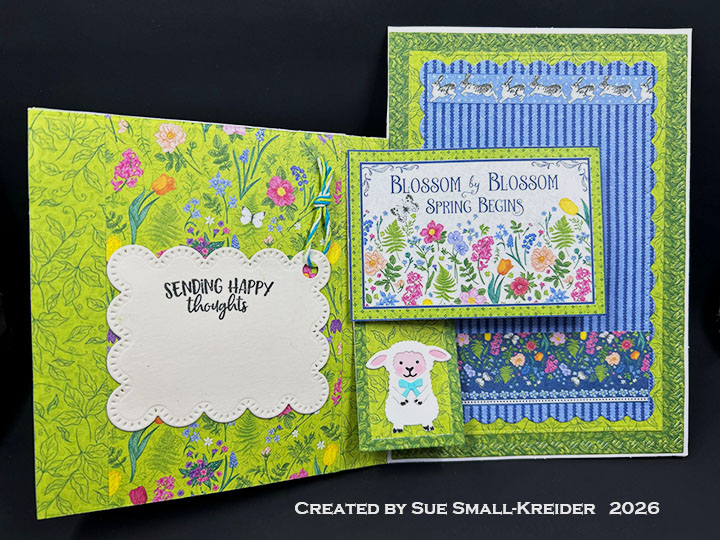
Sentiments: The front sentiment of “March – In like a lion and Out like a Lamb” was originally from the Farmer’s Almanac. I die cut the word “MARCH” using a retired Spellbinder’s Font One – Upper Case and digitally created the rest of the sentiment and then die cut it out using the scalloped edge rectangle die in the Pop N’ Swap die set. Inside, a journaling card was used from the Graphic 45 Spring Is In The Air collection pack for the “Blossom by Blossom, Spring begins.” The tag was cut using the same die as on the card front with a stamped sentiment of ” Sending Happy Thoughts” from Karen Burniston’s Stage Scenes stamp set. I used a hole punch to have a spot to thread some baker’s twine through to make a tag.
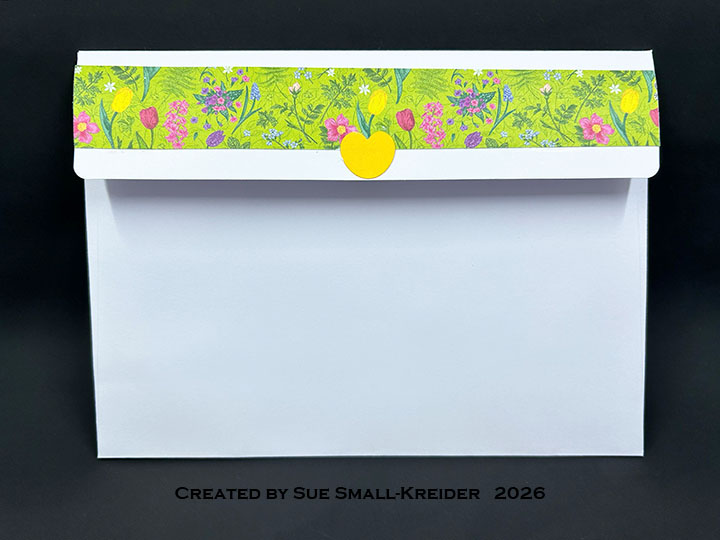
Envelope: The card fits into an A7 (5×7-inch) size envelope with a strip of decorative paper and leftover heart on the back of the envelope.
___________________________________
Thank you for experiencing this blog post. I hope this inspires you and makes you smile.
Please subscribe, like and leave comments 😊
Follow my YouTube channel, Instagram and Pinterest as well.
___________________________________
Disclaimer: Karen Burniston products are provided free of charge by the manufacturer for review and use. All other items were personally purchased. Compensated affiliate links used where or when possible, meaning I will receive a small percentage commission from these manufacturers at no cost to you. This will allow me to add more content to my YouTube channel and help out a lot. Thank you.
Materials Used:
Dies
- Karen Burniston in cahoots with Riley and Company – Rectangles and Labels – Crosshatch – 1233
- Karen Burniston in cahoots with Riley and Company – Monkey and Lion – 1187
- Karen Burniston in cahoots with Riley and Company – Pop N’ Swap – 1133
- Karen Burniston in cahoots with Riley and Company – Chicken, Pig and Lamb – 1092
Stamps
Papers
- Graphic 45 – 8×8 Double-Sided Cardstock – Spring Is In The Air
- Cream, Pink and White Cardstock
- Park Lane Paperie – A7 (5×7-inch) Cardbase and Envelope – White
Ink
- Memento – Fade Resistant Dye Ink – Tuxedo Black
- OLO Markers – Cotton Candy and Sky
- Pigma – Mircon 08 Fine Tip Pen – Black
- Ranger – Tim Holtz Distress Ink – Gathered Twigs
- Ranger – Letteri Fineliner 03 Marker – Yellow-Orange
Adhesives
Tools
- Die Cutting Machine
- We R – Precision Press Mini – Stamping Platform
- Scissors
- Paper Masking Tape
- Pencil
- Sponge Dauber
- Tweezers
Miscellaneous
- Baker’s Twine -Blue, Green & White