Disclaimer: Karen Burniston products are provided free of charge by the manufacturer for review and use. All other items were personally purchased. Compensated affiliate links used where or when possible, meaning I will receive a small percentage commission from these manufacturers at no cost to you. This will allow me to add more content to my YouTube channel and help out a lot. Thank you.
It’s time for the July 2024 Karen Burniston Design Team Challenge with the theme of SET SAIL.
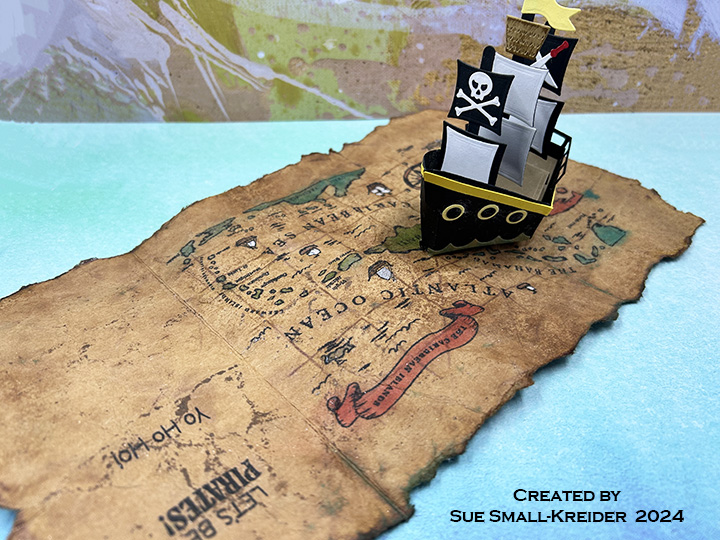
“Let’s Be Pirates” is the theme of this card made withKaren Burniston’s June 2024 release ofnew dies andclear stamps. For this card (which could be used for birthdays, Father’s Day, and just for fun), I used several of the new sets including: Pirate Borders, Pirate Ship Add-Ons and Boat Pop-Up die sets and Pirate Sentiments clear stamp set.
Cardbase: Cut a piece of kraft card stock 7-inches x 12-inches. Score and fold at 3 1/2-inches and 8 1/2-inches to form a gate fold cardbase with overlapping flaps. Stamp map onto cardbase. Use map’s stencils to ink in map. Stamp sentiments using the new Pirate Sentiments stamp set. Tear off and distress the card edges. Crumple up the cardbase flatten and crumple again. Spritz the cardbase with water. Lightly spray brown inks and splatter watercolor paint onto cardbase. Spritz again to allow inks to soak into the cardstock. Crumble cardbase while still damp. Dry flat over paper towel. (You may want to practice all the distressing with ink and water on scrap kraft cardstock before distressing your cardbase. I sprayed water to the back of the map as it was colored with Distress Inks which would run.)
Pirate Characters: Watch the video above to see how the pirate characters were made. The pirate captain’s hat was switched out with one from the new Pirate Borders. The treasure chest and captain hat borders are also from the Pirate Bordersset.
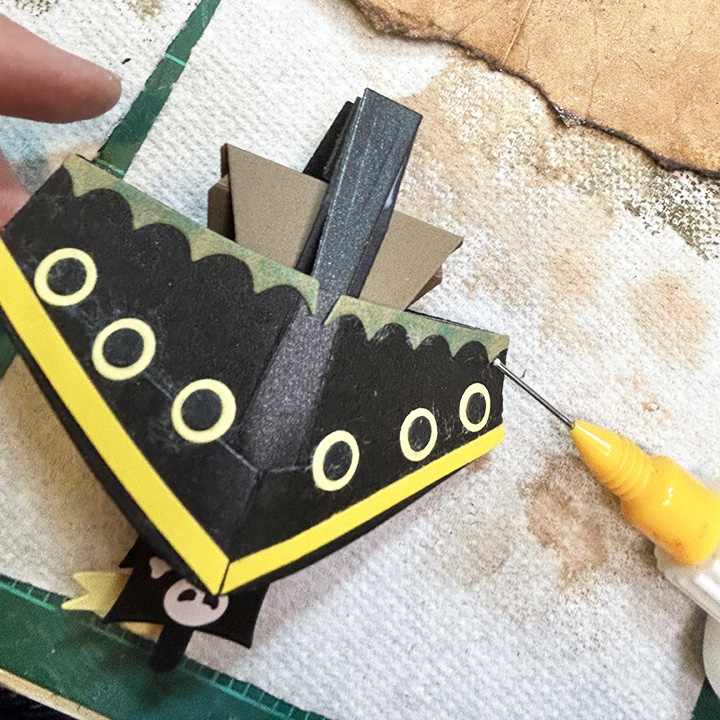
Train the folds on the ship’s body piece cut from the Boat Pop-Up die set in black. Glue the small side tab while the piece is folded flat. All of the following pieces are cut using the Pirate Ship Add-Ons set. Cut the boomerang shaped bow piece from black. Glue to the narrow-tabbed front of the ship while folded flat. Cut the back railing from black and glue to inside of ship back while folded flat. Cut 10 of the small circles in black and 10 of the larger circles in pale yellow. Glue small circles on top of large circles and attach them to ship body as show in photos.
Cut two sets of wave pieces. Ink blue. Glue to the sides of ship body, but not to the front or back flat panels. (The waves stick out in front to a point while the back jut out two wave points.) The tiny edge of the wave pieces match-up at the center side folds.
Cut the deck and seat pieces from the Boat Pop-Up die set in brown. Train folds. Trim off the front edge of the seat piece. (See red circle in photo.)
Cut two of the u-brace pieces from the Boat Pop-Up die set in black. Train folds and fold edges of tabs to fit through slots in the deck piece as shown in photos.
Cut two sets of masts from the Pirate Ship Add-Ons set in a thick back cardstock. Glue the mast pieces together matching up the different sizes to form two smaller masts and one taller mast. Slide the tallest mast through the center slot of the deck down between the two u-braces. (See red circled photo.) Glue to one of the u-brace sides. Add the second mast through one of the end slots and check alignment of the two masts in the folded position. Glue to u-brace. Repeat with third mast.
Test placement of seat (referred to as deck in photos) between center mast and back mast. Glue the deck front tab between the center tab and the mast. Glue back deck tab to back mast tab.
Cut three sets of the two sail dies from the Pirate Ship Add-Ons set in black. Cut three of the smaller sails from white and one of the large sail from white. Attach one of the small white sails to cover one small black sail. Do the same with the large white and black sails. Center the remaining two small white sails to the remaining two large black sails. (I used white label paper that had adhesive on the back.) Cut the sail decorations also from white and use the stencil feature of the skull die. Color the sword handles red. Attach decorations to smaller sails. Cut two of the crow’s nest basket from brown. Ink them brown. Cut the two flags from yellow. Starting with the tallest center mast, glue the flag at the top of the mast, the mast between the two pieces of flag then attach the basket in the same manner. Next attach the all-white small sail followed by the all-white large sail. For the smaller masts glue a decorated sail at the top and then a large sail.
Fold the deck up and add glue just to the front u-brace bottom. Slide folded deck into flatten ship body matching the front body narrow tab with u-brace. Repeat with back u-brace and body tab.
Test opening ship. You may have to help train it opening all the way. Flatten to glue into the cardbase. Add glue to one of the ship body tabs and attach with end of tab being in the cardbase fold. Add glue to other ship body tab and fold cardbase flap over to attach. Wait until glue has dried to open.
Sentiments: Stamp all sentiments before distressing the cardbase using Pirate Sentiments stamp set. On the front flaps are “It’s A Great Day to be a Pirate!” and “You arrr an absolute treasure.” Inside is “Let’s Be Pirates” and “Yo Ho Ho!” There is space inside for either a personal message or a die-cut sentiment such as Happy Birthday or Happy Father’s Day.
Envelope: This card will fit into an A7 (5 x 7-inch) envelope. (I choose to hand deliver the card because of the wax seal on the back of it.)
If you’ve read this far click here to go to yesterday’s Blog Hop Giveaway
Lost treasure, pirates, tropical islands, “Arrrr…,” stories of Long John Silver and Jack Sparrow and International Talk Like a Pirate Day, which happens to be today, September 19, 2022, are what today’s card is all about. (And maybe a little Snoopy too.)
I just love little Skellie, the skeleton from Karen Burniston’s new fall 2022 release of dies. Influenced by the many talented designers on KB’s design team, who have used Skellie as a variety of characters, I had to have him as a pirate popping up in a treasurer chest of gold coins, sword aloft. The Tiny Accessories Set 1 provide the eye patch, sword and head scarf to turn Skellie into a pirate.
The treasure chest is its own set of dies that play well with the Parcel Pop-Up mechanism. I viewed both the assembly videos for the Treasure Chest and the Parcel Pop-Up before making the card. Having worked with 19th century traveling trunks, I know that many had decorative paper lining the inside of them, so I chose a patterned kraft paper using the plain side to be wood embossed side (I used the ink the die method from Karen’s videowith a brown ink cube) and the patterned side for inside the trunk. The trim is a mirrored brown cardstock with the raised circles colored with a fine-tipped permanent marker.
For the front of the card, I used the side palm trees from the Palm Tree Pop-Up and the wavy sand from the Long Nature Edges set. The Long nature Edges stitched hills die cuts two sets of hills, so the second piece is used inside the card instead of the sand pile die that comes with the Treasure Chest set. Shells inked pink from the Tropical Scene die set complete the front of the card and a starfish on the back of the card for fun. The small island with palm trees inside the card are also from this set.
I’ve been wanting to use my pirate sentiment stamps for some time, and this was the card for them. The “Happy Birthday” that comes with the stamp set is small, so I went with KB’s larger sentiment die and shadow die.
Thank you for reading this blog post. Please like and leave comments 😊