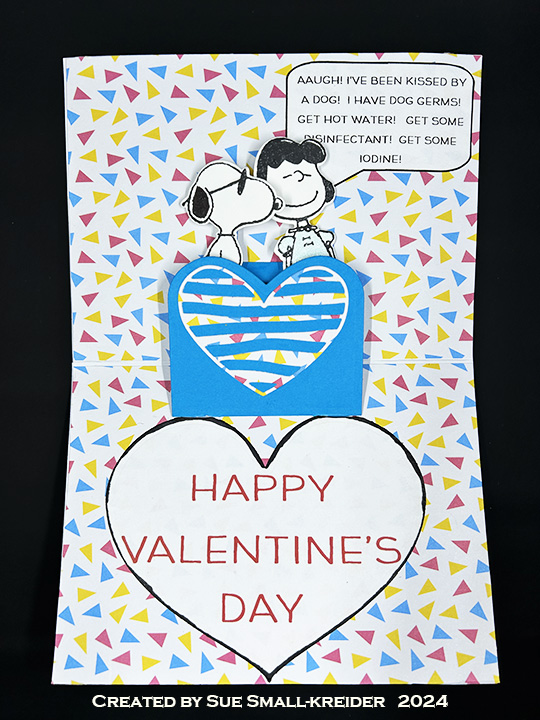
This Valentine was made for Craft Roulette #200 whose parameters included kid’s card, brrrr colors, comic or cartoon element and button(s).
I have had a Peanuts collection of stamps, coordinating dies along with papers and washi tape sheets from Craftstash for a few months and thought the comic parameter was a perfect use of them.
Snoopy has such a cute button nose and the papers have some icy blues. Because a kid’s card needs some interactivity, I used a wiper mechanism by i-crafter to make Snoopy smooch Lucy. The sentiments are all computer generated.
Thank you for reading this blog post. I hope this inspires you and makes you smile. Please like and leave comments 😊
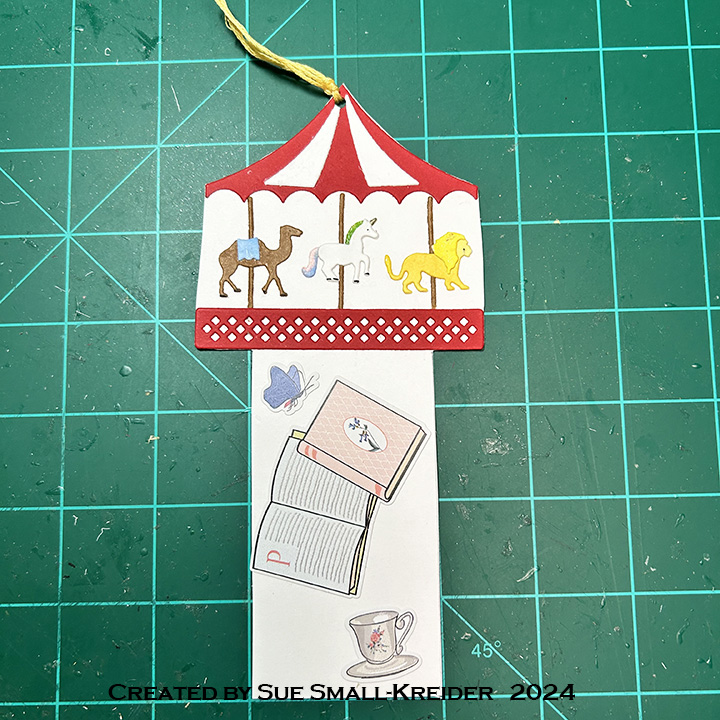
This birthday card was made for Craft Roulette #199 whose parameters included card with a bookmark, bakery colors, large animal element and horizontal lines.
For this card I used dies from two of my favorite crafting companies – Karen Burniston Pop-Ups and Rubbernecker Stamps (rebranded as Brass & Bliss). The front carousel, as well as the animals and lattice work used on the inside cake are from Rubbernecker’s retired Carousel set. The other dies used are Karen Burniston’s Happy Birthday Shadow, Happy Birthday, Cake Trims and Cake Pop-Up.
Cardbase: I used a purchased A7 (5×7-inch) cardbase and envelope. Cut four 5×7 panels of decorative paper. Glue two to the outside and two to the inside of the cardbase leaving the center fold uncovered. (I used two panels of a London park map paper inside the card, matching up the design at the fold.)
Card Front: The background paper, green border and journaling quote card are all from a Mary Poppins themed paper collection. The carousel is a bookmark tucks into the journaling card pocket. To create the pocket, I used thin strips of foam tape on three sides of the journaling card.
Bookmark: Because the carousel die is one piece, I cut it three times from white cardstock and once from red cardstock. For the animals I used markers to color them and glitter markers to add some magic to each critter. Once all the elements for the carousel were cut, colored and assembled, I glued them together at the top of a 4×8-inch rectangle of heavy white cardstock. Using a ruler, draw with a pencil the bookmark base as a 2-inch wide column centered at the bottom of the carousel. Fussy cut around the carousel and bookmark base. Punch a hole in the top point of the carousel. Thread two 6-strand pieces of yellow embroidery floss through hole for a bookmark pull. Decorate base and back with stickers from the paper collection.
Card Back: keeping with the bookmark theme, more of the collection paper was used to cover the card back featuring books and a sticker related to reading.
Pop-Up Cake: Watch the assembly video at the bottom of the link page for the Cake Pop-Up before die cutting. I wanted the cake to resemble the carousel, so the middle layer is white with the animals from the carousel die attached. The base layer is red and uses the carousel base cut in white trimmed to fit the sides of the cake. The top layer uses the Cake Trims set’s scalloped swag trim and the candle from the Cake Pop-Up set to suggest the roof and flag of the carousel.
Sentiments: Happy birthday uses two dies – the shadow cut in pink patterned paper and the words cut in matte gold.
Envelope: The back flap of the envelope has a carousel tent top.
Thank you for reading this blog post. I hope this inspires you and makes you smile. Please like and leave comments 😊
This tag birthday card was made for Craft Roulette #197 whose parameters included a card with two tags, happy colors, nail(s) and “outside the line.”
I followed the directions on Karen Burniston’s assembly video for making this Circle Tag Book Pop-Up (which is on the bottom of the linked page for this die set.)
The Nuvo Dream Drops that I used were fairly easy to apply as finger nails on the hands that were die-cut using a set by Karin Joan’s Missees collection.
For sentiments, I used Karen Burniston’s Happy Birthday with its shadow cut from a holographic pink paper. I added heart hands cut from the same die set as the inside hands. The back white label is a place for a personal message. A gift card could be tucked inside for a manicure.
Thank you for reading this blog post. I hope this inspires you and makes you smile. Please like and leave comments 😊
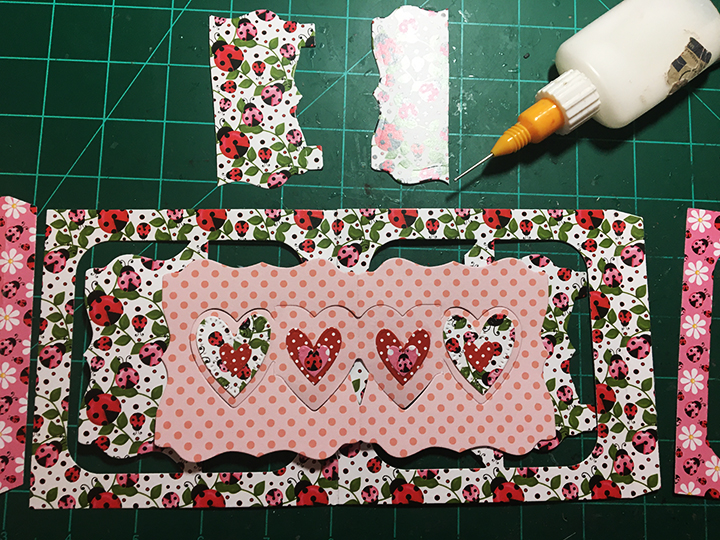
Celebrating Valentine’s Day often brings up visions of candy hearts and chocolate. This is a special display style Valentine card with coordinating candy hearts box and mini gift bag with a ladybug theme.
Before starting, watch assembly videos for the linked die sets. The videos are towards the bottom of the linked pages.
Accordion Frames: Cut four accordion frames using the Fancy Label Accordion die set. They will be decorated AND THEN they will be assembled. It is much harder to decorate a fully assembled accordion card when you cannot flatten the various moving panels and frames.
Hearts Add-Ons: The Hearts Add-On cut a pivot panel that attaches to two Fancy Label Accordion panels. It also has dies to cut decorative hearts in three sizes. Cur one hearts panel from a double-sided decorative paper. Train the folds on the panel as directed on the packaging. Decorate the heart panels on the front and back sides.
Once the panel is fully decorated, work on the accordion frames that it will be glued onto. Glue two frames together using the outer long tab. From one panel cut the label panel along the pivot point making sure to keep the label attached to the pivot bar. Cut the other label, but the cut will look different than the other panel. See photo below. Add glue to the back side of the hearts panel and attach it to one of the label panels. Add glue to the other end of the hearts panel and attach it to the other label panel. (I die-cut one pivot panel from ladybug paper to go over the back of the pivot panels as a decorative feature and to cover over the tabs from the other panels.)
End Frames: Cut two of the largest decorative labels from the Fancy Label Accordion set for use on the end frame panels. Using the stitched heart die from the Candy Heart Box, cut hearts out of the labels. Add labels to the end frame panels. Once the end frames are decorated, attach the end accordion frames to the center hearts frames. Cut off unused tab from accordion panel and glue over contrasting tab on back of card. Cut another tab to cover other contrasting tab. Glue the fancy labels together. (I die-cut one pivot panel from ladybug paper to go over the back of the pivot panels as a decorative feature and to cover over the tabs from the other panels.)
Sentiments: “Happy Valentine’s Day!” is made by cutting the shadow from white cardstock and using contrasting patterned paper for the words. The space for a personal message is on the right back panel and it uses the second largest label with dotted edge in the Fancy Label Accordion set.
Box: The Candy Heart Box is cut in one piece from double-sided decorative paper. Before the box is assembled, a large heart needs to be cut out of the front of the box. Using double-sided tape, adhere a piece of clear acetate or plastic to the inside of the box over the opening. Assemble the box as directed on packaging. (I used glue to assemble the box.) Decorate with hearts and add a scalloped white square folded over for a personal message.
Bag: (Watch assembly video) Using coordinating decorative paper, cut the two Mini Gift Bag pieces and assemble as directed on the packaging. (I used glue to assemble the bag.) Add ribbon or pom-pom string for handles. Decorate with leftover hearts from other pieces in the set.
Thank you for reading this blog post. I hope this inspires you and makes you smile. Please like and leave comments 😊
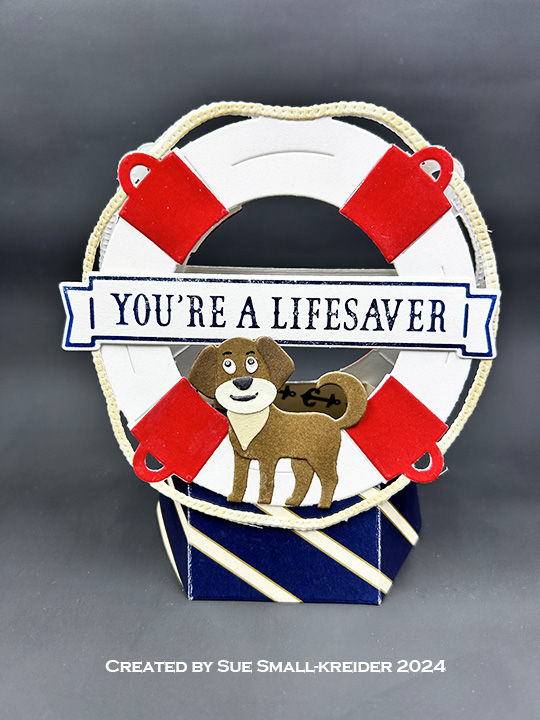
This pop-up display card sail-ebrating life was made for Craft Roulette #196 whose parameters were a celebration project with apple farm colors, preserve(s) element and a dog.
For my card I chose a Valentine theme using excerpts Edward Lear’s 1870 poem “The Owl and The Pussy-cat.” The action in this card comes as a wave lifting the pea-green boat up in the sea near the edge of the sand.
Cardbase: I used a purchased 5×7-inch (A7) white cardbase and covered the front and back panels with decorative blue sea patterned cardstock cut using the largest crosshatch rectangle in the Rectangles and Labels – Crosshatch set. Inside, I cut a 5×7 rectangle out of my one sheet of wave paper making the angle of the waves to match the angle of the raising platform base. From the scraps of wave paper, I pieced out the other inside panel leaving the bottom right corner without waves. I cut a sandy beach from patterned paper to cover the right corner. The edges of the beach were inked with blue ink and sea foam was added using a textured white paint. Trim off excess decorative paper from the card edges.
Raising Platform:(Watch the assembly video before starting.) From blue sea patterned paper cut, using the Raising Platform Pop-Up set, the “L” shaped mechanism piece, the largest label and a strip 1/4-inch by 2 1/2-inches. (Save the strip for use under the Boat section.)
(If your mechanism is cut from a one-sided patterned paper, cut a coordinating blue-green pattern paper cut two of each of the decorative diamond-shaped panels to cover the inside of the mechanism that is visible when assembled.)
Attach to inside of the card base as shown in assembly video/package instructions. Add waves cut from blue-green patterned cardstock using a die from the Tropical Scene set to the mechanism base making sure they don’t have catchpoints.
Owl: (Watch the assembly video before starting.) Cut two owls from brown, a triangle beak and a set of feet from yellow, one set of eyes from black and one oval from white using the Feathered Animals set. Glue white oval to back of one owl piece and attach black eyes. Add white dots to eyes as shown on packaging. Glue back owl piece to front and glue in the brown eye circles to back of head. Using the owl die, stencil on the feathers and wings to front and back of owl.
Cat: (Watch the assembly video before starting.) Cut two cats and two collars using the Cat and Dog set. Using die, stencil face on to one cat piece. Trim tag off one collar and glue to back cat piece and tagged collar to front cat piece. (I used markers and glitter brushes to color the collar.) Glue the green tab cut from scrap green cardstock used for the boat to the back side of one cat piece and then glue the other piece sandwiching the tabbed piece in between.
Boat: The boat is made by trimming off the two arm sections of the Raising Platform Pop-Up “L” shaped mechanism. (See photo for white sections to keep.) Train all the folds in the two pieces. Glue the tab to the inside of each piece to form the pointed front and back of the boat. Place one piece inside the other piece so that the untabbed tip of one piece points into the base point of the other and fold the sides to form a triangle. (See photo of inside of boat for folds.) Repeat with other piece. Glue the two pieces together making sure the boat is long enough to hold the cat and owl pieces.
Take the strip 1/4-inch by 2 1/2-inches cut in the Raising Platform section and fold in half. Fold again a 1/2-inch from the center fold and then 3/4-inch from the center fold. Repeat on the other side of the fold. (If using a one-sided patterned cardstock, cut 1/2-inch strips to cover the two ends that will show when assembled.) glue strip to bottom of boat as shown in photo.
Cut two more of the boat pieces for the inside of the boat. Trim off tabs and cut down the center fold to form diamond shapes. Glue in the cat and the owl inside the boat using their green tabs. Glue green boat diamonds inside the boat covering the animals’ tabs. Trim off excess patterned paper as needed along boat top edges.
Fold strip on bottom of boat form a cradle that the boat sets on when placed on raising platform . Adjust strip’s folds as needed. Glue cradle to platform.
Train boat and platform to close properly.
Sentiments: I used computer generated sentiments sized to be cut using dies in the Rectangles and Labels – Crosshatch set. I aged the pieces that were printed on cream cardstock by roughing-up the edges with a distress tool (knife sharpener) and crumpling the pieces and inking with yellow, brown and blue inks. On the inside sentiment I stamped in yellow a crescent moon in the clouds and on the front sentiment shooting stars in the corners. Tiny iridescent star confetti were glued randomly on the sentiments. On the card back credit is given to Edward Lear for the poem excerpts.
Thank you for reading this blog post. I hope this inspires you and makes you smile. Please like and leave comments 😊
Welcome to our Karen Burniston Products – KB Riley LLC December 2023 Release Blog Hop. (See details at the end of this post for blog list.) The Design Team have come together with Karen today for a fun blog hop to celebrate the release of 7 new dies. Sneak peeks of the new release started last week, and the dies are available to order NOW!
For this fun and interactive Christmas card with two mini ornaments that can go on the recipient’s own Christmas tree, I combined two of the new die sets in Karen Burniston’s December 2023 release – Topper Tags and Raising Platform Pop-Up. I also used previously released sets – Small Script -Christmas, Pattern Plate – Holly and Holiday Charms – to decorate the card.
(PLEASE NOTE: While the video shows both the raising platform installed going up and a second card with it going down, this tutorial will focus only on the assembly of the platform raising UP. You can create a down version by turning the mechanism so the points of the mechanism arms point down.)
Cardbase: Cut two of the largest tags from the Topper Tags set from decorative paper that you want for your card outside. Repeat with another paper for the card inside. (Note: I had to piece one of my card fronts because I was shy about an inch with the red paper.) Cut a strip of decorative outside paper 1/2-inch by 2-inches, fold lengthwise in half and glue inside the front card tags to form a hinge. Glue the inside pieces over the hinge and match-up the tag edges.
Raising Platform: The Raising Platform Pop-Up has two main pieces – the mechanism and the label. Cut one of the L-shaped mechanism pieces from decorative paper. (I cut two diamond shaped pieces to cover the inside of back arm.) Train all the folds and follow the package directions only putting glue on the triangle I marked with an “x.”
Cut from white cardstock the largest of the labels in the set. Fold in half and burnish with a bone folder for a crisp fold. Glue the folded label into the mechanism. (This can be a fiddly bit making sure the mechanism’s triangular tab edges are matching the label’s folded edge.) Test the opening of the mechanism to see if all is aligned and opening as desired before gluing into the card. Be sure to point the tips of the mechanism arms up when installing in the card, as they point to the direction that the platform will move. (Please note this method of installing the mechanism will not allow the mechanism to open totally flat. Karen’s assembly video has an alternate installation method that will allow for a flat opening of the card.)
Tree Branches: Cut two 1-inch by 2 1/4-inch rectangles from a green paper. Fold the rectangles in half lengthwise and glue together. Glue the strips to either side of the white label’s back. Cut six branches from the Holiday Charms Set from a green paper (I used a green and white patterned paper that gives the effect of snow on the branches.) Glue two branches to each strip making sure they don’t extend outside of the card when closed. Snip the remaining two branches into smaller pieces to decorate the top of the label.
Ornaments: The ornaments come from the Holiday Charms set. Cut two of both the circle and ornament topper piece for each ornament from foil cardstock Glue the circles back-to-back and then attach the ornament toppers onto the circle with them connecting back-to-back at their upper loop. You can add the snow flake decoration as I did on the one card or leave the shiny ornaments as they are.
Decorations: When using patterned paper collections that have journaling cards and other cut-out decorative elements, I use them to decorate. From the Topper Tags set I used the flower hole protectors both inside and out. The foiled holly leaves and berries comes from the Holly Pattern Plate trimmed regrouped.
Sentiments: Using the Small Script – Christmas word set, cut just the words “Christmas greetings” from red foil cardstock and adhere to the white label. (While you could adhere the words to the label before folding it. I find the mechanism works better when applying the words over the fold.)
Envelope: These large tag cards with their tied ribbons will fit nicely into #10 business envelopes.
Thank you for reading this blog post. I hope this inspires you and makes you smile. Please like and leave comments 😊
To celebrate the release Karen Burniston and each of the Karen Burniston – KB Riley LLC Design Team members will be giving away a $25 Gift Certificate to some lucky person who comments on our blog posts, so make sure you join the hop and comment on everyone’s blog post. Winners will be randomly chosen from ALL of the blog hop comments received on our blog posts by Monday,18th December 2023. Lots of chances to win some goodies, so just leave a comment on this post or any other blog hop posts to enter! Don’t forget to leave some way for us to contact you, in case you are a lucky winner!
This card was made for Craft Roulette #192 whose parameters included a thank you card, roadside market colors, yard(s) element and confetti.
Heartfelt thanks is the emotion that this accordion-fold card expresses. Inspired by Karen Burniston’s December 2023 release Heart Add-ons pivoting panel, the card features a shaker element filled with confetti. Other Karen Burniston dies were used including: Fence Add-Ons, Thank You and Fancy Label Accordion.
Before starting, watch the assembly videos of the pop-ups which are usually near the bottom of the linked pages for the various die sets used.
Accordion Frames: Cut three accordion frames from heavy blue cardstock using the main large die in the Fancy Label Accordion set. Train the folds of each frame and set aside. (You will cut a fourth accordion frame under the Shaker section using the same heavy cardstock.)
Fence Panel: Using the largest of the label die in the Fancy Label Accordion set, tape it inside the accordion frame die and cut two from decorative paper. Save the inner fancy labels for use on the fence panel. From the decorative paper accordion frames, trim the smaller panel frames away from the larger frame leaving the small tabs attached to the frames. Set both accordion frames and small frames aside for later use. From brown decorative paper cut one fence using the fence die in the Fence Add-Ons set. Cut flowers and grass to decorate fence with using dies also in the Fence Add-Ons set.
Attach a fancy label to the center panel of one of the blue accordion frames. Trim fence to fit panel and adhere to panel. Decorate the fence with grass and flowers. Glue the remaining fancy label to the reverse side of center panel. Set the piece aside.
Heart Pivot Panel: Glue the tab of one blue accordion frame to the backside of the remaining blue accordion frame. Cut from a lightweight teal blue cardstock the Hearts-Add-Ons panel. Train the folds of the hearts panel. From the blue accordion frames cut off half of the center panel leaving them attached at their pivot points. (See photo)
Put glue on the left back side edge of the teal blue hearts panel before attaching to the left blue center panel of the blue accordion frame. Match up the fancy curved edges of the panels. With the blue connecting post of the accordion frame behind the teal blue hearts panel, attach the right side of the hearts panel to the right accordion frame panel.
Cut a hearts panel from decorative paper. Trim out the string of hearts and save to decorate the backside of hearts. Glue decorative panel to the front side of hearts panel. Using the smaller decorative heart dies in the set, cut a number of hearts from patterned paper. Decorate both front and back sides of panel.
Glue the panel frames to the front of the hearts panel with the panel tabs being covered with decorative paper. Trim off the parts of the frames at the center of the hearts panel that are not attached. Set piece aside.
Shaker: Using the largest of the label die in the Fancy Label Accordion set, tape it inside the accordion frame die. Cut the fourth frame piece from the blue heavy cardstock. Keep the dies tapped together to cut four heavy cardstock frames and two decorative paper frames. Use smaller pieces of the heavy cardstock for the four panel frames. Cut the full accordion frame with the decorative paper. Trim the panel frames from the accordion frames and save the decorative paper frames for later. Cut two squares of clear acetate or plastic slightly larger than the panel frames.
To assemble, glue two blue panel frame pieces together. Using 1/8-inch wide double-sided tape around the blue frame, adhere the acetate to frame. Trim off overhanging acetate. Attach decorative pink paper frame over the acetate with more double-sided tape matching up edges. Glue the assembly to the accordion frame panel matching blue frame to blue frame. Repeat with the remaining two blue frames, pink decorative paper frame and acetate piece, but DO NOT attach to accordion frame panel.
Using an anti-static tool, swipe powder over all of the acetate inside the frame and the sides of the shaker frames. Add confetti/sequins to the frame attached to the accordion frame. Glue the remaining shaker frame over the confetti filled frame. Leave undisturbed until glue dries. (To listen to commentary about the anti-static products I used go to my video.)
Accordion Assembly: With all the accordion frames decorated, assembly can begin. Collect the four decorative paper accordion frames previously cut in the Shaker and Fence Panel sections. Cut four more frames from decorative paper, trimming out the inner panels which can be saved for later. Glue the fence panel accordion frame tab to the backside of the first heart panel accordion frame. Glue the second heart panel accordion frame tab to the backside of the shaker accordion frame. Trim off the unused tab on the shaker accordion frame. Cover the backs of all the accordion frames with the decorative paper frames. (This should hide all the tabs.) Glue decorative paper frames to fronts of the accordion frames.
Once all the decoration of frames is completed, glue the center panels of fence and shaker accordion frames to the heart panels. (Note: the tabs that attach to the shaker panel are glued to the front of the shaker panel, while the fence tabs are glued to the back of the hearts panel.)
Cut one of the decorative paper inner panels in half to cover the backsides of the panels cut in half that the hearts panel is attached to. (Green paper in the photo.)
Sentiment: “Thank You” is a die-cut that was cut twice from the same double-sided paper with the blue side used as an off-set shadow behind the pink patterned paper.
Envelope: The card is thick and would require a padded bubble envelope if not hand delivered.
Thank you for reading this blog post. I hope this inspires you and makes you smile. Please like and leave comments 😊
Materials Used:
Dies
Karen Burniston in cahoots with Riley and Company – Heart Add-Ons – 1257