Growing a year older should be celebrated. This show-stopper card is for a 9-year-old.
For this card I used two new dies from Karen Burniston’s December 2023 release – Birthday Candle Add-Ons and the Topper Tags – as well as her Fancy Label Accordion, Fancy Winter Frames, and a few other previously released die sets to decorate.
Before starting, watch assembly videos for the linked die sets. The videos are towards the bottom of the linked pages.
Accordion Frames: Cut four accordion frames using the Fancy Label Accordion die set. They will be decorated AND THEN assembled. It is much harder to decorate a fully assembled accordion card when you cannot flatten the various moving panels and frames. (I assembled this card as I would normally, but the candle and heart add-ons are designed to be assembled with with the accordion frame behind the add-on panel and not as I did by putting the frame’s center post in front of the panel.)
Candles Add-Ons: The Birthday Candles Add-On cut a pivot panel that attaches to two Fancy Label Accordion panels. It also has dies to cut and stencil four candles and their flames. Cut one candle panel from a solid color cardstock. Cut another from decorative paper. Train the folds on the solid color panel as directed on the packaging. Using the largest decorator label from the Fancy Label Accordion set, cut a frame from the decorative paper. (The section between the two label cut outs will fall out and the frame can be cut down the center fold.) Glue the frame onto the panel matching up the edges.
Assemble and decorate the candles using the die stenciling feature or use decorative papers. (Because I needed to celebrate a 9-year-old’s birthday, I did not use all twelve candles that the panel will hold. I decided to add a number 9 as another candle by cutting a “9” using the Numbers die set and cut the top of a candle with the flame attached to the back top of the number.) The flames I cut from a background paper I had made using glitter ink and drew the black burnt wick onto them.
Once the panel is fully decorated, work on the accordion frames that it will be glued onto. Glue two frames together using the outer long tab. From one panel cut the label panel along the pivot point making sure to keep the label attached to the pivot bar. Cut the other label, but the cut will look different than the other panel. See photo below. Add glue to the back side of the candle panel and attach it to one of the label panels. Add glue to the other end of the candle panel and attach it to the other label panel. (See 2nd photo under tags for what the back side of the attached candles panel into the accordion frames.)
Tags: Cut two tags using the second from the smallest tag die in the Topper Tags. (If your paper is a single-sided decorative paper like mine was, cut two more tags that cover at least the part of the tag that will not be covered by the fancy label panel. Glue the tags together as shown in the photo below.) Attach the back of the tags to the fancy label panels on their backsides.
Decorations: The Birthday Charms die set are used for balloons, party hats and cupcake. Three colors of bakers twine are used for the balloon strings and for tag ties. A thin black pen was used to draw the balloon strings onto card back. The frame borders are cut from white copier paper backed with a wide double-sided tape using the polka-dot frame die from the Fancy Winter Frames.
Once the frame borders are adhered, attach the end accordion frames to the candle frames. Add balloons to the folds and then glue the fancy labels together.
Sentiments: Add the sentiments once the accordion frames and fancy labels are all attached together. “Happy Birthday” uses two dies – Happy Birthday Shadow and Happy Birthday. “Just for You” uses three die sets – Word Set 15, Word Set 8 and Mini Alphabet. The “You” is cut from a phrase die and its shadow is created by tracing the outside of the die and fussy cutting. (You could use other word dies for the “You.”)
Envelope: The closed card fits into an A7 (5×7-inch) envelope.
Thank you for reading this blog post. I hope this inspires you and makes you smile. Please like and leave comments 😊
Materials Used:
Dies
Karen Burniston in cahoots with Riley and Company – Birthday Candle Add-Ons – 1258
Karen Burniston in cahoots with Riley and Company – Topper Tags – 1253
It’s the Karen Burniston design team challenge for December 2023 with the theme of “Naughty or Nice” using Christmas stockings and the idea that naughty persons get coal in their stockings while people who have been good/nice will get presents and sweet treats in their stockings.
Before starting, I recommend watching the assembly videos of the pop-ups which are usually near the bottom of the linked pages for the various dies used.
Cardbase: I folded a 7 3/4-inch by 8 3/4-inch rectangle of white cardstock long-wise in half for the cardbase. Because my decorative papers were 4 1/2-inchby 6 1/2-inch, I centered the papers on each of the four panels.
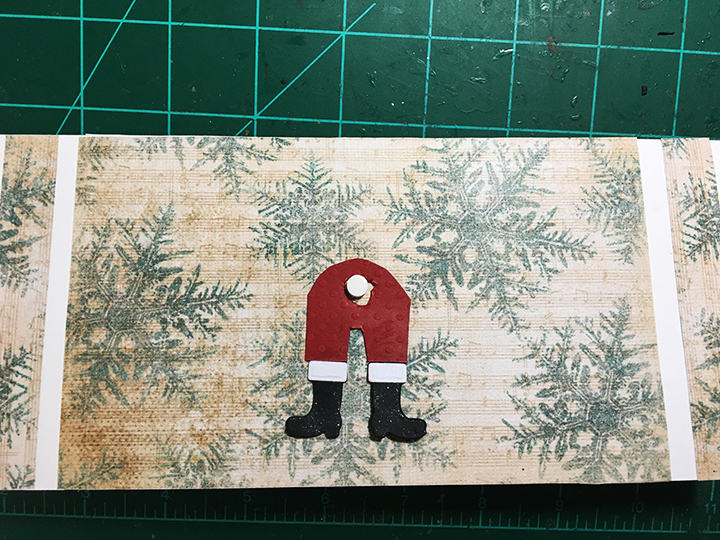
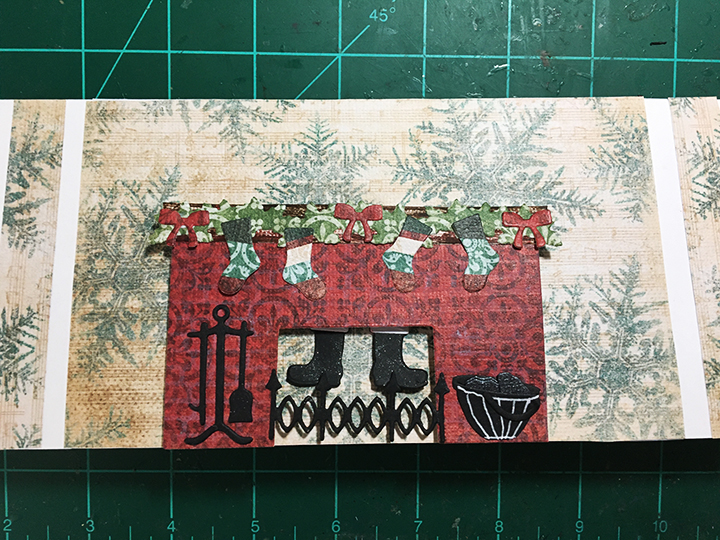
Fireplace: The fireplace main piece was cut using white ink rubbed on the die before cutting. The mantel piece was die cut and folded in half and glued together to add dimension. Christmas decorations – candles, stockings, greenery, bows, fireplace guard and tools are all in the Fireplace Extras 1 set. I cut down the pail from the Adirondack Chair Pop-Up set to be a coal shuttle next to the fireplace. For the picture of Father Christmas, I fussy cut it from the decorative paper collection I used.
Santa’s Boots: The boots are cut from black and white cardstock using the dies in the Fireplace Pop-Up set. Use the tab atop the boots to attach red pants that were cut free-handed with a holed punched and widened to accommodate a small foam dot. The boots were coated with glitter gloss before attaching to the card. Follow the pictures above for order of assembly of fireplace and Santa’s pants and boots. The fireplace was attached with two layers of foam tape to be slightly taller than the foam dot so that the boots would swing freely.
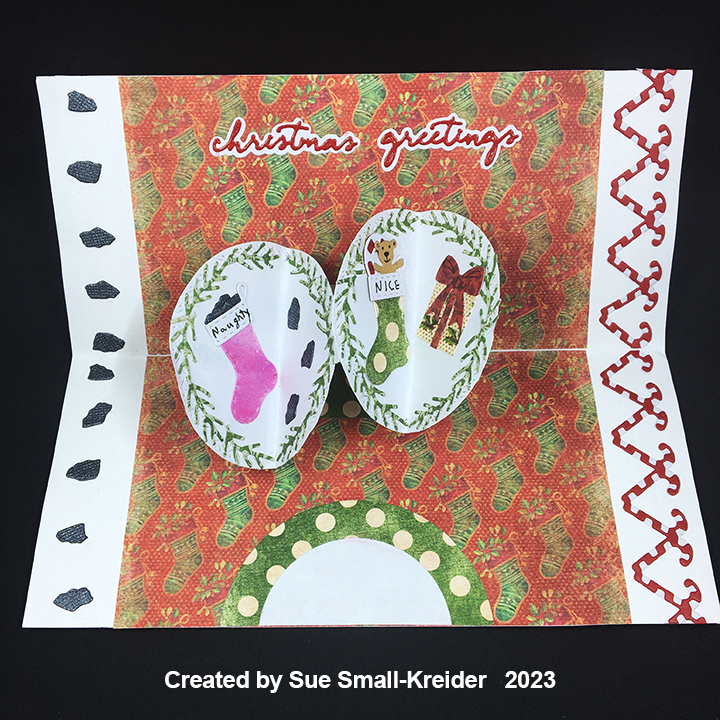
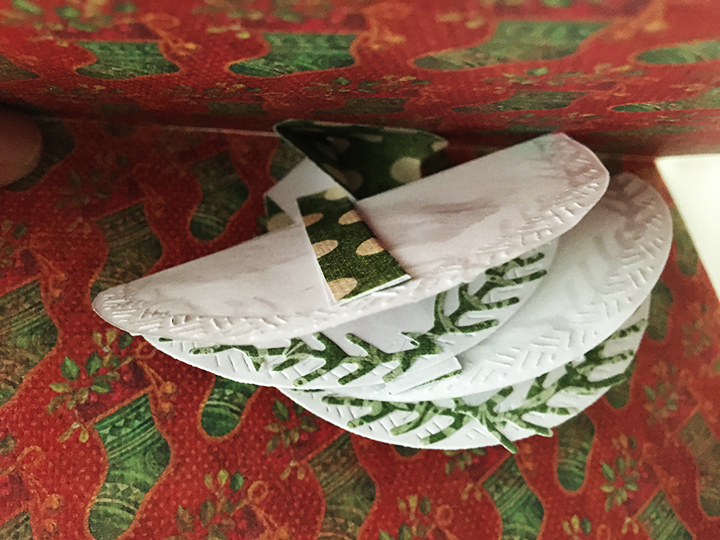
Wreaths: Using the second largest crosshatch circle, I cut two from heavy white paper. The greenery was made by cutting off the fir needles from the branch piece in the Holiday Charms set. Stockings and their coal, teddy bear and candy cane come from the same charms set. The wrapped gift is from the Big Birthday Charms set.
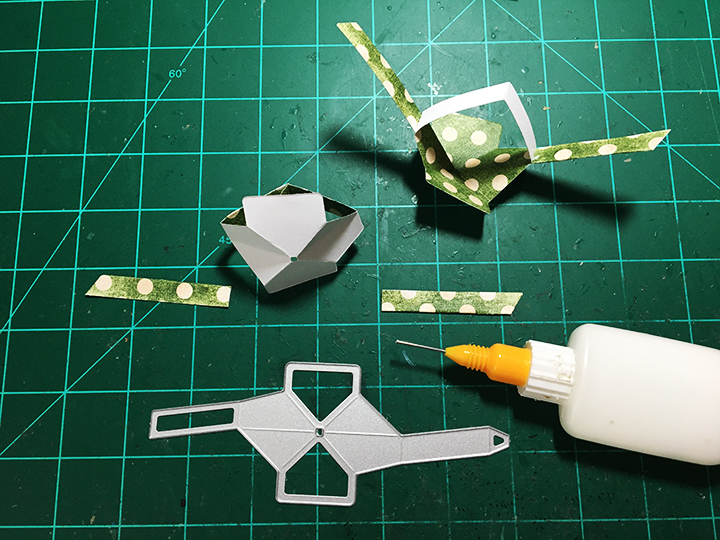
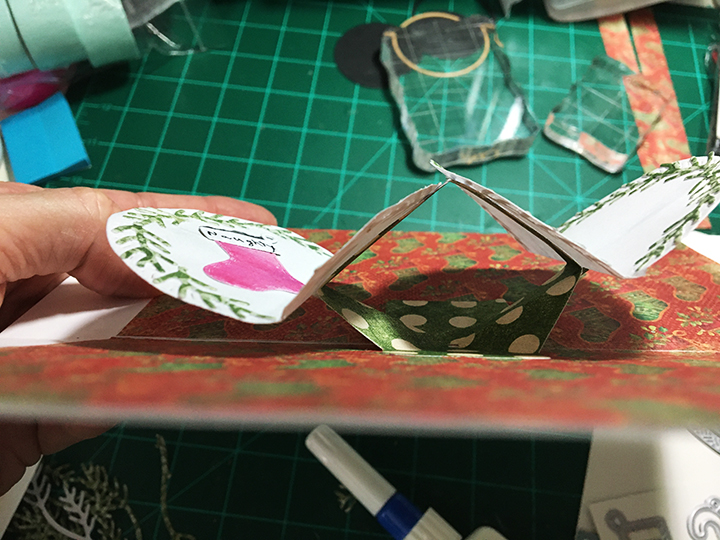
Inside Pop-Up Mechanism: I added extension arms onto the Twist Flower Pop-up mechanism to form a “W” shape. (Watch this Halloween card video to see how to make the mechanism.) The circle wreaths were folded in half and glued to the two “V” arms, playing with the positioning of the circles so there are no catchpoints.
Borders: The inside border of candy canes comes from the Christmas Borders 2 die set while the coal comes from the Holiday Charms. For the back borders, the branch die from the Holiday Charms set was used. Leftover strips of decorative papers were added to the card front as borders.
Sentiments: Clear tape over red cardstock is the secret to the glossy script letters with plain white cardstock shadows. The sentiments all come from the Small Script – Christmas die set. On the front is “ho ho ho” with “Christmas greetings” inside the card.
Envelope: The stocking border from the Christmas Borders 2 set was cut from the same striped paper that was used on the fireplace stockings and glued to the back envelope flap to hint at what’s to come.
Thank you for reading this blog post. I hope this inspires you and makes you smile. Please like and leave comments 😊
This card was inspired by Craft Roulette episode #191 whose parameters were a drop-down card, supper table colors, seasons element (Christmas), and shiny.
This card was made for Craft Roulette. #188 whose parameters included a gift card, coffee shop colors, go wild element and number(s).
Have a friend who finds it hard to get going without coffee? This is the card for them complete with a coffee gift card.
It is made with Karen Burniston’s Coffee Cup Pop-Up that includes tabs to hold a gift card on the back side of the cup. The sweet dragon having his morning cuppa on the card front and the knight in shiny armor atop the coffee cup are also Karen Burniston dies.
Cardbase: Cut from green cardstock one 5×7-inch rectangle and one 5×7.5-inch rectangle. Score and fold 1/2-inch on the 5×7.5-inch rectangle to have a 5×7-inch rectangle with a tab. Glue the tab to the other green piece to make a 5×7-inch top fold card. Cut decorative papers to cover panels inside and out.
Dragon: (Watch the assembly video for the Knight and Dragon die set first.) I cut the dragon from two shades of green cardstock and inked some shading on him. I used the die stencil feature for his eyes, mouth and wings. His red cup is from the Coffee Charms die set.
Knight: (Watch the assembly video for the Knight and Dragon die set first.) I cut two bodies for the knight gluing them back-to-back but sandwiching the red plume behind the helmet first. Add his shield and sword before gluing on his gloves.
Coffee Cup: (Watch the assembly video towards the bottom of the link page Coffee Cup Pop-Up before starting.) I chose to use patterned paper with names of coffee drinks for the body of the cup, white cardstock for the cup lid and kraft cardstock for the cup band. The band die embossed the ridges on it, and I enhanced the ridges with brown ink. Yellow ink was used to shade the cup lid. I used the circle dies in the die set for the logo.
Sentiments: The “Go Wild!” is cut from brown paper using the die set of the same name by Karen Burniston. Th yellow banner inside says “and Slay the Day with Excalibur coffee,” which was computer generated.
Thank you for reading this blog post. I hope this inspires you and makes you smile. Please like and leave comments 😊
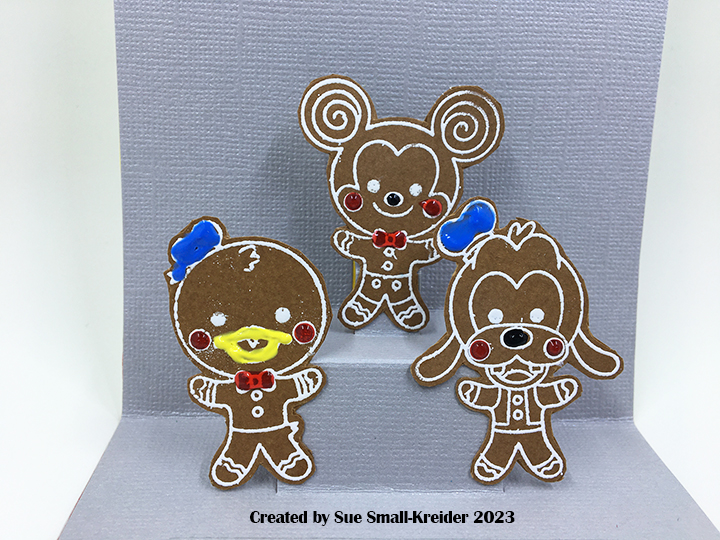
It’s the Karen Burniston design team challenge for November 2023 with the theme of “What’s Cooking” using the Oven Pop-Up die set. I chose to celebrate Pi Day with apple pie making in my card.
Before starting, I recommend watching the assembly videos of the pop-ups which are usually near the bottom of the linked pages for the various dies used.
Cardbase: I started with two rectangles of heavy weight cardstock one piece 5-inches by 7-inches and the second piece 5-inches by 11-inches, scored and folded at 7-inches. The short panel was glued to the back of the 5×7 rectangle to form an A7 top fold card. (The weight of this extra long tab is used to weigh down the floor of the card when open.)
Card Back
I cut a rectangle of the red and white tablecloth paper using the large crosshatch rectangle in the Rectangle and Labels – Crosshatch die set to cover the card front. Because I cut the front decorative paper on an angle, I had some triangles of the paper left over and so I made a table on the back of the card.
Oven/Stove: I followed the basic way to make the oven and cabinets on the assembly video using the cabinet doors from the oven extra’s set. The black mirror cardstock used for the oven can be hard to get glue to stick to, so I often use double-sided tape to stick on the burners, knobs, and window acetate and Glossy Accents to attach the door handle.
Cabinets: Once the stove is attached, you can add the side cabinets. I cut the cabinets from apple green cardstock and then inked them with a brown ink to age them. The upper cabinets and lower cabinet door fronts are cut using the larger rectangle die in the Oven Extras set and then covered with the small rectangle die pieces. Upper cabinets are attached with foam tape to add some dimension to them. A stove hood was cut from silver cardstock and is hidden mostly behind the small upper middle cabinet.
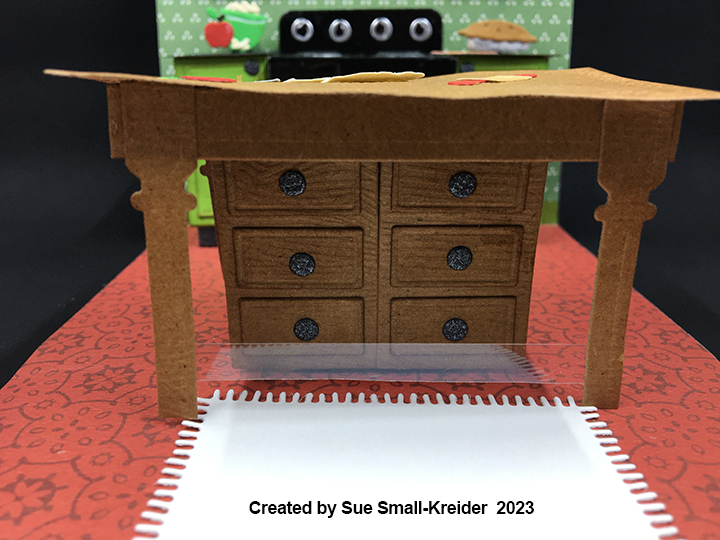
To make the table legs more stable, I added a piece of wood grain cardstock under the tabletop connecting the two legs as well as a thin strip of clear acetate plastic near the bottom of the legs. Tabletop is the second smallest crosshatch rectangle in Rectangles-Crosshatch set. All tabletop parts are cut from woodgrain embossed cardstock and inked with brown ink to bring out the grain. (I think if I made this card again, I would use two layers of cardstock for the tabletop and glue the items on to the tabletop before assembling it so the top would lay flat.)
Decorations: Between the two oven sets are lots of fun pieces that add dimension and realism to the pop-up scene. The Oven Pop-Up set includes the oven mitt, stove burners and knobs, oven rack and door handle. The Oven Extras set includes the cutting board and roasting pan that I used to make a small rolling pin, the knife and the green bowl that holds the apple slices. as well as three pop-up cube strips that I used to pop-up the oven rack, pie inside the oven and the items on the counter.
Apple slices are the leftover bits from cutting two burner plates. Pie crust on table was cut freehand and the burner circle die from the Oven Pop-Up set was rubbed to emboss the pie pan and then cut away to show the trimming of the piecrust. Burner circle is silver pie pan under the crust. The baked pies are cut from silver foil cardstock and brown kraft cardstock using the Picnic Elements set. Brown is inked around the edges of pie crust. The red apples are from the Tree Fruit die set.
Card Front
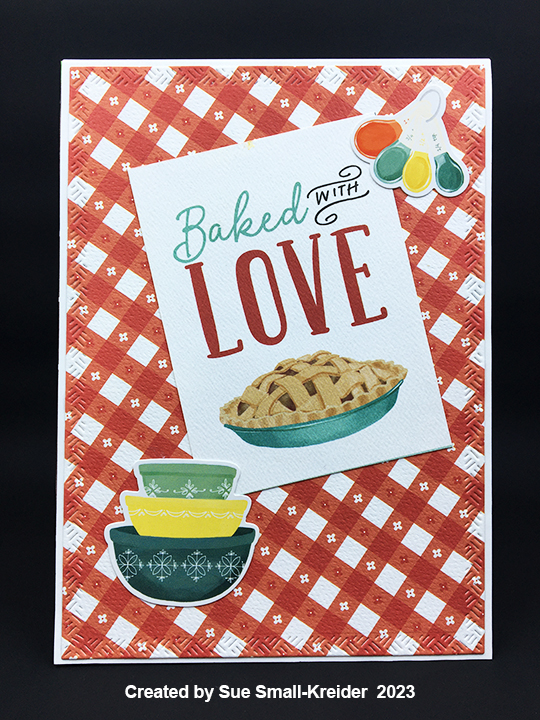
Sentiments: All the sentiments are either stickers, journaling cards or papers from the paper collection Sunflower Market by Carta Bella. The white rug inside the card is place for a personal message and is cut using the base blanket die in the Picnic Elements set.
Envelope: A strip of pie paper is glued to the back flap of the envelope to set the tone for the card inside and are from the paper collection. Two red apples left over from inside the card were also glued on the flap.
Thank you for reading this blog post. I hope this inspires you and makes you smile. Please like and leave comments 😊
This card was made for Craft Roulette #186 whose parameters included a dude card, library colors, large flower(s) and stitched.
These parameters suggested a book box with a pop-up surprise to me. I followed Nicki Baxley’s idea of using an embossing folder with flowers for the cover of the book and Mary Gunn’s idea of a 3D book.
Before the show, I had been experimenting with a new Stampin’ Up stamp and die bundle of skeletons so I had a number of heat embossed skeletons ready. I also had been playing with a Whimsey Stamps ATC Book die set.
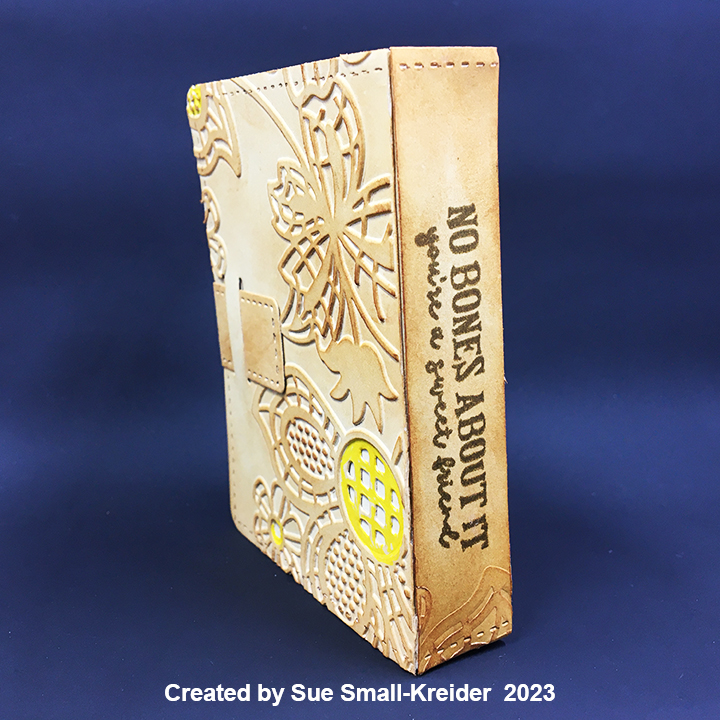
Book Box: Watch this video to see how the book box is assembled. Next, die cut two book cover pieces from kraft cardstock along with one of the box base piece from kraft cardstock and another from textured black cardstock. Run over one book cover with an embossing folder and color the flower centers with a yellow marker. Then trim off the front embossed cover and glue it to the top of the other book cover piece. Stamp the book title sentiment onto the embossed book spine and trim it off to be glued onto the top of the other book cover piece. With Distress Ink, age the book cover along the edges, spine and over the embossed flowers. Use a thin brown marker to color stitch marks embossed into book cover and closure strap.
Assemble the kraft box base. Cut off the tabs of the black box base piece and then trim off the four side pieces. Glue the black base into the kraft box bottom and then glue in black side pieces. Stamp sentiments to inside of book cover. Glue box onto inside bottom panel of plain book cover piece.
Book Pages: Cut three pieces of white cardstock the same width as the end sides and then trim to fit the outside of the box. Glue the white strips to the outside edges of the box. With a fine tipped dark marker, draw thin lines on all the white strips to represent page edges.
Skeletons: Stamp skeleton pieces onto black cardstock with watermark ink. Heat emboss with white detail embossing powder. Use dies to cut out pieces. Glue a jumping skeleton together. Cut an 11-inch by 1/4-inch strip of black cardstock. Fold strip in half and begin folding one strip end over the other to form a spring. Glue spring to the back of skeleton. Attach spring to inside of box. Add cat skeleton below the skeleton’s feet.
Sentiments: Stamp the “No Bones about it, you’re a sweet friend” sentiment on embossed book spine before gluing the piece onto book cover. Stamp the inside sentiments “Happy Halloween” and “BOO to you” before the box is glued inside the cover.
Thank you for reading this blog post. I hope this inspires you and makes you smile. Please like and leave comments 😊
Materials Used:
Dies
Stampin’ Up – Cut & Emboss Dies – Bag of Bones
Whimsey Stamps – Metal Craft Dies – ATC Book – WSD569