Stampin’ Up Gingerbread Man Card

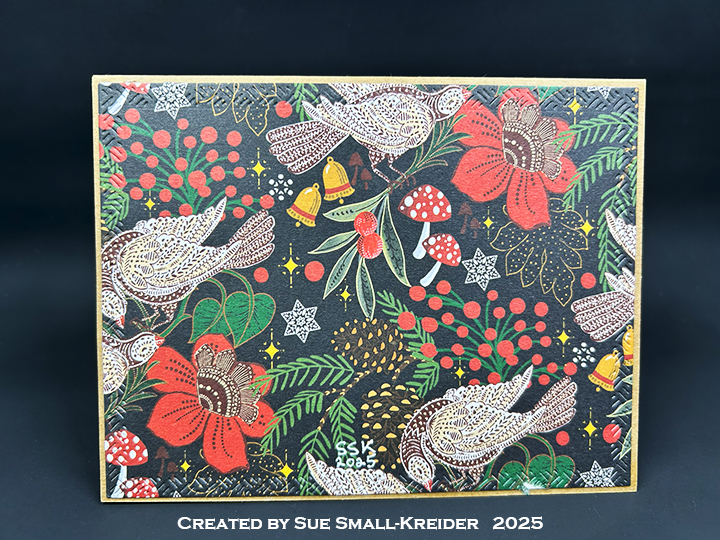
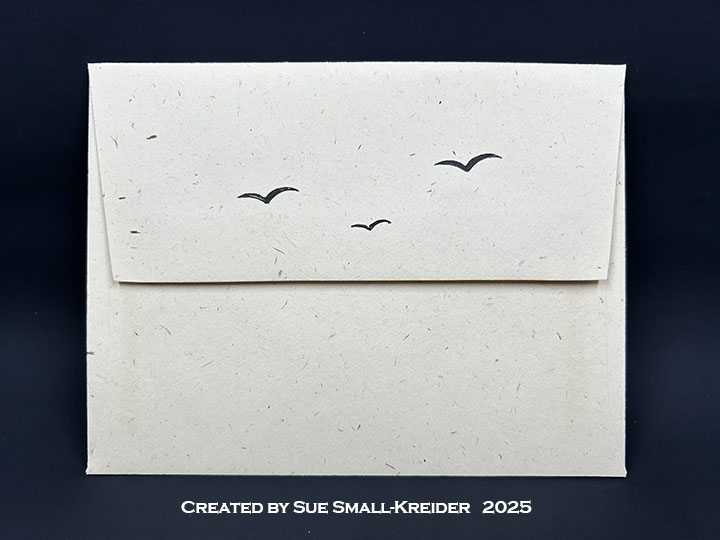
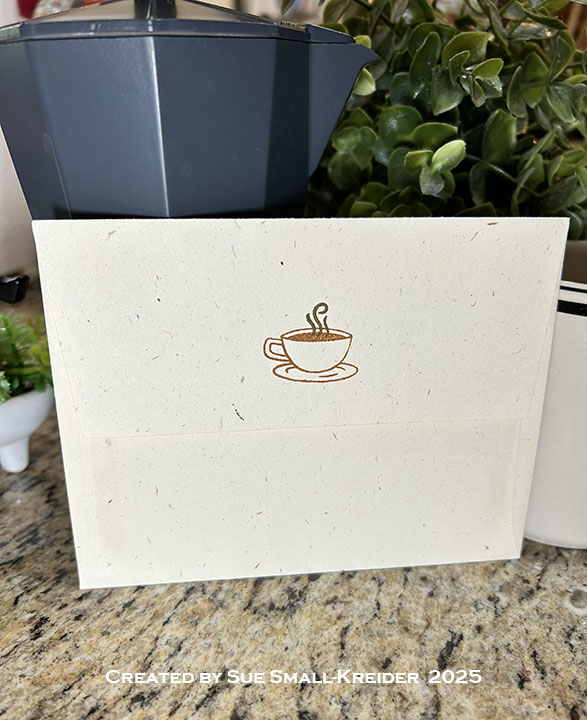
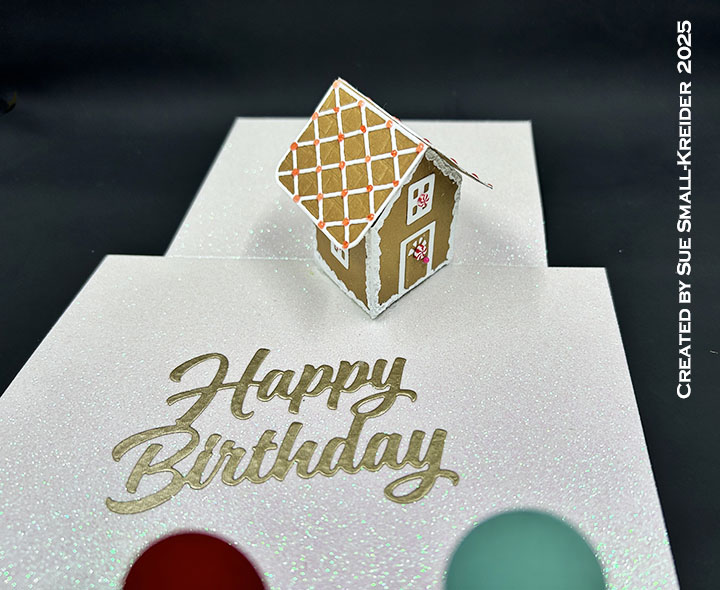
Warm gingerbread smells wonderful on a cold Autumn day fresh from the oven. This card tries to capture that yummy feeling of holiday baking using the new dies and stamps from Stampin’ Up.

Watch the video below to see how the card was made.

___________________________________

Thank you for experiencing this blog post.

I hope this inspires you and makes you smile.

Please subscribe, like and leave comments 😊

___________________________________

Disclaimer: Karen Burniston products are provided free of charge by the manufacturer for review and use. All other items were personally purchased. Compensated affiliate links used where or when possible, meaning I will receive a small percentage commission from these manufacturers at no cost to you. This will allow me to add more content to my YouTube channel and help out a lot. Thank you.

Materials Used:

Dies

  • Stampin’ Up – Stampin’ Cut & Emboss – Gingerbread Man

Stamps

  • Stampin’ Up – Photopolymer Stamps – Gingerbread Man

Papers

  • Rainbow Splash – 8.5×11 100lb Cardstock – Carmel

Ink

Adhesives

Tools

  • Die Cutting Machine
  • Paper Trimmer
  • Stamping Platform
  • Stamping Blocks
  • Scissors
  • Heat Gun
  • Kat Scrappiness – Anti-Static Tool
  • Paper Masking Tape

Day 5 – Week of Good Cheer Christmas Cards

This is Day 5 in the Week Of Good Cheer Christmas Card series featuring cups and mugs of winter beverages like hot cocoa, tea and coffee. Today’s card uses Karen Burniston’s die sets. (GIVEAWAY opportunity near end of post.)

Watch the video below to see how this card was made.

Cardbase:  The cardbase is a purchase A2 (4.25×5.5-inch) brown kraft paper one with matching envelope. The four panels are covered with decorative paper using rectangles cut by the largest die in the Rectangles – Crosshatch set.

Pop-Up Ball Cup:  Watch the assembly video for the Mini Ball Pop-Up located at the bottom of the linked page. Cut two of the ball pieces from red coated cardstock. Cut from the Mini Ball Add-ons 2 – Monkey and Lion die set, two of the curled tail piece – one on the coated side and one on the reverse side of coated cardstock – and glue together with paper tape addition as shown in the video above. Stamp the brown cocoa design onto a scrap of white cardstock and cut out using the Bitty Ball decorator hexagon die from either the Bitty Ball Double-Ups or the Bitty Ball Pop-Up. Cut out two white and one red hexagon frames using the Bitty Ball and Mini Ball decorator hexagon dies. (Mini Ball Double-Ups or the Mini Ball Pop-Up sets both have this die.) Assemble as shown in the video above. The white saucer is cut using the Hexagons – Crosshatch set.

Sentiments:  All the sentiments stamped in brown ink using the Karen Burniston stamp set – Winter Hugs. The labels on which they are stamped were cut using label dies in the Rectangles and Labels – Crosshatch set.

Envelope:  The card fits into an A2 envelope whose back flap is has stamped “Winter Hugs” in brown ink from the Winter Hugs stamp set.

___________________________________

Thank you for experiencing this blog post.

I hope this inspires you and makes you smile.

Please subscribe to the email notices, like and leave comments 😊

___________________________________

GIVEAWAY

I’m cleaning out my dies and stamps and will be giving away crafting bundles to 8 lucky crafters who follow, subscribe and comment on my Week of Good Cheer Christmas Cards posts on Facebook, Instagram, YouTube and my website. (If you comment on all 4 platforms, each day, you have over 28 opportunities to be picked for a crafting bundle.)

Tell me why you like each cup or which is your favorite cup. Winners will be picked by September 2, 2025.

___________________________________

Disclaimer: Karen Burniston products are provided free of charge by the manufacturer for review and use. All other items were personally purchased. Compensated affiliate links used where or when possible, meaning I will receive a small percentage commission from these manufacturers at no cost to you. This will allow me to add more content to my YouTube channel and help out a lot. Thank you.

Materials Used:

Dies

Stamps

Papers

  • Craft Consortium – 12×12 Double-Sided 200gsm Papers – Tis The Season by Linsey Kelly
  • Scrapbook.com – 6×8 Glossy Cardstock – Rainbow
  • White Cardstock
  • A2 (4.25×5.5-inch) Cardbase and Envelope – Brown Kraft

Ink

Adhesives

Tools

  • Die Cutting Machine
  • Stamping Platform
  • Paper Trimmer
  • Scissors
  • Tweezers
  • Scrapbook.com – Mint Paper Tape

Monster Slimline Birthday Card

This card was made for CRAFT ROULETTE #279 whose parameters included a kid’s card, theater colors, picture(s) element, and half & half. I chose to make a monster themed slimline pop-up card using dies by Karen Burniston and stamps by Picket Fence Studios and Craft Roulette.

Cardbase:  The cardbase is a 110 lb. cream cardstock 8.5×7.5-inch rectangle scored and fold in the center to make a 3.75x 8.5-inch top fold card. Three 3.5×8.25-inch rectangles of an orange patterned paper were used to cover the front and two inside panels of the card base. Two off-cut squares of the same paper was used to cover the cardbase back panel.

Triple Platform Pop-Ups:Β  Two Triple Platform Pop-Ups are what make the monster pictures pop-up as the card opens.Β  Watch the assembly video on the linked page. (Video is at the bottom of the linked page.) The base piece was cut from thin cream cardstock, while the trim pieces were cut from the orange paper used as the decorative panels on the card.

Monsters: Β The monsters were stamped on a thin creamy cardstock in black and the colored and die cut using the rectangle base dies from the Photo Collage Pop-Up set. The frames were cut from the same die set using shimmer cardstock.

Sentiment: Β β€œBeware: Monsters like birthday cake” was stamped in black from Picket Fence Studios You Creep Me Out set. β€œHappy Birthday” and its shadow are dies by Karen Burniston. The white stitched label is from the Triple Platform Pop-Up die set. The slices of cake and streamers are from the Big Birthday Charms die set. The card back is stamped with β€œInspired by Craft Roulette, made by” in blue ink on to a white rectangle from the Triple Platform Pop-Up die set.

Envelope:  The card fits into #10 business envelope (4.125x 9.5-inches) which was stamped with β€œHBD” on its back in red ink using the Craft Roulette Funn Sentiments #01 stamp set.

___________________________________

Thank you for experiencing this blog post.

I hope this inspires you and makes you smile.

Please like and leave comments 😊

___________________________________

Disclaimer: Karen Burniston products are provided free of charge by the manufacturer for review and use. All other items were personally purchased. Compensated affiliate links used where or when possible, meaning I will receive a small percentage commission from these manufacturers at no cost to you. This will allow me to add more content to my YouTube channel and help out a lot. Thank you.

Materials Used:

Dies

Stamps

  • Craft Roulette – Clear Stamps – Funn Sentiments #01
  • Craft Roulette – Clear Stamps – The Basics
  • Picket Fence Studios – Clear Stamps – You Creep Me Out

Papers

  • American Crafts – 12×12-inches Single-Sided Paper – 359971-Pink Sprinkles
  • My Favorite Things – 8.5×11-inch 110lb Cardstock – Chantilly Cream
  • Recollections – 8.5Γ—11 Shimmer Cardstock – White Gold
  • Stampin’ Up – 12×12-inches Double-Sided Paper – Stargazing
  • Brown, Cream, Teal and White Cardstock
  • #10 Business Envelope – Kraft

Ink & Pigments

  • Memento – Fade Resistant Dye ink – Paris Dusk, Rose Bud & Tuxedo Black
  • Nuvo – Highly Pigmented Watercolour Pencils – Brilliantly Vibrant
  • Sharpie – Permanet Marker – Ultra Fine Point – Black, Teal
  • Stampin’ Up – Stampin’ Blends – Light Daffodil Delight

Adhesives

Tools

  • Die Cutting Machine
  • Paper Trimmer
  • Bone Folder
  • Scissors
  • Paper Masking Tape
  • Stamping Platform
  • LDRS – Stampendable Stamping Tool
  • Stamping Blocks used as paperweights
  • Water Brush Pen

Sandy Dunes Birthday Card

I just got the July 2025 Simon Says Stamp Card Kit with the theme of Windows on the World. Using the Landscapes stencil from the kit, made this sand dunes scene Birthday card.

Cardbase: Start with a 4.25 x 11-inch piece of cardstock and fold in half to form a side-fold A2 (4.25×5.5-inch) card.

Stenciled Scene: Using the stencil by sticking the 4.25×5.5-inch white cardstock panel through the water patterns slots, I worked my way from the bottom up to build water waves coming ashore, then the sand dunes and finally the cloudy sky. The water used the two darker shades of blue while the sky used the lightest blue. The stencil includes three birds in flight, which I stenciled on using a fine tipped black marker.

Sentiments:  All the sentiments come from the Through The Window stamp set.

Envelope:  The card fits into an A2 (4.25x 5.5-inches) size envelope stenciled with the three birds on the back flap.

___________________________________

Thank you for experiencing this blog post.

I hope this inspires you and makes you smile.

Please like and leave comments 😊

___________________________________

Disclaimer: Karen Burniston products are provided free of charge by the manufacturer for review and use. All other items were personally purchased. Compensated affiliate links used where or when possible, meaning I will receive a small percentage commission from these manufacturers at no cost to you. This will allow me to add more content to my YouTube channel and help out a lot. Thank you.

Materials Used:

Stencils

  • Simon Says Stamp! – 6×6-inch Plastic Stencil – Landscapes

Stamps

  • Craft Roulette – Clear Stamps – Through The Window

Papers

  • SpellBinders – 8.5×11-inch -100lb Cardstock – Raindrop
  • White Cardstock
  • Fraser Papers for William House – A2 Envelope – Genesis Text Husk Smooth

Ink

  • Memento – Fade Resistant Dye ink – Tuxedo Black
  • Pigma – Mircon 03 Fine Tip Pen – Black
  • Stampin’ Up – Classic Stampin’ Pad – Azure Afternoon, Balmy Blue, Crumb Cake, Pacific Point

Adhesives

Tools

  • Die Cutting Machine
  • Paper Trimmer
  • Stamping Platform
  • LDRS – Stampendable Stamping Tool
  • Stamping Blocks used as paperweights
  • Scissors
  • Paper Masking Tape
  • We R Memories – QuickStick

2025 ATC Calendar – July

I started a new challenge for 2025 – the ATC calendar challenge. With a group of crafty friends, we are making a new image on a 4.25Γ—5.5-inch calendar card for each month.

July’s card is made with Stampin’ Up’s Notes & Totes dies and stamps.

Learn how I made this calendar by watching the video below.

To see other months’ calendars go to click here.

Click to see Lois Bak’s July calendar.

___________________________________

Thank you for experiencing this blog post.

I hope this inspires you and makes you smile.

Please like and leave comments 😊

___________________________________

Disclaimer: Karen Burniston products are provided free of charge by the manufacturer for review and use. All other items were personally purchased. Compensated affiliate links used where or when possible, meaning I will receive a small percentage commission from these manufacturers at no cost to you. This will allow me to add more content to my YouTube channel and help out a lot. Thank you.

___________________________________

Materials Used:


Dies
β€’ Stampin’ Up – Stampin’ Cut & Emboss Dies – Notes & Totes

Stamps
β€’ Stampin’ Up – Clear Stamps – Notes & Totes

Press Plates
β€’ Spellbinders – BetterPress Plates – 2025 DIY Calendar


Papers
β€’ Core’dinations – 12×12 Textured Cardstock – Vintage Collection – Blue
β€’ Copper Mirror Cardstock
β€’ Pink Textured Shimmer Cardstock
β€’ White and Yellow Cardstock
β€’ Spellbinders – BetterPress – 5.5 x 4.25” (A2) Cotton Card Panels – Porcelain & Pebble


Ink
β€’ Concord & 9th – Premium Dye Ink – Powder
β€’ Memento – Fad-Resistant Dye Ink – Tuxedo Black
β€’ My Favorite Things – Premium Dye Ink – Lazy Day
β€’ Spellbinders – BetterPress Ink – BetterPress Black
β€’ Stampin’ Up – Classic Stampin’ Pad – Crushed Curry

Adhesives
β€’ Neutral PH Adhesive by LINECO
β€’ Fine-Tip Glue Bottle
β€’ Scrapbook.com – Foam Tape – 1mm


Tools
β€’ Die Cutting Machine
β€’ Scissors
β€’ We R Memories – Piercing Tool
β€’ Blending Brush
β€’ Paper Masking Tape

Adhesives
β€’ The Paper Studio – Brads – Copper

Thanks A Latte

I always need Thank You cards and coffee, so what better way than to combining the two into some cute cards.

I used the Concord & 9th Coffee Blend Turnabout stamp set and coordinating dies for these two Thank You cards.

The inks that I used were from Stampin’ Up – Soft Suede, Cinnamon Cider and Real Red.

___________________________________

Thank you for experiencing this blog post.

I hope this inspires you and makes you smile.

Please like and leave comments 😊

___________________________________

A Pop-Up Zoyfold Birthday Card

This card was made for Craft Roulette #249 whose parameters included a zoyfold card, elegant colors, front door and three circles. (This is my second zoyfold card. Click here to see my first.)

Watch the process video to see how I made this card.

Details and supplies used are below.

Cardbase: The cardbase is really a blend of two cardbases together. The larger card is a 5×7-inch landscape/horizontal z-fold card with an almost square 4 1/2x 5 1/2-inch card for a joyfold card Hence the newly coined card fold – the zoyfold (The term was coined by Mary Gunn Funn and Irene β€œHattrick” Smith on the Craft Roulette Members Show #244.) Watch the process video for assembly instructions. The back of the card is covered with striped paper and a scalloped rectangle from the Karen Burniston’s Rectangles and Labels – Crosshatch die set.

Gingerbread House: (Watch the assembly videos for the Tiny House Pop-Up and Gingerbread Tiny House Add-ons at the bottom of each of the linked pages.) I used Nuvo Jewel Drops, Nellie’s Choice Snow Effects and adhesive backed peppermint candies to decorate the gingerbread house before attaching the house to the card with hot glue.

Sentiments: All sentiments are by Karen Burniston. ”You’re Sweet!” and β€œHappy Birthday” die cuts. The envelope sentiment is from the Sweet Treats stamp set.

Envelope: The card fits into an A7 (5x 7-inch) size envelope.

___________________________________

Thank you for experiencing this blog post.

I hope this inspires you and makes you smile.

Please like and leave comments 😊

___________________________________

Disclaimer: Karen Burniston products are provided free of charge by the manufacturer for review and use. All other items were personally purchased. Compensated affiliate links used where or when possible, meaning I will receive a small percentage commission from these manufacturers at no cost to you. This will allow me to add more content to my YouTube channel and help out a lot. Thank you.

Materials Used:

Dies

Stamps

Papers

  • PinkFresh Studio – 8.5×11 Essential Glitter Cardstock 250 GSM – Glacier
  • Stampin’ Up – 12×12 Double-Sided Cardstock – Marbled Elegance
  • Matte Gold Hammered Fabric Paper
  • Brown, Green, Red and White Cardstock
  • Recollections – A7 Envelope – Cream

Ink

  • Memento – Fade Resistant Dye ink – Tuxedo Black
  • Pigma – Mircon 01 Fine Tip Pen – Black
  • Sharpie – Permanent Marker – Ultra Fine Tip – Red

Adhesives

Tools

  • Die Cutting Machine
  • Paper Trimmer
  • Bone Folder
  • Score Board
  • Stamping Blocks
  • Scissors
  • Paper Masking Tape
  • We R Memories – QuickStick
  • Tweezers
  • Hot Glue Gun

Miscellaneous

  • Kat Scrappiness – Rainbow Dot Sprinkles
  • Nellie’s Choice – Snow Effects
  • Nuvo – Aqua Shimmer – Glitter Gloss
  • Nuvo – Jewel Drops – Strawberry Coulis
  • Scrapbook.com – Pops of Color – Glitter-Champagne
  • Stampin Up – Real Red & White Adhesive-Backed Peppermints
  • 2-inch-wide Red Organza Heart-Edged Ribbon

A Pop-Up Tag Card with a Nautical Theme

This card was made for Craft Roulette #248 whose parameters included a tag(s) , Disney colors, January element, and branch (es) or (ing). I used a Craft Roulette stamp set and two Karen Burniston dies die sets.

Watch the process video to see how I made this card.

Cardbase: Β Using Karen Burniston’s Tag Book Pop-Up die set, I cut two of the large tag frames from heavy weight light blue cardstock and two more from darker blue lightweight cardstock. The rectangular hinge die I cut once from light blue cardstock. The dark blue pieces I trimmed a 1/16-inch off all edges and then glued the dark blue on top of the light blue. The hinge was glued onto the inside of the light blue panels. (Watch Karen’s assembly video for her Tag Book Pop-Up.) You can cut two of the large tags from patterned paper to cover over the hinge on the inside. (It is easier to do the patterned paper background now than after you’ve glued in the yellow pop-up piece as I show in the process video above.) There are a number of decorator dies that come in the Tag Book Pop-Up Set such as the chain rope and hole protectors.

Pop-Up Panels: Cut two of the inside die piece from lightweight yellow cardstock.Β Cut two sets of the decorating strips die from dark blue. Follow the assembly instructions in her video.

Nautical Elements: The nautical elements of a ship, life preserver, anchor and ship’s wheel are all die cut and stenciled using dies from Karen Burniston’s Cruse Charms. (You can watch Karen’s assembly video for these charms at the bottom of this linked page Cruse Charms.) The chain rope borders and dark blue background mats are all dies in the Tag Book Pop-Up die set. The tags have red and white baker’s twine tied to them.

Sentiments: Β  The “Happy Birthday” and HBD sign are stamps in the Craft Roulette Funn Friend #1 stamp set. The “HBD” letters and yellow shade were cut using the stamp set’s coordinating dies.

Envelope: Β The card fits into a purchased A6 (4.5x 6-inches) size envelope or larger.

Below is the Craft Roulette Community Showcase show on which I originally made this card.

___________________________________

Thank you for experiencing this blog post.

I hope this inspires you and makes you smile.

Please like and leave comments 😊

___________________________________

Disclaimer: Karen Burniston products are provided free of charge by the manufacturer for review and use. All other items were personally purchased. Compensated affiliate links used where or when possible, meaning I will receive a small percentage commission from these manufacturers at no cost to you. This will allow me to add more content to my YouTube channel and help out a lot. Thank you.

Materials Used:

Dies

Stamps

  • Craft Roulette – Funn Sentiments Clear Stamps – #1

Papers

  • Bazzill – 8.5×11 Cardstock – Tiara -18-1002
  • Concord & 9th – 8.5×11 Cardstock – Harbor
  • Graphic 45 – 12×12 Double-Sided Pattern and Solids Paper – Let’s Get Cozy
  • Recollections – 8.5×11 65 lb. Cardstock – White
  • Dark Blue, Red and Yellow Cardstock

Ink and Watercolors

  • Memento – Fade Resistant Dye ink – Tuxedo Black
  • Pigma – Mircon 005 Fine Tip Pen – Black
  • Ranger – Tim Holtz – Distress Watercolor Pencils – Hickory Smoke
  • Sakura – Gelly Roll Pen – Medium – White
  • Sharpie – Permanent Marker – Ultra Fine Tip – Red & Yellow
  • Stampin’ Up – Classic Ink Pad – Real Red

Adhesives

Tools

  • Spellbinders – Platinum Die Cutting Machine
  • Paper Trimmer
  • Bone Folder
  • Stamping Platform
  • LDRS – Stampendable Stamping Tool
  • Stamping Blocks used as paperweights
  • Scissors
  • Paper Masking Tape
  • Waterbrush

Miscellaneous

  • Red & White Baker’s Twine

Accordion Birthday Card For A Crafty Friend

This card was made for Craft Roulette #247 whose parameters included a card for a crafty friend, pretty paper colors, bell(s) or belle(s) element, and something gold. I used Craft Roulette stamp sets and Karen Burniston dies.

Watch the process video to see how I made this card.

Cardbase: Β Cut three of the large die from the Landscape Rectangle Accordion die set from heavy weight cardstock. Cut three of the same die from thin decorative papers. Trim out the center pivot panel and side tab to form the decorative frames. Glue frames onto the larger panels. (I used a pretty patterned paper of blue, lavender and green for the center frame and coordinating lavender paper for the other two frames.)

Fence: Β Watch the assembly video at the bottom of this linked page Fence Add-Ons for a how-to on adding the fence into the accordion frame. (I used coordinating striped paper to cover gray cardstock fence pieces before i glued the fence in place.) The bluebell flowers are from the Fence Add-Ons die set.

People: The people were stamped using Craft Roulette’s Funn Friend stamp sets #1 and #2. They are colored with blended watercolor pencils. Using some teal colored twine, I tied a multi-looped bow with a small gold bell onto the card frame.

Sentiments:  On the third panel is the poetic crafty birthday sentiment which was embellished with hand-drawn balloons and a hint of glitter gloss. The sentiment is from the Craft Roulette Funn Sentiments #1 stamp set. The “Happy Birthday” and HBD sign are stamps in the Funn Friend #1 stamp set. “Crafty Friend” was hand written.

Envelope:  The card fits into a purchased A7 (5x 7-inches) size cream envelope. The back flap of the envelope was stamped with “HBD” (Happy Birthday) in a plum colored ink.

___________________________________

Thank you for experiencing this blog post.

I hope this inspires you and makes you smile.

Please like and leave comments 😊

___________________________________

Disclaimer: Karen Burniston products are provided free of charge by the manufacturer for review and use. All other items were personally purchased. Compensated affiliate links used where or when possible, meaning I will receive a small percentage commission from these manufacturers at no cost to you. This will allow me to add more content to my YouTube channel and help out a lot. Thank you.

Materials Used:

Dies

Stamps

  • Craft Roulette – Funn Friends Clear Stamps – #1 and #2
  • Craft Roulette – Funn Sentiments Clear Stamps – #1

Papers

  • Bazzill – 8.5×11 Cardstock – Tiara -18-1002
  • Bazzill – 8.5×11 Cardstock – Gummy Bear 6-6105
  • BoBunny – 6×8 Single-Sided paper – Bee-utiful You Collection
  • Recollections – 8.5×11 65 lb. Cardstock – White
  • Light Lavender Cardstock
  • Recollections – A7 Envelope – Cream

Ink and Watercolors

  • Gel Pens – Blues and Purples
  • Memento – Fade Resistant Dye ink – Tuxedo Black
  • Pigma – Mircon 005 Fine Tip Pen – Black
  • Ranger – Tim Holtz – Distress Watercolor Pencils – Carved Pumpkin, Chipped Sapphire, Festive Berries, Hickory Smoke, Mowed Lawn, Mustard Seed, Tattered Rose, Vintage Photo
  • Stampin’ Up – Classic Ink Pad – Perfect Plum

Adhesives

Tools

  • Spellbinders – Platinum Die Cutting Machine
  • Paper Trimmer
  • Bone Folder
  • Stamping Platform
  • LDRS – Stampendable Stamping Tool
  • Stamping Blocks used as paperweights
  • Scissors
  • Paper Masking Tape
  • Waterbrush

Miscellaneous

  • Craft Consortium – Tis The Season – Gold Metal Bell Charm
  • Fun Stampers Journey – Journey Thread – Beach Breeze