Toaster of Thanks

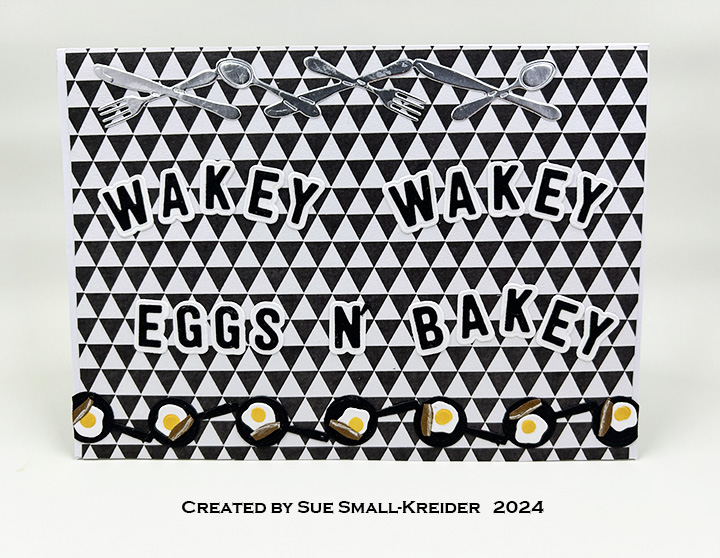
This card was made for Craft Roulette #262 whose parameters included a thank you card, 1950s colors, toast(s)/bread(s), and brown paper.

Watch the process video to see how I made this card.


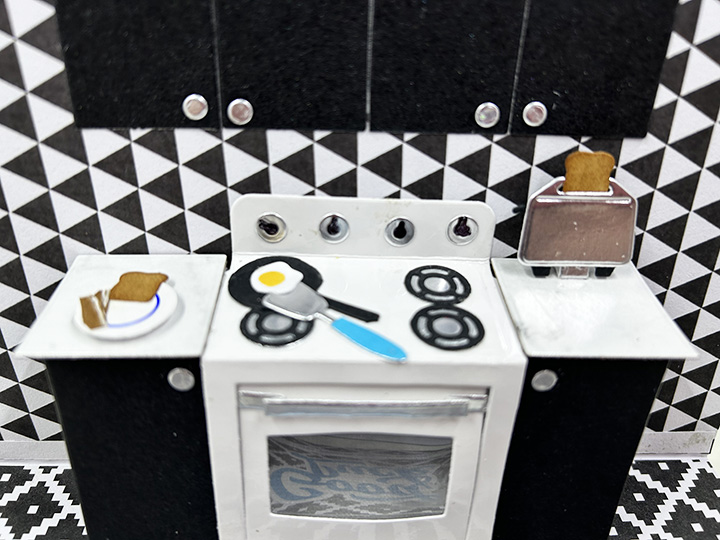
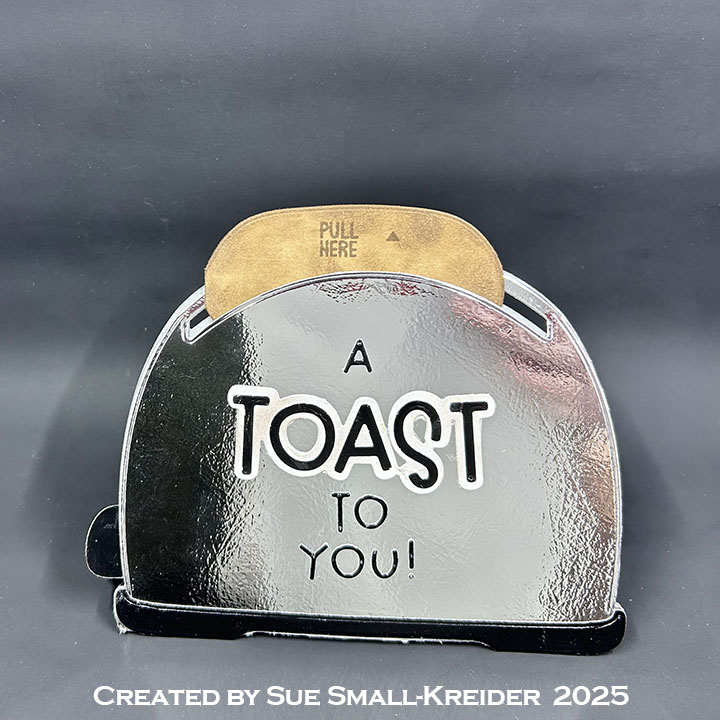
Cardbase: Score and fold in half a8.5x 5.5 rectangle of silver mirror cardstock. From the Trinity Stamps Toaster Card die set, cut the toaster shaped die with its feet just slightly over the fold of the silver folded cardstock to form a toaster shaped card hinged at its feet.


Toaster: Cut one whole toaster from silver and another from gray cardstock. Cut enough of the toaster lever knob to have two knobs that are black on both sides. Glue the knobs to the inside of the toaster card’s left side near the feet. Using 1mm thick foam tape, place tape around the inside of the folded shaped toaster card to form a U shape with the opening is where the slot is. Attach the silver toaster over the foam tape to form a pocket with the slot as its opening. Repeat gluing in knob, adding foam tape and attaching the gray cardstock toaster to the other inside side of the card. Add double-sided tape to the back of some shiny black cardstock or junk mail before cutting out two of the spiraling squiggle from the Elizabeth Craft Designs Karen Burniston Merry Christmas Pop-Up and three of the toaster feet bar from Trinity Stamps Toaster Card die set. Adhere the squiggle stickers to the inside center of the silver toaster and to the back of the card’s toaster. Adhere the feet bar to the silver toasters. The gray cardstock should be without decorations.


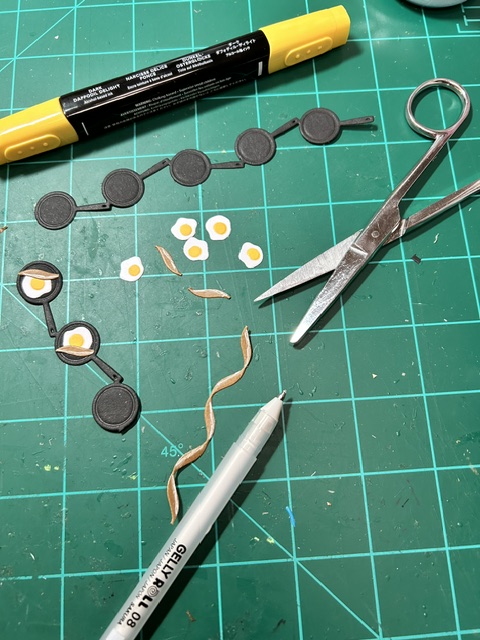
Toast Cards: From brown kraft paper, cut two bread shaped cards using the die from the Trinity Stamps Toaster Card die set. Cut two small bread shapes using the smaller die in the set from white. Ink the inside edges and the whole outside of the brown cards with a dark brown ink. Lightly ink the edges of the white pieces. Stamp sentiments onto the front outside of cards and tops of white pieces before gluing the white to the inside of cards.


Sentiments: The toast cards’ sentiments were all stamped in brown ink using the Rubbernecker Thanks Set and Lawn Fawn’s Push Here stamps. The toaster card front has die cut letters cut from black cardstock/shiny junk mail backed with double-sided tape to form stickers. The “TOAST” word shadow was cut from white and adhered to silver mirror card with double-sided tape. All the die-cut sentiment is cut using the Trinity Toaster Card set.


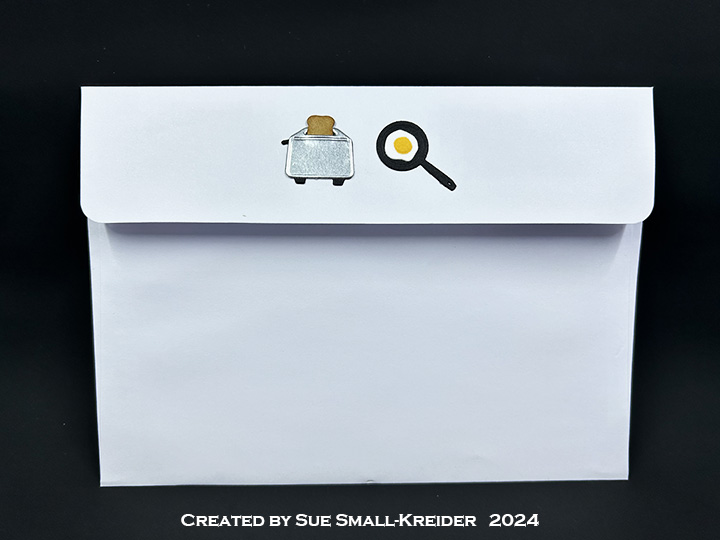
Envelope: The card fits into an A7 (5x 7-inches) size envelope stamped on its flap a piece of bread with a heart using the Lawn Fawn Let’s Toast stamp set.

___________________________________________


Thank you for experiencing this blog post.

I hope this inspires you and makes you smile.

Please like and leave comments 😊


___________________________________________

Disclaimer: Karen Burniston products are provided free of charge by the manufacturer for review and use. All other items were personally purchased. Compensated affiliate links used where or when possible, meaning I will receive a small percentage commission from these manufacturers at no cost to you. This will allow me to add more content to my YouTube channel and help out a lot. Thank you.

___________________________________________


Materials Used:


Dies

• Elizabeth Craft Designs – Karen Burniston Pop It Ups – Merry Christmas Pop-Up
• Trinity Stamps – Metal Dies – Toaster Card


Stamps
• Lawn Fawn – Clear Stamps – Let’s Toast
• Lawn Fawn – Clear Stamps – Push Here
• Rubbernecker – Clear Stamps – Thanks Set


Papers
• Concord & 9th – 8.5×11 80lb Cardstock – Dove
• My Favorite Things – 8.5×11 100lb Cardstock – Mirror – Silver
• Black Coated Junk Mail
• Brown Kraft Cardstock
• White Cardstock
• Recollections – A7 Envelope – White

Ink
• Memento – Fade Resistant Dye ink – Rich Cocoa
• Sharpie – Permanent Marker – Ultra Fine Tip – Black

Adhesives
Neutral PH Adhesive by LINECO
• Fine-Tip Glue Bottle
• Scrapbook.com – Double-Sided Tape – 1/8″ and 4″ wide
• Scrapbook.com – Foam Tape – 1mm thick

Tools
• Die Cutting Machine
• Paper Trimmer
• Stamping Platform
• Scissors
• Paper Masking Tape
• Sponge Daubers
• Microfiber Cloth
• Tweezers
We R Memories – QuickStick

A Toast To You – A Birthday Card

This pun themed card is a pop-up card that has a piece of toast that moves up when the card is opened. It is a top-fold A2 (4.25×5.5-inch) cardbase That uses Karen Burniston’s Parcel Pop-Up mechanism to make the toast and lever move when you open it.

The frame around the inside sentiment is from Karen Burniston’s Frame Pull Pop-Up and the sentiment is from her Photo Memories stamp set. The HBD! stamped on the toast is by Craft Roulette.

The toaster and bread were of my own design. The black decorative design on the toaster comes from a previously released die set by Karen Burniston. The doily is from Paper Discovery.

The letters on the card front are by PoppyStamps.

___________________________________

Thank you for experiencing this blog post.

I hope this inspires you and makes you smile.

Please like and leave comments 😊

___________________________________

Disclaimer: Karen Burniston products are provided free of charge by the manufacturer for review and use. All other items were personally purchased. Compensated affiliate links used where or when possible, meaning I will receive a small percentage commission from these manufacturers at no cost to you. This will allow me to add more content to my YouTube channel and help out a lot. Thank you.

Materials Used:

Dies

Stamps

Papers

  • Recollections – 8.5×11 65 lb. Cardstock – Kraft
  • Scrapbook.com – 6×8 Double-Sided 230 GSM papers – Berry Sweet
  • Gray Cardstock
  • Fraser Papers for William House – A2 Envelope – Genesis Text Milkweed Smooth

Ink

  • Memento – Fade Resistant Dye ink – Tuxedo Black
  • Ranger – Tim Holtz – Distress Ink- Gathered Twigs
  • Pigma – Mircon 005 Fine Tip Pen – Black

Adhesives

Tools

  • Die Cutting Machine
  • Paper Trimmer
  • Bone Folder
  • Stamping Blocks
  • Scissors
  • Craft Mat
  • Sponge Daubers
  • Paper Masking Tape

Wakey Wakey Eggs N’ Bakey

This card was made for Craft Roulette #202 whose parameters included a 5×7 inch card, formal & informal colors, warm(s) element and crisscross. Specifically, this card was made for a son starting a new job that requires an early morning wake-up time.

I use several of Karen Burniston’s new food borders and label dies from her February 2024 release including: Kitchen Borders, Baking Borders, Lorna Label Pop-Up and Good Luck word set as well as previously released Oven Pop-Up and Oven Extras.

Cardbase: Cover a 5×7-inch wide top-fold cardbase with two patterns of decorative paper – one for card front and inside top (think wallpaper) and another pattern for the back and inside bottom (think flooring.)

Card Front Decorations: Using the Kitchen Borders die set, cut one silverware border from matte silver cardstock for the top of the front panel. From black cardstock cut the frying pan/skillet border twice and trim one border down to three pans. Glue the two pan borders together by overlapping skillets. (Skillets are 1-inch wide, so should have seven skillets to cover all the way across card panel.)

Stove, Cabinets and Counters: Watch assembly video for the Oven Pop-Up at the bottom of the page link before starting. I used glossy white cardstock for the stove with a piece of clear packaging for the oven window. For the oven and cabinet base I used a textured silver cardstock and also cut a square piece to cover the back wall of the oven in textured silver. For the cabinet doors on the uppers and lowers, I used the large door die in the Oven Extras set (cut from a coated black cardstock) with the matte silver knobs from the Oven Pop-Up set.

Food: Using the Kitchen Borders set, cut out 8 eggs from white and use die as stencil to color egg yolks yellow. Using the ribbon border die from the Border Blends – Trims die set, cut one from brown cardstock. Using a white gel pen color the bacon fat along one edge of ribbon. Cut ribbon into strips small enough to fit into skillet.

Using the Kitchen Borders set, Cut two pieces of bread from kraft cardstock and using tweezers to hold, ink the edges to look toasted. For the toaster, cut a toaster border from black cardstock. Cut two of the toaster covers with slots from matte silver cardstock. Cut two of the toasters from the border leaving on the tiny levers that connect the toasters. (I cut the levers off and had to use the tiny waste pieces from the stove burners as toaster levers.) Glue the silver piece atop the black piece and insert bread before glue dries positioning it according to the lever position – up with toast almost out or down with toast mostly inside toaster.

For the plate, I used the circle border piece in the Baking Borders set and cut the plate from glossy white cardstock and used the die as a stencil to draw the blue circle in the center of the plate. The spatula is in the Oven Pop-Up set and is cut twice from different cardstocks and the handle trimmed to fit.

Sentiments: The front sentiment of “Wakey Wakey Eggs N’ Bakey” were cut using the Mini Alphabet set’s shadow and letter dies. Inside the card, The Good Luck die set was used along with a computer generated “On your new job” cut out with the banner in the Lorna Label Pop-Up. On the card back the largest label from the Lorna Label was used for a personalized message space.

Envelope: Leftover toaster and frying pan are glued to the back of the envelope. (I would put the card and envelope in a padded envelope to mail, but it will be hand delivered.)

Thank you for reading this blog post. I hope this inspires you and makes you smile. Please like and leave comments 😊

Materials Used:

Dies

Papers

  • DCWV – 12×12 Single-Sided Cardstock – Jet Black Stack
  • The Paper Cut – 8.5×11 Glossy Cardstock – White
  • Bazzill – 8.5×11 Textured Cardstock – Tiara -18-1002
  • Black Coated 8.5×11 White-Core Cardstock
  • Matte Silver Cardstock
  • White Marble Cardstock from Tissue Box Packaging
  • Black, Blue, Brown, Kraft and White Cardstock
  • Park Lane Paperie – A7 Cardbase and Envelope – White

Ink

  • Ranger – Tim Holtz – Distress Ink- Vintage Photo
  • Stampin’ Up – Stampin’ Blends Marker – Dark Daffodil Delight
  • Sharpie – Permanent Marker – Ultra Fine Tip – Black
  • Sharpie – Permanent Marker – Ultra Fine Tip – Blue
  • Sakura – Gelly Roll Pen – Medium – White
  • Computer and Printer

Adhesives

Tools

  • Tweezers
  • Sponge Dauber
  • Stamping Blocks used as paperweights
  • Scissors
  • Pencil

My Better Half

Sometimes you just need to let your partner know that they are the better half of yourself.

I needed to do just that and chose some of my partner’s favorite colors and the cute Lawn Fawn “Let’s Toast” stamp set with its add-on pull tab die set. The double-sided plaid papers are Becky Moore’s Say it with Stamps for Photoplay on a green A2 card base.

First, I stamped the images with Memento Tuxedo Black and colored the toaster with a silver metallic marker. Next, I covered the main body of the toaster with Glossy Accents.  The toast, butter pat and butter dish I colored with blending markers and watercolor pencils.

Because I had never used this Lawn Fawn pull tab mechanism before, I found a video to watch for the assembly. It was easy to assemble, but since I had fussy cut my stamped images, I had to trim down the tabs of the mechanism for the toast to be attached to and not show the edges of the tab.

For the pull tab top, I used a scrap of the green plaid cardstock to cover the portion of the tab that shows when the tab is pulled up matching the vertical plaid line. After this cover was glued down, I added the brown oval with the arrow cut-out and folded it to fit the cut-out notch of the cart rather than using the scored fold mark.

The sentiments were stamped with Versamark Watermark ink and heat embossed with a black detail embossing powder onto white scrap cardstock. The front sentiment was cut out as a banner and adhered to the card front with foam squares and the interior sentiment was cut close and glued in place with its matching images.

To hint at the envelope’s contents, I stamped two pieces of smiling toast onto the back flap with brown ink.

Thank you for reading this blog post. Please like and leave comments 😊

Materials Used:

Dies

Stamps

Inks & Embossing Powder

  • Memento – fade-resistant Dye Ink – Tuxedo Black
  • VersaMark – Watermark Stamp Pad
  • Recollections – Detail Embossing Powder – Ebony
  • My Favorite Things – Premium Dye Ink – Milk Chocolate

Papers

  • Photoplay – Fall Plaids 6×6 paper Pad – Say it with Stamps by Becky Moore
  • White card stock scraps
  • A2 green card base and white envelope

Miscellaneous