Here is a quick summary of cards using the new Karen Burniston Whirly Wheel die set.
(HINT: Click on the photo to go to the tutorial on how to make it.)
________________________
Thank you for experiencing this blog post.
I hope this inspires you and makes you smile.
Please like and leave comments 😊
________________________
Disclaimer: Karen Burniston products are provided free of charge by the manufacturer for review and use. All other items were personally purchased. Compensated affiliate links used where or when possible, meaning I will receive a small percentage commission from these manufacturers at no cost to you. This will allow me to add more content to my YouTube channel and help out a lot. Thank you.
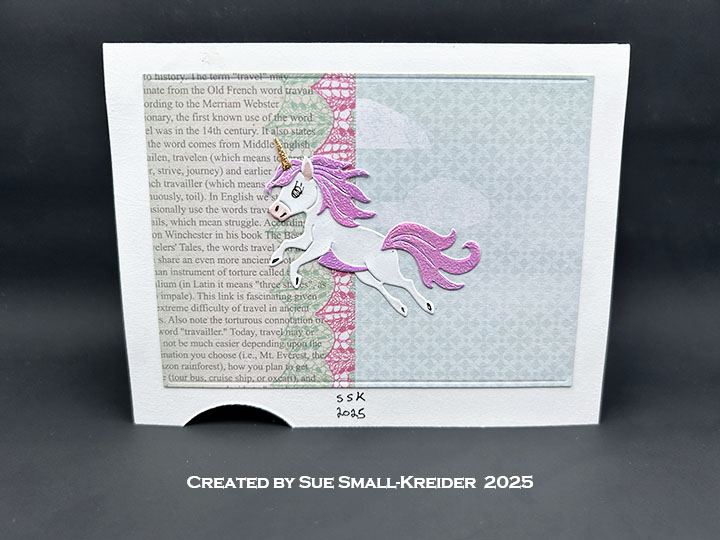
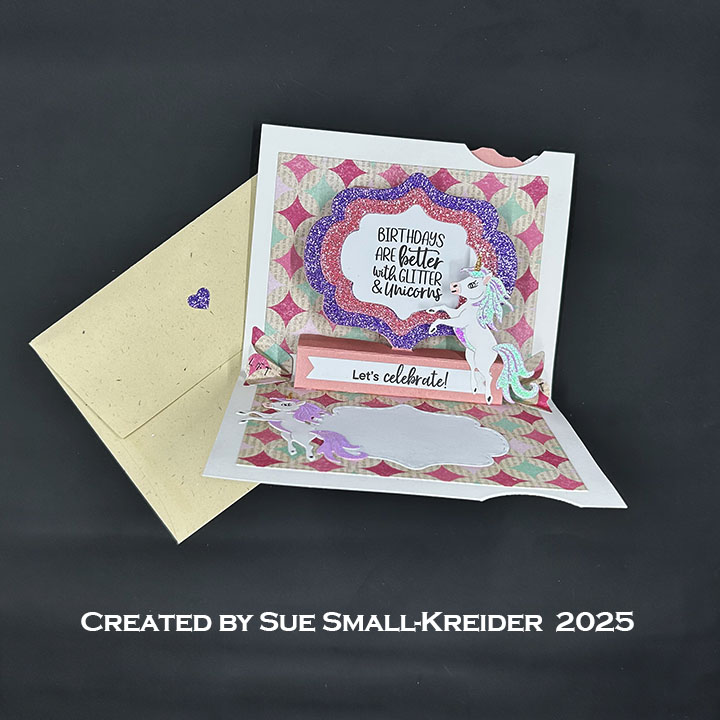
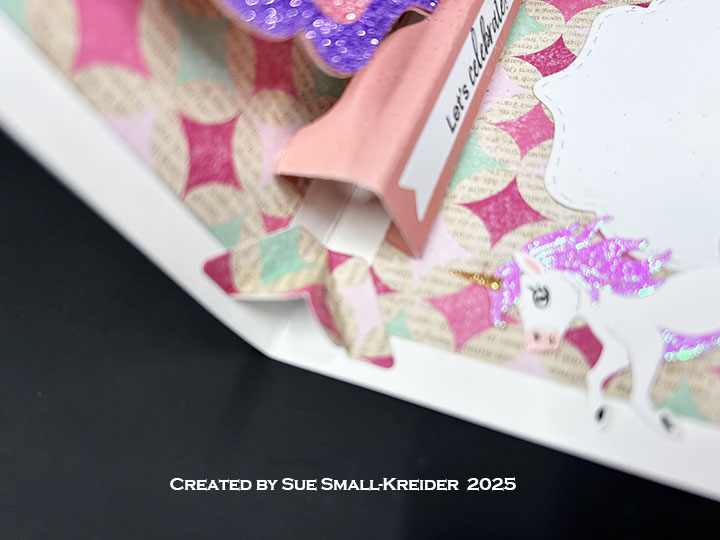
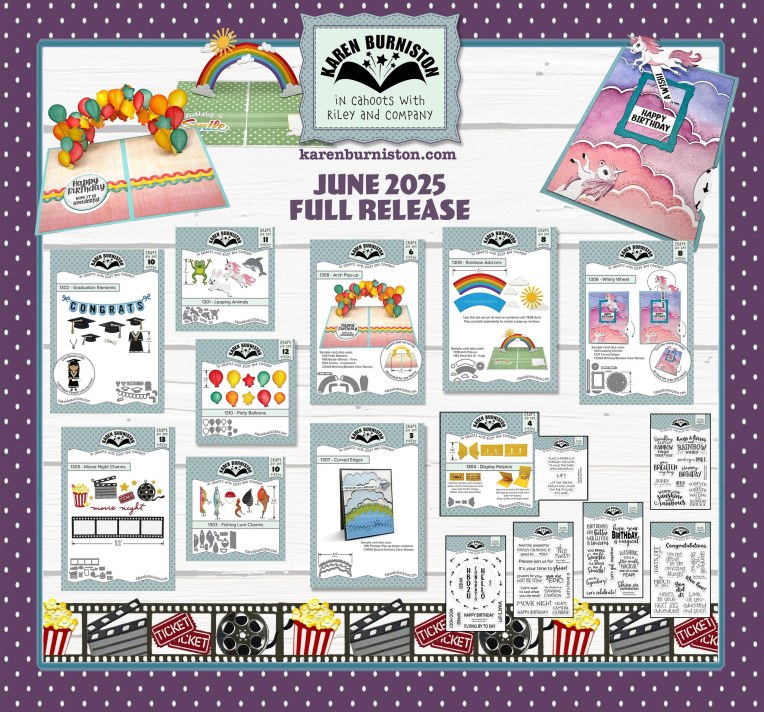
It’s Sneak Peek Week for Karen Burniston’s June 2025 release of ten new die sets and five new clear stamp sets. For this interactive glitter unicorn birthday card, I used several of the new dies including the Leaping Animals, Display Helpers, Whirly Wheel and Rainbow Add-Ons as well as the stamps in Birthday Magic and Movie Night sets.
Watch the process video to see how I made this card.
Cardbase: An 5.5×8.5-inch sheet of light weight white cardstock was scored and folded into a side-fold 4.5×5.5 size card. Watch the video above to see how I cut the half circle into the card and cut my decorator panels of patterned cardstock using the Rectangles – Crosshatch dies.
Unicorns: I used four unicorns on the card made with the Leaping Animals die set. Watch the video above to see how to assemble the animals. There are five dies needed for the unicorn – body, underbelly, horn, mane and tail. Cut the tail, mane and underbelly from pink, horn from gold and body from white.
Whirly Wheel: Cut one wheel and one large thermometer from sturdy pink cardstock using the Whirly Wheel die set. Cut one washer from a sturdy cardstock. (Color doesn’t matter as it will be hidden.) Using stencil feature, ink in arrows on the wheel (or use the Whirly Wheel Words stamp set.) Assemble wheel as shown in video above.
Lorna Label Pop-Up: Watch either the video above or the assembly video located at the bottom of the page linked to the Lorna Label Pop-Up.
Sentiments: The sentiments were stamped using the glitter and unicorns sentiment and “Let’s celebrate!” from the Birthday Magic stamp set. The “Happy Birthday” from the Movie Night set.
Display Helpers:Using the lift dies from the Display Helpers, install at either side of the Lorna Label Pop-Up following the video above. (Using the Display Helpers stamp set, you can stamp out a note to include in your card that says “Lift the tab for display and lower the tab to close the card.”)
Envelope: The card fits into an A2 (4.25x 5.5-inches) size envelope with a die-cut heart from the Lorna Label Pop-Up set glued to the back flap.
________________________________
Thank you for experiencing this blog post.
I hope this inspires you and makes you smile.
Please like and leave comments 😊
________________________________
Disclaimer: Karen Burniston products are provided free of charge by the manufacturer for review and use. All other items were personally purchased. Compensated affiliate links used where or when possible, meaning I will receive a small percentage commission from these manufacturers at no cost to you. This will allow me to add more content to my YouTube channel and help out a lot. Thank you.
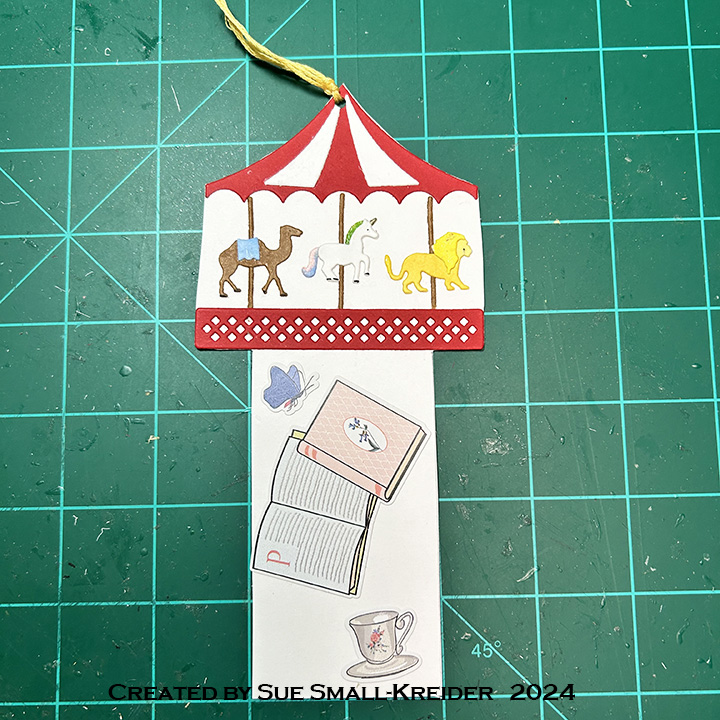
This birthday card was made for Craft Roulette #199 whose parameters included card with a bookmark, bakery colors, large animal element and horizontal lines.
For this card I used dies from two of my favorite crafting companies – Karen Burniston Pop-Ups and Rubbernecker Stamps (rebranded as Brass & Bliss). The front carousel, as well as the animals and lattice work used on the inside cake are from Rubbernecker’s retired Carousel set. The other dies used are Karen Burniston’s Happy Birthday Shadow, Happy Birthday, Cake Trims and Cake Pop-Up.
Cardbase: I used a purchased A7 (5×7-inch) cardbase and envelope. Cut four 5×7 panels of decorative paper. Glue two to the outside and two to the inside of the cardbase leaving the center fold uncovered. (I used two panels of a London park map paper inside the card, matching up the design at the fold.)
Card Front: The background paper, green border and journaling quote card are all from a Mary Poppins themed paper collection. The carousel is a bookmark tucks into the journaling card pocket. To create the pocket, I used thin strips of foam tape on three sides of the journaling card.
Bookmark: Because the carousel die is one piece, I cut it three times from white cardstock and once from red cardstock. For the animals I used markers to color them and glitter markers to add some magic to each critter. Once all the elements for the carousel were cut, colored and assembled, I glued them together at the top of a 4×8-inch rectangle of heavy white cardstock. Using a ruler, draw with a pencil the bookmark base as a 2-inch wide column centered at the bottom of the carousel. Fussy cut around the carousel and bookmark base. Punch a hole in the top point of the carousel. Thread two 6-strand pieces of yellow embroidery floss through hole for a bookmark pull. Decorate base and back with stickers from the paper collection.
Card Back: keeping with the bookmark theme, more of the collection paper was used to cover the card back featuring books and a sticker related to reading.
Pop-Up Cake: Watch the assembly video at the bottom of the link page for the Cake Pop-Up before die cutting. I wanted the cake to resemble the carousel, so the middle layer is white with the animals from the carousel die attached. The base layer is red and uses the carousel base cut in white trimmed to fit the sides of the cake. The top layer uses the Cake Trims set’s scalloped swag trim and the candle from the Cake Pop-Up set to suggest the roof and flag of the carousel.
Sentiments: Happy birthday uses two dies – the shadow cut in pink patterned paper and the words cut in matte gold.
Envelope: The back flap of the envelope has a carousel tent top.
Thank you for reading this blog post. I hope this inspires you and makes you smile. Please like and leave comments 😊