Ahoy! A Nautical Hello

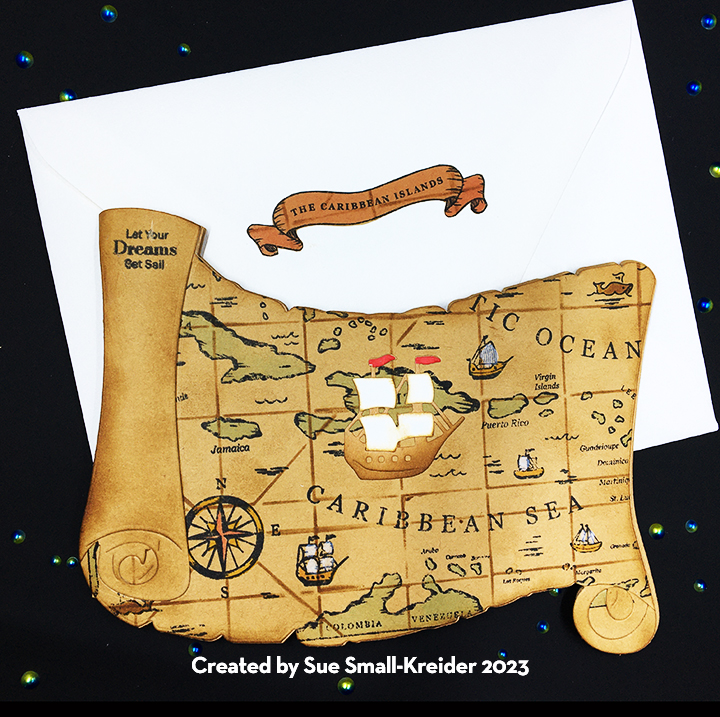
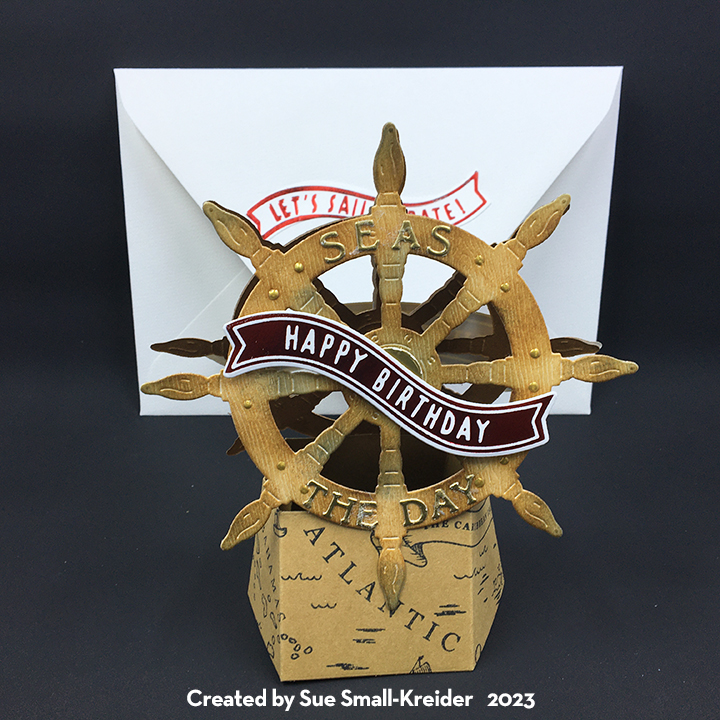
I am enchanted with Sabrina Leavell‘s new nautical collection of pop-up stand cards. (See more pop-ups – Life Preserver and Ship’s Wheel by clicking on them.)

For this pop-up 3D card, I used products from Scrappy Tails’ new Nautical 2023 June Collection.

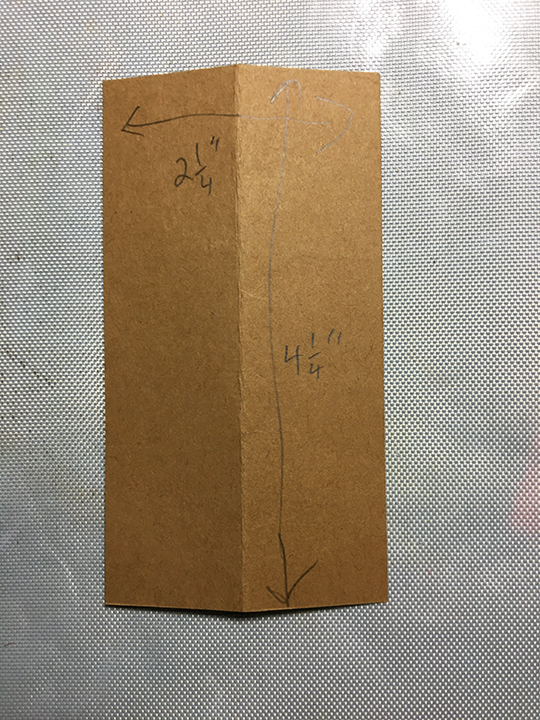
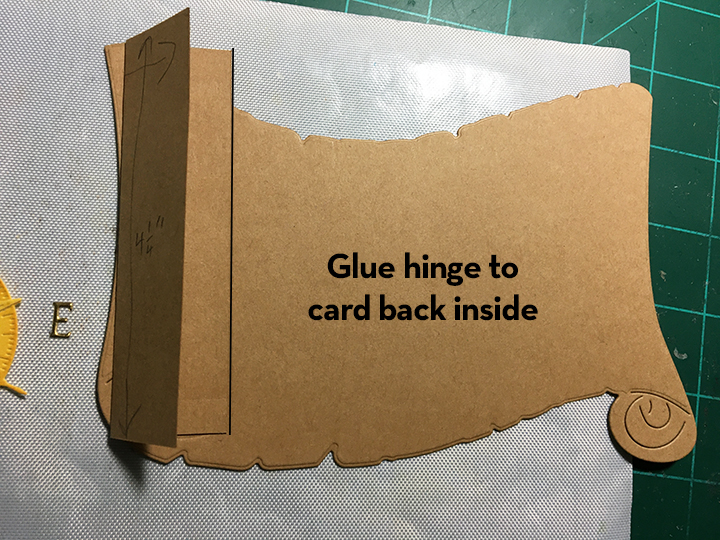
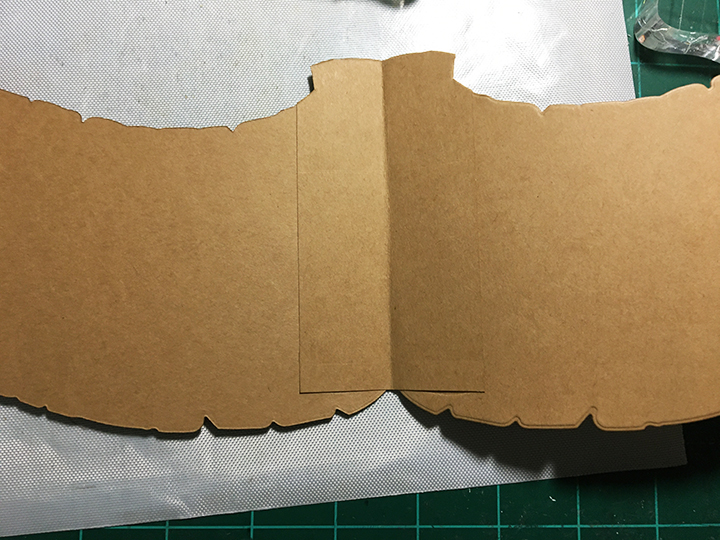
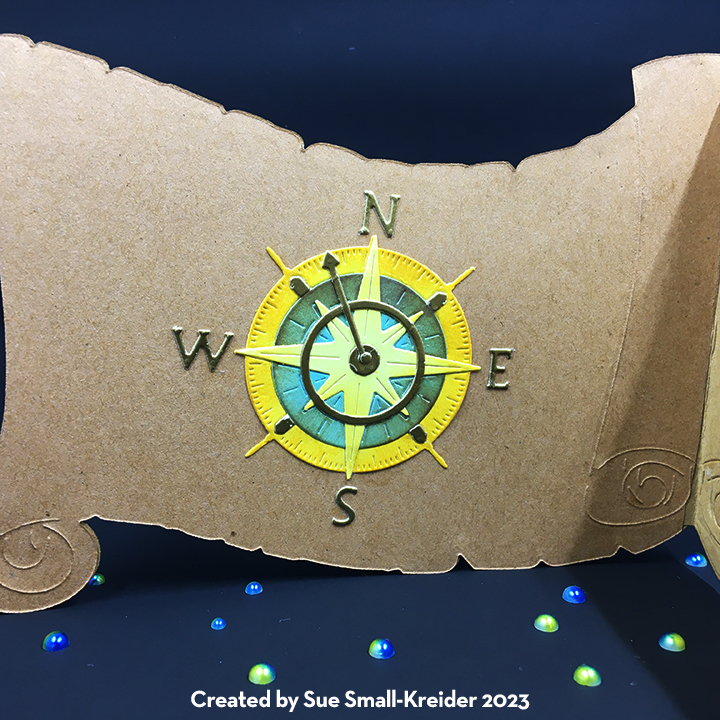
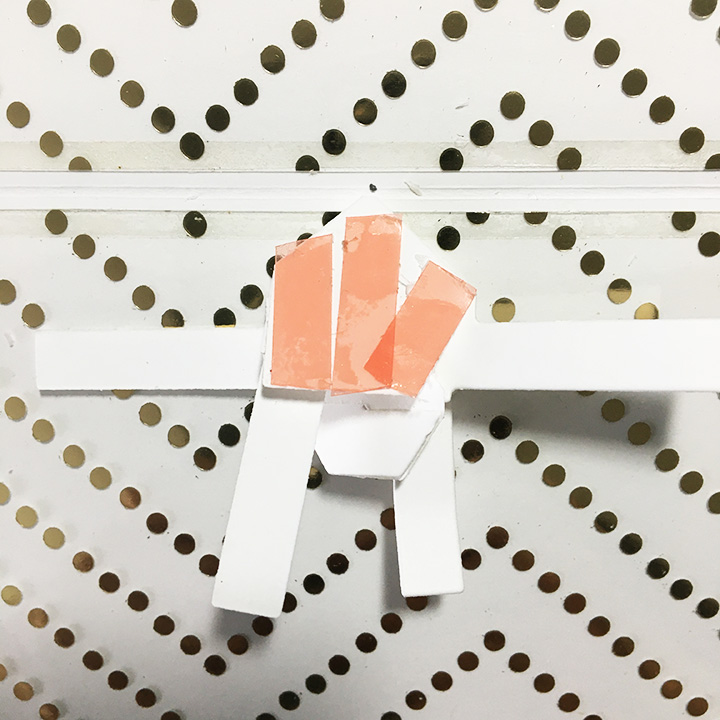
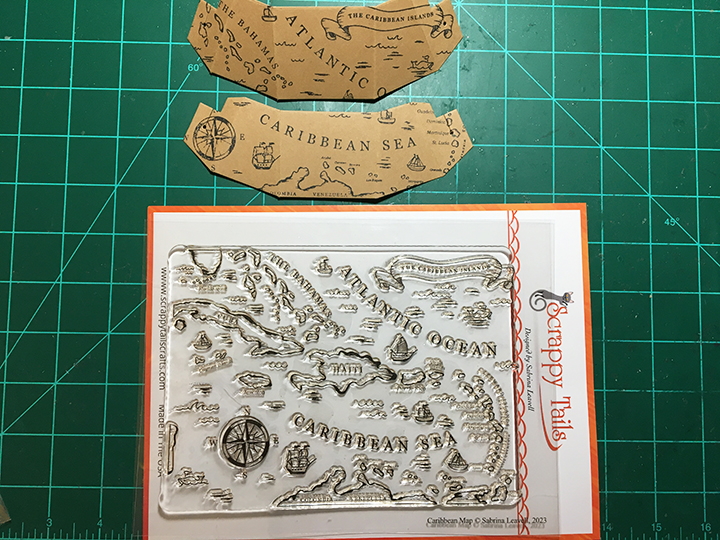
Base: Stamp on kraft paper the Caribbean Map Stamp. (To see the map colored with its coordinating layering stencils look at A Map To TheΒ Caribbean.) Cut two of the Pop Up Stand from the map. Train the folds on each piece and glue tabs with slot for rubber band together. Add rubber band. (I used a #12 band.)

Anchor: Cut two anchors from gold cardstock and two anchors from kraft cardstock using the large die from the Anchor die set. Trim the rope pieces from the gold anchors. Using the rope pieces in the die set, cut two sets of ropes from kraft cardstock. With a sponge dauber, ink the rope pieces to create shading. Glue the rope pieces to the kraft cardstock anchors. Next, glue gold anchors in place.

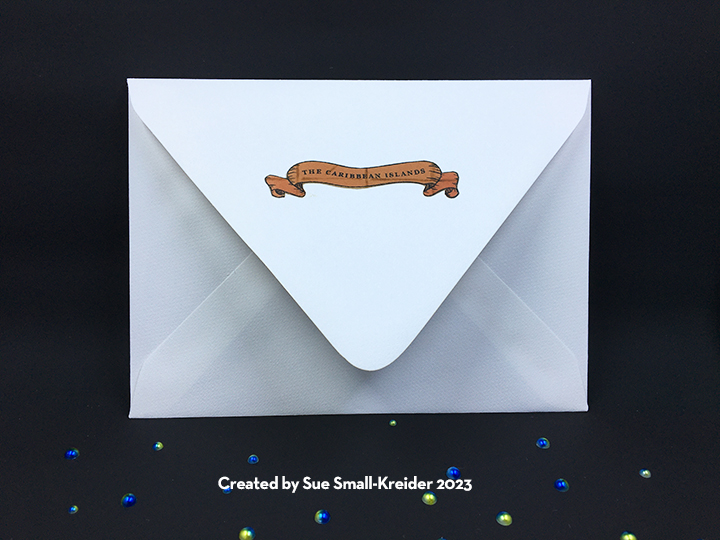
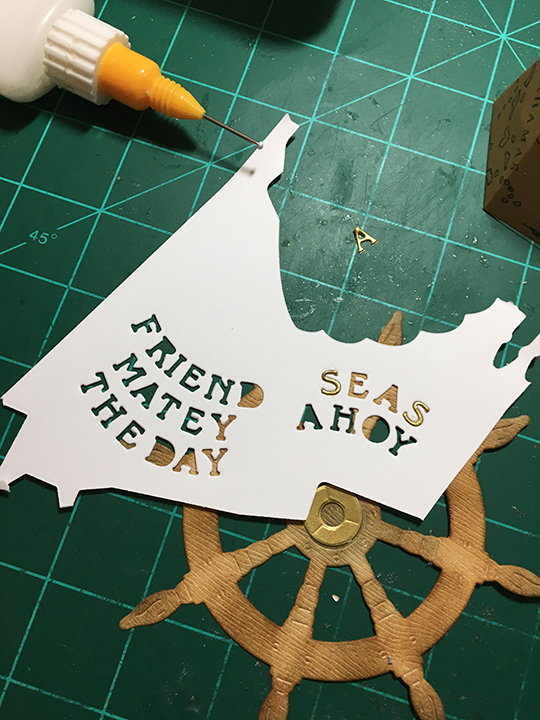
Sentiments: Three of the six hot foil banners in the Nautical Banner hot foil plates set were used – β€œLets sail-ebrate!” and β€œWaving Hello.” (I usually do batch hot foiling with my Spellbinders’ Glimmer Foil System because it takes time to set-up, heat-up and cool-down.) The sentiment banners are attached to the anchors with foam squares after being cut out using the coordinating dies. β€œAhoy!” was cut from navy blue cardstock from the Set Sail paper pad three times using a bonus gift die. Each β€œAhoy!” was glued in place on the base and envelope. Gems and pearls from the Set Sail Card Kit were added to each anchor.

Envelope: The card folds flat to fit into an A7 envelope that I decorated the back flap with the the remaining β€œAhoy!” and a scrap of gold rope.

Thank you for reading this blog post. I hope this inspires you and makes you smile. Please like and leave comments 😊

Materials Used:

Dies & Foiling Plates

Stamps

Papers

Foils:

  • Spellbinders – Glimmer Hot Foil – Polished Brass

Ink

  • Memento – Fade-Resistant Dye ink – Tuxedo Black
  • Ranger – Tim Holtz – Distress Ink- Vintage Photo

Adhesives

Tools

  • Die Cutting Machine
  • Sponge Dauber
  • Craft Mat
  • Scissors
  • Spellbinders -Glimmer Hot Foil System
  • Spellbinders – Quick Trimmer

Miscellaneous

A Map To The Caribbean

Taking a sailing vacation around the Caribbean Sea deserves a special bon voyage card.

For this shape card, I used products from Scrappy Tails’ new Nautical 2023 June Collection.

Map: Stamp on kraft paper the Caribbean Map Stamp. Using the coordinating stencil set –Layering Caribbean Map Trio, start with the grid stencil and brown ink. Use the next two stencils to add color to the land masses, ships, whales and compass. (I found it easier to use a white opaque marker to color the sails than use the stencil.) I used the A7 Compass Scroll die to cup the map making sure the words of β€œCaribbean Sea” were visible. To create the rolled back of the scroll, I die cut just the scroll portions of the die from kraft paper and trimmed to fit the map. I daubed brown ink to shade and age the scroll and map.

Cardbase:  Cut three scrolls from kraft paper using the A7 Compass Scroll die. Cut a 2 1/4-inch x 4 1/4-inch rectangle from kraft paper and fold in half longwise for the card hinge. Glue the hinge to one of the scrolls to be the cardback as shown in photo. Glue hinge to back of map scroll, matching the shape edges.

Trim over hanging bits of hinge. Glue the scroll edges together at hinge fold. Trim the remaining two kraft scrolls to fit inside the card and cover hinge.

Compass: Cut the nine dies that make up the compass from the A7 Compass Scroll die set. Use lightweight colored cardstock for the three main parts and ink them to provide depth and shading. Cut the smaller bits from gold cardstock.  Glue completed compass to inside of card.

Sentiment: Stamp in black, the β€œLet your dreams set sail” from the Set Sail stamp set on the top left of the map scroll.

Envelope: The card fits into an A7 envelope that I decorated the back flap with the Caribbean Islands banner fussy cut from the map.

Thank you for reading this blog post. I hope this inspires you and makes you smile. Please like and leave comments 😊

Want to see more of the Scrappy Tails nautical collection? Check out my blog posts:

Materials Used:

Dies

Stamps and Stencils

Papers

  • Kraft Cardstock
  • Matte Gold Cardstock
  • Blue, Brown, White and Yellow Cardstock
  • A7 ivory Envelope

Ink

  • Memento – Fade-Resistant Dye ink – Tuxedo Black
  • Ranger – Tim Holtz – Distress Ink- gathered Twigs, Fossilized Amber, Saltwater Taffy, Abandon Coral, Cracked Pistachio
  • Recollections – Opaque Marker – Snow
  • Sharpie- Permanent Marker – Fine Point – Red

Adhesives

Tools

  • Die Cutting Machine
  • Stamping Platform
  • LDRS – Stampendable Stamping Tool
  • Stamping Cloth
  • Sponge Dauber
  • Quickstik Tool
  • Craft Mat
  • Scissors

You Are A Life Saver!

Needing a thank you card for a recent kindness from a friend, I made a life preserver pop-up card.

For this pop-up 3D card, I used products from Scrappy Tails’ new Nautical 2023 June Collection.

Base: Cut two of the Pop Up Stand from blue starfish cardstock from the Set Sail paper pad. Train the folds on each piece and glue tabs with slot for rubber band together. Add rubber band. (I used a #12 band.)

Preserver: Using the A7 Life Preserver die set, cut two preservers from heavy white cardstock as well as two sets of ropes. Cut a total of eight of the bands and C-rings from red. (I used packaging with a shinny coating). Ink the rope pieces before gluing to the preserver.  Glue the C-rings to the preserver and then glue the bands over them. Pick a side of the preserver to be the top and add a line of glue across the back and adhere to the top back of the second preserver. Glue the life preservers to base.

Sentiment Banners: Three of the six hot foil banners in the Nautical Banner hot foil plates set were used – β€œYou’re A Lifesaver” and β€œThank You So Much.” (I usually do batch hot foiling with my Spellbinders’ Glimmer Foil System because it takes time to set-up, heat-up and cool-down.) The coordinating dies make the banners easy to cut out.

Envelope: The card folds flat to fit into an A7 envelope that I stamped the back flap with the life preserver from the Set Sail stamp set in red ink.

Thank you for reading this blog post. I hope this inspires you and makes you smile. Please like and leave comments 😊

Want to see more of the Scrappy Tails nautical collection? Check out my blog posts:

Materials Used:

Dies & Foiling Plates

Stamps

Papers

Foils:

  • Spellbinders – Glimmer Hot Foil – Red

Ink

  • Ranger – Tim Holtz – Distress Ink- Antique Linen
  • Stampin’ Up – Classic Stampin’ Pad – Real Red

Adhesives

Tools

  • Die Cutting Machine
  • Stamping Platform
  • LDRS – Stampendable Stamping Tool
  • Stamping Cloth
  • Sponge Dauber
  • Craft Mat
  • Scissors
  • Spellbinders -Glimmer Hot Foil System
  • Spellbinders – Quick Trimmer

Miscellaneous

  • #12 Rubber Band

Father’s Day Cards In Review

Here is a look at Father’s Day cards I’ve made over the years. (Click on the title to see the blog.)

Father’s Day Waterfall Pop-up

In-VEST

Work Bench

A Fishing Father’s Day

A Toolbox Father’s Day

A Train Lover’s Father’s Day

A Cabin Fathers Day Card

A Golfing Minion Father’s Day Card

YOU’RE THE G.O.A.T.

Go Bears Father’s DayΒ Card

Waterfall Father’s Day Card – This card has photos of this man’s children that can be flipped through when the waterfall pull tab is pulled.

Thank you for reading this blog post. I hope this inspires you and makes you smile. Please like and leave comments 😊

Charting A Nautical Birthday

I often make cards with my father in mind. Growing up I visited a lot of historic sailing ships around the world with him. This is a birthday card in his honor.

For this pop-up 3D card, I used products from Scrappy Tails’ new Nautical 2023 June Collection.

Base: Stamp on kraft paper the Caribbean Map Stamp. Cut two of the Pop Up Stand from the map. Train the folds on each piece and glue tabs with slot for rubber band together. Add rubber band. (I used a #12 band.)

Wheel: Cut two wheels from embossed woodgrain paper and two wheels from brown cardstock using the large die from the Ship Wheel die set. Using sponge daubers, ink the woodgrain wheels with browns and black. Glue the brown cardstock wheels to the back of the woodgrain wheels. Die cut from gold cardstock the β€œSeas the day” sentiment letters included in the Ship Wheel set. (I cut a letter placement guild from scrap cardstock. Putting a drop of glue on the back of my hand to drip the letters in before placing them on the wheel.)

Add from gold cardstock the center wheel tuning bearings and screw heads to wheel. (While the set comes with tiny circles to cover the screws on the wheel, I elected to use Nuvo Drops for the screw heads.) Glue top handles of the two wheels together before gluing wheels to base.

Sentiment Banners: Three of the six hot foil banners in the Nautical Banner hot foil plates set were used – β€œLets sail-ebrate!” β€œHappy Birthday” and β€œJust for You.” (I usually do batch hot foiling with my Spellbinders’ Glimmer Foil System because it takes time to set-up, heat-up and cool-down.)

Envelope: The card folds flat to fit into an A7 envelope that I decorated the back flap with the β€œLet’s Sail-ebrate!” banner in red foil.

Thank you for reading this blog post. I hope this inspires you and makes you smile. Please like and leave comments 😊

Want to see more of the Scrappy Tails nautical collection? Check out my blog posts:

Materials Used:

Dies & Foiling Plates

Stamps

Papers

  • MemoryBoxCo.com – 8.5×11 Embossed Cardstock – Woodgrain
  • Kraft Cardstock
  • Matte Gold Cardstock
  • Brown, White and Cream Cardstock
  • A7 ivory Envelope

Foils:

  • Spellbinders – Glimmer Hot Foil – Red
  • Spellbinders – Glimmer Hot Foil – Polished Brass

Ink

  • Memento – Fade-Resistant Dye ink – Tuxedo Black
  • Ranger – Tim Holtz – Distress Ink- Vintage Photo, Walnut Stain and Black Soot

Adhesives

Tools

  • Die Cutting Machine
  • Stamping Platform
  • LDRS – Stampendable Stamping Tool
  • Stamping Cloth
  • Sponge Dauber
  • Craft Mat
  • Scissors
  • Spellbinders -Glimmer Hot Foil System
  • Spellbinders – Quick Trimmer

Miscellaneous

  • #12 Rubber Band
  • Nuvo – Crystal Drops – Bright Gold

Rock-A-Bye Baby

It’s time for the Karen Burniston Design Team Challenge for June. We were asked to use the theme of wedding or baby. I have chosen to welcome a new baby.

To create this pop-up cradle swing, the following Karen Burniston’s dies were used: Bam Box Pop-Up, Crosshatch Hexagons, Picnic Elements, Christmas Trees Pop-Stand, a rubber band and some embroidery floss.

Cardbase and Pop-Stands: Cut an 11×4.25-inch piece of pink cardstock and fold to form a 5.5×4.25-inch top fold cardbase. (Watch Christmas tree pop-stand assembly video at the bottom of the die’s page.) Cut two pieces of decorative paper as 5.25×4-inches and use clear tape on the back side for placement in card. Use the hexagon for the cradle stand to determine placement of the pop-stand die-cuts. Using decorative paper scraps, cover the four holes that pop-stands leave on back side of paper.

Cradle Stand: taping the largest two plain hexagons from the crosshatch hexagon set, die cut two from heavy pink cardstock. Trim bottom edge .25-inch so that it will measure 4.25-inches or less to fit into cardbase.

Cradle: From the two leftover hexagons, die cut the checker grid from the blanket in the picnic elements set. (Watch assembly video at the bottom of the bam box page.) Create a white bam box and cut four pieces of the checker grid to be the sides of the bam box cradle. Cut two 6-inch pieces of green floss or cord. Glue floss/cord to bottom of bam box. Tape square pink end pieces to bottom of bam box with the floss glued to checker grid pieces. (I would recommend cord as the floss unraveled on me. Also I would glue the checker grid onto thin white copier paper to make less catch-points on the cradle.) Glue longer pink sides to bam box sides to form cradle. Use a border from the party border blends to create a finished edge of the cradle from gold foil cardstock. Glue the floss between the top bar of the two hexagons. Pull floss to make cradle hang straight before glue sets. Trim off excess floss once glue has dried. Cut one bam box decorator side piece from pink speckled paper and trim to fit the cradle as a blanket.

To make the cradle close, flatten bam box and fold in the square ends with floss. Hold flat as card is closed.

Blanket and Bears: Cut from pearlescent paper the fringed picnic blanket and from cream paper the checkered grid. glue together. Cut three teddy bears from light brown cardstock using bear die from the holiday charms set. Using the stencil features in the bear die, ink in eyes, nose and mouth with a black gel pen and the ears with a pink gel pen. One bear is in the cradle and other is on the blanket. The last bear is on the envelope flap.

Decorations: Flower borders cut from pink speckle paper using the long nature borders 2 set, are used on the cradle stand frame and card front and back. (Front with yellow Nuvo drops centers and back with pink gel pen stenciling.) More of the party border blends borders,cut from white cardstock, are used on all card panels. (See assembly video explaining how to get the border on the card back.)

Personal Message Label: The largest crosshatch label die from the rectangles and labels die set was cut in white.The thin metallic pink frame was made by using the largest label frame and the crosshatch label dies taped together. (This was a leftover piece I had saved from another project.)

Sentiment: Two sentiments were used to create the “Welcome BABY” on the card front. Welcome is its own die set with word (white) and shadow (pink speckle) dies. BABY is from the baby charms set which was cut once each from white and from pink and blue speckled papers. The blocks base is cut from white. Some paper piecing was done using pieces from the different papers to created the colorful blocks.

Envelope: The card fits an A2 size envelope.with the back flap decorated with a strip of the decorative paper and the last teddy bear.

Thank you for reading this blog post. I hope this inspires you and makes you smile. Please like and leave comments 😊

Materials Used:

Dies

Papers

  • Craft Consortium – Hackney & Co.- 6″x6″ Double-Sided 200gm Papers – English Garden
  • Lawn Fawn – 6″x6″ Double-Sided Paper Pad – Spiffy Speckles
  • Bazzill – 8.5″ x 11″ Heavy Cardstock – Cotton Candy
  • White, Cream and Cream Pearlescent Cardstock
  • Gold Foil and Pink Holographic Scraps
  • Staples – Invitation A2 Envelope – Pink

Ink

  • Gel Pen – Pink
  • Sakura – Gelly Roll Pen – Medium – Black

Adhesives

Tools

  • Die Cutting Machine
  • Paper Trimmer
  • Scissors
  • Craft Knife
  • Bone Folder
  • Kat Scrappiness – Telescopic Embossing Powder Tool with Retractable Brush
  • Quickstik Tool

Miscellaneous

Celebrating 66 Years of Marriage!

Recently I had the honor of creating a pop-up card celebrating a couple’s 66th wedding anniversary. Since there are no special designations for the 66th anniversary, I decided to go with silver, gold and sapphire blue as colors and balloons, stars, hearts and streamers as elements. My inspiration for the card came from a 50th anniversary card by Nicky Foden using Karen Burniston‘s Heart Collage Pop-Up, Balloon Collage Add-Ons and other dies.

Before I began, I read through Nicky’s blog on her card and watched Karen Burniston’s video on making a triple heart collage slimline pop-up card. I learned that I would need to trim down the outer mechanisms’ arms that will stick out of the card and continually test the placement of items to avoid catch points. The mechanism I used is the from the Heart Collage Pop-Up die set.

Cardbase: I used a medium weight white cardstock rectangle measuring 8 3/4 x 7 3/4-inches. When folded in half, the card measures 3 3/8 x 8 3/4-inches. Using the largest two dies from the Long Rectangles – Crosshatch die set, I cut frames from gold glitter cardstock and a large white rectangle to cover the front of the card. The frames went on the front and back of the card. For the inside of the card, I followed the dimensions of the largest die, but used a paper cutter to cut two panels of gold dotted acetate. (The acetate was too thick for the die to cut well.) While the glitter cardstock and white cardstock could be adhered using glue, the acetate required double sided-tape. Measuring the inside of the glitter frame on the back of the card, I cut a piece of acetate to fit the opening.

Mechanisms: Following Karen’s instructions on the placement of the mechanisms, I marked the locations with pencil on the inner fold. Making sure to line-up the pencil mark in the center hole of the mechanism and aligning the mechanism fold to the card fold, before I adhered one side of the mechanism to the card. Because of the acetate being used for the surface the mechanisms would adhered to, I used red backed super sticky double-sided tape. Once the mechanisms were in place and trained by opening and closing the card, I noted which arms stuck out of the card and trimmed them to fit inside the card.

Decorating: Die-cutting a number of balloons and stars from the Balloon Collage Add-Ons die set and ribbons with tiny hearts from the Border Blends – Trims, I hoped I had enough pieces to decorate the card. Watching Karen’s video one more time to see how the dimension pieces needed to be installed on the mechanisms, I stated with those balloons on the top arms. I worked from the tips of the arms and center mechanisms using balloons, testing for catch points before gluing in permanently. Next came stars and streamers (I cut the ribbon down into smaller streamers.) Finally the tiny hearts. I used double-sided tape to adhere anything to the front of the glitter cardstock or acetate on the cardbase.

Sentiment: To create the custom “Happy 66th Anniversary” sentiment on the front of the card, I used two die sets – Word Set 12- Anniversary and Numbers. The Numbers set comes with the “th” as well as “st”, “rd” and “nd”. For the label to write a personal message inside the card, I used white cardstock and my favorite crosshatch label die from the Rectangles and Labels – Crosshatch set.

Envelope: The back of the envelope is decorated with ribbon bits and tiny hearts all cut from the Border Blends – Trims die set.

Thank you for reading this blog post. I hope this inspires you and makes you smile. Please like and leave comments 😊

Materials Used:

Dies

Papers

  • Hot off the Press– 8 1/2 x 11-inches Foil Cardstock – Fireworks Blue Holographic
  • Hot off the Press– 8 1/2 x 11-inches Foil Cardstock – Stars Silver Holographic
  • American Crafts – WE R – 8 1/2 x 11-inch Acetate – Chevron Dot – Gold
  • Gold and Silver Foil Cardstock
  • Gold Glitter Cardstock
  • White Medium Weight Cardstock
  • #10 Business Envelope – Kraft

Adhesives

Tools