Popping The Question

Hi Crafty Friends,

Welcome to our Karen Burniston Products – KB Riley LLC December Release Blog Hop. The Design Team have come together with Karen today for a fun blog hop to celebrate the release of 11 new dies. Sneak peeks of the new release started last week, and the dies are available to order NOW!

This proposal is literally popping the question!

Karen Burniston’s December 2022 release includes the Surprise Cube Pop-Up, Slider Box and Wedding Charms die sets used to make this proposal box.

Three decorated Surprise Cubes comfortably fit inside the slider drawer. (See assembly video for Surprise cubes.) Using the smallest crosshatch rectangle from the Slider Box set to hold the big question, it was glued to one side of a cube when flat. Placing this cube in the bottom of the drawer it tends to stay inside the drawer when the other cubes pop out. (Slider Box assembly video)

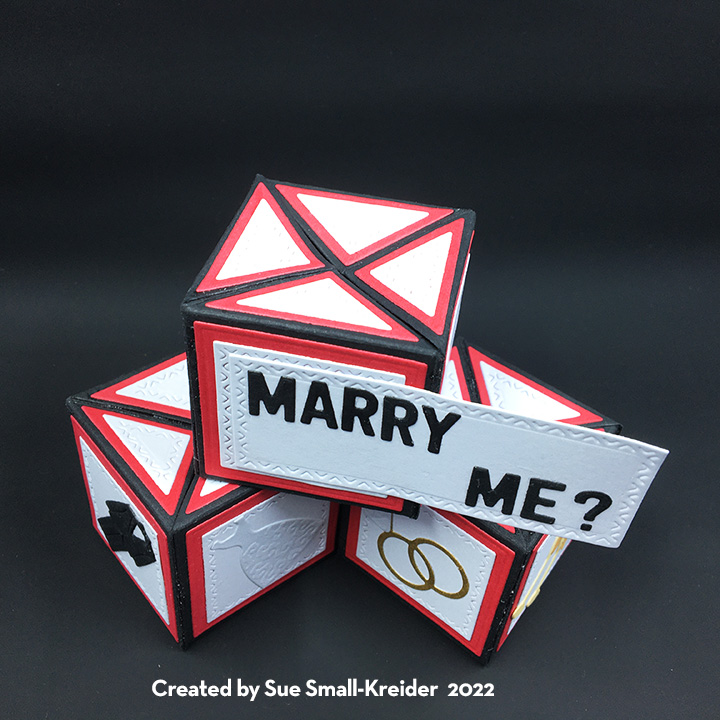
Four different charms- groom tux, bride wedding dress, double wedding rings and clicking champagne glasses – from the Wedding Charms set cover the sides of the cubes.

The tiny crosshatch squares and triangles included in the Surprise Cube set along with matting squares and triangles make for quick decorating. The Mini Alphabet letters spell out the proposal.

Not ready to pop the big question? Then try these die sets for asking someone to the prom, wishing a Happy Birthday or a Happy Christmas. The drawer will fit a gift card under the three cubes.

This release includes:

  • 2 new charm die sets
  • 1 new stand alone die set
  • 2 new Tiny House Add-Ons sets
  • 2 new Pop-up die sets
  • 1 new Woven Box Basket die set
  • 2 new Crosshatch die sets
  • 1 new Box die set

Dies are available to order now on the website.

GIVEAWAY:

To celebrate the release Karen Burniston and each of the Karen Burniston – KB Riley LLC Design Team members will be giving away a $25 Gift Certificate to some lucky person who comments on our blog posts, so make sure you join the hop and comment on everyone’s blog post. Winners will be randomly chosen from ALL of the blog hop comments received on our blog posts by Monday, 19th December 2022. Lots of chances to win some goodies, so just leave a comment on this post or any other blog hop posts to enter! Don’t forget to leave some way for us to contact you, in case you are a lucky winner!

Karen Burniston 

Lois Bak 

Sue Small-Kreider – YOU are HERE

Karen Aicken 

Jennifer Webster 

Frances Byrne 

Nicky Foden 

Sandy Diller  

Suzanne Smit

Fran Sabad 

Chevron Bag – Part II

Quick and clever gift bags for small treats were needed and the Divinity Designs Chevron Background die provided the visual pop required.

I cut three the background die three times from coordinating papers to make each of these bags. Then I placed each pattern paper pieces in separate bags so as not to lose any of the pieces especially the tiny triangles. I also kept the thin L-shaped scrap pieces from the edges of the die-cutting to be used as bag handles.

Next, I glued the frame onto a 4 1/4 x 5 1/2 inch piece of thin white paper placing dots of glue at the zig-zag points and the outside frame. (You will see that I used scrap paper for the backing that had black printing on it knowing that it would be covered with a another backing paper.)

Then the fun part of deciding on the positioning of the different papers within the frame and making a duplicate frame as well.

(I found that laying out the chevron strips and gluing the strips in place from the bottom up worked well with the duplicate frame as a guide in case of the strips being mixed-up.)

Once the glue has dried, trim the backing paper overhang away from the frame on both pieces.

Depending on the size of your paper, you may have enough scrap pieces to make the sides and/or a bottom of the bag. (I found that using 4.5 x 6.5 inches sized paper made me use two additional pieces to cut the sides (2 1/4 inches by 5 1/4 inches) and a bottom piece of 2 1/4 inches by 4 1/2 inches.)

The bottom piece is scored at 1/8 inch on the long sides and 1/4 inch along one end of the piece while the other end is marked where it needs to be folded by holding the bottom piece up to the bottom edge of the chevron frame.

Scoring the long edges of the side pieces at 1/ 8 inch is the first step for marking the sides. Using a pencil and a ruler draw a pencil line down the center each side piece. Mark a dot at 1 1/2 inches from the bottom of the center line and draw a line from the center dot to each of the corner bottom edges to from a triangle. Erase the line that is in the center of the triangle. Score along the remaining pencil lines. Mountain fold the 1/8 inch edges. Valley fold the pencil line folds.

Glue the tabs of the bottom piece to the insides of the chevron pieces and side bottom pieces.

Glue the side tabs to one of the chevron pieces, using your finger to adhere the tabs to the front pierce. Glue the remaining side tabs using a long tool such as a pencil or pen to adhere the tabs to the back piece.

Glue the L-shape scraps to the inside of the chevron pieces. Then adhere two 3 7/8 inches by 5 1/8 inches pieces of white paper to cover the bottom and side tabs and handle ends on the inside of the chevron pieces.  If you have a piece of leftover decorative paper that will fit the bottom of the bag glue it into place as well.

Like this bag? Check out this week’s other bag.

Thank you for reading this blog post. Please like and leave comments 😊

Materials Used:

Dies

Papers

  • WRF Studio – Romance 4.5” x 6.5” Design Paper Pad (230gsm Heavyweight Cardstock)
  • White paper

Miscellaneous

Impossible Boxes for Photographers

Impossible boxes come in a variety of shapes from squares to hexagons. They are called impossible because to open them it seems impossible as the lid is attached to the box base and has to be fully pushed open to retrieve what is inside the box.

I made some boxes for my photographer friends to hold some small trinkets using Helen Griffin’s Simply Made Crafts’ Hexagonal Impossible Box Dies Set for the box. The way the box lid opens reminds me of a camera lens. The box will easily hold something 3 x 3 x 2 inches.

To decorate the box, I used Lou Collins’ TEXT{ures} wavy film strip die from her Vintage Travel Collection cut I twice in black.  On one box I had the film go over the box lid edge, cutting it apart so the box could open. The other I wrapped around the box.

Here are some brands of Impossible Box Die sets:

Videos and blogs on Impossible Boxes

If you enjoyed reading this post, please“Like” and “Follow” my blog.