I have been collecting and making oven cards for several years now. Here is a collection of all my ovens blog posts. Click on an image to see details of the oven.
(Images are posted from the earliest release of dies/stamps/kits 2016 to newest 2023.)
____________________________
Thank you for experiencing this blog post.
I hope this inspires you and makes you smile.
Please like and leave comments 😊
___________________________________
Disclaimer: Karen Burniston products are provided free of charge by the manufacturer for review and use. All other items were personally purchased. Compensated affiliate links used where or when possible, meaning I will receive a small percentage commission from these manufacturers at no cost to you. This will allow me to add more content to my YouTube channel and help out a lot. Thank you.
It’s the Karen Burniston design team challenge for November 2023 with the theme of “What’s Cooking” using the Oven Pop-Up die set. I chose to celebrate Pi Day with apple pie making in my card.
Before starting, I recommend watching the assembly videos of the pop-ups which are usually near the bottom of the linked pages for the various dies used.
Cardbase: I started with two rectangles of heavy weight cardstock one piece 5-inches by 7-inches and the second piece 5-inches by 11-inches, scored and folded at 7-inches. The short panel was glued to the back of the 5×7 rectangle to form an A7 top fold card. (The weight of this extra long tab is used to weigh down the floor of the card when open.)
Card Back
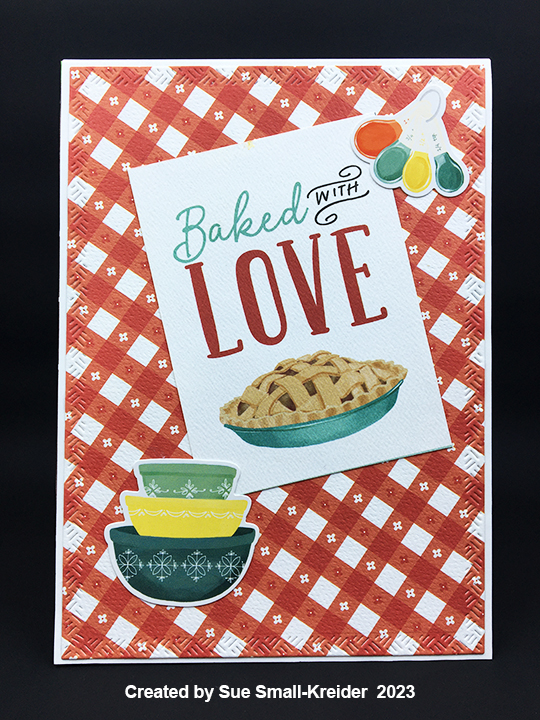
I cut a rectangle of the red and white tablecloth paper using the large crosshatch rectangle in the Rectangle and Labels – Crosshatch die set to cover the card front. Because I cut the front decorative paper on an angle, I had some triangles of the paper left over and so I made a table on the back of the card.
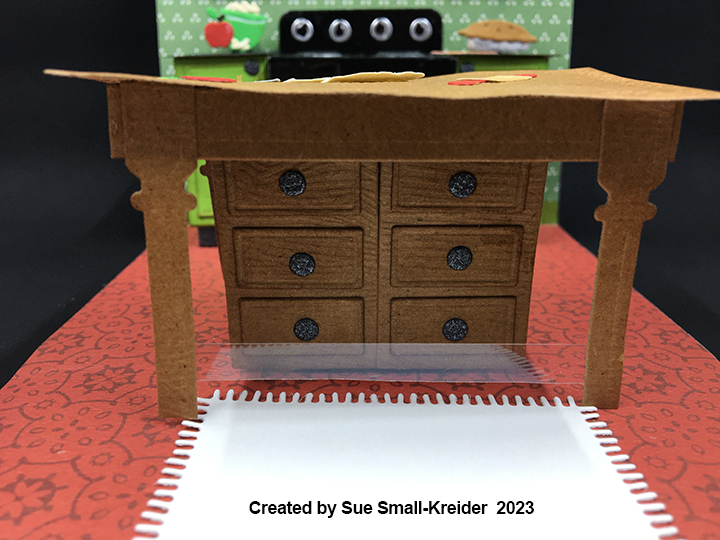
Oven/Stove: I followed the basic way to make the oven and cabinets on the assembly video using the cabinet doors from the oven extra’s set. The black mirror cardstock used for the oven can be hard to get glue to stick to, so I often use double-sided tape to stick on the burners, knobs, and window acetate and Glossy Accents to attach the door handle.
Cabinets: Once the stove is attached, you can add the side cabinets. I cut the cabinets from apple green cardstock and then inked them with a brown ink to age them. The upper cabinets and lower cabinet door fronts are cut using the larger rectangle die in the Oven Extras set and then covered with the small rectangle die pieces. Upper cabinets are attached with foam tape to add some dimension to them. A stove hood was cut from silver cardstock and is hidden mostly behind the small upper middle cabinet.
To make the table legs more stable, I added a piece of wood grain cardstock under the tabletop connecting the two legs as well as a thin strip of clear acetate plastic near the bottom of the legs. Tabletop is the second smallest crosshatch rectangle in Rectangles-Crosshatch set. All tabletop parts are cut from woodgrain embossed cardstock and inked with brown ink to bring out the grain. (I think if I made this card again, I would use two layers of cardstock for the tabletop and glue the items on to the tabletop before assembling it so the top would lay flat.)
Decorations: Between the two oven sets are lots of fun pieces that add dimension and realism to the pop-up scene. The Oven Pop-Up set includes the oven mitt, stove burners and knobs, oven rack and door handle. The Oven Extras set includes the cutting board and roasting pan that I used to make a small rolling pin, the knife and the green bowl that holds the apple slices. as well as three pop-up cube strips that I used to pop-up the oven rack, pie inside the oven and the items on the counter.
Apple slices are the leftover bits from cutting two burner plates. Pie crust on table was cut freehand and the burner circle die from the Oven Pop-Up set was rubbed to emboss the pie pan and then cut away to show the trimming of the piecrust. Burner circle is silver pie pan under the crust. The baked pies are cut from silver foil cardstock and brown kraft cardstock using the Picnic Elements set. Brown is inked around the edges of pie crust. The red apples are from the Tree Fruit die set.
Card Front
Sentiments: All the sentiments are either stickers, journaling cards or papers from the paper collection Sunflower Market by Carta Bella. The white rug inside the card is place for a personal message and is cut using the base blanket die in the Picnic Elements set.
Envelope: A strip of pie paper is glued to the back flap of the envelope to set the tone for the card inside and are from the paper collection. Two red apples left over from inside the card were also glued on the flap.
Thank you for reading this blog post. I hope this inspires you and makes you smile. Please like and leave comments 😊