One Layout- Three Cards

Using the Craft Roulette Funn Sentiments #01 stamps and dies sets and Concord & 9th Make Some Noise dies, I created three different birthday cards using the same basic elements, but switched up the papers, card orientation and inside sentiments. All the cards are A2 (4.25×5.5-inches) in size.

Watch the process video to see how I made these cards.

Below are the details for each card.

Blue Stripes Materials Used: Craft Roulette Funn Sentiments #01 stamps and dies sets * Craft Roulette Funn Friends #01 stamps set * Concord & 9th Make Some Noise dies * Taylored Expressions Stencil – Plaid * Bay Blue Velveteen Felt Paper * Stellar White Carnival Groove Cardstock * White Copier Paper * Craft Consortium Little Robin Redbreast Paper * Dark Blue and White Cardstock * A2 Envelope * Memento Paris Dusk Ink * Clear Sequins * Stickles Sunburst * White Gel Pen * Liquid Glue * Foam Squares

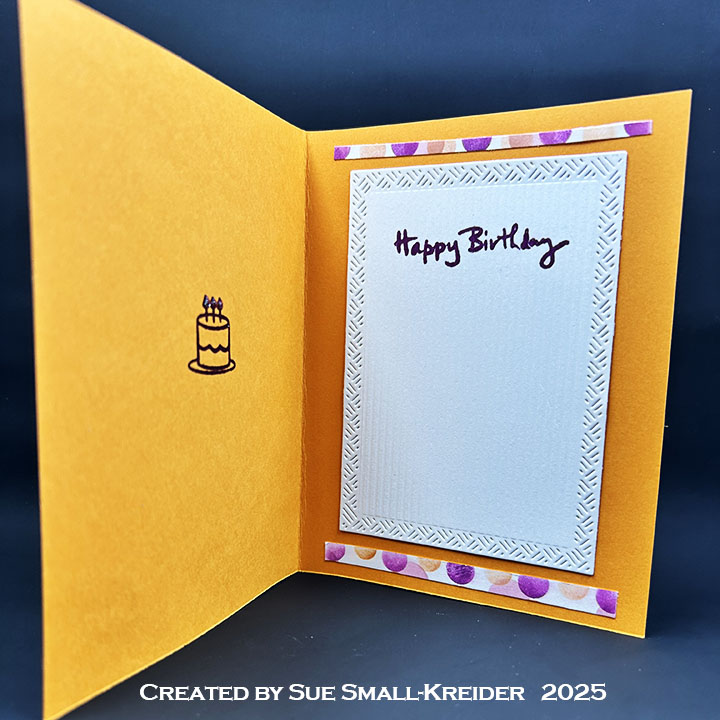
Orange Dots Materials Used: Craft Roulette Funn Sentiments #01 stamps and dies sets * Craft Roulette Funn Friends #01 stamps set * Concord & 9th Make Some Noise dies * Photoplay Stencil – Dots * Karen Burniston Crosshatch Rectangle die * Stellar White Carnival Groove Cardstock * White Cardstock * Craft Consortium Little Robin Redbreast Paper * White Copier Paper * Spellbinders Orange Cardstock * A2 Envelope * Sunbird Spark Ink – Canyon, Dahlia, Mulberry & Ochre Ink * Nuvo Glitter Gloss * Stickles Sunburst * White Gel Pen * Liquid Glue * Foam Squares

Teal Tiles Materials Used: Craft Roulette Funn Sentiments #01 stamps and dies sets * Concord & 9th Make Some Noise dies * Paper Discovery Moroccan Nights Background stamps* Karen Burniston Big Birthday Charms Balloon die* Craft Consortium Little Robin Redbreast Paper * Pale Blue and White Cardstock * Your PaperInsider Sliver Holographic Oil Slick Envelope * White Copier Paper * A2 Envelope * Unknown Water Soluble Ink in Teal & Pale Blue* Clear Sequins * Black Fine-Line Pen * Liquid Glue * Foam Squares

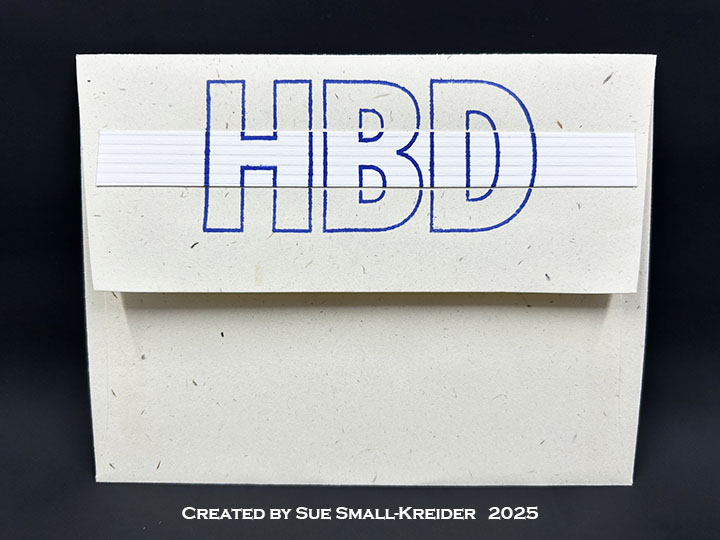
Envelopes:  The cards fit into A2 (4.25x 5.5-inches) size envelopes stamped with β€œHBD” on the back flap in inks and papers that coordinate with each card’s specific materials.

You can also see another post using a similar layout by clicking here.

___________________________________

Thank you for experiencing this blog post.

I hope this inspires you and makes you smile.

Please like and leave comments 😊

___________________________________

Disclaimer: Karen Burniston products are provided free of charge by the manufacturer for review and use. All other items were personally purchased. Compensated affiliate links used where or when possible, meaning I will receive a small percentage commission from these manufacturers at no cost to you. This will allow me to add more content to my YouTube channel and help out a lot. Thank you.

Materials Used:

Dies

  • Craft Roulette – Metal Dies – Funn Sentiments #01
  • Concord & 9th – Metal Dies – Make Some Noise
  • Karen Burniston in cahoots with Riley and Company – Big Birthday Charms – 1180
  • Karen Burniston in cahoots with Riley and Company – Rectangles – Crosshatch – 1054

Stamps

  • Craft Roulette – Clear Stamps – Funn Sentiments #01
  • Craft Roulette – Clear Stamps – Funn Friends #01
  • Paper Discovery – Clear Stamps – Moroccan Nights – Moroccan Background

Stencils

  • PhotoPlay – Say It With Stamps – Plastic 4×9-inch Stencil – 3-Piece Dots by Becky Moore
  • Taylored Expressions – Plastic 6×6-inch Stencil – Plaid – TESN63

Papers

  • Craft Consortium – 210x297mm – 200gsm Double-Sided Papers – Little Robin Redbreast
  • Spellbinders – 8.5×5.5-inches 100# Cardstock – Persimmon
  • Your PaperInsider – Box 10 – 8.5×5.5-inches 235 gsm – Bay Blue Velveteen Felt Paper
  • Your PaperInsider – Box 10 – 8.5×5.5-inches 100# Cover – Stellar White Carnival Groove
  • Your PaperInsider – Box 10 – 4.25×5.5-inches 60# Text– Sliver Holographic Oil Slick Envelope
  • Blue and White Cardstock
  • Fraser Papers for William House – A2 Envelope – Genesis Text Milkweed Smooth

Ink

  • Memento – Fade Resistant Dye ink – Paris Dusk
  • Sunbird Spark – Velvety Dye Ink – Canyon, Dahlia, Mulberry & Ochre
  • Unknown Water Soluble Ink – Teal & Pale Blue
  • Pigma – Mircon 01 Fine Tip Pen – Black
  • Sakura – Gelly Roll Pen – Medium – White
  • Nuvo – Aqua Shimmer – Glitter Gloss

Adhesives

Tools

Miscellaneous

  • Clear Sequins
  • Ranger – Stickles (Glitter Gel) – Sunburst

Paddlewheel Boat Pop-Up Birthday Card

It’s the Karen Burniston design team challenge for March 2025 using the theme of Lake or Ocean. I made a birthday card using the Cruise Ship Add-ons, Boat Pop-Up and Cruise Charms to make a pop-up paddlewheel boat. (You can see other boat and ship pop-ups by clicking here.)

Watch the process video to see how I made this card.

Cardbase: Start with a 4.25 x 11-inch piece of cardstock and fold in half to form a side-fold A2 (4.25×5.5-inch) card. Cover the four panels with decorative papers.

Pop-Up: Watch the assembly videos for the Boat Pop-Up and Cruise Ship Add-ons. Cut out one of the back trim piece from the Cruise Ship Add-ons and two of the ship’s wheels from the Cruise Charms in red.  Trim the ship’s wheels as directed in the video above.

Sentiments:  All the sentiments used on the card come from the Sail Away stamp set except for the β€œHappy Birthday” which is from the Belated Birthday set.

Envelope:  The card fits into an A2 (4.25x 5.5-inches) size envelope stamped with a sentiment used on the card on the back flap in dark brown ink.

___________________________________

Thank you for experiencing this blog post.

I hope this inspires you and makes you smile.

Please like and leave comments 😊

___________________________________

Disclaimer: Karen Burniston products are provided free of charge by the manufacturer for review and use. All other items were personally purchased. Compensated affiliate links used where or when possible, meaning I will receive a small percentage commission from these manufacturers at no cost to you. This will allow me to add more content to my YouTube channel and help out a lot. Thank you.

Materials Used:

Dies

Stamps

Papers

  • Glitz Girls – 12×12 inch Single-Sided Paper –Love Nest by Lisa Rupp
  • The Paper Studio – 12×12 inch Single-Sided Paper – Beach House
  • Blue, Red and White Cardstock
  • Fraser Papers for William House – A2 Envelope – Genesis Text Milkweed Smooth

Ink

Adhesives

Tools

  • Die Cutting Machine
  • Paper Trimmer
  • Bone Folder
  • Score Board
  • Stamping Platform
  • LDRS – Stampendable Stamping Tool
  • Stamping Blocks used as paperweights
  • Scissors
  • Pencil
  • Paper Masking Tape
  • We R Memories – QuickStick

Miscellaneous

  • Cotton Ball

Pirate Themed Pop-Up Birthday Card

This card was made for Craft Roulette #256 whose parameters included an A7 card, hippie colors, island(s), and wood.

Watch the process video to see how I made this card.

Cardbase:  A purchase kraft brown 5×7 cardbase was used. The front was stamped with a Caribbean map by Scrappy Tails.

Pirates: All the die cut characters were made with Karen Burniston dies. Watch video below.

Treasure Chest: Watch the assembly video at the bottom of the Karen Burniston Treasure Chest linked page.

Sentiments:  The sentiments were all stamped in black ink using the Karen Burniston’s Pirate Sentiments stamp set.

Envelope:  The card fits into an A7 (5x 7-inches) size envelope stamped with a sentiment and map.

___________________________________

Thank you for experiencing this blog post.

I hope this inspires you and makes you smile.

Please subscribe, like and leave comments 😊

Follow my YouTube channel, Instagram and Pinterest as well.

___________________________________

Disclaimer: Karen Burniston products are provided free of charge by the manufacturer for review and use. All other items were personally purchased. Compensated affiliate links used where or when possible, meaning I will receive a small percentage commission from these manufacturers at no cost to you. This will allow me to add more content to my YouTube channel and help out a lot. Thank you.

Materials Used:

Dies

Stamps

Stencils

  • Scrappy Tails – 6×8 Plastic Stencil –Layering Caribbean Map Trio

Papers

  • My Colors Cardstock – 12×12 Charcoal Metallic Textured Cardstock – Black Bear
  • Gold and Silver Foil Cardstock
  • Black, Blue, Kraft, Orange, Pink, Red, and White and Yellow Cardstock
  • Park Lane  β€“ A7 Cardbase and Envelope – Kraft

Ink

  • Memento – Fade Resistant Dye ink – Tuxedo Black
  • Ranger – Tim Holtz – Distress Ink – Abandoned Coral, Fossilized Amber, Salvaged Patina, Twisted Citron and Walnut Stain
  • Stampin’ Up – Classic Ink Pad – Balmy Blue
  • Pigma – Mircon 05 Fine Tip Pen – Black
  • Sakura – Gelly Roll Pen – Medium – White
  • Sharpie – Permanent Marker – Ultra Fine Tip – Black, Blue, Red
  • Sharpie – Permanent Marker –Fine Tip – Green
  • Stampin’ Up – Stamp Write Marker – Chocolate Chip

Adhesives

Tools

  • Die Cutting Machine
  • Paper Trimmer
  • Stamping Platform
  • Scissors
  • Paper Masking Tape
  • Sponge Daubers
  • Blending Brush
  • This Calls For Confetti – It’s No Secret Anti-Static Powder Tool
  • We R Memories – QuickStick

2025 ATC Calendar – MARCH

I started a new challenge for 2025 – the ATC calendar challenge. With a group of crafty friends, we are making a new image on a 4.25×5.5-inch calendar card for each month.

My March card is made with PoppyStamps dies from their Corner Shoppe collection.

Check Out Lois’s March calendar card.

___________________________________

Thank you for experiencing this blog post.

I hope this inspires you and makes you smile.

Please like and leave comments 😊

___________________________________

Disclaimer: Karen Burniston products are provided free of charge by the manufacturer for review and use. All other items were personally purchased. Compensated affiliate links used where or when possible, meaning I will receive a small percentage commission from these manufacturers at no cost to you. This will allow me to add more content to my YouTube channel and help out a lot. Thank you.

Materials Used:

Dies

  • Spellbinders – Cutting Dies – DIY Easel
  • PoppyStamps – Craft Dies – Corner Shoppe Wooden Cart -2619
  • PoppyStamps – Craft Dies – Flower and Leaf Sprinkles -2622

Press Plates

  • Spellbinders- BetterPress Plates – 2025 DIY Calendar

Papers

  • Spellbinders- BetterPress – 5.5 x 4.25” (A2) Cotton Card Panels – Porcelain & Pebble
  • Heavy Weight Brown Cardstock
  • Black, Brown, Pink, Purple and Yellow Cardstock Scraps
  • My Paper Insider – Envelopes – Silver Holographic Oil Slick

Ink

  • Pigma – Mircon 005 Fine Tip Pen – Black
  • Spellbinders- BetterPress Ink – BetterPress Black

Adhesives

Tools

A Toast To You – A Birthday Card

This pun themed card is a pop-up card that has a piece of toast that moves up when the card is opened. It is a top-fold A2 (4.25×5.5-inch) cardbase That uses Karen Burniston’s Parcel Pop-Up mechanism to make the toast and lever move when you open it.

The frame around the inside sentiment is from Karen Burniston’s Frame Pull Pop-Up and the sentiment is from her Photo Memories stamp set. The HBD! stamped on the toast is by Craft Roulette.

The toaster and bread were of my own design. The black decorative design on the toaster comes from a previously released die set by Karen Burniston. The doily is from Paper Discovery.

The letters on the card front are by PoppyStamps.

___________________________________

Thank you for experiencing this blog post.

I hope this inspires you and makes you smile.

Please like and leave comments 😊

___________________________________

Disclaimer: Karen Burniston products are provided free of charge by the manufacturer for review and use. All other items were personally purchased. Compensated affiliate links used where or when possible, meaning I will receive a small percentage commission from these manufacturers at no cost to you. This will allow me to add more content to my YouTube channel and help out a lot. Thank you.

Materials Used:

Dies

Stamps

Papers

  • Recollections – 8.5×11 65 lb. Cardstock – Kraft
  • Scrapbook.com – 6×8 Double-Sided 230 GSM papers – Berry Sweet
  • Gray Cardstock
  • Fraser Papers for William House – A2 Envelope – Genesis Text Milkweed Smooth

Ink

  • Memento – Fade Resistant Dye ink – Tuxedo Black
  • Ranger – Tim Holtz – Distress Ink- Gathered Twigs
  • Pigma – Mircon 005 Fine Tip Pen – Black

Adhesives

Tools

  • Die Cutting Machine
  • Paper Trimmer
  • Bone Folder
  • Stamping Blocks
  • Scissors
  • Craft Mat
  • Sponge Daubers
  • Paper Masking Tape

A February Birthday Card

This card was made for Craft Roulette #255 whose parameters included an A2 card, Valentine colors, February element, and metallic/foil.

Watch the process video to see how I made this card.

Cardbase: I used a purchased cardbase and envelope. The cardbase had a pink plaid exterior with was covered with decorative paper on the card back and a frame mat was cut from red using the Karen Burniston rectangle die so that some of the pink plaid would show.

Sentiments:  The β€œSweet” sentiment on the card front is front a journaling card from the 12×12 Memory Place paper collection. Inside, a Craft Roulette sentiment stamp was used for β€œHappy Birthday.”

Envelope:  The card fits into an A2 (4.25x 5.5-inches) size envelope with decorative paper strips glued to the back flap.

___________________________________

Thank you for experiencing this blog post.

I hope this inspires you and makes you smile.

Please like and leave comments 😊

___________________________________

Disclaimer: Karen Burniston products are provided free of charge by the manufacturer for review and use. All other items were personally purchased. Compensated affiliate links used where or when possible, meaning I will receive a small percentage commission from these manufacturers at no cost to you. This will allow me to add more content to my YouTube channel and help out a lot. Thank you.

Materials Used:

Dies

Stamps

  • Craft Roulette – Clear Stamps – The Basics
  • Craft Roulette – Clear Stamps – Funn Sentiments #01

Papers

  • Memory Place – 12×12 inch Double-Sided Paper – Peter’s Garden
  • Memory Place – 6×6 inch Double-Sided Paper – Peter’s Garden
  • Memory Place – 6×6 inch Collage Origami Paper – Peter’s Garden
  • Craft Smart – A2 Printed Card and Envelope – Pastel Plaids

Ink

  • Memento – Fade Resistant Dye ink – Tuxedo Black
  • Pigma – Mircon 01 Fine Tip Pen – Black
  • Nuvo – Aqua Shimmer Brush Marker – Glitter Gloss
  • Nuvo – Glitter Marker – Lemon Drizzle

Adhesives

Tools

  • Die Cutting Machine
  • Paper Trimmer
  • Stamping Platform
  • Stamping Blocks
  • Detail Scissors
  • Trimming Scissors
  • Paper Masking Tape

On A Musical Note – Happy Birthday!

This card was made for a musical crafty friend who loves purple.

Cardbase:  I made this much the same way as I did with a previous gate fold aperture card (See Button Heart Gate Fold Aperture Birthday Card). Cut a 5.5Γ—12-inch piece of purple cardstock. Score at 2-inches, 4-inches, 8-inches and 10-inches. Fold as shown in video. On the gate fold panels, place circle with treble clef die with center of the circle over the fold and die-cut. With die still taped to card, close flaps and tape die to other side lining up the die to complete the circle.

Musical Decorations: All the musical decorations are die cut from black using the dies from the Paper Discovery box 9 of Papercraft Society kits.

Sentiments:  β€œHappy Birthday” is a rubber stamp from Rubbernecker Stamps and was stamped onto the white rectangle before it was glued into the card, but after the black circle was glued in place. (See Button Heart Gate Fold Aperture Birthday Card video for how to line-up white rectangle for stamping).

Envelope:  The card fits into an A2 (4.25x 5.5-inches) size envelope that has the back stamped with musical staff and β€œA note to wish you well” all from Paper Discovery musical set.

___________________________________

Thank you for experiencing this blog post.

I hope this inspires you and makes you smile.

Please subscribe, like and leave comments 😊

Follow my YouTube channel, Instagram and Pinterest as well.

___________________________________

Disclaimer: Karen Burniston products are provided free of charge by the manufacturer for review and use. All other items were personally purchased. Compensated affiliate links used where or when possible, meaning I will receive a small percentage commission from these manufacturers at no cost to you. This will allow me to add more content to my YouTube channel and help out a lot. Thank you.

Materials Used:

Dies

  • Paper Discovery by Olga Direktorenko – Papercraft Society – Box 9 – Music

Stamps

  • Paper Discovery by Olga Direktorenko – Papercraft Society – Box 9 – Music
  • Rubbernecker Stamps – Red Rubber Stamp – 0218 SO – Happy Birthday

Papers

  • DCWV – 12Γ—12 Textured Cardstock Stack – Brights
  • Recollections – 8.5Γ—11 65 lb. Cardstock – White
  • Fraser Papers for William House – A2 Envelope – Genesis Text Milkweed Smooth

Ink

  • Memento – Fade Resistant Dye ink – Tuxedo Black
  • Pigma – Mircon 01 Fine Tip Pen – Black

Adhesives

Tools

  • Die Cutting Machine
  • Paper Trimmer
  • Bone Folder
  • Score Board
  • Stamping Platform
  • LDRS – Stampendable Stamping Tool
  • Stamping Blocks used as paperweights
  • Scissors
  • Paper Masking Tape
  • We R Memories – QuickStick

Pop-Up Alice In Wonderland Birthday Card

This card was made for Craft Roulette #254 whose parameters included a book binding card, candy colors, rhymes with β€œogg” element, and letters (ing).

Watch the process video to see how I made this card.

Cardbase: Start with an 11×4.25-inch rectangle of white lightweight cardstock. Score and fold at 5-inches and at 5.5 -inches. Cover the four panels created by the folds with decorative papers from the Stamperia collection (inside panels) and solid red for outside panels. Glue the .5-inch strip together to form the book binding card. Cut a 1 to1.5-inch wide stripe of black cardstock and score at .5-inches down the strip. Cover the book binding strip of card front and wrap over to back of card.

Card Front Image: Stamp the Alice in Wonderland image from Creative Expressions on a piece of licorice red cardstock in black and glue to front of card, trimming off excess.

Pop-Up: Watch the assembly video at the bottom of the linked page for Karen Burniston’s Little Twist Panel Pop-Up. Cut pieces from Stamperia decorative paper.

Sentiments:  β€œHappy Birthday” is stamped in black using the Craft Roulette sentiment stamps. A small white, fancy label die-cut from the Karen Burniston’s Rectangles and Labels set for a space for a personal message.

Envelope:  The card fits into an A2 (4.25x 5.5-inches) size envelope. The Cheshire Cat was cut from some of the Stamperia decorative paper and glued to the envelope back flap.

___________________________________

Thank you for experiencing this blog post.

I hope this inspires you and makes you smile.

Please like and leave comments 😊

___________________________________

Disclaimer: Karen Burniston products are provided free of charge by the manufacturer for review and use. All other items were personally purchased. Compensated affiliate links used where or when possible, meaning I will receive a small percentage commission from these manufacturers at no cost to you. This will allow me to add more content to my YouTube channel and help out a lot. Thank you.

Materials Used:

Dies

  • Karen Burniston in cahoots with Riley and Company – Rectangles and Labels – Crosshatch – 1233
  • Karen Burniston in cahoots with Riley and Company – Little Twist Panel Pop-Up – 1232

Stamps

  • Craft Roulette – Clear Stamps – Funn Sentiments #01
  • Creative Expressions – Rubber Stamp by Paper Panda – We’re All Mad Here

Papers

  • Scrapbook.com – 4.25×5.5-inch Smooth Cardstock – Peppermint
  • Stamperia –  8×8-inch Double-Sided Papers – Alice In Wonderland
  • Black and White Cardstock
  • Fraser Papers for William House – A2 Envelope – Genesis Text Milkweed Smooth

Ink

  • Memento – Fade Resistant Dye ink – Tuxedo Black
  • Pigma – Mircon 005 Fine Tip Pen – Black
  • Sharpie – Permanent Marker – Fine Tip – Black

Adhesives

Tools

  • Die Cutting Machine
  • Paper Trimmer
  • Bone Folder
  • Score Board
  • Stamping Platform
  • LDRS – Stampendable Stamping Tool
  • Stamping Blocks
  • Scissors
  • Paper Masking Tape

2025 ATC Calendar – FEBRUARY

I started a new challenge for 2025 – the ATC calendar challenge. With a group of crafty friends, we are making a new image on a 4.25×5.5-inch calendar card for each month.

Watch the process video to see how I made this calendar card.

To see other months’ calendars go to click here.

___________________________________

Thank you for experiencing this blog post.

I hope this inspires you and makes you smile.

Please like and leave comments 😊

___________________________________

Disclaimer: Karen Burniston products are provided free of charge by the manufacturer for review and use. All other items were personally purchased. Compensated affiliate links used where or when possible, meaning I will receive a small percentage commission from these manufacturers at no cost to you. This will allow me to add more content to my YouTube channel and help out a lot. Thank you.

Materials Used:

Dies

  • Spellbinders – Cutting Dies – DIY Easel
  • Spellbinders – Cutting Dies – Reversible Royal Court by Jaycee Gaspar

Press Plates

  • Spellbinders- BetterPress Plates – 2025 DIY Calendar
  • Spellbinders- BetterPress Plates – Enchanting Suit Facets by Jaycee Gaspar

Papers

  • Spellbinders- BetterPress – 5.5 x 4.25” (A2) Cotton Card Panels – Porcelain & Pebble
  • Gold Matte Cardstock
  • Black, Green, Pinks, Reds and White Cardstock
  • Heavy Weight Brown Cardstock

Ink

  • Sharpie – Permanent Marker – Fine Tip – Pink
  • Spellbinders- BetterPress Ink – BetterPress Black, Strawberry

Adhesives

Tools

Miscellaneous

  • Simon Says Stamp! -Peppermint Pawsitively Dazzling Gems