Potted Pets Baby Pop-up Card

This card was made for Craft Roulette#206 whose parameters included Project type of card with a heart, vintage colors, plant(s) element and lace on the base.

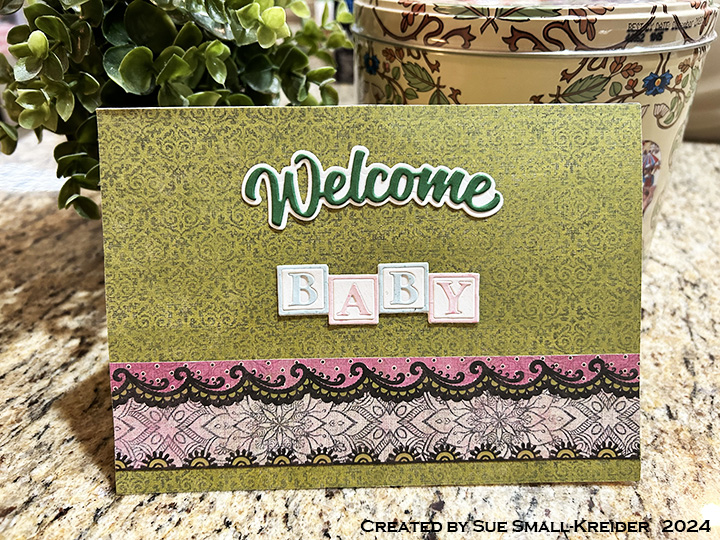
In honor of Craft Roulette’s host Mary Gunn’s new grandchild, I made a new baby card using the parameters listed above.

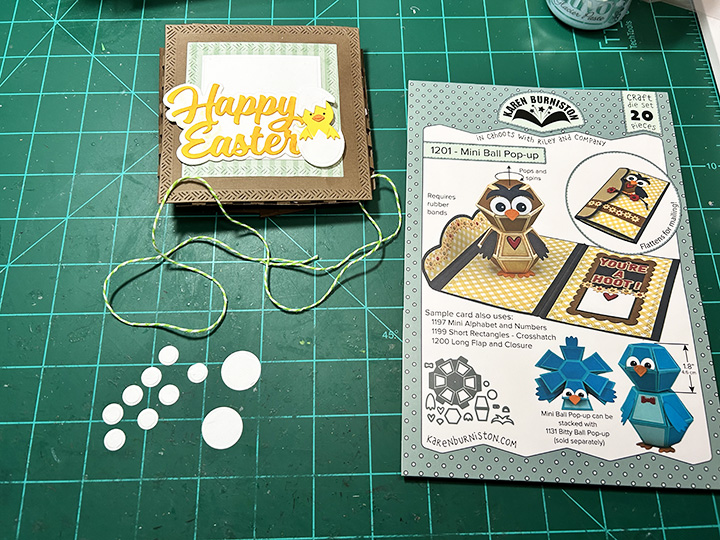
Cardbase: I used a 5×7-inch purchase cardbase and covered all four panels with vintage green patterned paper. The decorative stripes and lacy decorations were scraps from the opposite side of the paper.

Potted Plants: I decorated the panels with potted animal planters that were made from solid color cardstock using My Favorite Things Potted Pets die set.

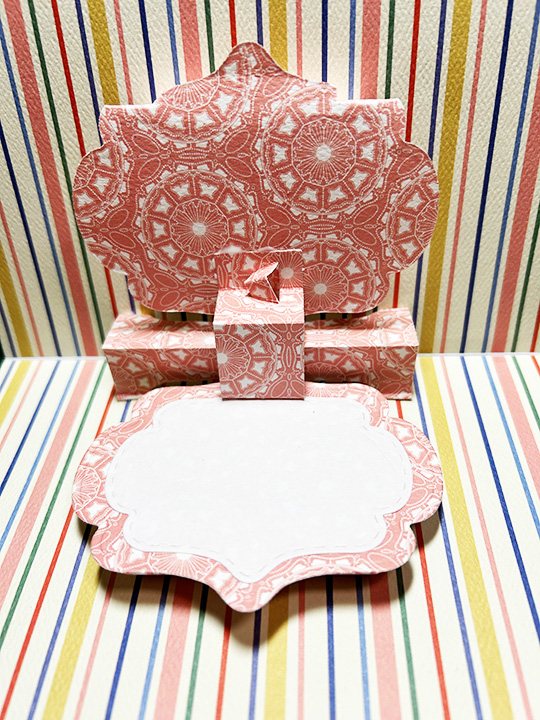
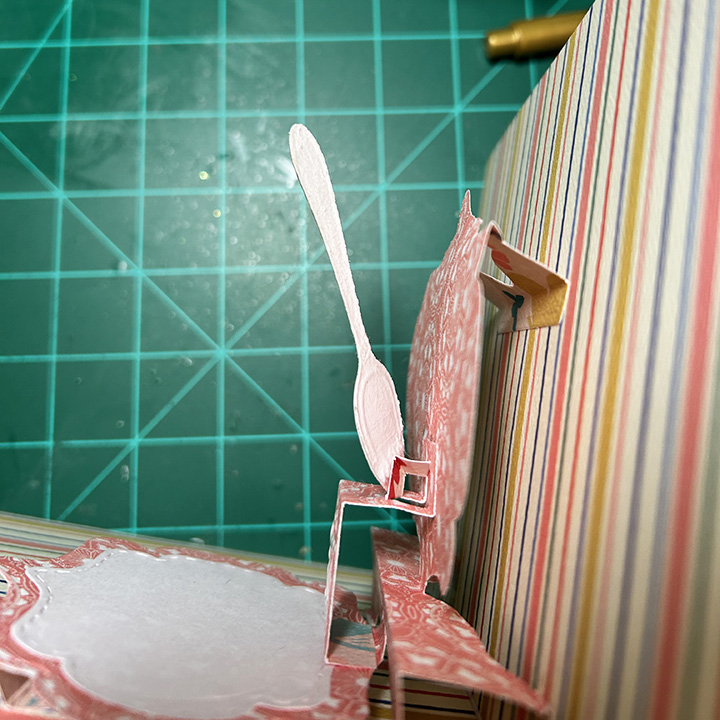
Pop-Up Twist Panel: I used Karen Burniston’s Twist Panel Pop-Up die set. Watch video below for instructions.

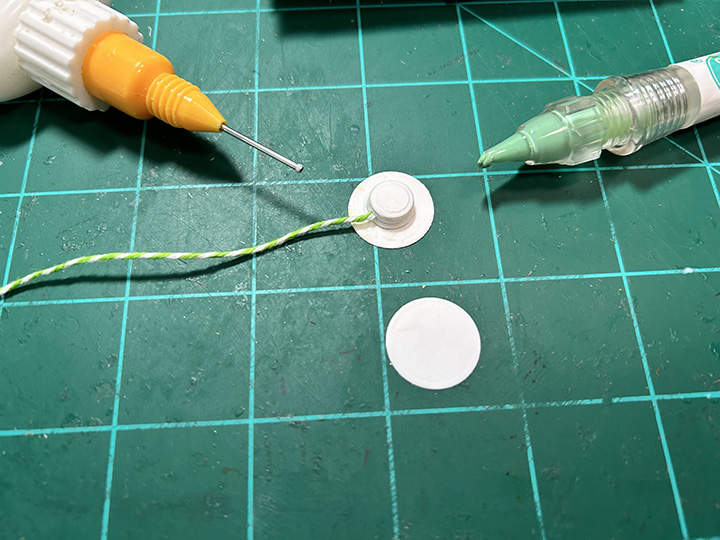
Sentiments: I used Karen Burniston Welcome and Baby Charms die sets to create the “Welcome Baby.” In the video above I explain how I used Karen Burniston’s Connectors word set dies to perform “word surgery” to create the phrase “oh baby.”

_____________________________________

Thank you for experiencing this blog post. I hope this inspires you and makes you smile.

Please like and leave comments 😊

____________________________________________

Materials Used:

Dies

Papers

  • Hot Off The Press – 12×12 Double-Sided Paper Pack – Spice Market
  • Bazzill – 8.5×11 Textured Cardstock – Tiara -18-1002
  • Black, Browns, Greens, Pink and White Cardstock
  • Park Lane Paperie – A7 Cardbase – White

Ink

  • Sharpie – Permanent Marker – Ultra Fine Tip – Black
  • Spectrum Noir – Tri-Blends – Orange Blend
  • Stampin’ Up – Stampin’ Blends Marker – Dark Daffodil Delight

Adhesives

Tools

  • Die Cutting Machine
  • Bone Folder
  • We R Memories – QuickStick
  • Tweezers
  • Craft Clips
  • Stamping Blocks used as paperweights
  • Corner Punch
  • Scissors
  • T-Ruler
  • Pencil

Vintage Roses for Mother’s Day

The sweet pinks and reds of old-fashion rose bushes always remind me of their scent. This Mother’s Day card is a loving way to say how much mothers are appreciated.

I used Honeybee Stamps’ layering Bold Backgrounds Vintage Roses dies for the front of the card. The roses are cut from three different shades of pink cardstock and inked with a bright red ink. The leaves were cut in an apple green and inked with a medium green ink. There layering guide which you have to download from the Honeybee Stamps website shows how the the three sizes of roses are assembled. The sentiment banner is a strip of apple green cardstock 4 1/2-inched wide by 1/2-inches tall with fishtails ends cut free-hand and inked to match the leaves. The gold foiled sentiment strip “Appreciate You” is from Spellbinders that I had batched foiled previously.

The inside “Happy Mother’s Day” sentiment is cut from the apple green cardstock using a die by Papertrey Ink. The back of the card is covered with a striped sheet of printed paper from This Calls for Confetti.

I went stash diving to find a old-fashioned looking rose for the back of the envelope and ended up using a stamp set from Pinkfresh Studios called Pretty Paisley. The roses were stamped in melon red ink while the tiny sentiment “It’s the little things that make life big” was stamped in a green pear ink.

_________________________________________________________

Thank you for experiencing this blog post. I hope this inspires you and makes you smile.

Please like and leave comments 😊

__________________________________________________________

Materials Used:

Dies

  • Honey Bee Stamps -Layering Dies – Bold Backgrounds Vintage Rose
  • Papertry Ink – Waffer Thin Metal Dies – Happy Mother’s Day

Stamps

  • Pinkfresh Studios – Clear Stamps – Pretty Paisley

Papers

  • This Calls For Confetti – 6×6 Single-Sided Papers – Painted Patterns
  • Three Shades of Pink and Apple Green Cardstock
  • Tonic Studios – Craft Perfect – A6 Cardbase and Envelope – Bright White

Ink

  • Stampin’ Up – Classic Ink Pad – Melon Mambo and Pear Pizzazz
  • Ranger – Tim Holtz – Distress Ink- Fossilized Amber, Lumberjack Plaid and Rustic Wilderness
  • Sharpie – Permanent Marker – Ultra Fine Tip – Black

Hot Foiling

  • Spellbinders – Glimmer Hot Foil Plates and Banner Dies – Mini Everyday Sentiments
  • Spellbinders – Glimmer Hot Foil Roll – Matte Gold


Adhesives

  • Neutral PH Adhesive by LINECO
  • Fine-Tip Glue Bottle
  • Tape Runner – 1/2-inch wide

Tools

  • Die Cutting Machine
  • Stamping Platform
  • LDRS – Stampendable Stamping Tool
  • Craft Mat
  • We R Memories – QuickStick
  • Sponge Dauber
  • Stamping Blocks used as paperweights
  • Spellbinders’ Glimmer Hot Foil System
  • Scissors

Bunny Cake Easter Card

It’s time for the Karen Burniston March 2024 Design Team Challenge with the theme of Bunny Ears.

I decide on a pop-up bunny cake using the Cake Pop-Up with the Animal Add-Ons 5 and Easter Borders along with the new Happy Easter sentiment and paper doilies.

______________________________________________________________________

Thank you for watching and reading this blog post. I hope this inspires you and makes you smile.

Please like and leave comments 😊

______________________________________________________________________

Materials Used:

Dies

Papers

  • Hot off The Press – Paper Pazazz – 12×12 Single-Sided Paper – Soft Tints Green Stripes
  • Keep It Simple – 12×12 Double-Sided Cardstock – Jade Collection Pack – Random Dot & Solid
  • Black, Green, Orange, Pink and White Cardstock
  • Park Lane Paperie – A7 Cardbase and Envelope – White

Ink

  • Ranger – Tim Holtz – Distress Ink- Vintage Photo
  • Sizzix – Luster Wax – Lilac Rainbow
  • Sharpie – Permanent Marker – Ultra Fine Tip – Black
  • Pigma – Mircon 01 Fine Tip Pen – Black

Adhesives

Tools

  • Tweezers
  • Sponge Dauber
  • Stamping Blocks used as paperweights
  • Scissors
  • Tweezers
  • Ruler
  • Pencil

Miscellaneous

  • 6 Heart Shaped Paper Doilies

Spring Is Here Interactive Card

This card was made for Craft Roulette #204 whose parameters included: thinking of you project, fairy tale colors, hear(s) or ear(s) element and stamped background.

To learn how I made the card, watch this process video.

_________________________________________________________

Thank you for experiencing this blog post. I hope this inspires you and makes you smile.

Please like and leave comments 😊

__________________________________________________________

Materials Used:

Dies

  • Karen Burniston in cahoots with Riley and Company – Word Set 5 – Royalty – 1034
  • Spellbinders – Cutting Dies by Vicky Papaioannou – Umbrella Bloom – SS-554
  • Spellbinders –Small Die of the Month – March 2022 – Floating Bunny – DOM-MAR22

Stamps

  • Nellie’s Choice – Motive Stamps – Burst of Drops -TXCS016
  • Penny Black – Clear Stamps – My Universe – 30-796
  • Scrapbook.com – Clear Stamps – Sunshiney Day
  • Simon Says Stamp! – Unmounted Rubber Stamp – Sun and Moon Mandala – sss102337

Papers

  • This Calls For Confetti – 6×6 Single-Sided Papers – Speckled
  • American Crafts – 12×12 inch Single-Sided Papers – Everyday Papers
  • Colored and White Cardstock Scraps
  • Tonic Studios – Craft Perfect – A6 Cardbase and Envelope – Bright White

Ink

  • Catherine Pooler – Premium Dye Ink – Party Collection – All That Jazz
  • Catherine Pooler – Premium Dye Ink – Spa Collection – Mandarin Spice
  • Simon Says Stamp – Pawsitively Saturated Ink – SunBeam
  • Sharpie – Permanent Marker – Fine Tip – Black
  • Pigma – Mircon 01 Fine Tip Pen – Black
  • Faber-Castell – Pitt Artist Pen with Bullet Nib – White 101

Adhesives

Tools

  • Die Cutting Machine
  • Paper Trimmer
  • Stamping Platform
  • LDRS – Stampendable Stamping Tool
  • We R Memories – QuickStick
  • Scissors
  • Metal Ruler/Straight-Edge

Miscellaneous

  • Riley and Company – Mini Action Wobbles Spring
  • Nuvo – Vintage Drops – Yellow Brick Road

A Walk Along Main Street Pop-up Card

This card was made for Craft Roulette #203 whose parameters included a flip fold card, Main Street colors, walk(s) element and heart(s).

________________________________________________________________

Thank you for checking out this blog post. I hope this inspires you and makes you smile.

Please like and leave comments 😊

________________________________________________________________

Materials Used:

Dies

  • Concord & 9th – Metal Dies – Bake Shoppe
  • Concord & 9th – Metal Dies – Book Shoppe
  • Concord & 9th – Metal Dies – Fashion Shoppe
  • Concord & 9th – Metal Dies – Pop-Up Shoppe Base
  • Concord & 9th – Metal Dies – Window Shoppe Pop-Up Base

Stamps

  • Concord & 9th – Clear Stamps – Bake Shoppe
  • Concord & 9th – Clear Stamps – Book Shoppe
  • Concord & 9th – Clear Stamps – Fashion Shoppe
  • Concord & 9th – Clear Stamps – Flower Shoppe
  • My Favorite Thinks – Clear Stamps – Coffee Shop CS-734
  • Rubbernecker Stamps – Rubber Stamp – Good Friends 642-13

Papers

  • Craft Consortium – 6×6 Double-Sided Cardstock – Brick Textures
  • My Favorite Things – 6×6 Single-Sided Paper Pad – Finishes and Textures
  • Spellbinders – 8.5×11-inch 100 lb. Cardstock – Terra Cotta
  • Spellbinders – 8.5×11-inch 100 lb. Cardstock – Snowdrift
  • The Paper Studio – 8.5×11-inch Printed Paper – Brick Wall
  • Gold and Silver Matte Foil Cardstock
  • Colored Cardstock
  • Dura-Lar – 9×11-inch .005 Clear Film or Acetate

Ink & Embossing Powder

  • StazOn – Solvent Ink – Jet Black
  • Stampin’ Up – Classic Stampin’ Pad – Early Espresso
  • VersaMark – Watermark Stamp Pad
  • Ranger – Tim Holtz – Distress Ink- Antique linen, Salty Ocean, Scorched Timber
  • Gelly Roll – Gel Pen – Gold
  • Sharpie – Permanent Marker – Ultra Fine Tip – Black
  • Pigma – Mircon 01 Fine Tip Pen – Black
  • Recollections – Detail Embossing Powder- Ebony (used on “Books” sign)

Adhesives

  • Neutral PH Adhesive by LINECO
  • Fine-Tip Glue Bottle
  • Double-Sided Tape -1/8-inch wide
  • Double-Sided Tape -1/2-inch wide

Tools

  • Die Cutting Machine
  • Bone Folder
  • Stamping Platform
  • LDRS – Stampendable Stamping Tool
  • Craft Mat
  • We R Memories – QuickStick
  • Tweezers
  • Sponge Dauber
  • Stamping Blocks
  • Heat Tool
  • Scissors
  • Metal Ruler/Straight-Edge
  • Pencil 

Pop-Up Chick In A Basket

Wanting a basket to put a hatching chick pop-up ball in, I came up with a collapsible basket card for Easter using several of the new die sets in Karen Burniston’s February 2024 release.

How to make this interactive card:

Chick: Make two Mini Pop-up Balls – one entirely yellow and the other half yellow, half white. Assemble chick following Karen Burniston’s assembly video located at the bottom of the Mini Pop-up Balls page. Cut six of the top and bottom eggshell jagged pieces and one hexagon for the top of the egg from white cardstock using the dies from the Animal Add-on 5 die set.

Basket: Cut four of the basket pieces from the Wide Woven Basket Box Card set and assemble as shown in the KB assembly video at the bottom of the linked page. Trim off the side tabs on the four basket pieces. Watch the following video. Cut two of the largest crosshatch squares from brown.

Closure Sentiment: Cut the Shadow from the Happy Easter word set from white. Cur the words from yellow and ink bled to a darker yellow. Die cut eggshell and chick pieces following assembly video for Spring Animals.

Glue assemble chick to sentiment.  Cut eight of the smaller eye circles and two of the larger eye circles from the Mini Pop-up Balls die set. Glue four of the small circles onto one of the large circles. Cut a piece of string at least 24-inches long and glue one end on top of small circle stack. Glue the last four circles on top of the string end, thus sandwiching the string in center of the small circles stack of eight. Attach to top of stack the last large circle. Once the stack is dry, glue to the back of the sentiment and then onto top basket flap. Let dry with a weight on top of it.

Envelope: This card would either be hand delivered or mailed in a bubble pack envelope.

_______________________________________

Thank you for reading this blog post. I hope this inspires you and makes you smile.

Please like and leave comments 😊

_______________________________________

Materials Used:

Dies

Papers

  • Hot off The Press – Paper Pazazz – 12×12 Single-Sided Paper – Soft Tints Green Stripes
  • Black, Blue, Brown, Orange, White and Yellow Cardstock

Ink

  • Ranger – Tim Holtz – Distress Ink- Fossilized Amber and Vintage Photo
  • Pigma – Mircon 01 Fine Tip Pen – Black

Adhesives

Tools

  • Stamping Blocks used as paperweights
  • Scissors
  • Tombow – Mono – Sand Eraser -512A

Miscellaneous

  • 24-inches of Baker’s Twine

Coffee Loving Couple

Different things bond couples together, but for one couple I know it is coffee. This is a card to celebrate their wedding anniversary.

I used two of Karen Burniston’s new February 2024 release diesTea and Coffee Borders and Tea and Coffee Pop-Up along with several previously released dies – Rectangles and Labels – Crosshatch, Word Set 12 – Anniversary and Cupcake Pop-Up.

Thank you for reading this blog post. I hope this inspires you and makes you smile. Please like and leave comments 😊

Materials Used:

Dies

Papers

  • Carta Bella – 12×12 Double-Sided Textured Cardstock Collection Kit – Gather At Home
  • Bazzill – 12×12 inch Cardstock – Travertine
  • Recollections – 8.5×11 Shimmer Cardstock – White Gold
  • Black, Brown, Pale Green and White Cardstock
  • Clear Vellum
  • #10 Business Envelope – Kraft Brown

Ink

  • Ranger – Tim Holtz – Distress Ink – Black Soot, Gathered Twigs and Saltwater Taffy
  • Pigma – Mircon 01 Fine Tip Pen – Black

Adhesives

Tools

  • Die Cutting Machine
  • Bone Folder
  • Craft Mat
  • Sponge Dauber
  • Stamping Blocks used as paperweights
  • Scissors
  • Ball Tipped Shaping Tool
  • Stiff Foam Mat

A Practically Perfect Birthday Card

It’s time to see more of Karen Burniston’s February 2024 release of new dies.

There is a wonderful scene in the Julie Andrew’s movie Mary Poppins, where she takes measure of the children with her tape measure and when her measure is taken it says “practically perfect.” This is a birthday card for the “practically perfect” person in everyone’s life.

Cardbase: I used a purchased A7 (5×7-inch) cardbase and envelope. Cut four 5×7 panels of decorative paper. (I used a Mary Poppins themed paper collection from Carta Bella.) Glue two to the outside and two to the inside of the cardbase leaving the center fold uncovered. (I used two panels of striped paper inside the card, matching up the stripes at the fold.) Decorate the front and back with journaling cards from the paper collection. (I used two heart paper doilies to go under the front journaling card which was popped-up with foam tape, while the back had a copier paper scalloped border cut using the scalloped rectangle die in the Rectangles and Labels – Crosshatch set and trimmed to fit.)

Double Lorna Platform: Fold a piece of pink decorative cardstock 4×8-inches to form a 4-inch square. Using a bone folder, make the fold crisp. With the paper folded, place the largest die from the Lorna Label Pop-Up set with the open tab above the fold matching the score line with the fold. (I found that I had to use a shim to cut through the double thickness of the cardstock to get the die to cut through both layers. You may have to adjust the sandwich for your die cutting machine. Test first before cutting your decorative cardstock.)

Train the folds. Place the center fold of the double mechanism along the inside center fold of the cardbase. Tuck the tiny tabs on either side of the label base under and glue to the cardbase with both the mechanism and cardbase flat. Close card to train label base to pop-out. (I used a pencil to pop the tube-like base out the first time.) Glue the upper tabs to cardbase as shown on package directions.

Cut a label from white copier paper using the largest stitched label die and glue to the bottom label platform.

Tea Cup and Spoon Mechanism: When gluing the mechanism from the Tea and Coffee Pop-Up set onto the double Lorna platform, a strip the width of the Lorna platform must be cut from the bottom tab of the mechanism.

Spoon: Cut from a heavy silver foil cardstock using the spoon die in the Tea and Coffee Pop-Up set.  (I used some silver packaging.) Glue the back of spoon to angled top mechanism making sure the position will be within the cup when open and within the card when closed.

Tea Cup and Saucer: Emboss the cup and saucer onto lightweight pink cardstock the die cut using the cup and saucer dies in the Tea and Coffee Pop-Up set. Leaving the cup in the die, ink through the stencil feature with pink ink. Remove from die and ink the cup’s handle, base and rim stripe with pink ink. Ink saucer base. With gold marker trace embossed lines on cup and saucer. Glue to front of mechanism.

Sentiments: A journaling card with “Sweet and Kind and Smart and Cheery” and a word tape measure border from the paper collection were used for the front and back of the card. “Happy Birthday” was cut from light blue cardstock using Word Set 2 – Birthday.

Envelope: The back flap of the envelope is covered with a border strip of a tea party.

Thank you for reading this blog post. I hope this inspires you and makes you smile. Please like and leave comments 😊

Materials Used:

Dies

Papers

  • Carta Bella – 12×12 Double-Sided textured Paper Collection Kit – Practically Perfect
  • White Copier Paper
  • Pale Blue and Pink Lightweight Cardstock
  • White Heart Shaped Paper Doilies – 4-inch wide
  • Silver Foil Packaging
  • Park Lane Paperie – A7 Cardbase and Envelope – White

Ink

  • Ranger – Tim Holtz – Distress Ink- Saltwater Taffy
  • Pigma – Mircon 01 Fine Tip Pen – Black
  • Crafter’s Square – Metallic Marker .05 in Point – Gold

Adhesives

Tools

  • Die Cutting Machine
  • Bone Folder
  • Craft Mat
  • Sponge Dauber
  • Stamping Blocks used as paperweights
  • Scissors
  • Pencil