Last week I went to a cardmaking class taught by Donna Butler and had a chance to catch-up with some friends I hadn’t seen in a while. Here are the cards I made.
FRACTURED SHUTTER CARD
Here is a video that shows the Fractured Card or Faux Shutter technique.
SO REFRESHING CARD
Donna’s daughter Sarah designed this refreshing notecard.
IRRESISTIBLE BLOOMS CARD
Thank you for reading this blog post. I hope this inspires you and makes you smile. Please like and leave comments 😊
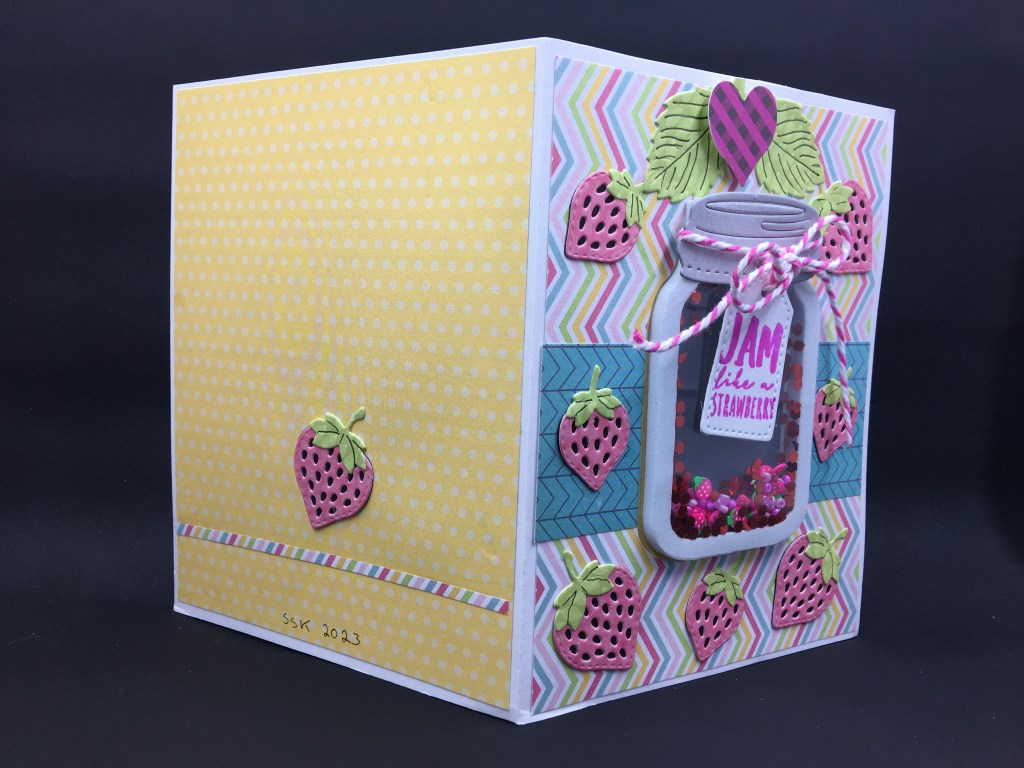
This card was made for Craft Roulette #176 whose parameters included: a split in the middle, jolly colors, a fruit element and a heart.
My inspiration for this card came from the Berry Special die and stamp set that came in the Die Cutting Essentials, issue 103. (This magazine is available on the Craftstash website. Note that there are different country based websites for this online vender. Use the one that works for youto avoid unnecessary currency/customs fees.) It has a stamp that says “Jam like a strawberry” so I immediately thought of a jam jar shaker and went to my Queen and Company stash of shaker kits.
Cardbase: Using a 8.5×5.5 inch rectangle of heavy white cardstock for the cardbase, I folded it in half and used a bone folder to burnish the card into a 4.25×5.5 inch A2 size. The front and back panels of the card are covered with 4×5.25 inch decorative paper rectangles. The front has an additional strip of blue decorative paper near its middle. The back uses a thin strip cut from the front panel paper as decoration. I used the jar frame die to cut the aperture into the card front when only the front decorative papers had been attached. Next, I glued on the inside decorative papers and cut the aperture again.
Shaker: Queen and Company are known for their shaker kits which use pre-cut foam shaker frames with adhesive on both sides and clear acetate covers which take the tediousness out of making shaker cards. For the jar I used two acetate pieces and one foam frame that all had been dusted with an anti-static brush. I peeled off one side of the frame’s adhesive backing and attached a pre-cut piece of acetate. Adding the glitter, seed beads and strawberry slices to the frame, I dusted the next acetate sheet again and peeled off the adhesive backing on the foam frame and attached the acetate to enclose the shaker elements. (The chucky glitter had a lot of static electric charge and jumped to the tiny bits of adhesive at the foam edges.) The shaker is attached to the card by gluing a jar frame cut from the front of the card to the inside of the card and then gluing the shaker to the jar frame.
Decorations: Eight layered strawberries were cut using the Berry Special die set from pink and green patterned paper and black cardstock. The dies cut two stems, large and small strawberry outlines and fronts with seeds cutout as well as a plant stem with large leaves. I also used two of the large leaves on the card front. Seven strawberries are scattered on the card front and one large strawberry on the back. A red plaid paper sticker on a foam dot is at the top of the card front.
Sentiments: Using the stamps from the Die-Crafting Essentials gift set, I stamped in purply-pink ink the sentiment “Jam like a strawberry” on the jar tag which is tied around the jar lid with baker’s twine, and the inside sentiment “Thank you berry much!”
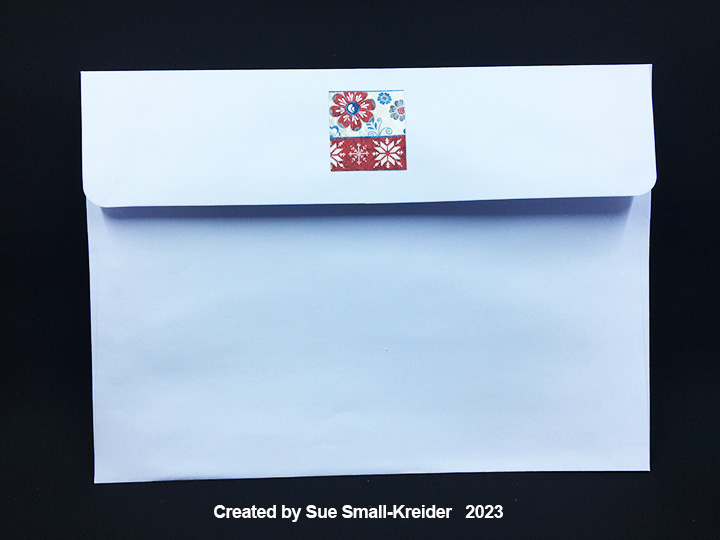
Envelope: Stamped on the envelope flap is “You’re the sweetest!” in purply-pink ink.
Thank you for reading this blog post. I hope this inspires you and makes you smile. Please like and leave comments 😊
Materials Used:
Dies
Queen & Company – Steel Dies – Love Jar
Die Cutting Essentials, issue 103 – Dies – Berry Special
Stamps
Die Cutting Essentials, issue 103 – Clear Stamps – Berry Special
Shaker Elements and Frame
Queen & Company –Foam Shaker & Acetate – Love Jar
Red Chunky Glitter
Pink Seed Beads
Dress My Craft – Polymer Clay – Strawberry Slices
Papers
Queen & Company – 6×6 Double-Sided Mat Stack – Flirty Florals
Crate Paper – 6×6 Single-Sided Patterned Paper Pad – Cool Kid
This is the eighth card in the Fireplace Christmas Card series.
Santa’s coming. Can you hear him on the rooftop? He’s sliding down the chimney.
For this card I used Karen Burniston dies to create an accordion card with a pop-out fireplace with Santa’s boots dangling in the fireplace opening. (Before starting, please watch the assembly video for the Fancy Label Accordion located near the bottom of the linked page.)
Cardbase: I cut three Fancy Label Accordion panels from heavy white cardstock. I also cut four of the same panels from red decorative paper and two panels from green decorative paper. The green paper panels I adhered to a cardstock panel. (I realized I needed to cut one more green panel to cover the tabs when all the panels are glued together.)
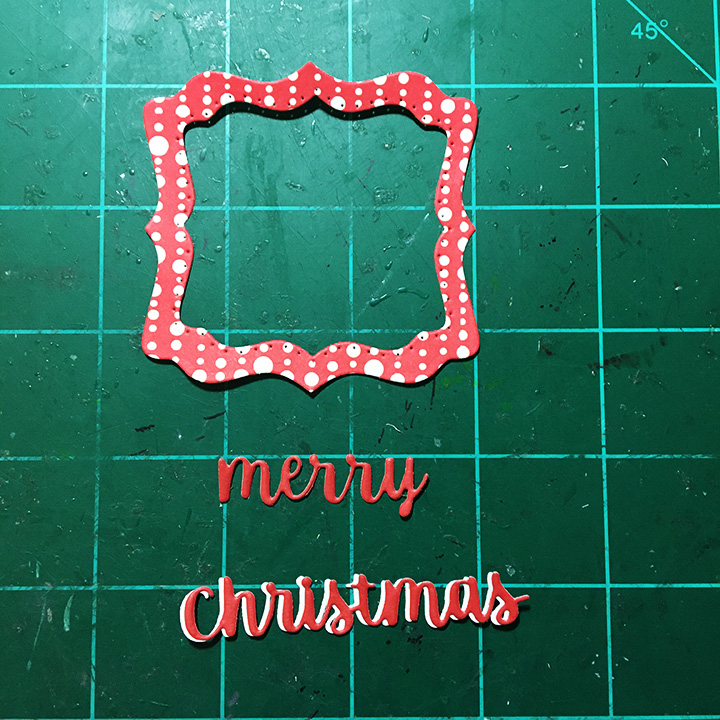
The red panels I trimmed out the center label at the pivot points. Using the largest and second largest label dies in the set to cut a frame, I cut borders from two of the red center labels. For the back personal message label I used the largest of the label dies to cut a frame that went to the edge of the white label.
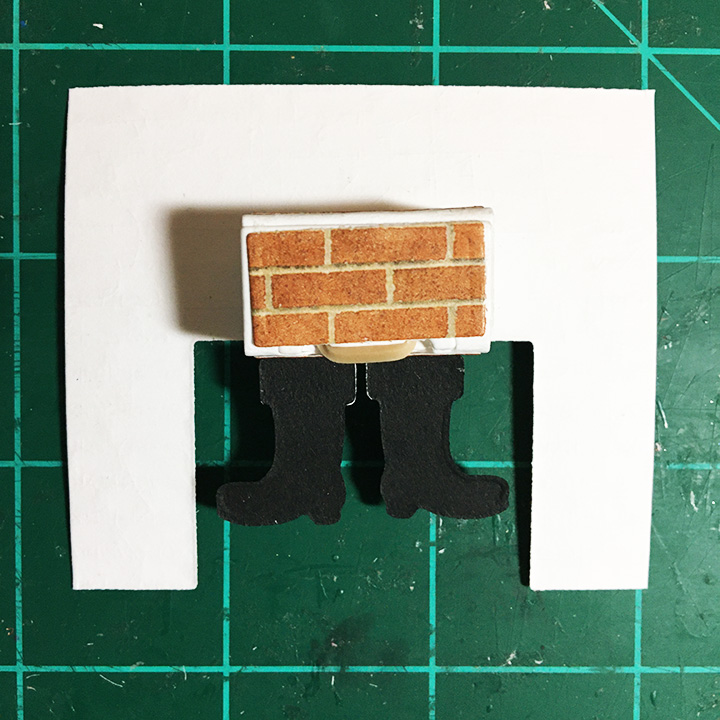
Fireplace: I cut the fireplace front and mantel pieces using the Fireplace Pop-Up. For the fireplace I glued a brick decorative paper to white cardstock and die-cut it using the embossing feature. I then trimmed off a 5/8-inch from each side of the fireplace so it would fit into the card. The mantel piece was cut from white and ink blended.
Bam Box and Boots: Because I was using a different mechanism than the fireplace mechanism, I recommend watching the assembly video for the small bam box. I tried both sizes of bam box, but you need to use the smaller one to get the fireplace to fit on the label and not catch when the card is folded closed. Glue three of the four decorative panels to the bam box. Before you add the rubber band to the bam box, cut the teardrop shaped holes for the boots (circled in red in photo below) using a sharp pointed piercing tool and scissors. (I used an old ice pick or awl.) If you plan to glue the bam box arched side to the fireplace, cut the holes in the panel just below it as shown in the photo circled in red. Attach the boots by slipping the tabs through the holes.
Assemble the bam box as usual.
I did not attach the fourth decorative panel on my card since I knew the arched side would be glued to the back of the fireplace. Test the placement of the bam box on both the fireplace and the pivot label before the glue sets. Once the fireplace is attached to the panel, attach the mantel with the wider side glued to the fireplace.
Card Back: Every time I make an accordion card, I forget to save the decorative frame papers to glue on last, to cover the tabs that get glued as the card is assembled. This time I did it to the middle green panel.
Sentiments: “Ho Ho Ho” comes from cutting down the “Hooray!” in Word Set 4 while “Merry Christmas” is from Word Set 3. The Santa face is from the Gnome and Santa die set.
To get the word” Christmas” to stand-out from the red border paper I cut an additional “Christmas” in white and off set it behind the red word.
Envelope: The red “Merry Christmas” on the envelope flap and its green border are stamps from Anna Griffin.
CRX Sheet: The card recipient experience (CRX) sheet explains how to close the fireplace. it is a free download.
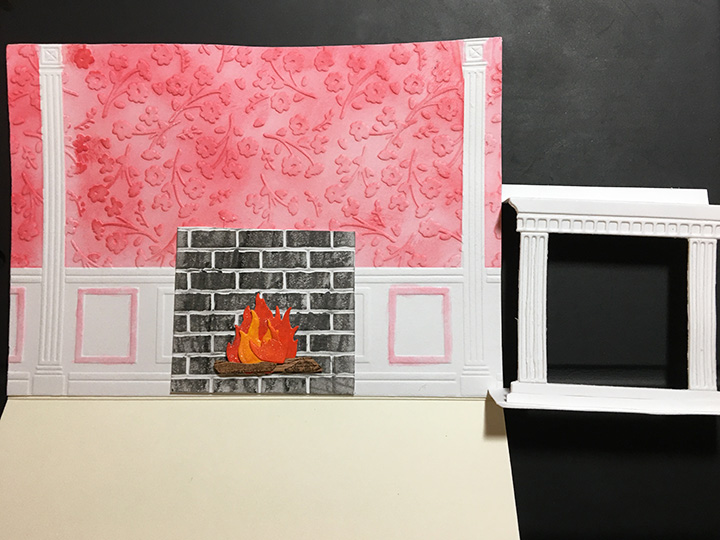
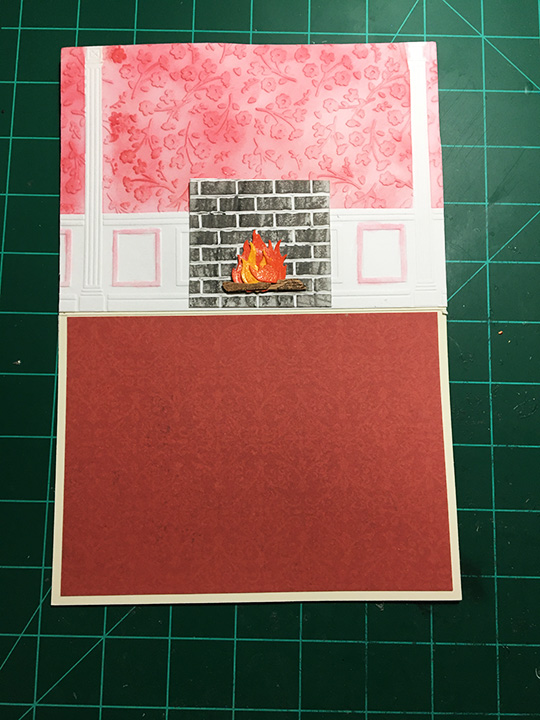
This is the seventh card in the Fireplace Christmas Card series.
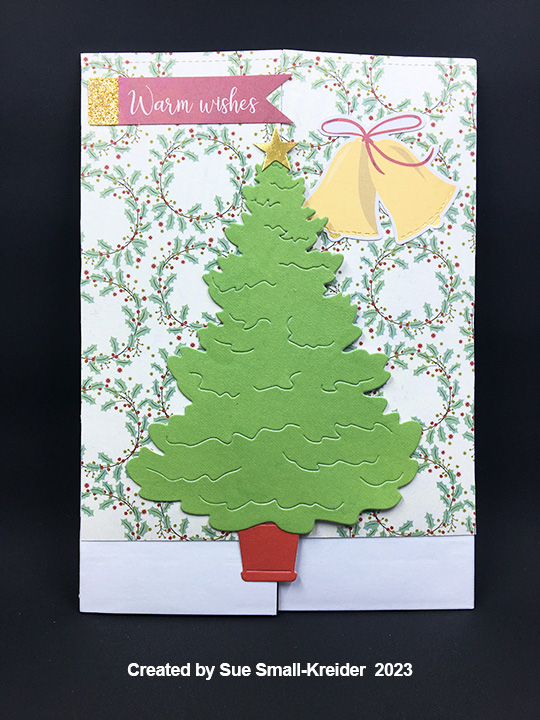
Waiting for the grandchildren to arrive to decorate the tree. It’s that peaceful moment when the dog is asleep before the fire and the chairs are ready for tired bodies.
For this card I used two Paper Discovery die sets by Olga Direktorenko – Timeless Room and Elegant Roomas well as the Timeless Room embossing folder. These sets are available in limited quantities from Craftstash. Olga is an amazing designer of scene dies and stamps who lives in Ukraine.
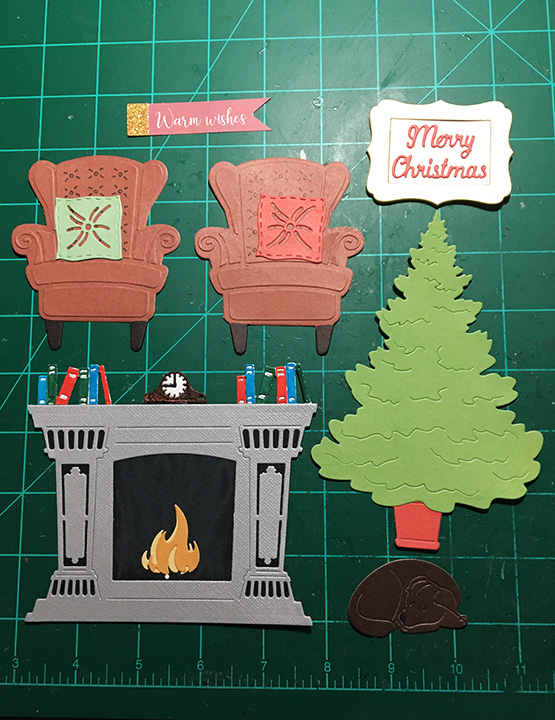
Cardbase: A purchased A7 (5×7 inches) gatefold cardbase and matching envelope were used for this card. The inside was covered in a red and white striped wallpaper with embossed floor moldings made using the Timeless Room embossing folder. A red rug is in the center bottom. The outside has wreath paper from the same 6×6 paper pad as the striped paper.
Fireplace: The fireplace die cuts a detailed image that needs to be backed with black paper to make the details stand out. The final touch is the snoozing chocolate labrador retriever in front of the fire.
Chairs: The chair die in the Timeless Room set has an outline die and then one other die that cuts all the detailed pieces that make up the dimensional chair. The seat back die has a stencil feature for tufting which I used with a fine-tipped black marker to add this detail to the chair. The cushions are from the same set. When attached to the inside flaps of the card, the chair extend slightly over the edge, but card covered by the tree on the card front when the card is closed.
Card Front: An evergreen tree sits in a red pot waiting to be decorated. The tree is from the Elegant Room set while the pot is from the Timeless Room set. The left half of the tree is glued to the left card flap. The yellow bells were added to balance out the banner. Both are from a Spellbinder’s Christmas card kit.
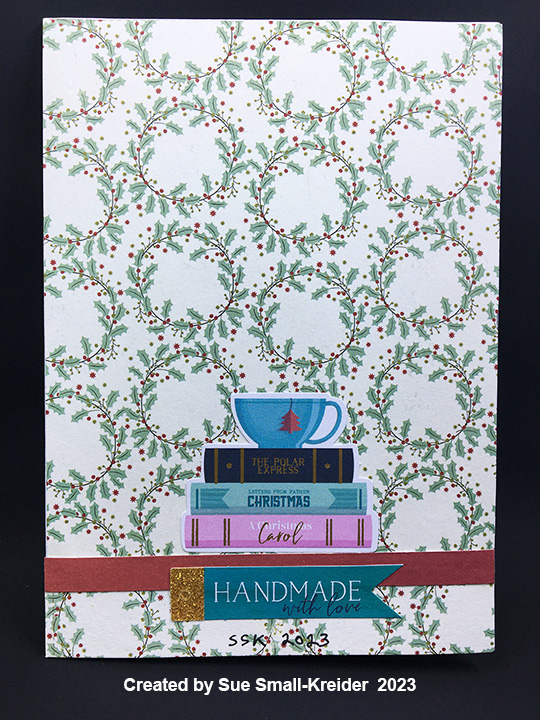
Card Back: A red strip covers the seam where the two pieces of paper meet. Ephemera from a Spellbinder’s Christmas card kit was used to decorate the back including a stack of Christmas themed books and a banner stating, “Handmade with love.”
Sentiments: The front banner “Warm Wishes” is from a Spellbinder’s Christmas card kit. “Merry Christmas” is part of the Elegant Room set and includes the frame. The two white ovals over the chairs are spaces to write personal messages.
Envelope: The back flap is decorated with yellow bells from a Spellbinder’s Christmas card kit.
Thank you for reading this blog post. I hope this inspires you and makes you smile. Please like and leave comments 😊
This is the sixth card in the Fireplace Christmas Card series.
Fireplaces have a bit of magic in them on Christmas eve. This easel card plays into the magic complete with an elf sitting on the mantel shelf.
Hero Arts made the Stamp & Cut XL Fireplace set that was used to make this card along with Graphic 45 patterned paper Lets Get Cozy.
Cardbase: Starting with a purchased A7 cardbase, I cut it along its fold to have two pieces of 5×7 inch rectangles. Next, I cut a piece of the heavy weight pink cardstock 7.5-inches by 4.25-inches and folded at 2-inches and at 5.5-inches. (You may need to change the fold in the easel arm as I did, but you can cover the extra fold line with decorative paper.)
One tab was glued to the top of a cardbase panel and the other tab will be glued to the base of the other panel once it is decorated as the card front. Cover the bottom card base panel with a carpet like patterned paper. Also cover the back side of the case base with patterned paper. (I choose a wallpaper-like floral print and put a house border along the bottom edge to ground the back of the card.)
Fireplace: While designed to be a single layer die-cut, the fireplace can be cut multiple times to create a more 3D effect. The dies need to be clipped to separate the main outline of the fireplace from the mantel piece and the stocking from the rest of the piece. Cut one outline piece and one mantel piece from heavy blush pink cardstock. You will have to cut the mantel piece from the cardstock at its connecting points with a kraft knife. Cut another mantel piece to fussy cut the scalloped inner opening that frames the firebox. (I like to cut this piece to include some of the columns.)
On the outline piece, trace the firebox opening with a light pencil using the mantel piece die.
Using the layering stamps with two shades of brown ink for the logs and yellow and orange ink for the flames, create the burning logs within the penciled firebox. Using a blending brush, ink up the firebox to make sooty walls. Glue the inner firebox frame around the inked firebox. Use foam squares on the back of the mantel piece to adhere it to the outline piece. Blend some color onto the mantel piece.
Decorations: There are a number of decoration stamps in Fireplace Stamp & Cut set. I stamped both candles, the elf, tallest tree and the pinecones in greenery onto white heavy cardstock and heated embossed them before coloring with watercolor pencils. Next, I fussy cut them out leaving a long tab at the bottom of each to attach them to the fireplace I glued the tabs to the backside of the mantel piece and place foam squares on the backs of the pieces. The stockings were also stamped, heat embossed and watercolored. They are glued to the front of the mantel piece.
Sentiments: All of the sentiments were stamped, and heat embossed onto cardstock. The “ho ho ho” was stamped on pink cardstock to go at the base of the fireplace as if the sounds were coming down the chimney into the firebox. Crosshatch dies were used to cut out the larger sentiments of “Warm wishes” on a rug and “Merry Christmas” on a wall plaque. A second white rug was added for a personal message. The first rug is popped up on foam squares to act as an easel stop while the second rug is glued down for the ease of writing a message.
Envelope: The back flap of the envelope is stamped with a green elf to hint at the magic to come.
CRX Sheet: With many interactive cards, the recipient needs instructions on how to open and set-up the card. I create CRX sheets (card recipient experience) to include in the envelope. You can download for free the easel/double easel CRX sheet.
Thank you for reading this blog post. I hope this inspires you and makes you smile. Please like and leave comments 😊
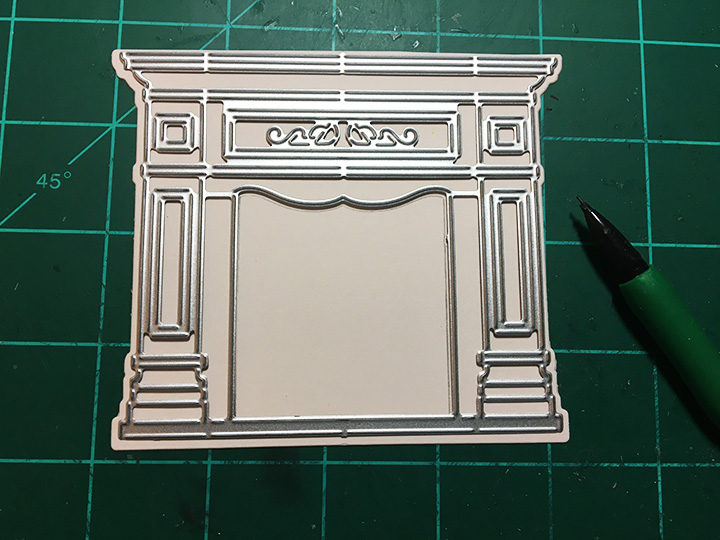
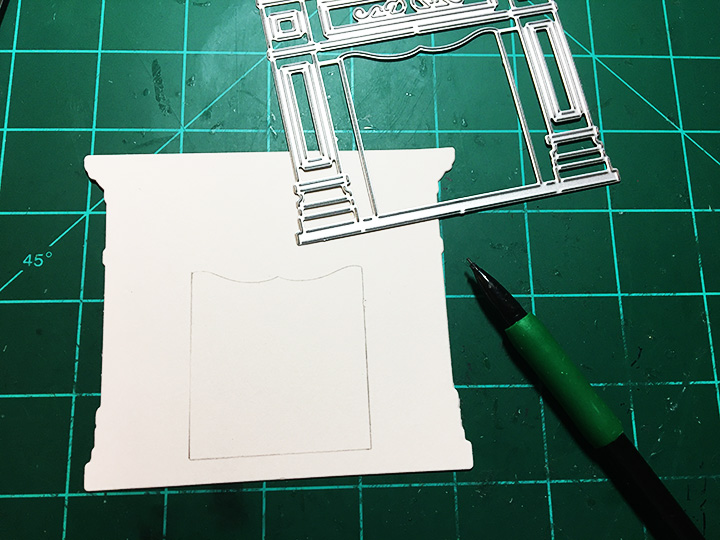
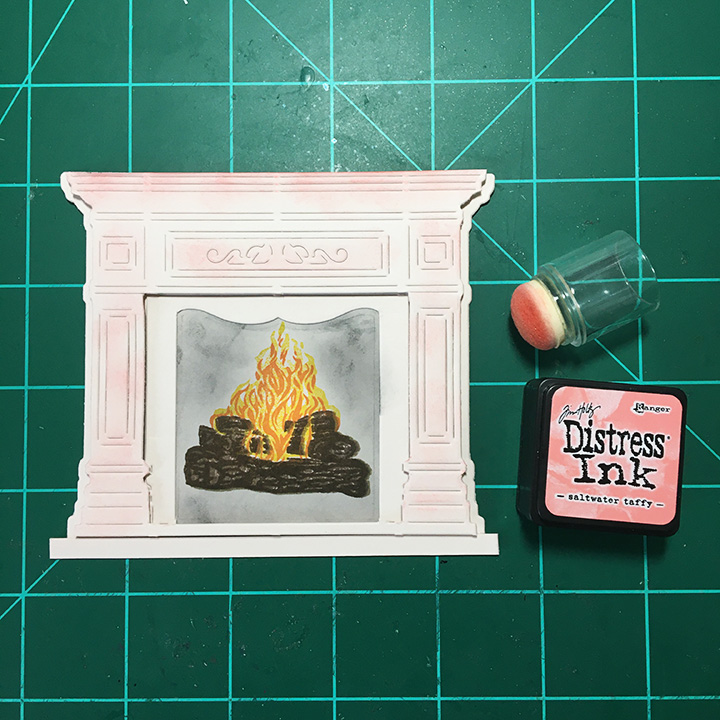
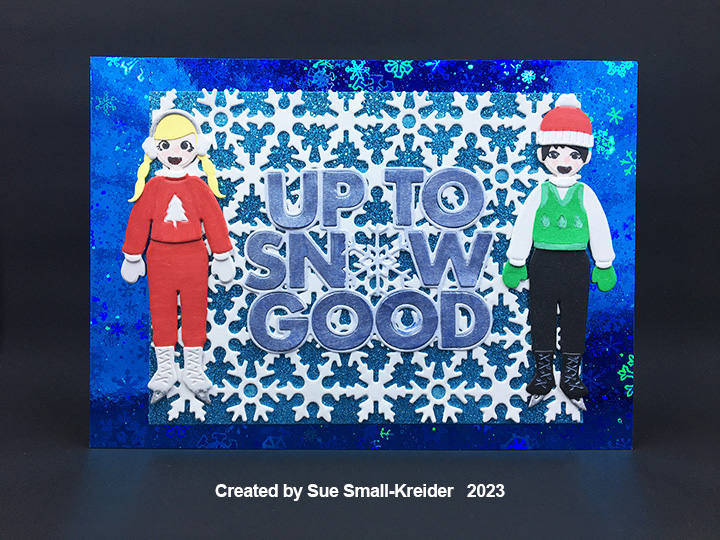
This is the fifth card in the Fireplace Christmas Card series.
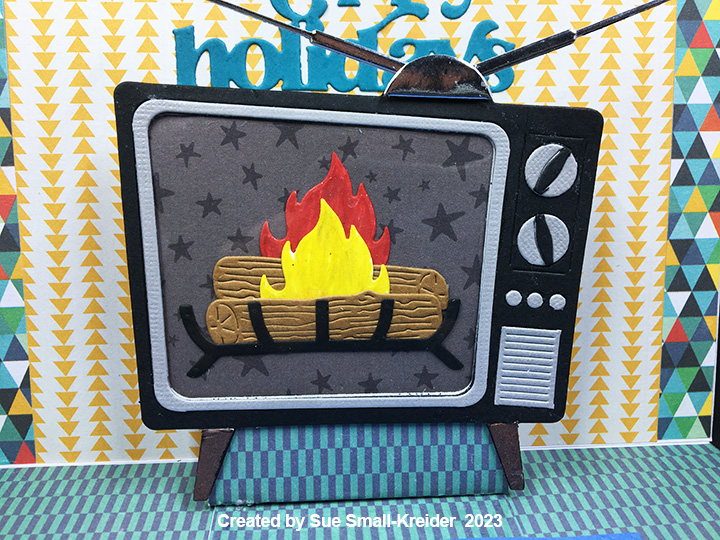
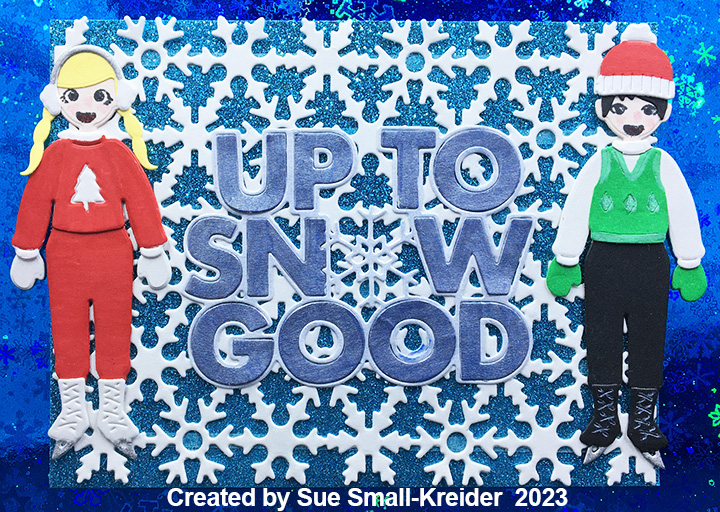
In the good old-days of the 1950s and 1960s, the winter holidays meant snow, winter sports like ice skating on a homemade ice ring made in the backyard of 2×4 boards and a few inches of water frozen. On Christmas day the TV stations broadcast images of burning logs to replace the normal programing.
This card commemorates those childhood memories using dies by Hero Arts along with basic dies and stamps by other companies.
Cardbase: I used a purchase A7 (5×7 inch) cardbase and envelope. I covered the inside with papers that represent wallpaper and carpeting. The card back is also covered with patterned paper. Because I used 6×6 inch patterned paper and some designs I only had one piece, I placed borders of contrasting paper.
Pop-Up: I wanted this television set to pop-up inside the card, so once it was assembled, I made my own pop-up cube from scrap carpeting patterned cardstock (I would have used the wallpaper, but I had no more of it.) The pop-up cub is made from strip 2.5×7 inches, folded at .5-inches, 3-inches, 3.5-inches and 4-inches, and the .5-inch tab is glued onto the carpet panel inside the card, butted up against the fold and the other 3-inch end of the strip glued to the wallpaper panel. The TV is glued to the front of the pop-up.
TV: As with many Hero Arts dies, you have to cut them multiple times and then fussy cut with scissors the decorative pieces such as the TV knobs, speaker box and legs. I cut the knobs, speaker and screen frame from a textured metallic gray cardstock and legs from woodgrain paper.
The whole television I cut once from black and twice from a thick cardstock in my junk mail recycling. The junk mail pieces I glued together. On the back of the black piece, I attached a piece of clear acetate using thin double-sided tape. Next, I trimmed the excess acetate. (Don’t attach black front to junk mail back piece until burning log screen is attached.)
White cardstock that was colored with markers and covered with glitter gloss was used for the flames while recycled kraft cardboard packaging was what the logs were cut from. Once the burning logs were assembled, they were glued to star patterned paper TV screen piece. Place a piece of wide clear packing tape over the backside of the junk mail piece and place the finished screen inside the junk mail frame. Glue the black front to the junk mail piece.
Attach the TV to the pop-up inside card. Play with the antenna placement so they won’t show when the card is closed. (I cut the antenna once from silver foiled packaging and once from the thick junk mail cardstock and glued together.)
Card Front: For this layered mat front, I used a 5×7 inch rectangle of holographic snowflake cardstock that I cut a 4×5.25 inch crosshatch rectangle out of the center. A 4.25 x 5.5 inch piece of glitter cardstock was covered with a snowflake pattern plate attached with 1/8-inch wide double-sided tape. The open places in the center of some snowflakes had stickiness from the tape adhesive and was covered with an anti-static brush and powder.
Skaters: Hero Arts makes a paper doll die-cut series complete with a variety of hair and facial expressions as well as clothing and accessories. These mid-century styles ice skaters use the Winter Accessories set along with the basic Hero Lifestyle Forms and Faces sets. Markers were used to color the clothing.
Sentiments: Two die cut sentiments were used on this card. On the front is “Up To Snow Good” a pieced die set by Riley & Company. I cut it once from heavy white cardstock and colored the letters with a blue metallic marker. I used glue to attach all pieces to the snowflake pattern plate. Inside the card is “Happy holidays” a die set by Simon Says Stamp. The lavender rug inside the card is a place for a personal message.
Envelope: To hint at what is to come, the back flap of the envelope was stamped with an Art Impressions’ sentiment stamp in blue ink.
Thank you for reading this blog post. I hope this inspires you and makes you smile. Please like and leave comments 😊
This is the fourth card in the Fireplace Christmas Card series.
Grand rooms to celebrate Christmas evokes feelings of another time that is both formal and cheery.
To create the 3D card front and inside pop-up fireplace, Crafter’s Companion Gemini Create-A-Card die sets were used along with a Paper Discovery embossing folder to create the textured wallpaper and moldings.
Embossed Walls: I made a room scene card a few years back using the same embossing folder to create the wall. Because I liked the look of the red ink blending and the white woodwork of that earlier card, I repeated it. I cut two pieces of heavy weight white cardstock, spritzed them with water and used the embossing folder with the suggested sandwich of embossing mat and thin plate to emboss in my die-cutting machine. (I used 3M post-It notes the last time I ink blended the wallpaper.) This time with low-tack paper tape, I masked off the columns and wainscoting molding before ink blending.
Cardbase:For the cardbase, I used a purchased ivory A6 (4.5 x 6.25 inch) card with matching envelope.The two embossed wall pieces go on the card front and the inside top panel. Because they are back-to-back, heavy layers of decorative papers need to go on the card back to balance out the weight of the two panels when the card is opened. The advent calendar numbers on the back are to suggest the counting of days until Christmas.
Card Front: I placed the embossed piece with the left column at the left edge of the card. The dies for the staircase are in the tree die set and cut just the banister and stair treads. I embossed a smaller piece of molded wainscoting to adhere the stair treads to with thin foam square. The railing backs-up to the column. Using a brown marker, I colored the hand railing before adding some greenery swags from the accessories die set and ornaments from the yuletide treasure set.
The Christmas tree is popped-up on thicker foam squares. I used some tiny holographic tinsel to create the illusion of a fir tree. More of the ornaments from the stairway are used with a glitter foam star as tree decorations. For the tree stand, I trimmed-down the coal shuttle from the accessories set after die-cutting it from black shinny packaging. The frame of the sentiment is cut from matte gold cardstock and the white sentiment pieced into the frame and glued in place with thin strips of cardstock on the backside, before being adhered to the card with thin foam squares.
Fireplace: Because the fireplace die is designed to be cut out from the cardbase, I had to modify it by cutting it from a scrape of heavy white cardstock and cutting a .25-inch tab across the top and a similar tab at the base. The four decorative molding pieces need to glued on to the mantel piece. I cut a .5-inch strip to go across the two side flaps of the hearth stone so the firebox has a white floor.
Next, I cut a 2.5-inch square of white cardstock and embossed it in the brick folder. Using gray and back Distress crayons, I colored the bricks to look sooty before gluing them in place to the inside wall of the cardbase. Using the flame and logs from the accessories set, I cut the pieces and then used some glitter inks to color the flames. The logs were cut from brown woodgrain paper. The fender or fire guard piece was cut from gold matte cardstock and glued to the backside of the mantel piece. (Fender is also in accessories set.) The carpet needs to be glued onto the bottom inside card panel before the mantel can be glued in place. Glue goes on the bottom of the hearthstone and the back top tab. I positioned the bottom piece to be a smidge from the cardbase fold. With the fireplace folded flat on the carpet, I lowered the cardbase top panel onto the flattened mantel piece to get the correct placement.
Room Decorations: With in the accessories set, there are the coal shuttle, holly and greenery garlands, a wreath and bow, two stockings and a picture frame. The mirror is a piece of sliver plastic packaging adhered to the woodgrain embossed cardstock frame with double-sided tape. Nuvo Drops were used on the holly strands for berries. A fine-tipped marker was used to create the striped stockings.
Sentiments: There is only one sentiment of “Happy Christmas” on the card front. The cream-colored rug inside the card can be used to write a personal message.
Envelope: To hint at what is to come, “Warm Wishes” has been stamped in red ink onto the back envelope flap.
Thank you for reading this blog post. I hope this inspires you and makes you smile. Please like and leave comments 😊
This is the third card in the Fireplace Christmas Card series.
Modern, clean and simple design are what this holiday card is all about. Inspiration comes from Altenew’s Modern Fireplace die set which creates a layered fireplace with a traditional mantelpiece, herringbone brickwork and an embossed firebox. An add-on set of Mantel Décor -Winter offers the wreath, bow and candlesticks. The burning logs and grate are part of the Fireplace set.
Cardbase: I started with an A2 size kraft cardstock base (4.25 x 5.5 inches when closed) and covered the outsides two panels with patterned cardstock.
Fireplace: For the fireplace mantel, I used a textured metallic gray cardstock, cutting the mantel shelf piece twice and the main piece once. The mantel shelf I also cut once from a heavy cardboard piece of junk mail. With the herringbone brick layer, I used a terra cotta piece of cardstock covered with clear packing tape to die-cut the piece. A dark gray piece of cardstock was used for the firebox which was distressed with white water-soluble crayon. To assemble follow the directions on the video on the link page. I glued a strip of white copier paper between the firebox layer and the brick layer just at the top, to give the mantel shelf piece an additional place to be attached to besides the top edge of the mantel base.
I cut the two flames and log pieces from white cardstock and colored them with markers and glitter ink. After coloring, I glued the layering pieces together and added the tiny black grate.
Decorations: The decorations on the card are minimal with two tall candlesticks in teal blue with white candles. All of these pieces were cut once from a heavy cardboard piece of junk mail and a second time from colored cardstock. The wreath was cut once from a heavy cardboard piece of junk mail and colored with a red marker. The bow was cut twice from teal with the knot being fussy cut out of the second piece.
Sentiments: I stamped the “Holiday Fun” before I assembled the card onto the card front. The sentiment was part of an Altenew stamp set that came in a crafting magazine from 2020. Inside the card I used the same teal cardstock from the mantel decorations to die cut “Happy holidays.”
Envelope: For the flap of the envelope, I used Altenew’s Mini Brownstone stamp set with two shades of red ink and two shades of brown ink to stamp the suggestion of what the outside of the home looks like. I finished off the scene with a .01 mm black pen to create a tree, windowpanes, sidewalk and fence.
Thank you for reading this blog post. I hope this inspires you and makes you smile. Please like and leave comments 😊
This is the second card in the Fireplace Christmas Card series.
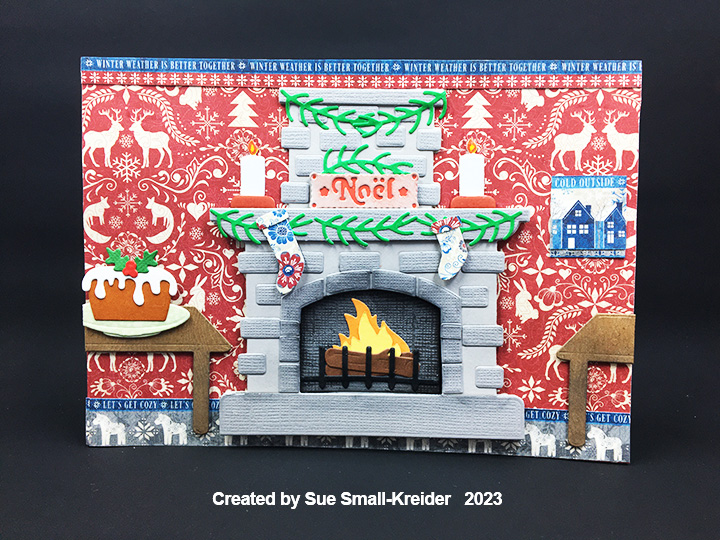
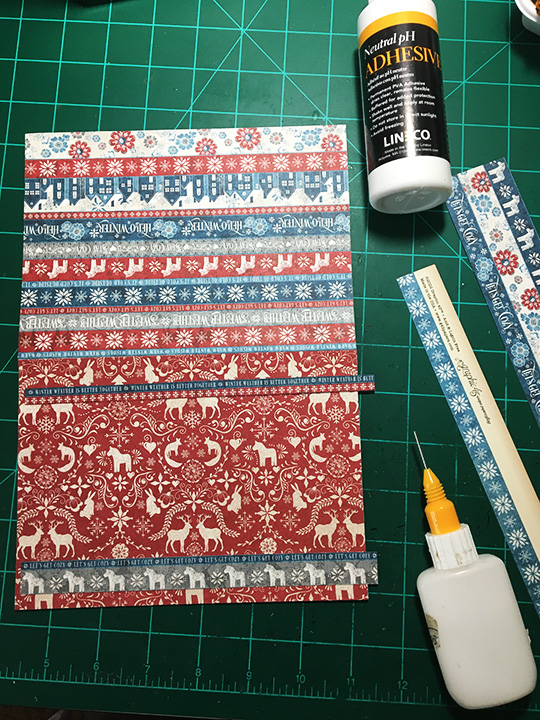
My inspiration for this cozy fireplace scene comes from the Graphic 45 paper collection Let’s Get Cozy and the Elizabeth Craft Designs Cozy Fireplace and Let’s Bake die sets.
Cardbase: A purchase A7 (5×7 inches) cardbase was covered with decorative papers on the two outside panels with leftover scraps used inside.
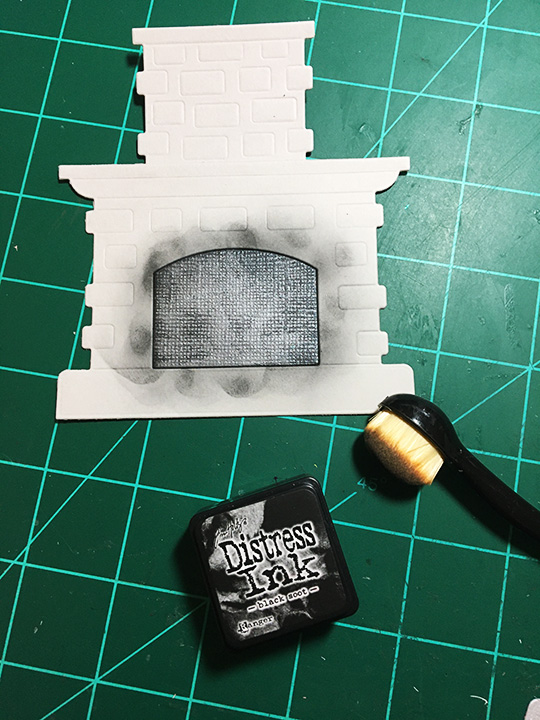
Fireplace: To create the stone fireplace, I cut two chimney pieces and two mantel pieces from the smooth side of the Bazzill cardstock and one mantel piece from the textured side of the same cardstock to get a textured firebox arch, mantel shelf and hearth stone. (The mantel shelf and hearthstone were fussy cut from the die-cut.) The individual stones (cut twice) and stones around the firebox were cut from the textured side of the gray cardstock. The top piece of the chimney was also cut from the textured cardstock. Glue individual stones to one fireplace piece then attach the stones around the opening. With black ink color the firebox piece if sooty.
Glue the two chimneys together. Glue the three chimney top strips together and then attach it to the chimney top. Center the chimney piece behind the fireplace piece with firebox. Using clear tape across the back of the fireplace piece without the stones attached, add the sooty firebox and with an inky blending brush add soot to the surrounding area of the firebox. Assemble the burning logs and glue onto firebox.
Add foam squares to the front of the fireplace with chimney, backsides of mantel shelf and hearthstone pieces. Attach the fireplace with stones onto base, then attach mantel shelf and hearthstone. Glue to front of cardbase.
Decorations: The Cozy Fireplace set comes with stockings, candles, and greenery. From the Let’s Bake set the table was cut from woodgrain embossed paper and ink blended with black ink. The Christmas pudding and its holly decoration comes from the same set with the cake stand cut down to a platter. The tiny NOEL plaque from an old Hunkdory set sits on the mantel shelf and was cut from gray cardstock, inked with red ink and a piece of red paper glued to the back. The candle flames were colored with markers. All decorations were popped-up on foam squares except the candles, greenery and picture which were glued in place.
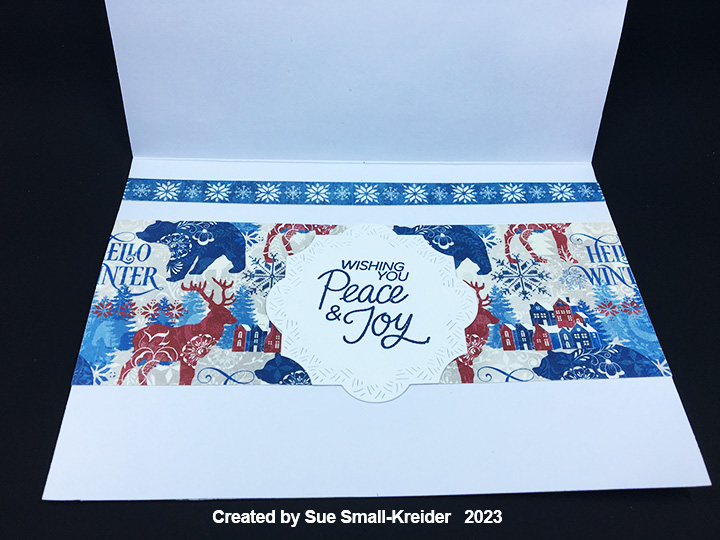
Sentiments: There is a whole sheet in the Graphic 45 Let’s Get Cozy collection of borders with sentiments like “Winter is better together,” “Let’s get cozy,” “It’s cold outside,” “Warm Winter Wishes,” “Sweater weather,” “Stay cozy” and “Hello winter.” Some of the thin word borders were used on the card front to set the tone of the card. Others are used to cover the card back. A tiny NOEL plaque from an old Hunkdory set, sits on the mantel shelf. Stamped in blue on a crosshatch label inside the card, is the main sentiment of “Wishing you Peace and Joy.”
Envelope: A leftover decorative border scrap was glued to the envelope’s back flap as a subtle hint to what is inside.
Thank you for reading this blog post. I hope this inspires you and makes you smile. Please like and leave comments 😊